Jump to content


Photo

Pam's pink Corvette


  • Please log in to reply
95 replies to this topic

#1 robbovius

robbovius

    Mid-Pack Racer

  • Full Member
  • PipPipPip
  • 146 posts
  • Joined: 20-March 14
  • Gender:Male
  • Location:MA, USA

Posted 06 April 2015 - 09:01 AM

One Wed night at Modelville, I watched a group of friends casually bombing around the Modelville Fig 8 with a variety of cars, a couple with a pair of Can-Ams, a guy with a sprint car, and another couple with a pair of hardbodies (the woman was driving an AMT '57 BelAir kit), and I thought that might be fun for  me and my girlfriend to do... she's a car girl.


I suggested the same, said I'd scratchbuild a car of her choice, and then we went through my boxes of static unfinished static models which - except for a trio of AMY/ERTL Dogde Vipers I bought in the mid-'90s - have follwed me around since the late '70s or so.


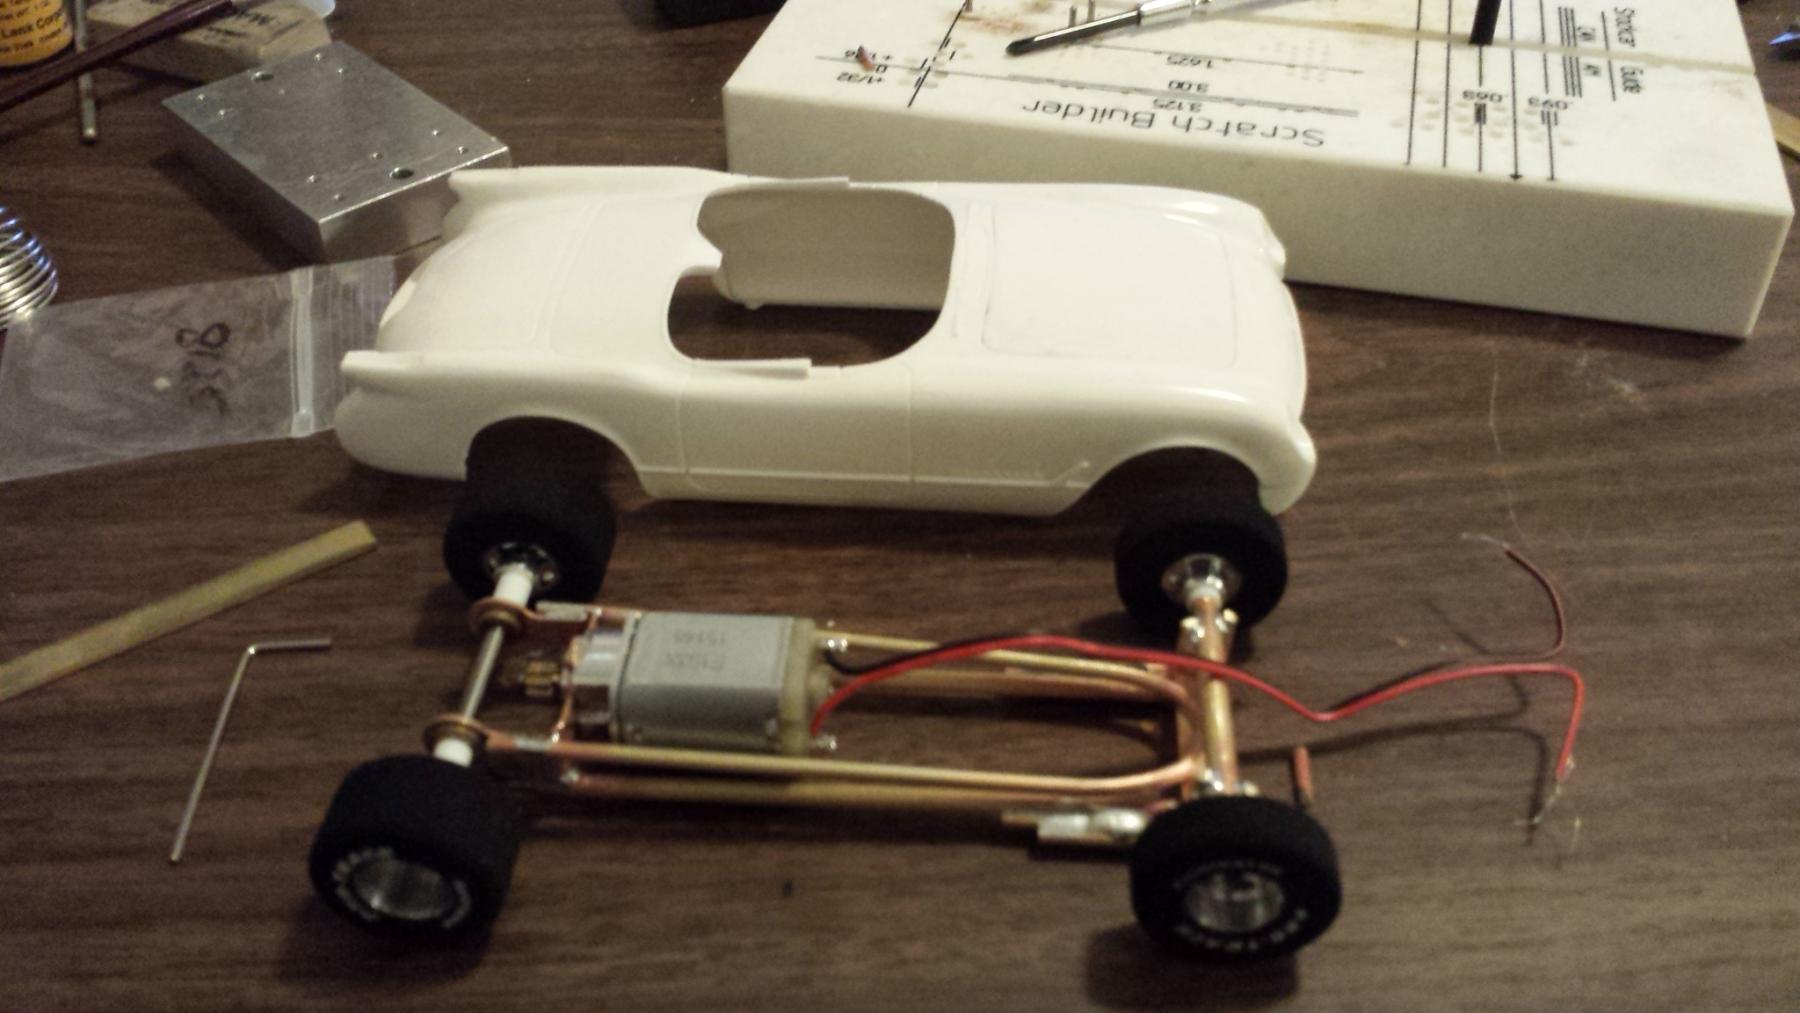
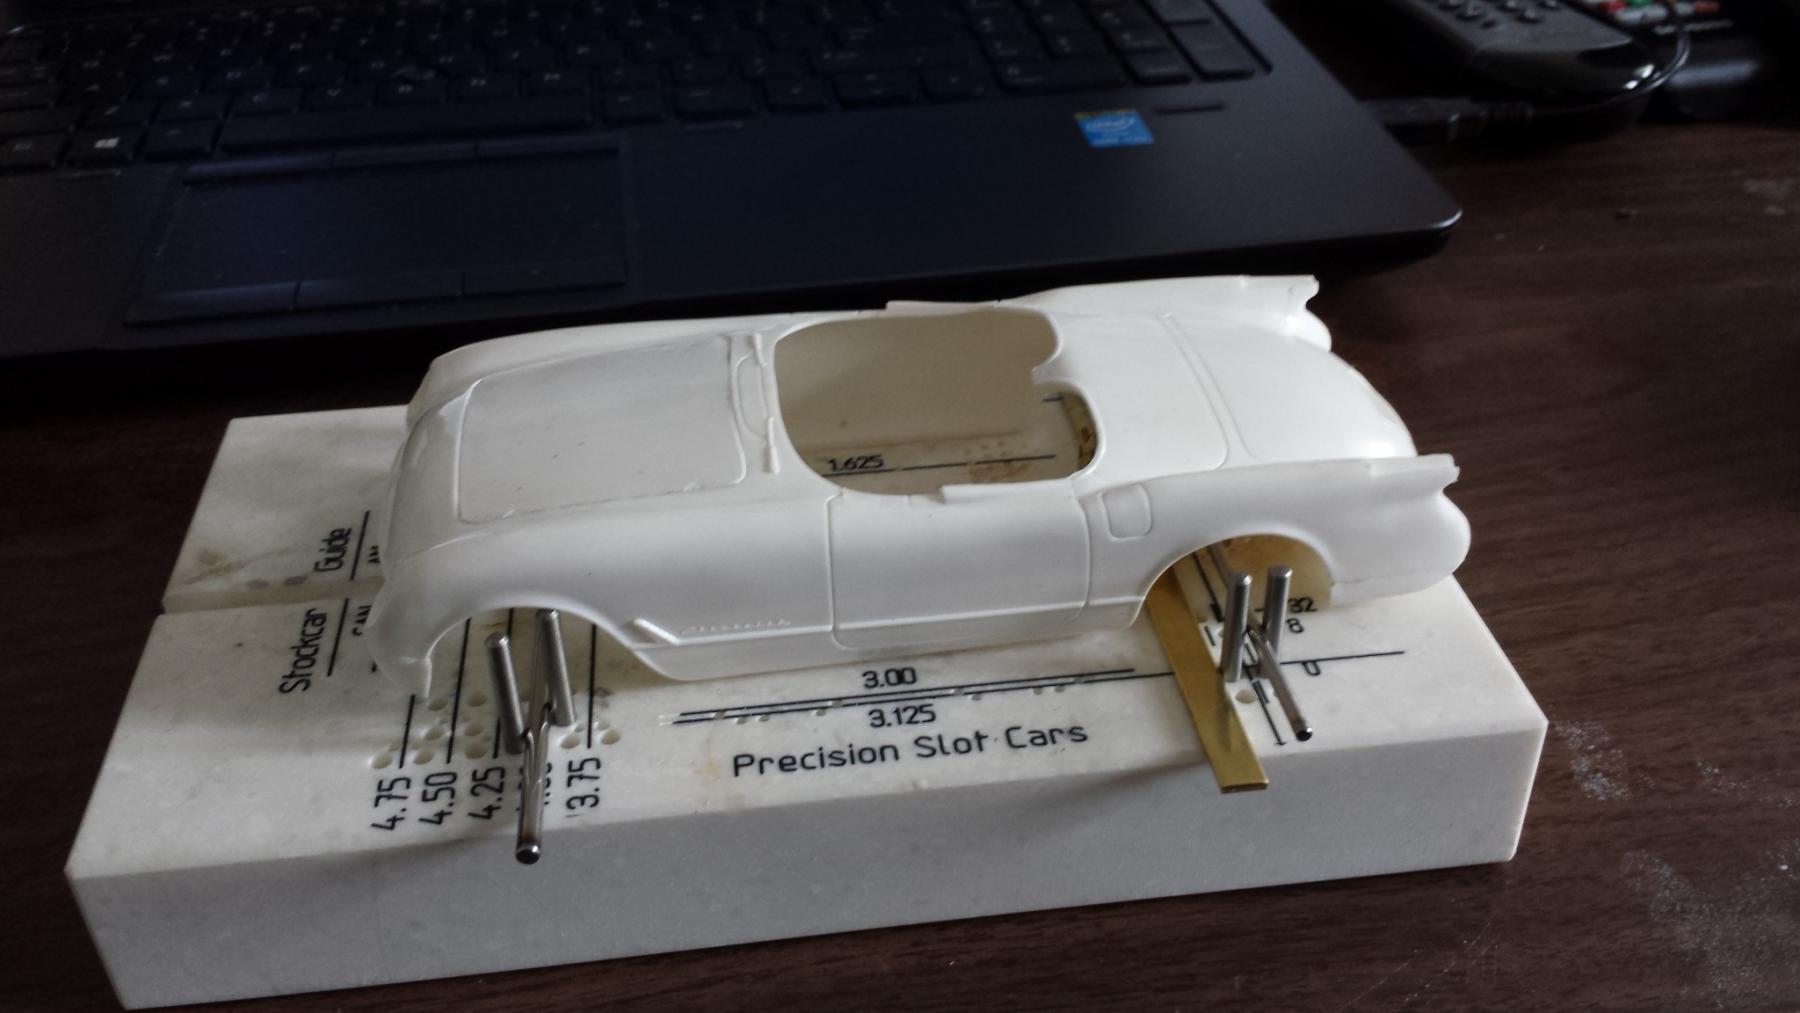
For her car, Pam picked out an AMT 1953 Corvette, which she deemed shall be pink, with a white convertible top. 


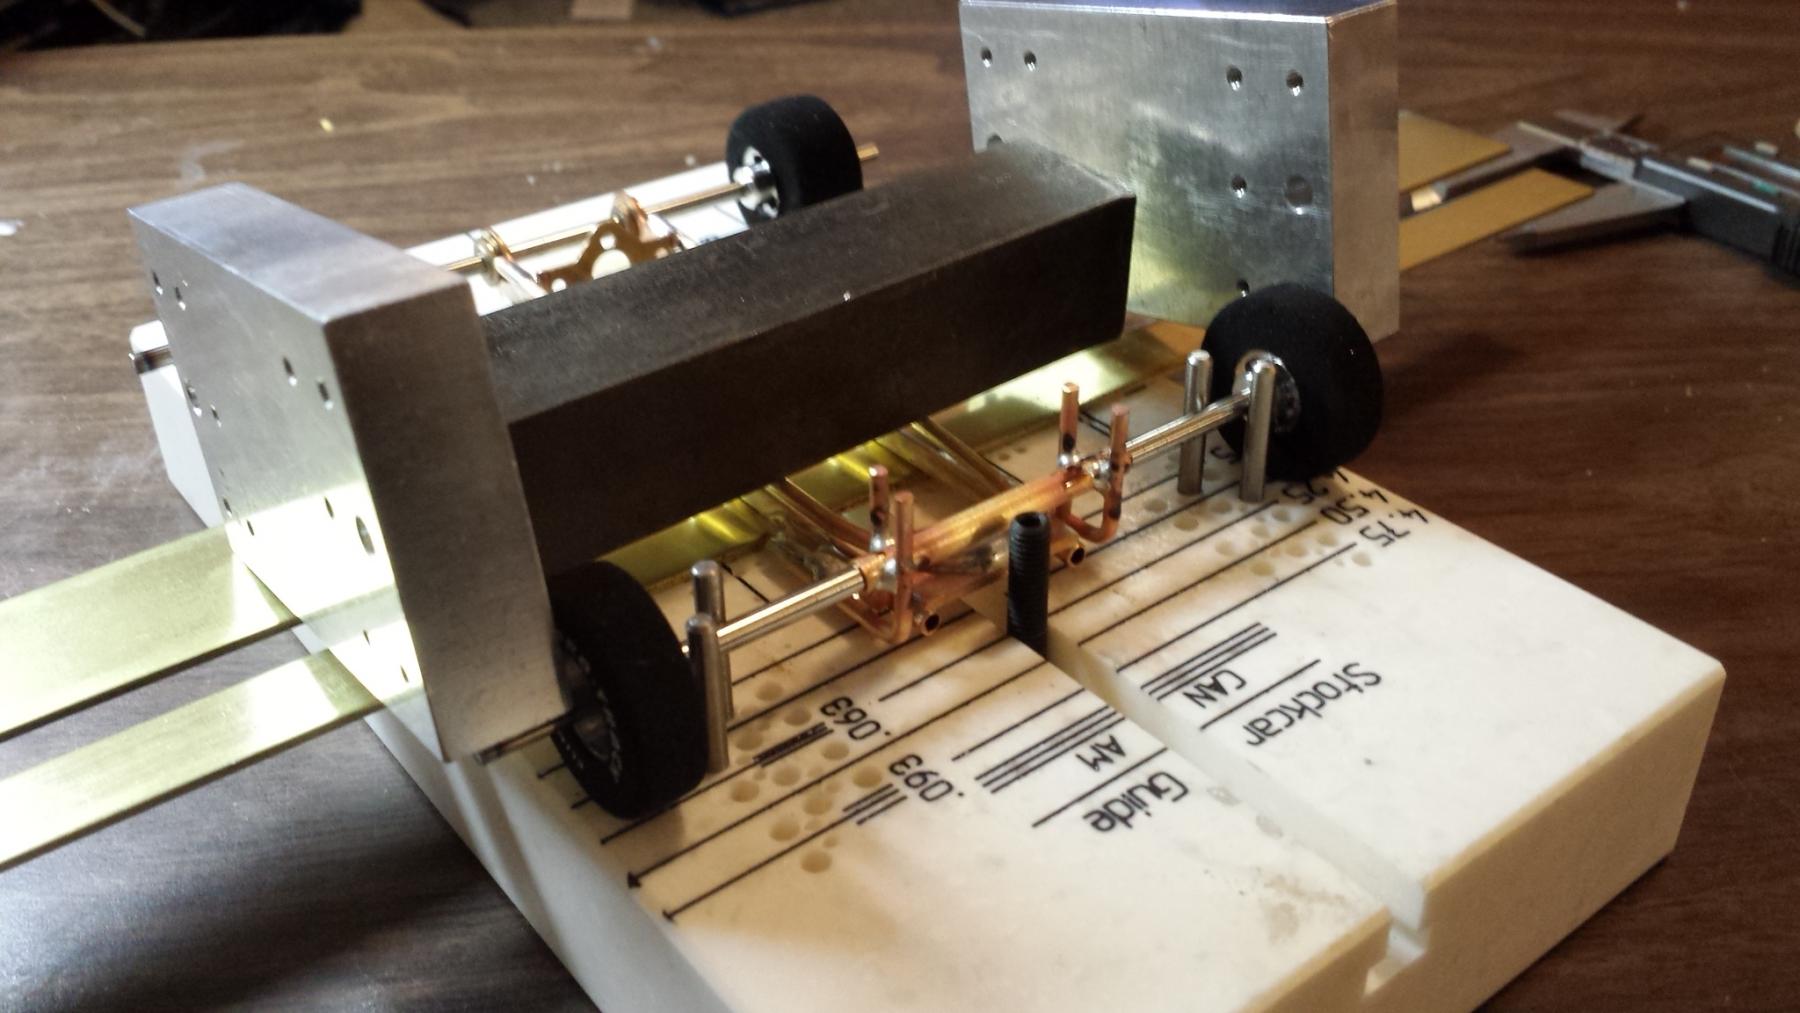
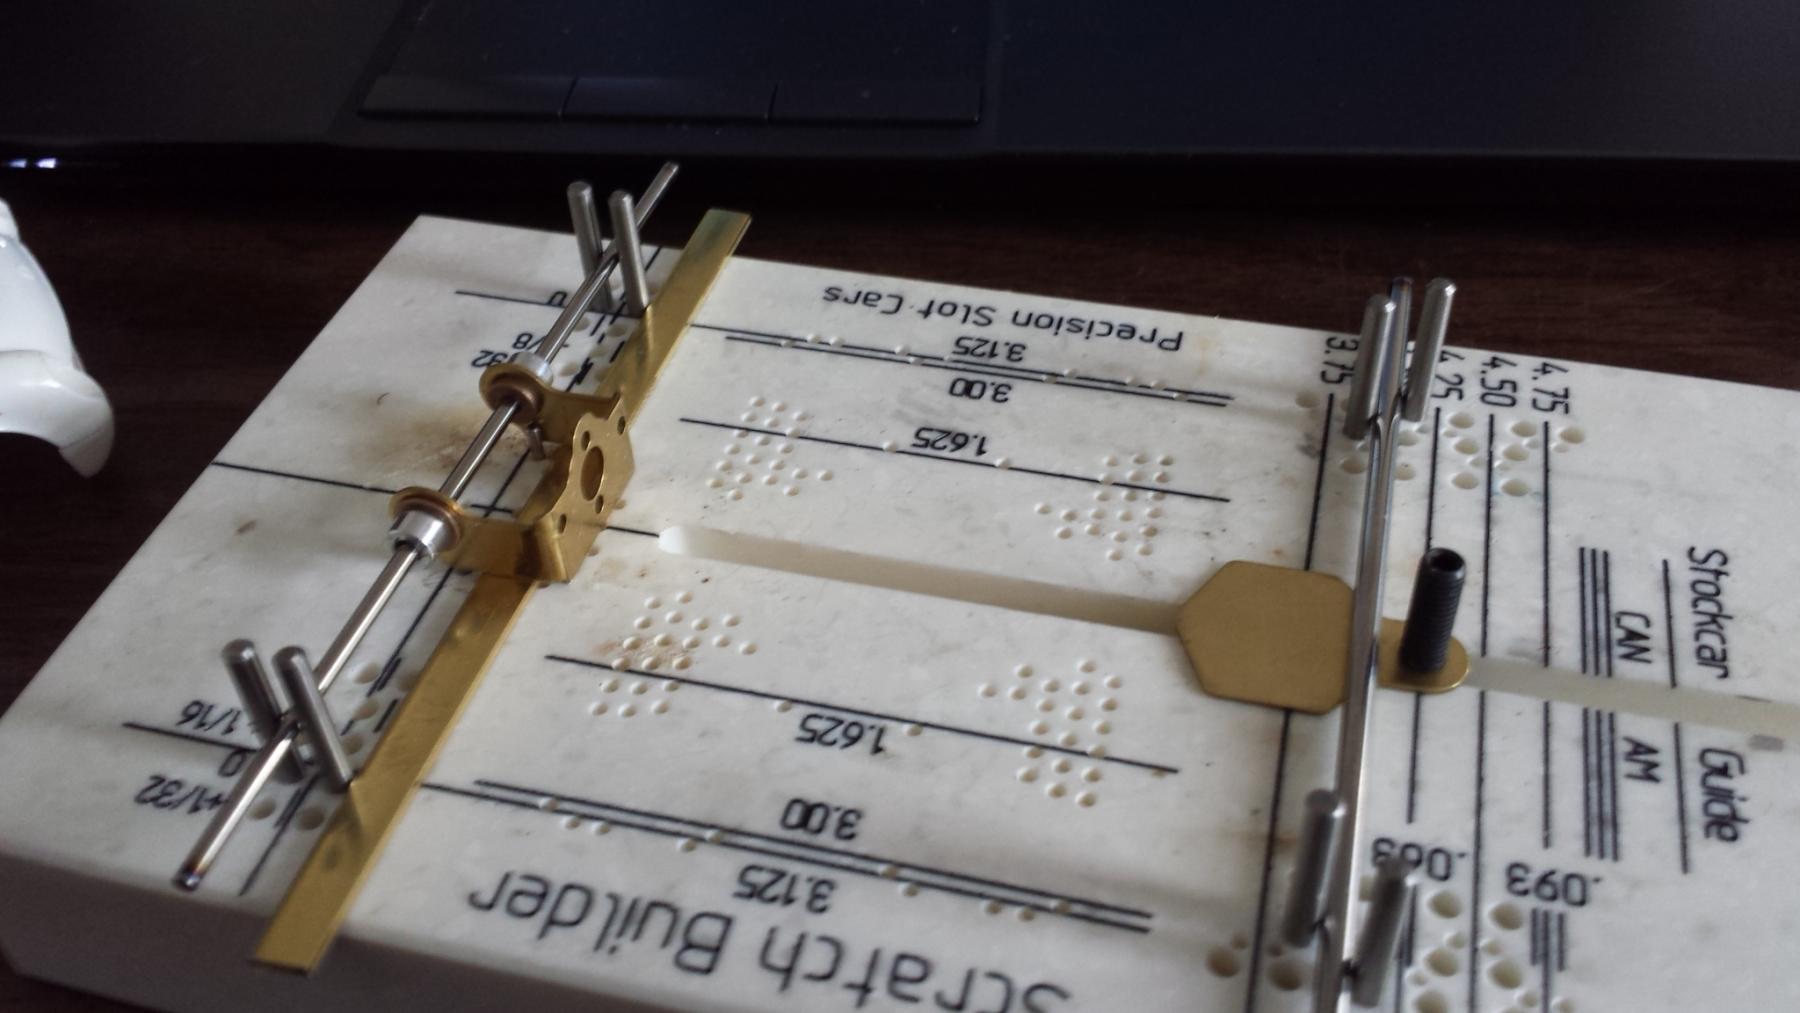
So, over the course of this past weekend (including Friday off) I had some fun fabricating my very first scratchbuilt 1/24 chassis.


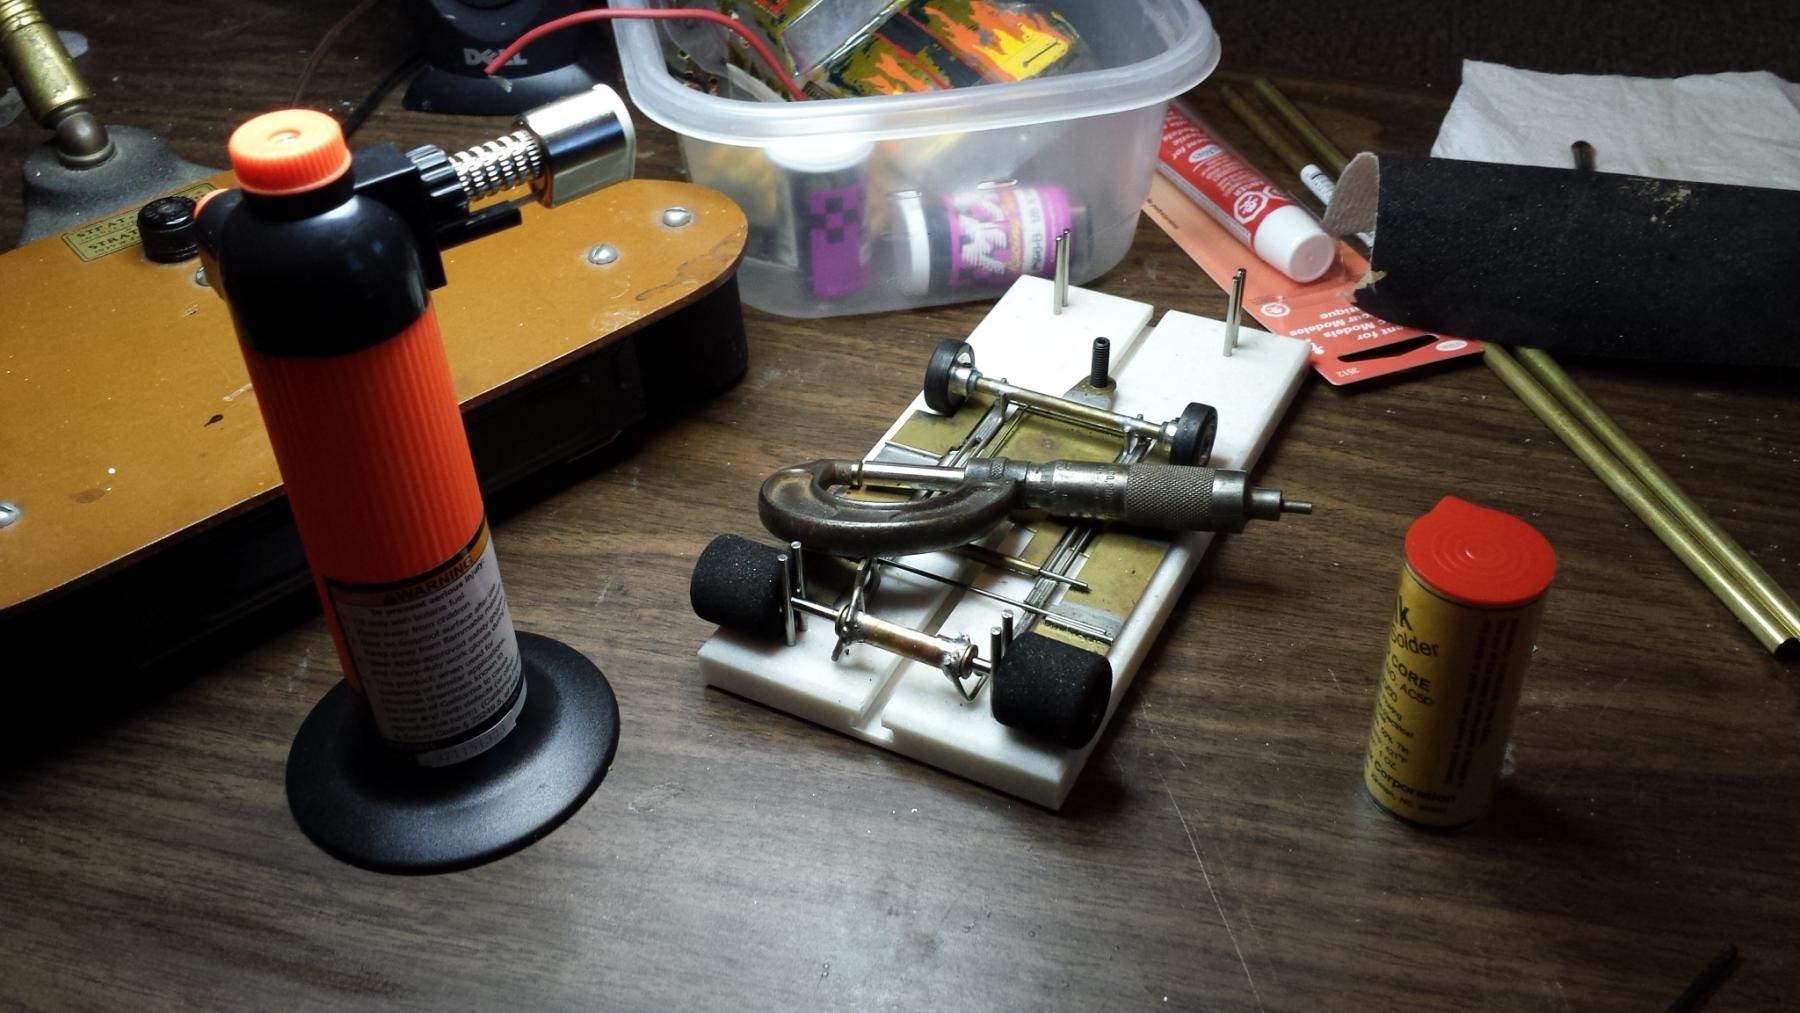
Initially on the jig, setting wheelbase.


20150403_104249.jpg


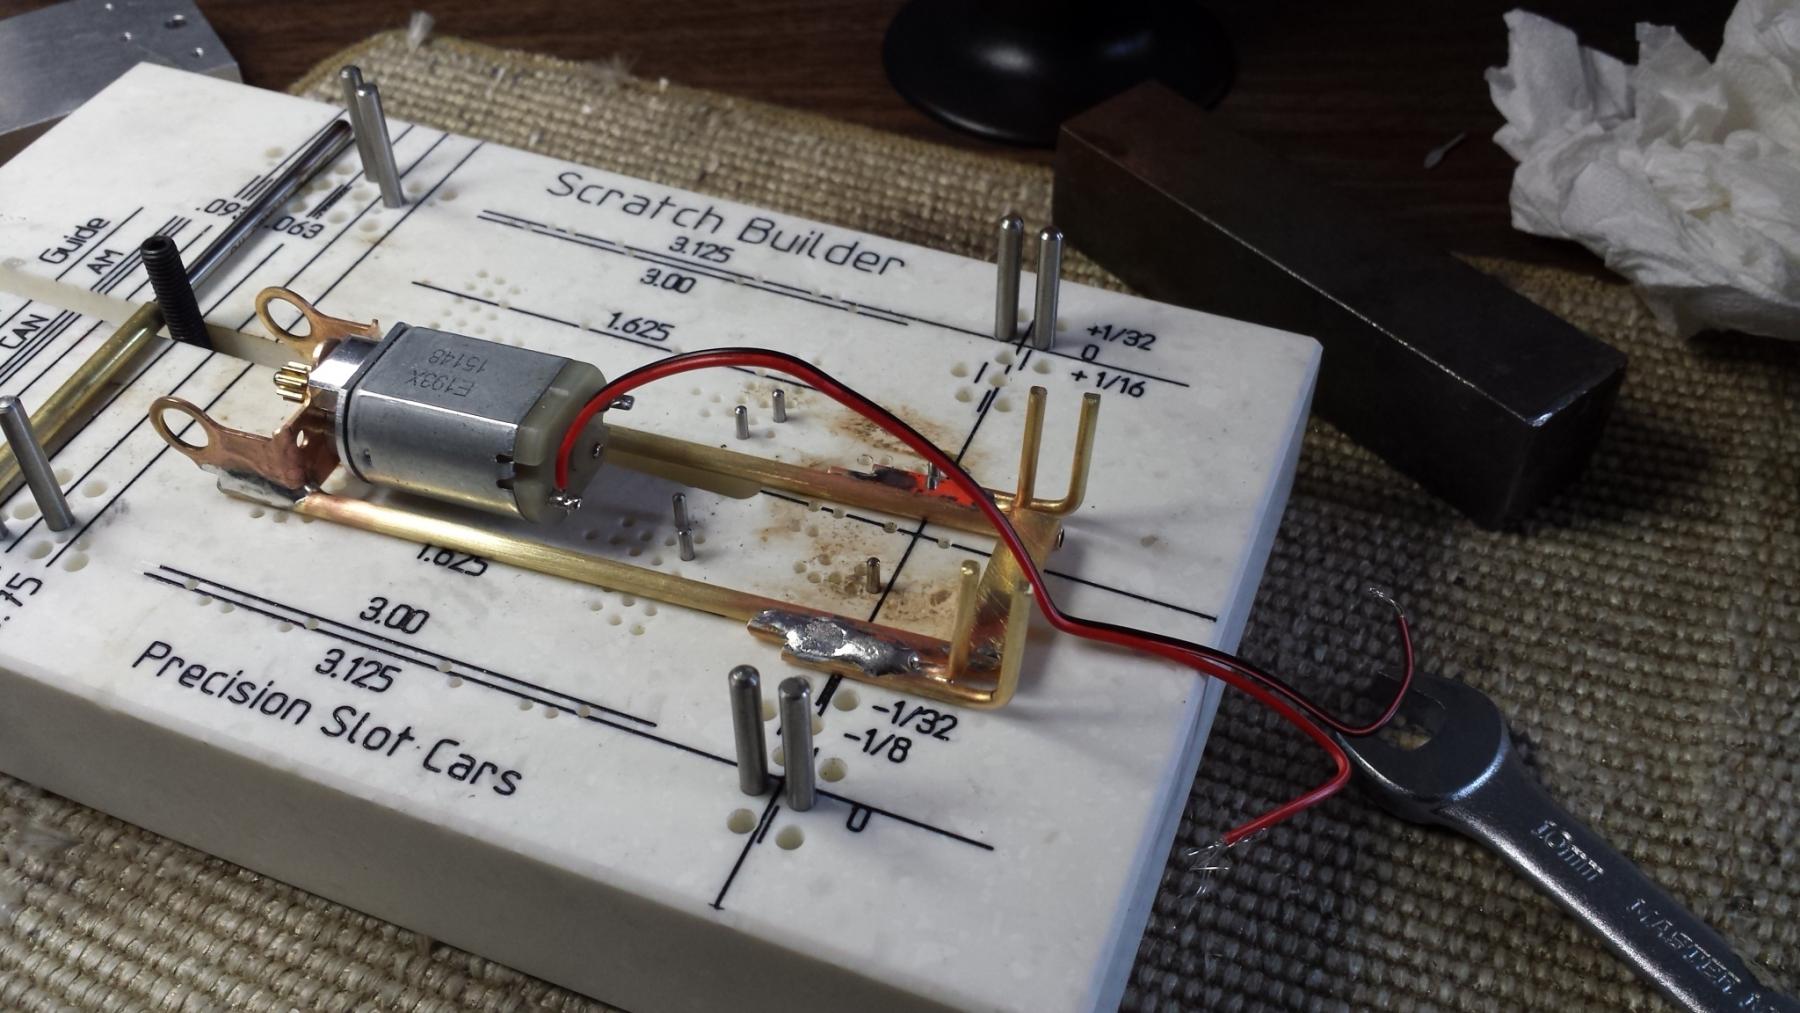
Once upon a time, I thought I'd go utterly hardcore and fabricate my own motor brackets, but then I realized that was a stupid idea... for now.


Thus I bought several, with holes for the usual 1/8" x .25" oilite. Because my jig came with pin spacing for 3/32" axles, I bought some 3/32" x .25" oilites to set rear axle position. Fortunately, I was able to find a pin spacing that accomodated a 1/8" jig axle at the front.


20150403_104423.jpg


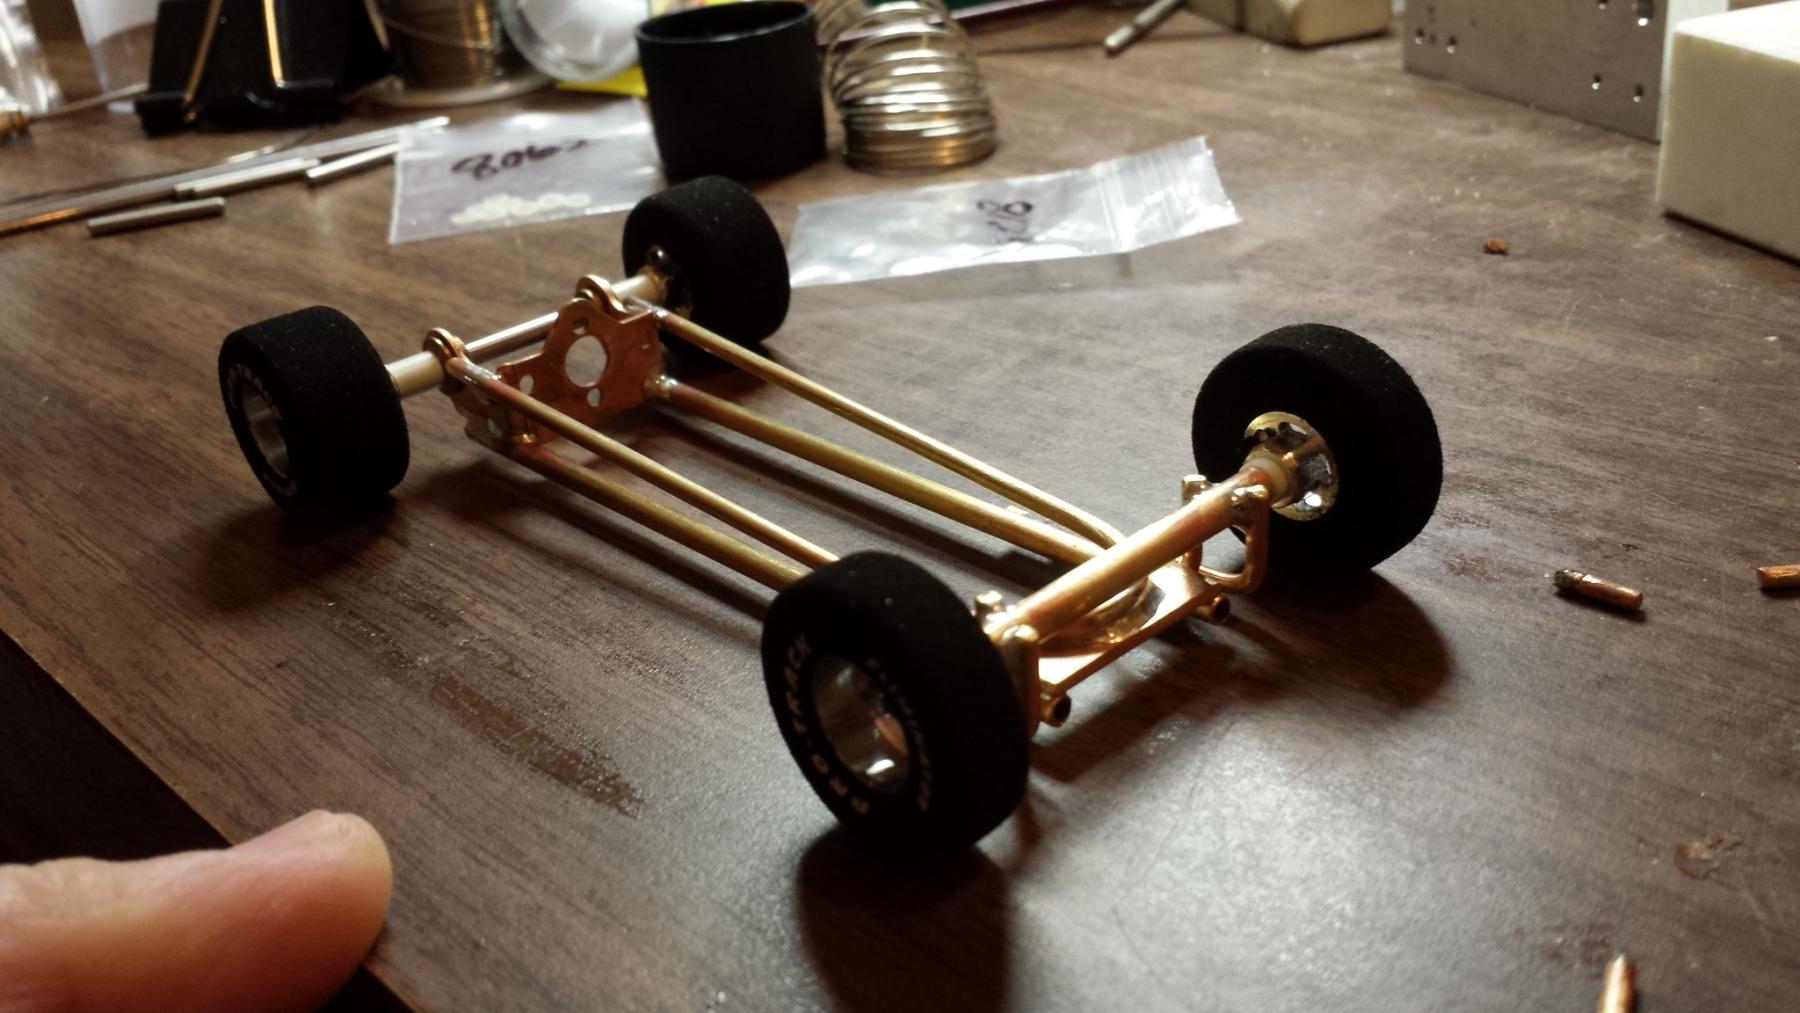
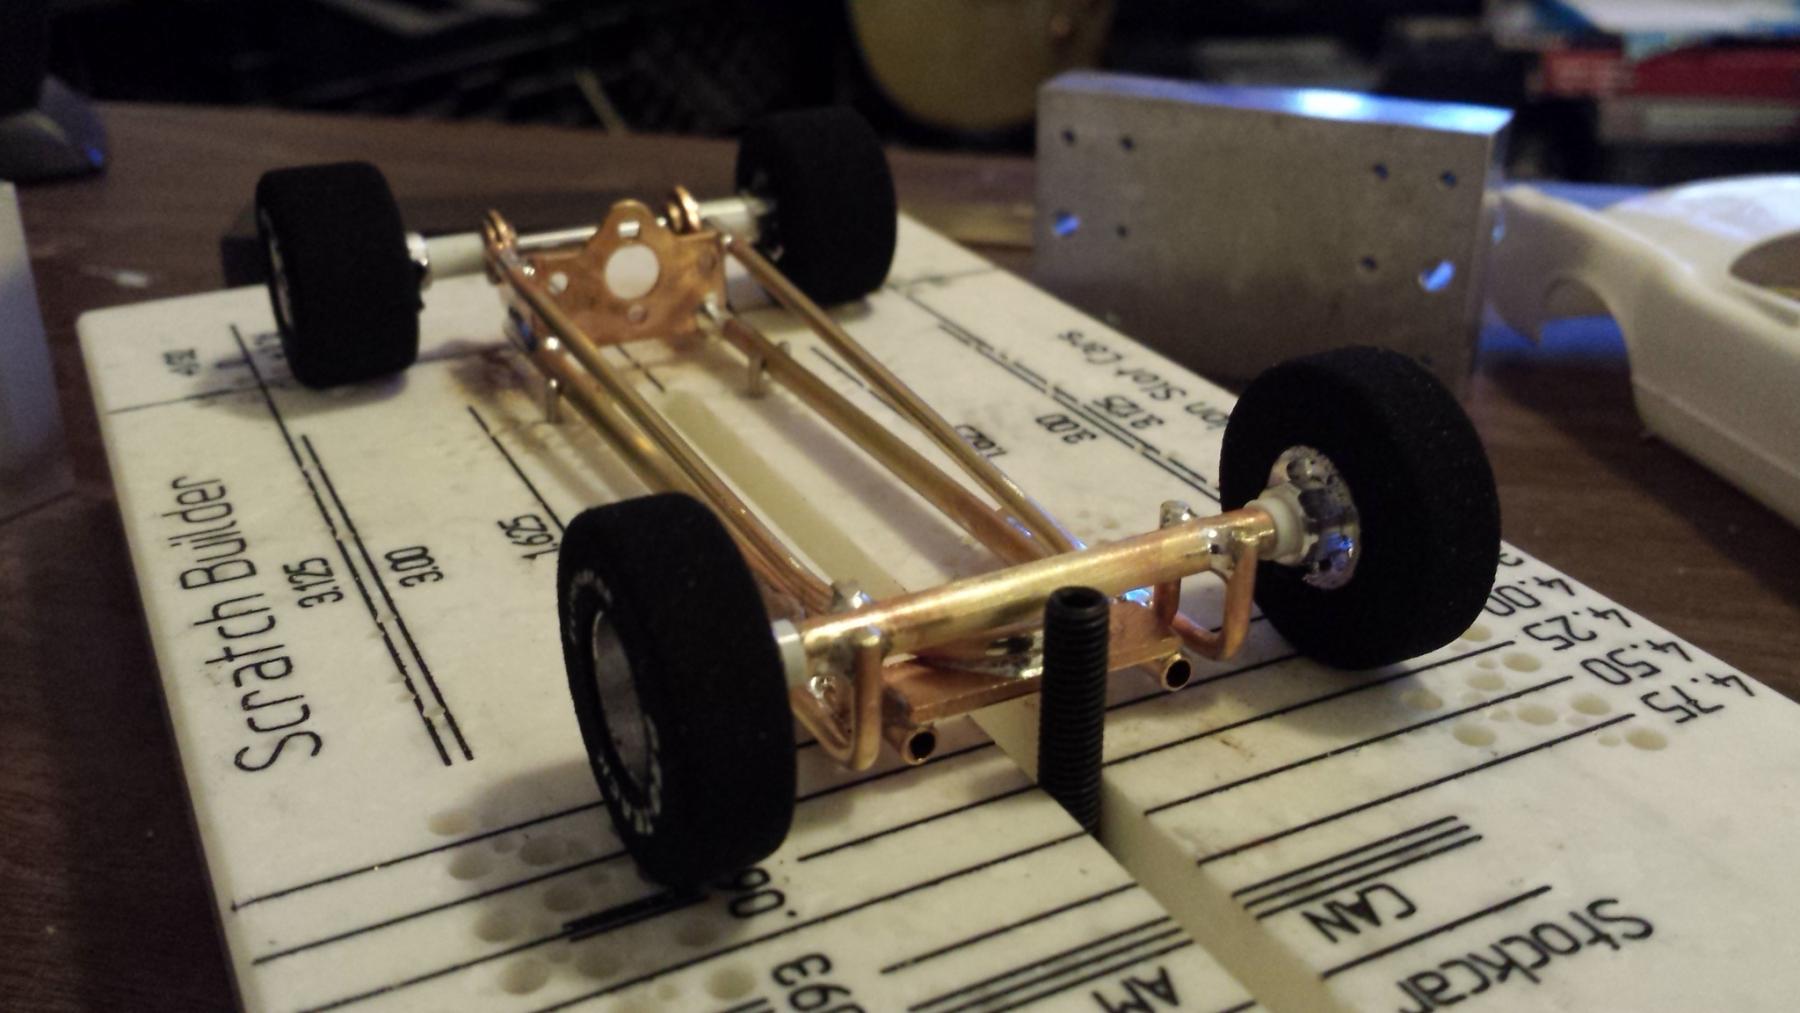
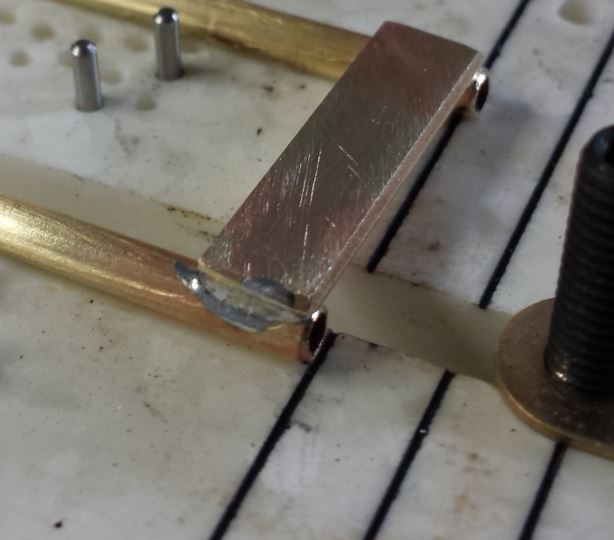
I cut some main rails of .125" brass tube, massaged the bracket corners to fit, set up the pins on the jig to hold the tube in place, did my base metal prep, fired up the microtorch, and was not displeased with the results. A short bar of .25" x .065" was added at the front to close the rectangle.


20150403_123439.jpg


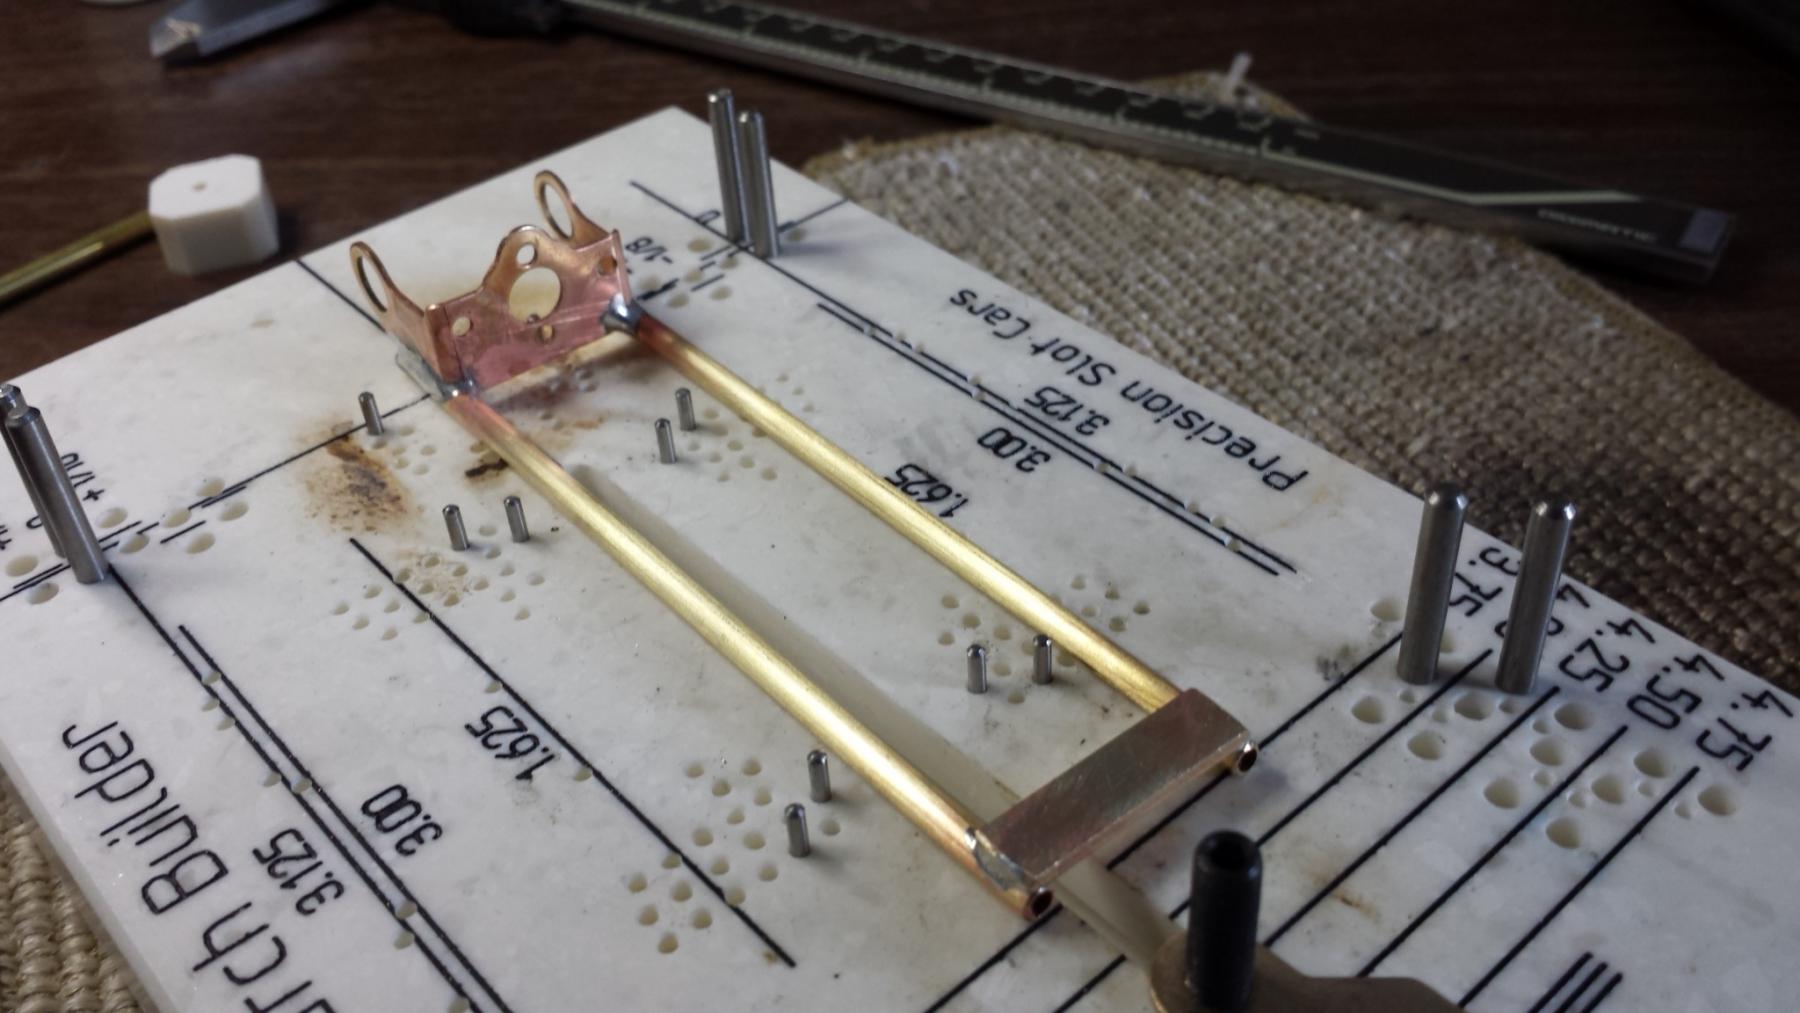
On this build, I tossed the Lenk 50/50 solder in favor of the Stay Brite silver solder, and I find I like it. I still apply too much in places but I'm getting better at that... I think.


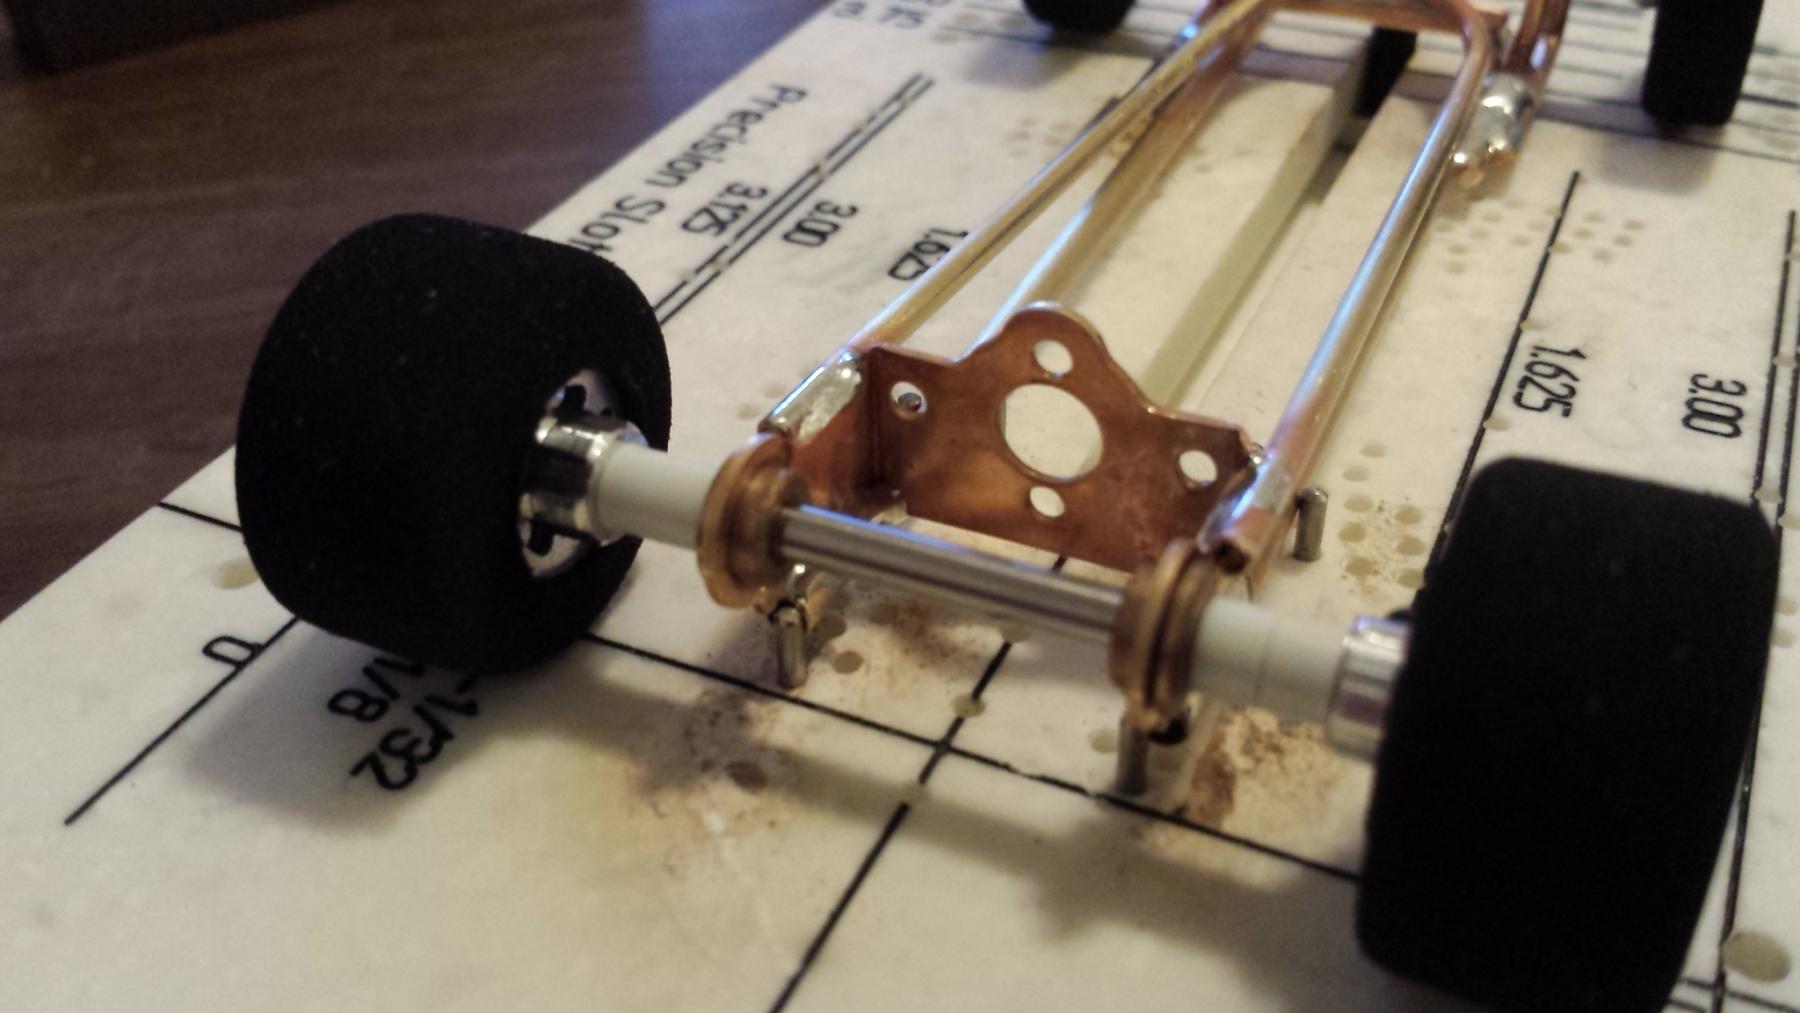
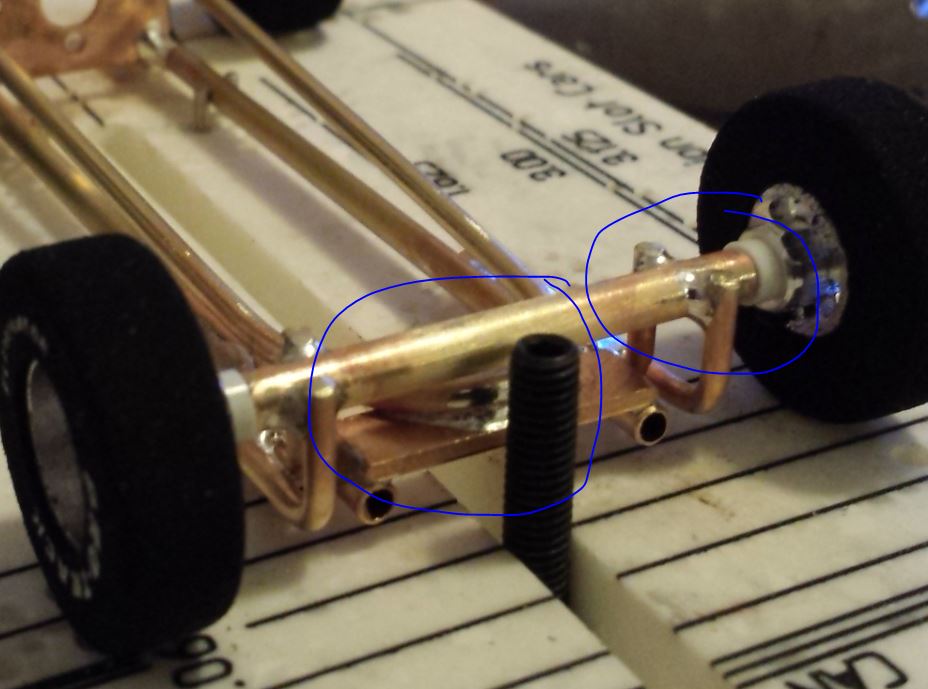
Next I fabricated the front axle tube of 5/32", to accept an 1/8" axle. Front tires are Pro-Track .980" x .300" wide drag rears, with the edges rounded.


20150403_130046.jpg


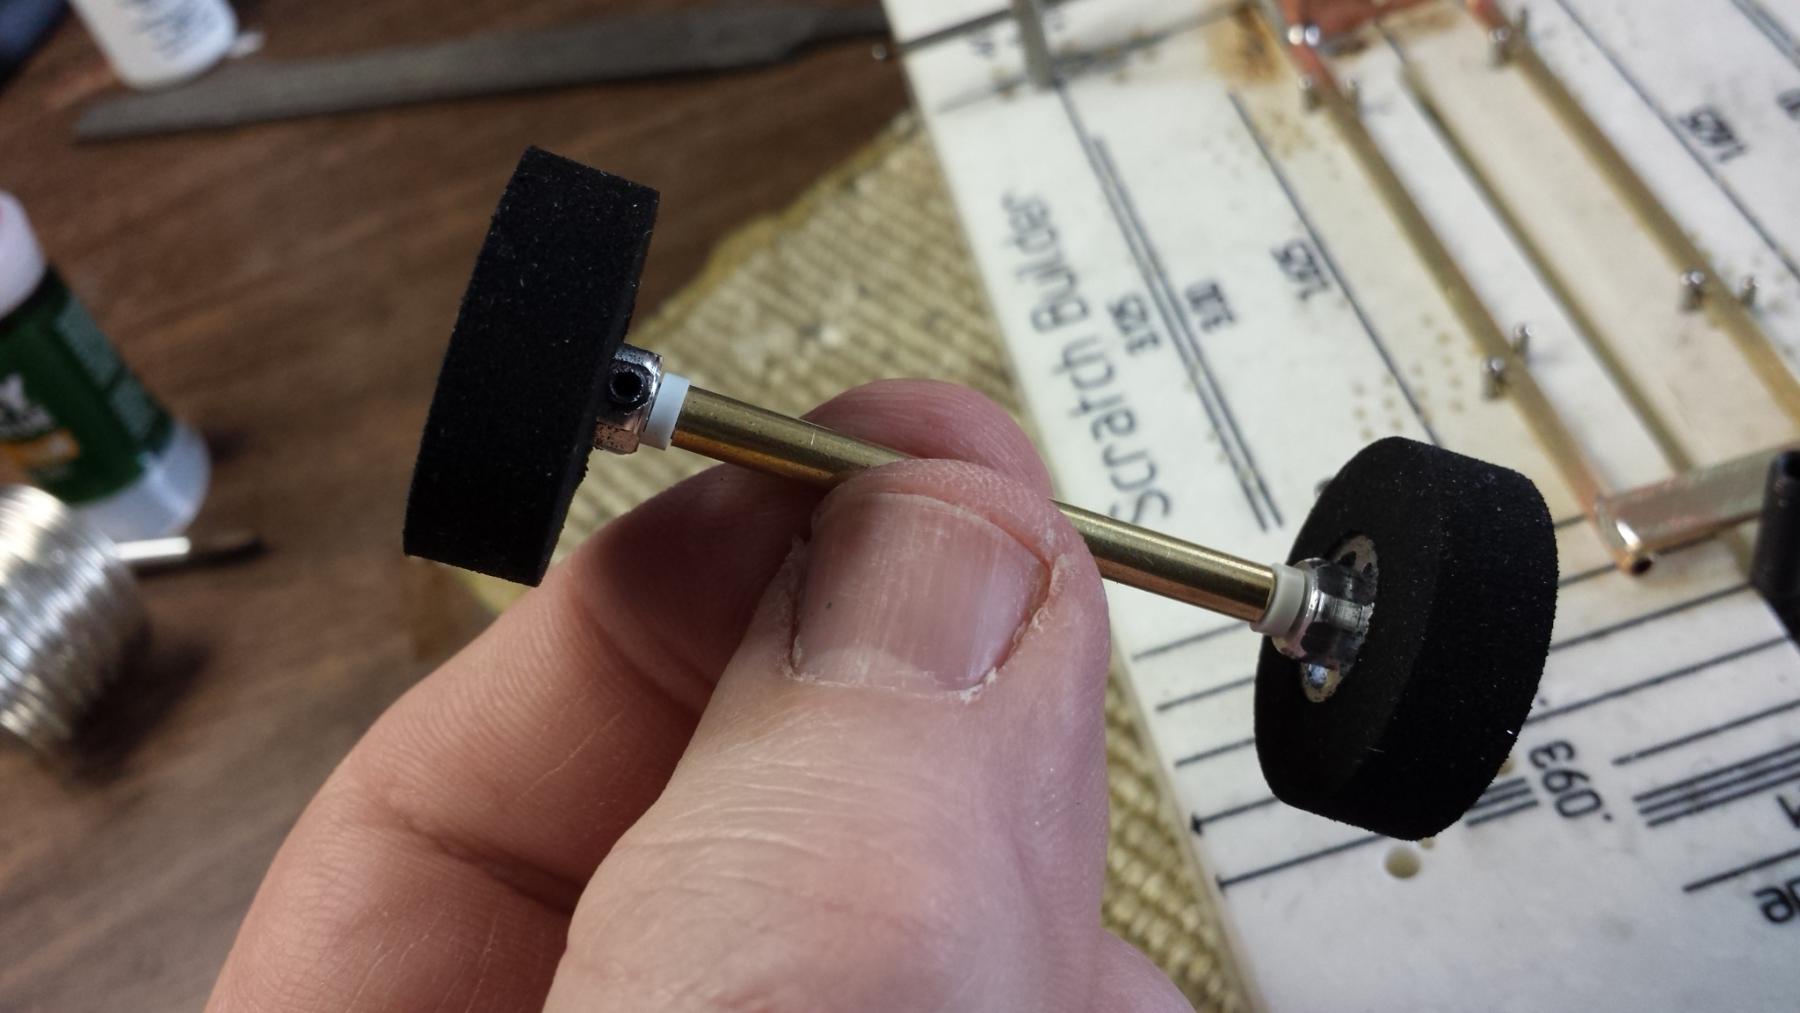
With the rear tires on (Pro-Track .950"x .800" wide) the chassis sits at  a just-right .063" off of the track surface.


20150403_130749.jpg


Front axle mount - bent-up .063" brass rod - soldering setup, "drivers" side...


20150403_140623.jpg


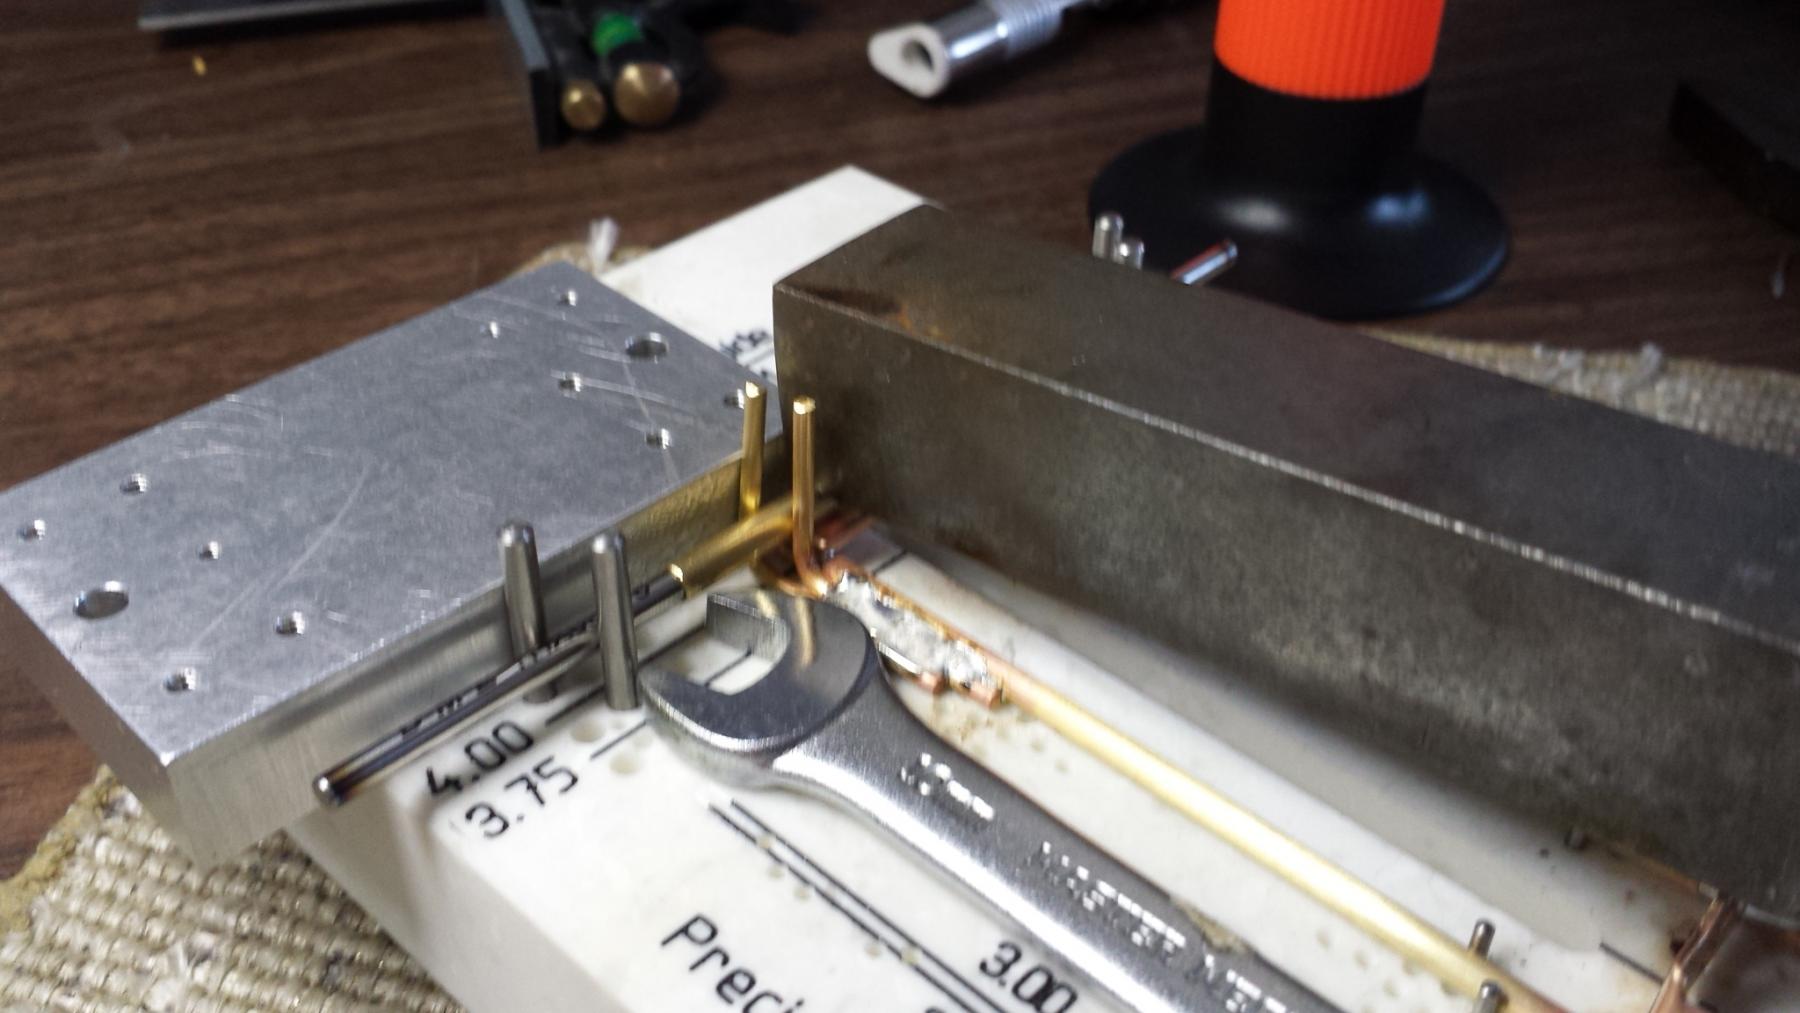
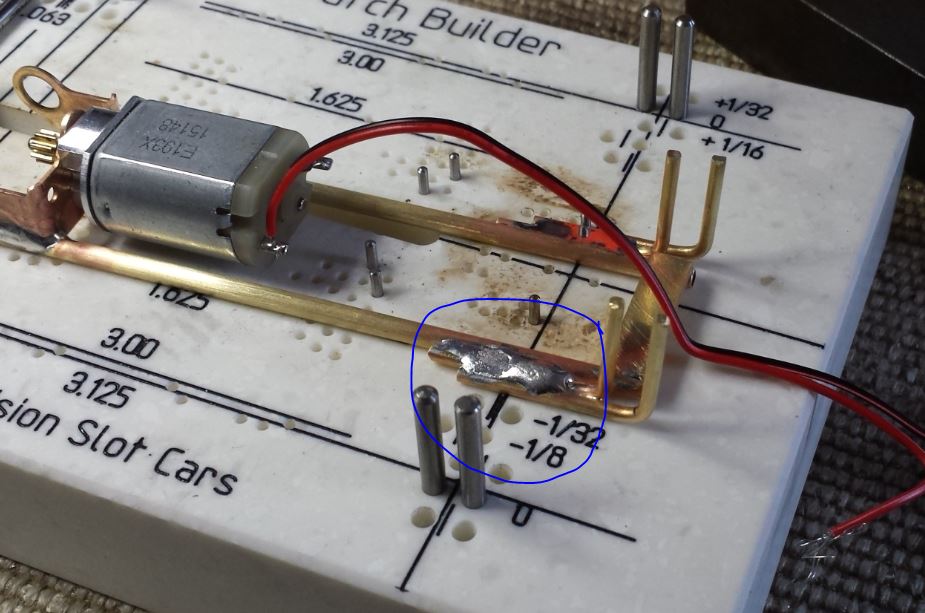
And the result, after minor tweaking of vertical element straightness, including first check fit of the motor, which in this case is the original AMT motor/endbell set up from the Catalina.


20150403_142353.jpg


Lastly, I added the frame bracing, with a piece of finger-bent 3/32" tube...


20150403_165623.jpg


... And that, it seemed, was good enough for Friday.


  • Cheater and hiline2 like this


#2 robbovius

robbovius

    Mid-Pack Racer

  • Full Member
  • PipPipPip
  • 146 posts
  • Joined: 20-March 14
  • Gender:Male
  • Location:MA, USA

Posted 06 April 2015 - 09:17 AM

Sunday, Sunday, SUNDAAAAYYY...
 
... evening, after the Easter feaster, I got on with soldering the front axle tube in place and turning this thing into a roller...
 
Front and rear wheels in place on the jig axles, .063" brass maintaining track clearance, and weights applied to hold things in place...
 
20150405_215250.jpg
 
And, yeah, bitchin'.  
 
20150405_221701.jpg
 
On the jig, front detail.
 
20150405_221911.jpg
 
And - sorta blurry - rear...
 
20150405_221921.jpg
 
Motor check fit, next to the body...
 
20150405_222808.jpg
 
... And with the body just resting on the tires. Final body rake will be similar, but lifted a bit for tire clearance.
 
20150405_222907.jpg
 
Tonight, fabrication of the drop arm guide tongue...


  • miko and James Fetherolf like this

#3 Bill from NH

Bill from NH

    Age scrubs away speed!

  • Full Member
  • PipPipPipPipPipPipPipPip
  • 14,361 posts
  • Joined: 02-August 07
  • Gender:Male
  • Location:New Boston, NH

Posted 06 April 2015 - 10:54 AM

Nice start on the chassis, Robb!

Your build techniques might be a bit different than mine, but I want to watch your build through completion. :)  

A tip for setting body rake and tire clearance is to place a layer(s) of corrugated cardboard squares on top of your tires when mounting the body. Remove them after to get the body where you want it.
  • Cheater likes this
Bill Fernald
 
I intend to live forever!  So far, so good.  :laugh2:  :laugh2: 

#4 robbovius

robbovius

    Mid-Pack Racer

  • Full Member
  • PipPipPip
  • 146 posts
  • Joined: 20-March 14
  • Gender:Male
  • Location:MA, USA

Posted 06 April 2015 - 11:31 AM

Thanks, Bill.

It's really been quite a lot of fun. ;-)

#5 Pablo

Pablo

    Builder

  • Administrator
  • PipPipPipPipPipPipPipPip
  • 18,375 posts
  • Joined: 20-February 06
  • Gender:Male
  • Location:Cleveland, Tennessee

Posted 06 April 2015 - 07:33 PM

That is bitchin' to the max. :good:

I would like to critique just a couple things on building techniques but not sure if you want it. If you do, send me a PM, I'll be here all night.

Paul Wolcott


#6 robbovius

robbovius

    Mid-Pack Racer

  • Full Member
  • PipPipPip
  • 146 posts
  • Joined: 20-March 14
  • Gender:Male
  • Location:MA, USA

Posted 07 April 2015 - 06:15 AM

Pablo, go for it, I don't mind discussing the build openly. This is my first scratchbuilt slot car ever, it's going together okay, but I know there are guys around on this site who have far more experience than I do, and I'm not averse to advice, critique, etc. An open discussion may help others, too.


Fire away. ;-)


#7 Pablo

Pablo

    Builder

  • Administrator
  • PipPipPipPipPipPipPipPip
  • 18,375 posts
  • Joined: 20-February 06
  • Gender:Male
  • Location:Cleveland, Tennessee

Posted 07 April 2015 - 07:46 AM

OK cool, Robb. Three main things:


1. That is a really nice jig and I hate to see you burn it with the torch. I love using a minitorch, matter of fact I'll post my info on the subject. But I highly recommend you use an iron when the chassis is in the jig, just to tack the parts temporarily in place. Then remove it from the jig and transfer to a flat plate of some kind to go hog wild with the torch. (if you set it up like I do, it will lift straight up and off the jig whenever you want) You don't want to buy a new jig every month.  :)


2. Using a weight like that to hold parts in place is going to result in stressing them, and when that stress is relieved, things will spring back into "other than straight and flat" positions. I avoid even clamping things in the jig, I want it all to lay flat without stress. If I do clamp, I do it very gently. Lots of times I even use masking tape.


3.  Minitorch info:


I prefer the Radio Shack minitorch because the flow can be adjusted with the same hand that holds it. If you use a torch that requires a second hand to adjust/turn off the flow, you will be handicapped. Get a Radio Shack minitorch ($20) and some butane. Remove the small tip that comes on it and install the BIG tip.

For an experiment, take a piece of brass plate and a piece of piano wire. Clean both parts with sandpaper. Lay the wire on the brass.  

Apply acid flux. Cut a very small sliver of solder with sharp dikes. Wedge the solder in between the wire and plate, like a wedge of cheese. Why? This is where many people cannot use a torch like I do - that solder is going to try ball up then run from the heat!  Right here is where most people fail and give up. We battle this tendency three ways:

1. WEDGE the solder sliver in close to the joint.
2. Turn torch on low power and ignite. Heat solder SLOWLY at first with low heat until it melts a little, rolls into a ball,  and behaves, then gradually go full throttle.  When I say "gradually", I mean within the course of about 3 seconds.
3. IF the solder balls up and runs away, ABORT, discard the ball and do a new wedge. IT HAPPENS. Don't waste time; once the wedge has balled up and refused to go where you want, it's over. You would need to re-flux also.
 
At this point you have your joint wet with flux and your solder sliver(s) is/are in place. Apply low, then medium throttle, using the airflow of heat/fuel to push the wedge toward the crevice. As soon as the solder is partially melted, and is showing signs of obedience, go full throttle and heat the entire area until it flows, then STOP. Meaning, immediately stop the butane flow. This is the beauty of the Radio Shack torch - you can adjust the flow with the same hand you are holding it with.  This whole process from the moment you apply the heat only takes a couple seconds. Remember solder and flux like to go downhill; use this to your advantage.  Capillary action rules apply also.

You can apply flux and a series of solder slivers along a single, long joint, and the result will be a PERFECT solder joint. This is 100% CONTROL of FIRE, YEEHAW,  once you do it like this, you will wonder why people build frames with just an iron. I personally have used BOTH minitorch and iron on ONE solder joint (not at the same time, silly), to make it perfect. I spot tack the weld on first with an iron, then check for straightness/correctness, then go wild with the minitorch.

When soldering a tongue doubler or a steel tongue, first I pre-tin both sides with an iron. Then I flux it heavy, lay the tongue in place, holding it in place with an icepick.  Apply full flow until the tongue floats home, then shut off the flow !

DON'T BURN DOWN THE HOUSE WITH THE TORCH... HAHAHA.


Pablo


  • hiline2 likes this

Paul Wolcott


#8 robbovius

robbovius

    Mid-Pack Racer

  • Full Member
  • PipPipPip
  • 146 posts
  • Joined: 20-March 14
  • Gender:Male
  • Location:MA, USA

Posted 07 April 2015 - 10:47 AM

Well, so far I'm doing realy well on the whole "not burning the house down" thing. ;-)


I hear ya on not burning up the jig. I have been as careful as I can about not actually letting the minitorch flame contact the jig surface, although i admit when I was first soldering on the catalina frame, I got the jig a bit. Some of that brown stuff on the jig is cooked flux residue that I haven't cleaned off yet.


But, point well taken, I will practice assiduous flame-jig contact avoidance. I like that PCS jig a lot, it's a great tool, well worth the money.


 Weights and clamping... so far, the Corvette chassis lifts right up off of the pins, no binding. Last night, I soldered in a tube that will become the drop arm pivot...


20150406_225021.jpg


... and didn't use any clamping at all, just the weight of a 1/8" jig axle thru to keep it in place while I fluxed and soldered.


I've been pretty happy with how straight an square the chassis is turning out. Those two aluminum blocks are actually pretty light, but that square steel bar (leftovers from the three wheeler project in my signature) is really a bit of a lump; I shall dispense with its usage as an on-top weight.


Minitorches. I have three - so far - all sourced from HF. The one I use the most these days is the pistol grip shown below with the adjustment knob on top and snap starter button conveniently placed under where the thumb falls if held in the right hand.


20150205_171236.jpg


I can adjust the knob while holding the torch in hand. I've also got this little pencil torch...


20150319_180652.jpg


... which is great for precise flame pointing, and its got a little finger lever for flame adjustment on the fly, but when I fill it, it allows a crap ton of gas blowby on the filler nozzle, hate that. Plus its not a snap starter, and that's kind of a pain. I can get about the same flame flow on the orange pistol grip unit, it's just a little more awkward to position.


I've got another, bigger snap-start pencil torch, but the flame adjustment on that stinks. It's either off, or full blast. I've used it, but that's the one I burnt the jig with.


I really like your method of pre-placing the silver solder at the joint and then melting it in place. I am not unfamiliar with this method, but that is more in the manufacturing world of inductive brazing. I'm gonna run that experiment you mention with some scraps I have.


Applying flux/base metal prep: currently what I do is sand the metal with some 400 wet/dry well beyond the soldering area. Then I place the parts and jig them, and apply heat and brush on a small amount of liquid acid flux so that it sizzles. Then I reapply flame and heat the metal until it melts the solder when I touch it to the joint.


I have not been pre-tinning the parts, which I understand is not best practices. I expect that, combined with the pre-application of the solder prior to heat, would help me solve applying too much solder.


The other thing is tacking with solder. Bill in NH mentioned using good old 60/40 rosin core, but when I tried it, I found that the rosin bubbled and outgassed, and the solder really didn't flow that well onto the parts. Could that have been a chemical reaction between the rosin and acid flux?
 

I think I need to do more practice parts...


  • hiline2 likes this

#9 Pablo

Pablo

    Builder

  • Administrator
  • PipPipPipPipPipPipPipPip
  • 18,375 posts
  • Joined: 20-February 06
  • Gender:Male
  • Location:Cleveland, Tennessee

Posted 07 April 2015 - 11:55 AM

Sounds like you are on track.


- Any minitorch where you can hold and adjust flame with one hand will work with my method.


- Pre-tinning is rarely necessary; if you are doing it for every single joint you're wasting time.


- Sanding is also rarely necessary, unless the metals are dirty or have a coating, like piano wire.


- I disagree with using rosin core solder. The rosin is for electrical connection solderers who aren't using acid like we are; all it does is make a brown mess. Try Radio Shack clear flux solder, or solder without flux.


- If you practice and become proficient at my method, you will have absolute control over how much solder is used.


DSC00933.JPG


  • hiline2 likes this

Paul Wolcott


#10 Bill from NH

Bill from NH

    Age scrubs away speed!

  • Full Member
  • PipPipPipPipPipPipPipPip
  • 14,361 posts
  • Joined: 02-August 07
  • Gender:Male
  • Location:New Boston, NH

Posted 07 April 2015 - 11:58 AM

Robb,


I've been using 60/40 with both acid flux and paste flux for years and never experienced a flow problem. I've been using soldering irons, rather than a torch. I don't know if the hotter heat from a torch causes your problem or not. I wouldn't think it would.


Were the parts you tried soldering plated, unplated, and clean? Solder doesn't stick to every type of plating, often you have to remove it to get to the base metal before soldering. One example of this is Parma's Flexi Kar (Flexi-1) chassis. Synthetic steel wool works great for cleaning brass before soldering it.


Bill Fernald
 
I intend to live forever!  So far, so good.  :laugh2:  :laugh2: 

#11 Pablo

Pablo

    Builder

  • Administrator
  • PipPipPipPipPipPipPipPip
  • 18,375 posts
  • Joined: 20-February 06
  • Gender:Male
  • Location:Cleveland, Tennessee

Posted 07 April 2015 - 07:25 PM

Robb,

I agree with Bill when he says the rosin core doesn't cause a flow problem - I never had that problem either.

My point is merely that the rosin isn't needed when using acid, and in fact leaves a little brown goop.

If you have flow problems, it's not a solder issue.

Paul Wolcott


#12 Bill from NH

Bill from NH

    Age scrubs away speed!

  • Full Member
  • PipPipPipPipPipPipPipPip
  • 14,361 posts
  • Joined: 02-August 07
  • Gender:Male
  • Location:New Boston, NH

Posted 07 April 2015 - 08:02 PM

Robb, what were you soldering when 60/40 with acid flux wouldn't flow? Was it raw brass? Something plated? Or something else? Was the joint thoroughly clean? Regardless of the type of solder being used, generally brass to brass joints only need a rosin flux. Brass to steel & steel to steel joints (piano wire) need an acid flux. You can keep things simple & use acid flux on everything thats for non-electrical use. That's what I usually do. :)


Bill Fernald
 
I intend to live forever!  So far, so good.  :laugh2:  :laugh2: 

#13 Pablo

Pablo

    Builder

  • Administrator
  • PipPipPipPipPipPipPipPip
  • 18,375 posts
  • Joined: 20-February 06
  • Gender:Male
  • Location:Cleveland, Tennessee

Posted 07 April 2015 - 08:35 PM

To me it looks like nothing on the chassis is flowing, just melting.

It's a simple matter of getting it up out of the jig, which is sucking up all the heat.


The only jig you can successfully use a torch on without melting it is a Briggs with an aluminum plate :)


Paul Wolcott


#14 Bill from NH

Bill from NH

    Age scrubs away speed!

  • Full Member
  • PipPipPipPipPipPipPipPip
  • 14,361 posts
  • Joined: 02-August 07
  • Gender:Male
  • Location:New Boston, NH

Posted 07 April 2015 - 10:06 PM

I wouldn't have thought a torch soldered joint could be heat-starved, but then I'm not a torch solderer like you. If the jig is soaking up much of the heat, it should only be used for tacking parts together. The tacked together pieces should be moved to a flat piece of building material, such as MDF, plywood, chipboard, or plyscore, where it can be soldered solidly without all the heat being drawn off. 


Bill Fernald
 
I intend to live forever!  So far, so good.  :laugh2:  :laugh2: 

#15 Pablo

Pablo

    Builder

  • Administrator
  • PipPipPipPipPipPipPipPip
  • 18,375 posts
  • Joined: 20-February 06
  • Gender:Male
  • Location:Cleveland, Tennessee

Posted 07 April 2015 - 10:10 PM

I already said that, Bill, post 7, para. 1. :dash2: :crazy:
 
The best soldering surface is, none at all, nothing to soak up heat. Use the Steube trick - place the area to be soldered over the slot of the jig, or over the edge, and watch that stuff flow. :dance3:

Paul Wolcott


#16 hiline2

hiline2

    On The Lead Lap

  • Full Member
  • PipPipPipPip
  • 468 posts
  • Joined: 22-February 06
  • Gender:Male
  • Location:Piney Woods around Tyler, TX

Posted 08 April 2015 - 05:49 AM

Pablo and Bill, Thanks, I'm doing my best to absorb your soldering explanations and techniques. :good:
 
When can I sign up for classes! I'm serious. :yes:
 
I'd be really appreciative to have the chance to attend and apprentice from many of you guys!  :i-m_so_happy:
Paul Bass

#17 Pablo

Pablo

    Builder

  • Administrator
  • PipPipPipPipPipPipPipPip
  • 18,375 posts
  • Joined: 20-February 06
  • Gender:Male
  • Location:Cleveland, Tennessee

Posted 08 April 2015 - 05:53 AM

You are already in class, you just don't know it yet. :wink3:

Please don't let us delay the real mission - the pink Corvette. :clapping: :good:

Paul Wolcott


#18 John Streisguth

John Streisguth

    Johnny VW

  • Full Member
  • PipPipPipPipPipPipPipPip
  • 5,638 posts
  • Joined: 20-November 08
  • Gender:Male
  • Location:Bangor, PA

Posted 08 April 2015 - 05:55 AM

A few things from my perspective:

- put the acid flux on before your heat, not after
- silver solder melts as a much higher temp, and doesnt tend to flow as well
- large blocks of steel and aluminum will suck heat away almost as fast as you apply it, so if you need a hold down, use wood.
 
I use Radio Shack 60/40 rosin core for all my chassis builds, and never have a problem other than a bit of residue left over that is easily scraped off. 

And the only time I use a torch is to help heat up thick plate brass.
  • olescratch likes this
"Whatever..."

#19 robbovius

robbovius

    Mid-Pack Racer

  • Full Member
  • PipPipPip
  • 146 posts
  • Joined: 20-March 14
  • Gender:Male
  • Location:MA, USA

Posted 08 April 2015 - 07:04 AM

Wow, a nice cascade of commentary to respond to, becasue I HATE talking about it. ;-)
 
But you've answered a couple of my questions re: 60/40 rosin solder, and there's a couple details I can clarify...
 
Bill, when I tried the 60/40 rosin solder, it was soldering an oilite into the plated steel chassis of the Catalina, so, given your comment it would seem the flow problem had to do with not sanding off all the nickel plate on the AMT chassis. That - the nickel plated steel - liked the Lenk acid core 50/50 solder much more than the 60/40 rosin.
 
I have mentioned this before (in Jarius' AMT test thread?), that, back in the late '70s, when I was at my "peak" of static modelling, I built some 1/25 T bucket frames out of soldered 1/8' square brass tube. I can't recall doing anything special for those - no cleaning, no fluxing, soldered with my dad's tank of a Weller gun, using whatever solder was around - which I have assume was the usual 60/40 rosin core electronics stuff (because at the time I was a starving musician, repairing guitar and speaker cords weekly) and would have had that laying around. I remember soldering the frame pieces together (angled butt joints) on a piece of glass using scotch tape to hold things in place.  
 
But that was then. When I bought the initial batch of brass - back around the time I first poested here asking help ideintifying the chassis on the Buyers Protection Plan Special - I tried soldering with a 100 watt "Chicago Electric" (HF) gun, but that didn't really work well at all, and so set stuff aside until I got back into it this year. Now it's torches all the way. Though I did buy a craftsman 45W iron recetly, and that thing gets MUCH hotter than any of my older pencil irons. Due for some experiementation with brass I think.
 
Anyway, about the jig. That PCS jig is a big fat slab of Corian, and I'm not as sure as you guys that its acting as an efficient heat sink, as its perfomace data shows it to be pretty thermally inert. (Mech engineering geek for my day gig, but I try not to let that get in the way of just impulsively going for it.) I can touch the slab right after soldering, when the chassis is still too hot to touch, which while not especially scientific is a nice empirical verification of its lack of heat absoption. Also, I'm pretty sure that some of what looks like poor flow in my pictures is me being waaay over-generous with the solder, and getting a blob on there after the initial good flow.
 
Here's a couple details.
 
On the front axle you can see that the mating meniscus is smooth between the axle tube and rod uprights, and looking at it under my magnifying lamp, there aren't any voids in the edges of the flow. the flow under the curved section of the chassis brace is also nicely smooth, and it had flowed thru underneath to the other side by capillary action, forming a smooth meniscus there, too. (Though the only pics I have of the inside edge are rather more blurry than would make for effective viewing.
 
solder meniscus.JPG
 
Most of the joints are like the above, but I admit some have blobbiness going on, because I couldn't leave well enough alone and not add more solder. That's deinitely the case at the motorbracket/chassis tube joint, though I did get a couple good ones, like this where I successfully resisted glopping the solder on there.
 
chassis front detail.JPG
 
And then there's this...
 
blob detail.JPG
 
Yeah, ugly.Hhere's what happened: up above there's a picture of the weighted fixturing setup I used to hold the axle uprights in place, that had a wrench on the outside holding the pins in place. On the "passenger side" after the initial flow (which wet through to the underside by capilary action, though I don't have any pics of that) there was a small "sprue" that had climbed up the side of the wrench, and so I decided to remelt that, of course leaving that nice fat blob.  
 
Still, even with all my above explanations, tonight I'm gonna break out the 10x eyeloupe and give the chassis a good inspection.
 
I do appreciate all the commentary, advice, explanation, and encouragement.
 
Paul, Pink Covette FWD!
 
John, wooden fixturing wieghts, check...
 
Hiline, we are in class totally, hi-fives.

#20 John Streisguth

John Streisguth

    Johnny VW

  • Full Member
  • PipPipPipPipPipPipPipPip
  • 5,638 posts
  • Joined: 20-November 08
  • Gender:Male
  • Location:Bangor, PA

Posted 08 April 2015 - 07:25 AM

Soldering oilites boils the oil out of them. That's what you saw bubbling, not the rosin flux (or possibly the flux was bubbling on top of the oil). That's a separate issue from soldering brass.
 
On the "glob", that's probably a combination of heat being drawn away by the metal you are using to locate the parts, and not enough flux to get the solder flowing onto the metal. What I do is use a long piece of rod (usually steel since I build racing chassis) and use the length to hold it in position, then cut off the excess after it is soldered in place.
 
When I'm done building a chassis, I usually end up washing my face first, because I can feel the acid on my skin.  :laugh2:
"Whatever..."

#21 Bill from NH

Bill from NH

    Age scrubs away speed!

  • Full Member
  • PipPipPipPipPipPipPipPip
  • 14,361 posts
  • Joined: 02-August 07
  • Gender:Male
  • Location:New Boston, NH

Posted 08 April 2015 - 07:49 AM

Just a couple comments.
 
1.) Your uprights to front axle joints look good.
 
2.) Sometime when you have your Sears 45W iron out, first brush one of your joints, that looks globby to you, with acid flux while cold, then heat the joint with your iron. See if the solder flow looks smoother and improves.
 
3.) Sometime, try the 60/40 solder and acid flux on a raw brass to raw brass joint (such as one of those on the Pink Vette.) Soldering oilites in a chassis can be tricky. Most nickel plating can be directly soldered to without removing it. I don't have experience with AMTs. I think your flow problem was caused by the oil inside the oilite material. I often wire brush (Dremel) a oilite's outside before soldering. Sometimes, I'll burn out all of an oilite's oil before soldering. I put the bushing on the tip of my soldering iron until it stops smoking, then wire brush it's outside when cool. With no oil in them, oilites should solder in easily. While still hot from the soldering, give them a liberal oiling. They'll soak up much of it. Try soldering in oilites with your iron, rather than your torch.
 
4.) Some of the local Modelville guys who race on Tuesday nights should be able to give you some pointers, but they may want to do it on another night.
 
John made some good suggestions in his posts above.
Bill Fernald
 
I intend to live forever!  So far, so good.  :laugh2:  :laugh2: 

#22 Cheater

Cheater

    Headmaster of the asylum

  • Root Admin
  • PipPipPipPipPipPipPipPip
  • 25,556 posts
  • Joined: 14-February 06
  • Gender:Male
  • Location:Norcross, GA

Posted 08 April 2015 - 08:10 AM

I was trying to give Robb a little soldering advice via PM before he started this thread and I'll bring over the couple of pics I sent him as illustrations. These are believed to be Ray Price's work, on what John Austin thinks is one of his last flat-track F1 chassis.

solder1.jpg

What is seen here, and not seen as much on Pam's chassis, is much better "wetting" of the solder on the brass. And the only way to accomplish this is to get the brass hot enough to melt the solder.

solder2.jpg

The point of this photo, other than to show the good wetting, is to point out that there are places a torch can't be used! LOL!

When I was actively building, I used a good hot iron for 95% of my soldering, primarily because I can control the application of heat much better with an iron than with a torch. Sort of like the difference between an X-Acto knife and a machete...

Yes, when soldering thick brass or large areas, a torch can be very useful. I tended to use a torch to finish a large soldering operation (say complex bracing on a motor bracket) as opposed to starting it. Often used the torch to "flow" the joints on a multiple joint assembly.

I was always taught that when soldering one should heat the metal until the solder melts when you apply it to the joint. Obviously, this approach is harder to do with a torch.

The iron vs torch debate has occurred at Slotblog numerous times and really, there's no right or wrong way as long as good strong joints are the end result.
  • olescratch likes this

Gregory Wells

Never forget that first place goes to the racer with the MOST laps, not the racer with the FASTEST lap


#23 robbovius

robbovius

    Mid-Pack Racer

  • Full Member
  • PipPipPip
  • 146 posts
  • Joined: 20-March 14
  • Gender:Male
  • Location:MA, USA

Posted 08 April 2015 - 08:50 AM

Cheater, thanks for reposting those.


Bill, I'll try that, but I think what I'm going to do is take a few of my brass scraps and have a go with the 45W iron and 60/40 rosin core solder.


John, re: soldering the oilites. When I first tried soldering the oilites into the Catalina frame, I first tried tinning one out of the frame and saw the oil boil out of it, and so when I worked on soldering them in, I gave each one a blast with the torch to boil the oil out before trying to solder them. Maybe I didn't get quite all of it out. When I applied the rosin core stuff though, right after the solder balled up there was a very noticable increase in the flow of brown liquid, which I took to be the rosin.


#24 Gator Bob

Gator Bob

    Grand Champion Poster

  • Banned
  • PipPipPipPipPipPipPipPip
  • 13,391 posts
  • Joined: 12-April 11
  • Gender:Not Telling
  • Location:.

Posted 08 April 2015 - 08:52 AM

More heat (hot iron).

More acid flux.

Less solder.


Scuff sand and degrease all parts to be joined. ANY oil will cause solder to ball up.


I use 60/40 rosin core with acid flux without any issues.

I only use a mini torch on thick brass or steel tongues as a pre-heat, the iron finishes the joint. 


  • Cheater likes this
Posted Image
                            Bob Israelite

#25 John Streisguth

John Streisguth

    Johnny VW

  • Full Member
  • PipPipPipPipPipPipPipPip
  • 5,638 posts
  • Joined: 20-November 08
  • Gender:Male
  • Location:Bangor, PA

Posted 08 April 2015 - 10:22 AM

If you managed to boil out the oil from an oilite, apply oil after you are done soldering and while it is still hot, and keep applying as it cools. That should wick some oil back into the pores. Boiling out the oil defeats the purpose of it being an oil-impregnated bearing.


I'm of the same mind as Bob on the torch, I only use it on thick and/or large pieces. 


ALso, FWIW, I cracked my first jig using a torch, although it was an earlier one by a different manufacturer that was not as thick. 


"Whatever..."


Electric Dreams Online Shop