

Rick,
Oh yeah, 5/8" fronts like PdL's Group 20/7 car. It seems like all the later "pro" cars went with 5/8"s.
Would it be possible for you to post a picture of your center section jig with some measurements??
While my Rick B jig is awesome for D3 stuff, I need to build something else for the center section layout and soldering.
And Bill (from NH) has given me a real Parma drop arm which I'm saving for the No Glue car build.
Is there a certain angle used for the motor box area?? I've got a number of vintage Muras now and wonder how to make sure they fit.
Thanks again.

The 888 and the 1972 Nats...
Started by
dc-65x
, Feb 02 2008 10:21 PM
71 replies to this topic
#51

GTPJoe
-

- Full Member
-

- 448 posts Joined: 26-July 07
On The Lead Lap
- Gender:Male
- Location:Manch-Vegas NH
Posted 19 February 2008 - 12:40 PM
GTP Joe Connolly
In theory there is no difference between theory and practice.
In practice there is.
#52
dc-65x
-
- Subscriber
-
- 6,979 posts Joined: 14-February 06
Grand Champion Poster
- Gender:Male
- Location:Captain Rick: The only vintage slot car nut in SW Oregon?
Posted 19 February 2008 - 01:15 PM
Joe,
I'm going to be making a new jig soon and I'll have a drawing I can send you then.
I set the motor angle the way Lee Gilbert did in his Car Model magazine "how-to" articles. I get the motor and gears I'll be using and set them up in the jig at the shallow angle that will still allow the gears to mesh and the magnet to not contact the axle.
I did a complete construction article with a zillion pictures that's now hosed with the current forum. It was my first post with a digital camera and I didn't resize the pictures properly. I will get that post fixed and reposted. In the mean time here is part of that old post that deals with motor angle. The chassis is a three-bearing so that's why I talk about cutting the center out of the rear axle tube. For a conventional two-bearing chassis it would remain just as it is in the pictures:
Here's the motor, axle tube, gear, and jig wheels, all centered up in the jig:
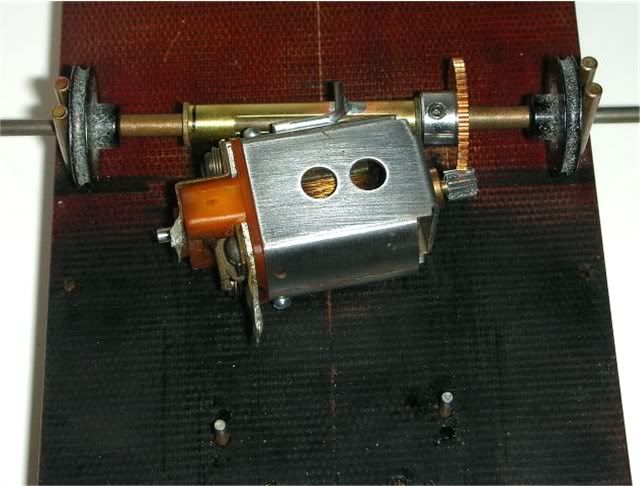
The axle motor is temporarily soldered to the axle tube with a wire brace. The axle tube is 1.250" long and is notched for motor clearance. The notch is .100" from the gear side and .250" from the end bell side. The depth of the notch is about half way through the tube. After all the rear axle bracing is installed I'll cut out the center of the axle tube to make room for the third axle bearing.
It's time to solder in the main rails...
My digital camera skills are still lacking but here goes. Here are the four main rails of the chassis. I leave ends LONG until I've "convinced" them to take the shape I want. Piano wire is cheap. Oh, one thing I noticed with this batch of hobby shop piano wire was that some of the pieces were not straight... kind of wavy. Now I spin each piece with my fingers to see if its straight and running true:
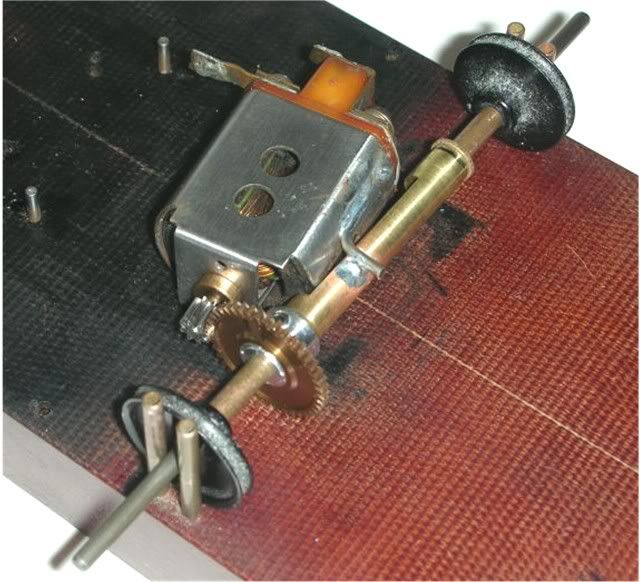
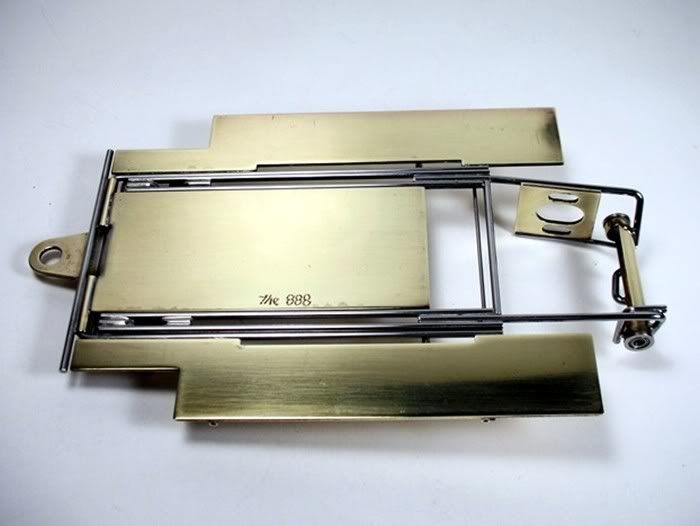
Here's the start of the center section in the jig. Next comes the two rear axle braces and cutting out of the center of the axle tube:
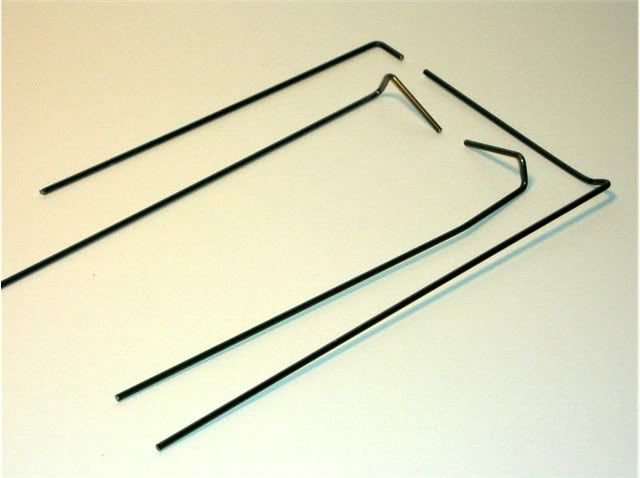
I'll also need to trim the main rails to length. For that I'll need the drop arm with all its plumber hinge tubes and bumpers installed. Here are the parts for the drop arm:
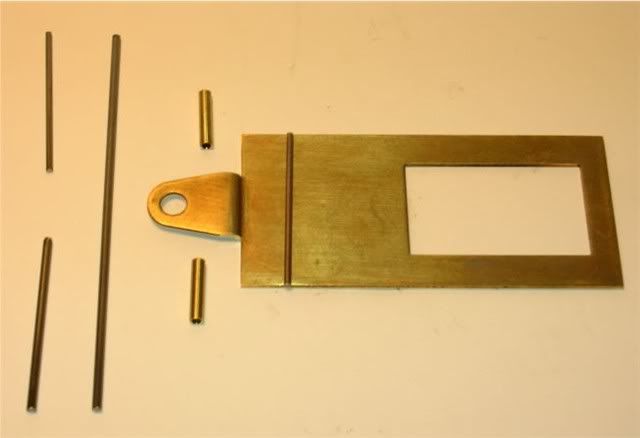
The wire sitting on the drop arm is .047" and is cut to the width of the drop arm. The two 3/32" diameter brass tubes are .475" long. The .062" dIameter wire bumpers are left long to be trimmed even with the pans latter.
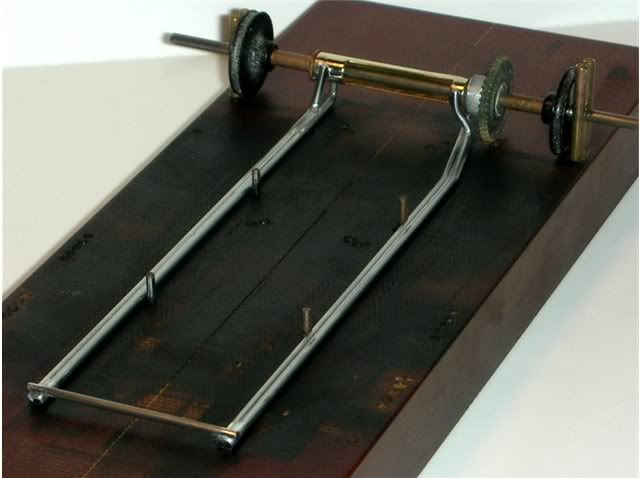
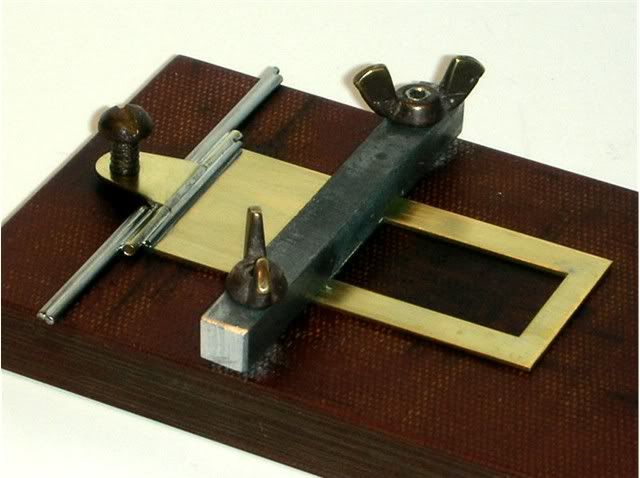
These are the soldered up parts in the drop arm jig:
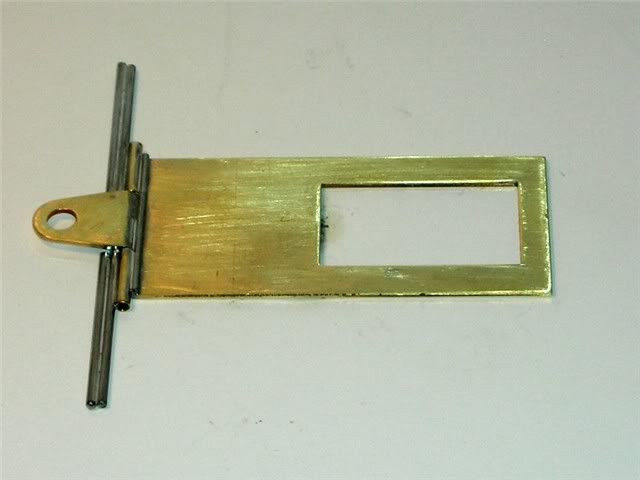
And the finished drop arm awaiting the Diamond front axles:
I'm going to be making a new jig soon and I'll have a drawing I can send you then.
I set the motor angle the way Lee Gilbert did in his Car Model magazine "how-to" articles. I get the motor and gears I'll be using and set them up in the jig at the shallow angle that will still allow the gears to mesh and the magnet to not contact the axle.
I did a complete construction article with a zillion pictures that's now hosed with the current forum. It was my first post with a digital camera and I didn't resize the pictures properly. I will get that post fixed and reposted. In the mean time here is part of that old post that deals with motor angle. The chassis is a three-bearing so that's why I talk about cutting the center out of the rear axle tube. For a conventional two-bearing chassis it would remain just as it is in the pictures:
Here's the motor, axle tube, gear, and jig wheels, all centered up in the jig:
The axle motor is temporarily soldered to the axle tube with a wire brace. The axle tube is 1.250" long and is notched for motor clearance. The notch is .100" from the gear side and .250" from the end bell side. The depth of the notch is about half way through the tube. After all the rear axle bracing is installed I'll cut out the center of the axle tube to make room for the third axle bearing.
It's time to solder in the main rails...
My digital camera skills are still lacking but here goes. Here are the four main rails of the chassis. I leave ends LONG until I've "convinced" them to take the shape I want. Piano wire is cheap. Oh, one thing I noticed with this batch of hobby shop piano wire was that some of the pieces were not straight... kind of wavy. Now I spin each piece with my fingers to see if its straight and running true:
Here's the start of the center section in the jig. Next comes the two rear axle braces and cutting out of the center of the axle tube:
I'll also need to trim the main rails to length. For that I'll need the drop arm with all its plumber hinge tubes and bumpers installed. Here are the parts for the drop arm:
The wire sitting on the drop arm is .047" and is cut to the width of the drop arm. The two 3/32" diameter brass tubes are .475" long. The .062" dIameter wire bumpers are left long to be trimmed even with the pans latter.
These are the soldered up parts in the drop arm jig:
And the finished drop arm awaiting the Diamond front axles:
Rick Thigpen
Check out Steve Okeefe's great web site at its new home here at Slotblog:
The Independent Scratchbuilder
There's much more to come...
#53
GTPJoe
-
- Full Member
-
- 448 posts Joined: 26-July 07
On The Lead Lap
- Gender:Male
- Location:Manch-Vegas NH
Posted 19 February 2008 - 02:19 PM
Rick,
Great!
I see now one of the constraints is the 1.250" long axle tube. Get that centered, motor in place and gears meshing, soldered to axle tube temporarily. Then from the last jig pin that's holding the center section that bend to the tube is the angle for the motor. If it comes straight back it misses the tube but the bend goes right in front of the can and attaches to the tube. That's how you're able to build for different motors.
OK, it's coming together now. I won't drill my Garolite till I see your jig setup.
Thanks again!
GTP Joe Connolly
In theory there is no difference between theory and practice.
In practice there is.
#54
dc-65x
-
- Subscriber
-
- 6,979 posts Joined: 14-February 06
Grand Champion Poster
- Gender:Male
- Location:Captain Rick: The only vintage slot car nut in SW Oregon?
Posted 19 February 2008 - 04:22 PM
Joe,
Usually I add the width of the two rear wheels, the spur gear, bearing flanges, and any spacers I want to use. Then I subtract that from the maximum allowable width (usually 3-1/8" or 3" for older cars). That gives me the length of the rear axle tube. It usually works out to about 1.200" for a 3-1/8" track width.
Have you downloaded the Lee Gilbert Pro Car How-To articles he did for Car Model magazine? The first anglewinder I built I had a lot of trouble with. After reading Lee's articles it all made sense.
Rick Thigpen
Check out Steve Okeefe's great web site at its new home here at Slotblog:
The Independent Scratchbuilder
There's much more to come...
#55
TSR
-

- Full Member
-
- 42,299 posts Joined: 02-February 06
The Dokktor is IN
- Gender:Male
- Location:Marxifornia
Posted 19 February 2008 - 05:08 PM
This is the one Jan was selling to the public:

Philippe de Lespinay
#56
dc-65x
-
- Subscriber
-
- 6,979 posts Joined: 14-February 06
Grand Champion Poster
- Gender:Male
- Location:Captain Rick: The only vintage slot car nut in SW Oregon?
Posted 19 February 2008 - 06:15 PM
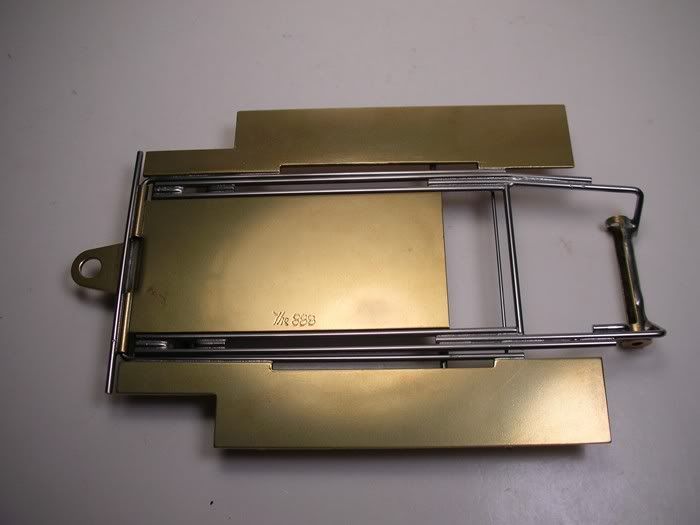
That's like the first one I show on page 2 of this post except my gear side axle brace was missing and I must have soldered the replacement on backwards  :
:
So this style was a later version sold to the public? I've had several of these:
:So this style was a later version sold to the public? I've had several of these:
Rick Thigpen
Check out Steve Okeefe's great web site at its new home here at Slotblog:
The Independent Scratchbuilder
There's much more to come...
#57
GTPJoe
-
- Full Member
-
- 448 posts Joined: 26-July 07
On The Lead Lap
- Gender:Male
- Location:Manch-Vegas NH
Posted 20 February 2008 - 12:17 PM
Rick,
Is the Lee Gilbert article posted here on Slotblog??
Is the Lee Gilbert article posted here on Slotblog??
GTP Joe Connolly
In theory there is no difference between theory and practice.
In practice there is.
#58
dc-65x
-
- Subscriber
-
- 6,979 posts Joined: 14-February 06
Grand Champion Poster
- Gender:Male
- Location:Captain Rick: The only vintage slot car nut in SW Oregon?
Posted 20 February 2008 - 01:27 PM
Here's his motor building article. I guess it's the only one left from all the different forums. 
Pro Motor Build
I'll check to see if I still have the scans and can post them again.
Pro Motor Build
I'll check to see if I still have the scans and can post them again.
Rick Thigpen
Check out Steve Okeefe's great web site at its new home here at Slotblog:
The Independent Scratchbuilder
There's much more to come...
#59
JerseyJohn
-

- Subscriber
-
- 4,203 posts Joined: 05-September 07
Jersey John
- Gender:Male
- Location:Northern NJ
Posted 23 March 2008 - 04:51 PM
Hello Rick, I race with TonyP and Noose. I just wanted to say your restoration work, and duplicate work is incredible. Thanks for sharing them with us...Here's his motor building article. I guess it's the only one left from all the different forums.
Pro Motor Build
I'll check to see if I still have the scans and can post them again.
John Chas Molnar
"Certified Newark Wise Guy since 1984" (retired)
"Certified Tony P Chassis God 2007.2023
Retro Chassis Designer-Builder

#60
sportblazer350
-

- Full Member
-
- 2,177 posts Joined: 04-July 06
Posting Leader
- Gender:Male
- Location:New Jersey
Posted 23 March 2008 - 06:08 PM
Great chassis building, i wish i had a tiny bit of the talents of you chassis builders on this blog.
So...here is a car i race using one of the $19.99 REH chassis. I simply use a $8 Cheetah-II motor, and this baby performs well! I do not know anything about chassis set ups, and this car handles great as i got it, no mods at all, except for soldering on a motor to rear axle tube brace to hold the motor in better. this makes for a very inexpensive and fun car to race.
So...here is a car i race using one of the $19.99 REH chassis. I simply use a $8 Cheetah-II motor, and this baby performs well! I do not know anything about chassis set ups, and this car handles great as i got it, no mods at all, except for soldering on a motor to rear axle tube brace to hold the motor in better. this makes for a very inexpensive and fun car to race.
Glenn Orban
NJ Vintage Racing
NJ Scale Racing
C.A.R.S. Vintage Slot Car Club
#61
dc-65x
-
- Subscriber
-
- 6,979 posts Joined: 14-February 06
Grand Champion Poster
- Gender:Male
- Location:Captain Rick: The only vintage slot car nut in SW Oregon?
Posted 23 March 2008 - 07:14 PM
Thanks John .
Glenn, these old anglewinder are a lot of fun aren't they . If you want to go from fun to a real rush, stick a modern GP20 C-can in it

Rick
. Glenn, these old anglewinder are a lot of fun aren't they
. If you want to go from fun to a real rush, stick a modern GP20 C-can in it Rick
Rick Thigpen
Check out Steve Okeefe's great web site at its new home here at Slotblog:
The Independent Scratchbuilder
There's much more to come...
#62
dc-65x
-
- Subscriber
-
- 6,979 posts Joined: 14-February 06
Grand Champion Poster
- Gender:Male
- Location:Captain Rick: The only vintage slot car nut in SW Oregon?
Posted 12 April 2008 - 03:44 PM
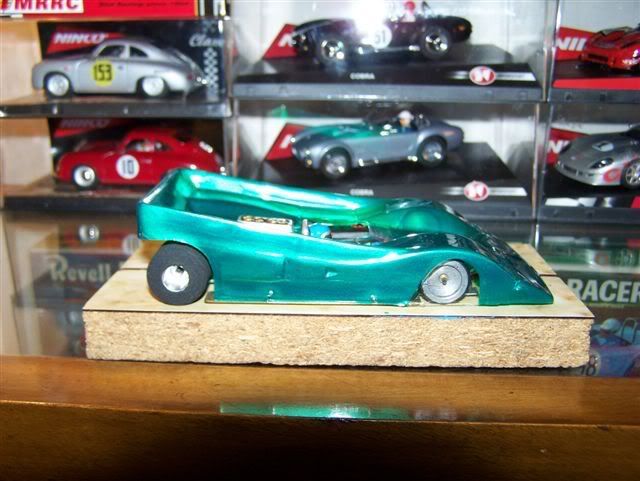
I took Adam's 2008-888 to the track last weekend and here's how our version of a Big Dog angle winder worked out (the tires pictured on the car are old junkers as the "good" tires are in their air tight tube in the fridge)
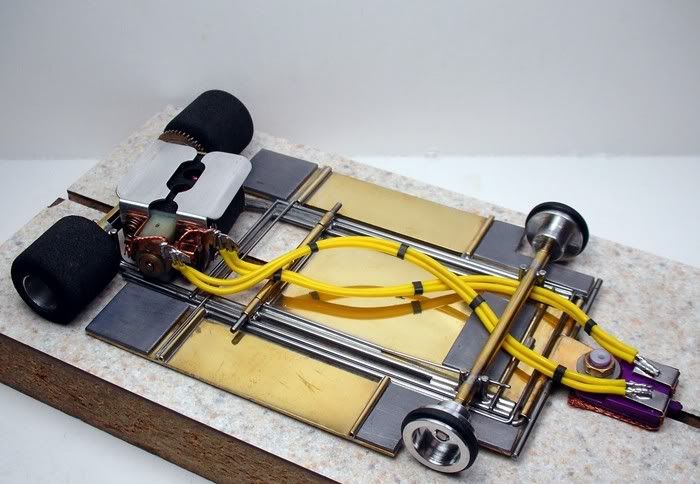
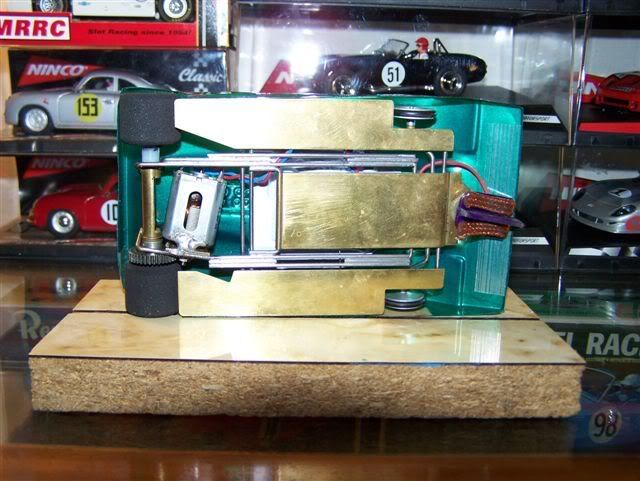
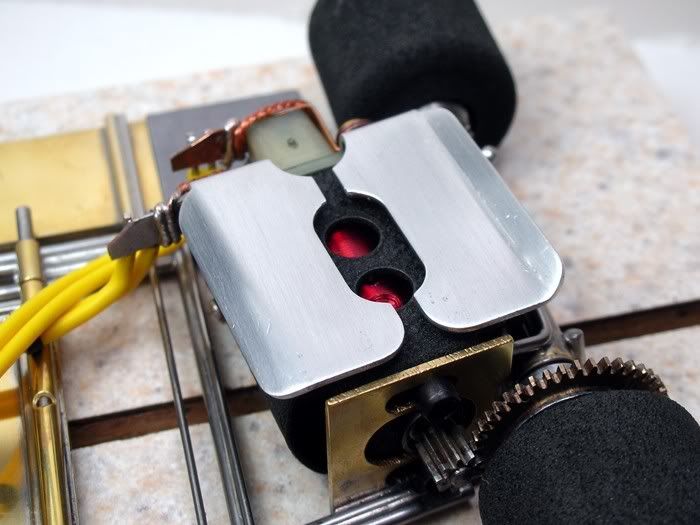
I made one change at Adam's request. He liked the "Aero Style" heat sinks on my Tony P ISO Can Am Turbo motor so I swapped out these Parma clones:
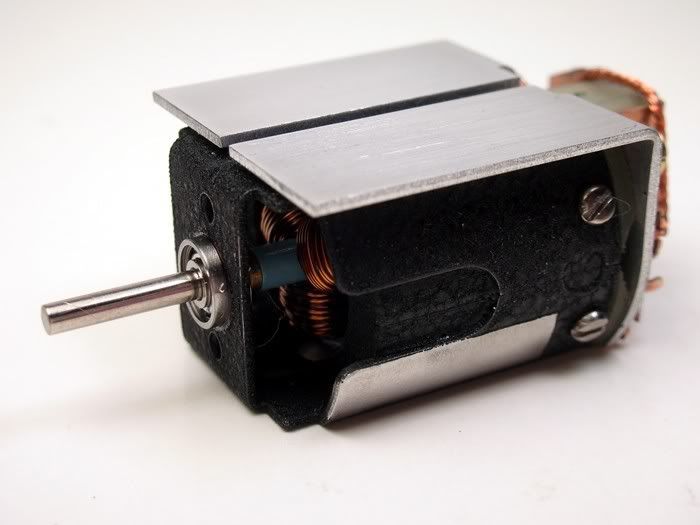
for these modified Mura's:
At the track it handled absolutely bitch'n . I couldn't be happier with the handling. The Eddie 20 (a vintage Mura C-can setup with modern GP20 drag arm and magnets) had good power. For comparison Rodney ran his Parma "Sliding Plumber" chassis with a vintage Mura C-can and a vintage tagged GP7 arm. The Eddie 20 pulled the GP7 down the straights and was about .3 per lap faster.
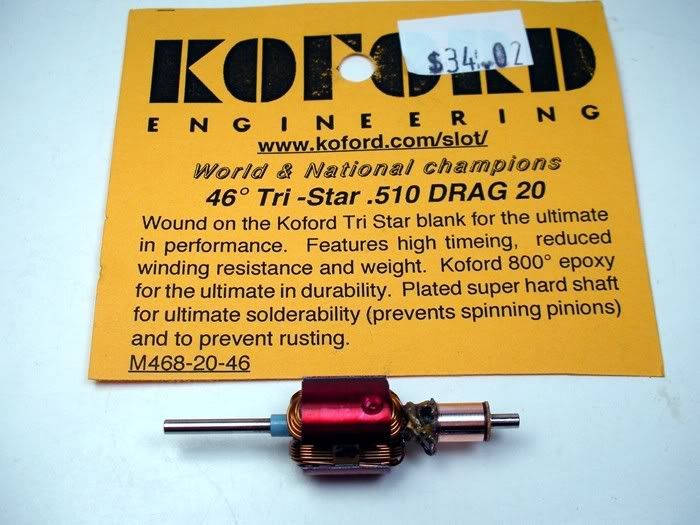
Then I decided to compare the 2008-888 with its Koford 20 arm:
to my Starship with it's ProSlot 20 arm:
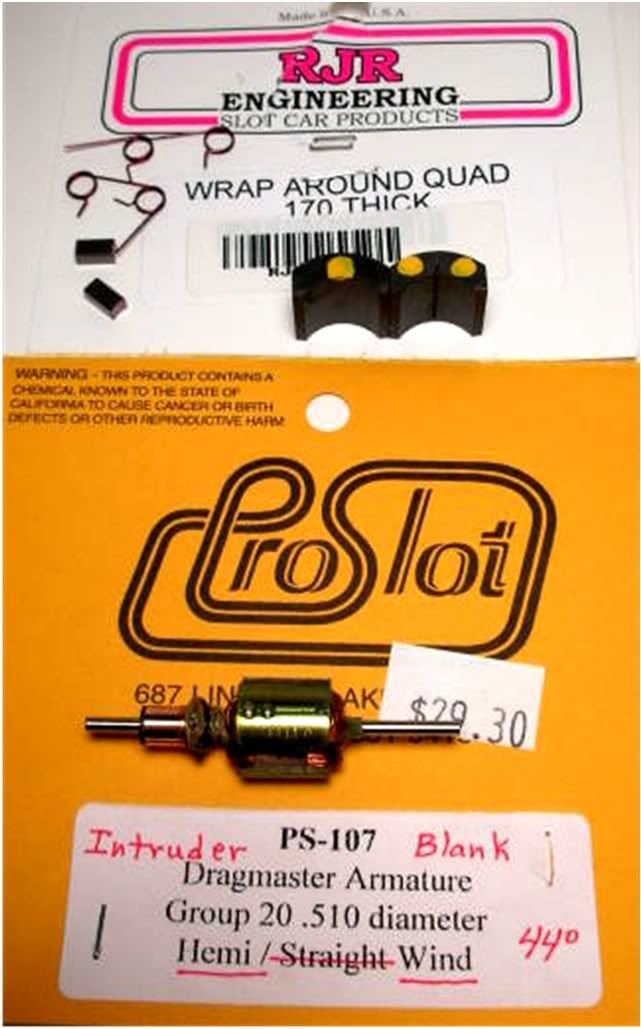
The ProSlot powered car just seemed a little better all around. It had a little more speed, slightly better brakes and even ran cooler. The armature air gap, brushes, brush springs and gearing are all the same. The Koford also drew more amps during the break in as I remember. I’m not sure how long this motor will last. I’ve absolutely hammered my ProSlot powered Eddie 20 and it just keeps going and going…………..
Maybe the Koford powered motor will pick up with some more track time..........or maybe it will go up in a ball of fire  . I will ship this car to Adam and let him have fun wringing its neck and whatever happens will happen but its next arm will be a ProSlot .
So if you see this car running at BPR
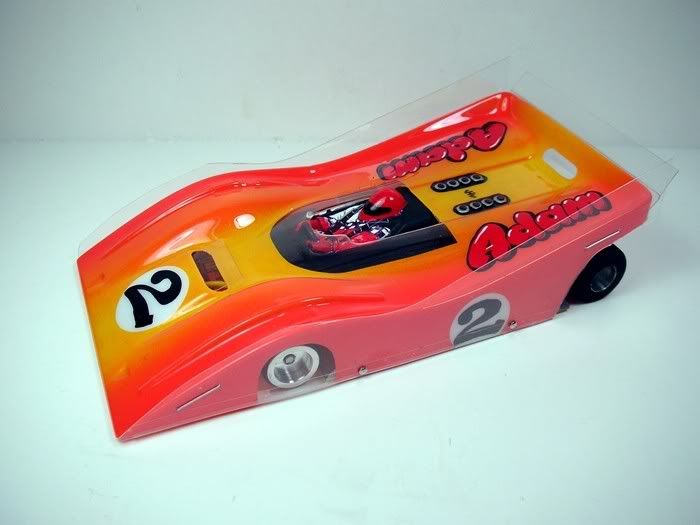
and it goes POOF! we won't be surprised. We'll just rebuild that good old Mura 2-hole C-can with a ProSlot arm and it will be even faster .
ONWARD............
(the tires pictured on the car are old junkers as the "good" tires are in their air tight tube in the fridge)I made one change at Adam's request. He liked the "Aero Style" heat sinks on my Tony P ISO Can Am Turbo motor so I swapped out these Parma clones:
for these modified Mura's:
At the track it handled absolutely bitch'n
. I couldn't be happier with the handling. The Eddie 20 (a vintage Mura C-can setup with modern GP20 drag arm and magnets) had good power. For comparison Rodney ran his Parma "Sliding Plumber" chassis with a vintage Mura C-can and a vintage tagged GP7 arm. The Eddie 20 pulled the GP7 down the straights and was about .3 per lap faster.Then I decided to compare the 2008-888 with its Koford 20 arm:
to my Starship with it's ProSlot 20 arm:
The ProSlot powered car just seemed a little better all around. It had a little more speed, slightly better brakes and even ran cooler. The armature air gap, brushes, brush springs and gearing are all the same. The Koford also drew more amps during the break in as I remember. I’m not sure how long this motor will last. I’ve absolutely hammered my ProSlot powered Eddie 20 and it just keeps going and going…………..
Maybe the Koford powered motor will pick up with some more track time..........or maybe it will go up in a ball of fire
. I will ship this car to Adam and let him have fun wringing its neck and whatever happens will happen but its next arm will be a ProSlot . So if you see this car running at BPR
and it goes POOF! we won't be surprised. We'll just rebuild that good old Mura 2-hole C-can with a ProSlot arm and it will be even faster
.ONWARD............
- Jencar17 likes this
Rick Thigpen
Check out Steve Okeefe's great web site at its new home here at Slotblog:
The Independent Scratchbuilder
There's much more to come...
#63
Jairus
-

- Subscriber
-
- 10,174 posts Joined: 16-February 06
Body Painter Extraordinaire
- Gender:Male
- Location:Salem, OR
Posted 12 April 2008 - 04:01 PM
I love those aero heat sinks....
Jairus H Watson - Artist
Need something painted, soldered, carved, or killed? - jairuswtsn@aol.com
www.slotcarsmag.com
www.jairuswatson.net
http://www.ratholecustoms.com
Check out some of the cool stuff on my Fotki!
#64
JohnnySlotcar
-

- Full Member
-
- 2,036 posts Joined: 26-August 06
Posting Leader
- Gender:Male
- Location:Barrington, IL
Posted 12 April 2008 - 04:39 PM
Way too much timing. Either go down a tooth on the pinion, or risk meltdown.Next time go 38 degrees.
John Austin
#65
dc-65x
-
- Subscriber
-
- 6,979 posts Joined: 14-February 06
Grand Champion Poster
- Gender:Male
- Location:Captain Rick: The only vintage slot car nut in SW Oregon?
Posted 12 April 2008 - 05:37 PM
Hi John,
My current ProSlot is a 44 but it looks like they now only list 35, 38, 40 and 46 at PCH online. My current 44 runs great but I don't trust that 46 degree Koford. When I buy another one I'll take your advice and go down to a 38 (or maybe a 40 ) and stay away from the 46. We are running 8 - 42 gearing currently.
Thanks for your input,
Rick
My current ProSlot is a 44 but it looks like they now only list 35, 38, 40 and 46 at PCH online. My current 44 runs great but I don't trust that 46 degree Koford. When I buy another one I'll take your advice and go down to a 38 (or maybe a 40
) and stay away from the 46. We are running 8 - 42 gearing currently.Thanks for your input,
Rick
Rick Thigpen
Check out Steve Okeefe's great web site at its new home here at Slotblog:
The Independent Scratchbuilder
There's much more to come...
#66
Bill from NH
-

- Full Member
-
- 14,762 posts Joined: 02-August 07
Age scrubs away speed!
- Gender:Male
- Location:New Boston, NH
Posted 12 April 2008 - 06:13 PM
Rick, next time you have those arms out of a can, it won't hurt to check their actual timing as compared to the advertised. Some are closer than others.
Bill Fernald
I intend to live forever! So far, so good.
I intend to live forever! So far, so good.
#67
dc-65x
-
- Subscriber
-
- 6,979 posts Joined: 14-February 06
Grand Champion Poster
- Gender:Male
- Location:Captain Rick: The only vintage slot car nut in SW Oregon?
Posted 12 April 2008 - 06:29 PM
Hi Bill,
I don't have a gizmo to check arm timing. What one do you recommend I buy. Sounds like a nice addition to my "Tools For Retirement"
I don't have a gizmo to check arm timing. What one do you recommend I buy. Sounds like a nice addition to my "Tools For Retirement"
Rick Thigpen
Check out Steve Okeefe's great web site at its new home here at Slotblog:
The Independent Scratchbuilder
There's much more to come...
#68
Bill from NH
-
- Full Member
-
- 14,762 posts Joined: 02-August 07
Age scrubs away speed!
- Gender:Male
- Location:New Boston, NH
Posted 12 April 2008 - 07:00 PM
Rick, the two tools I own aren't being manufactured any more, but are essentially just a protractor with a pointer. The best one I've seen recently is the Proformance Racing tool. Here's a link to it on the PCH site. Comm Timing Tool
Bill Fernald
I intend to live forever! So far, so good.
I intend to live forever! So far, so good.
#69
MarcusPHagen
-

- Full Member
-
- 451 posts Joined: 16-February 06
On The Lead Lap
- Gender:Male
- Location:Bloomington, MN [USA]
Posted 14 March 2019 - 02:45 AM
That "plentiful" may have been true 11 years ago, but it's pretty slim pickin's these days!The Mura two-hole C-can setup is plentiful on eBay. I bought this lot...
... which yielded these usable parts:
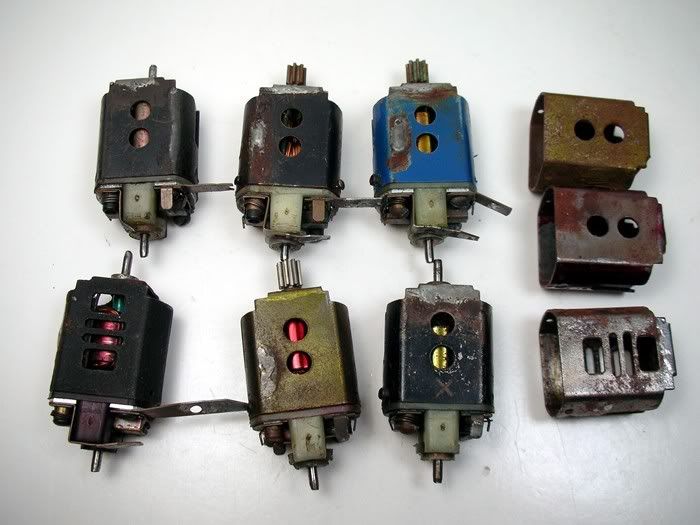
Did you set aside the "non-usable" cans & other parts, or just toss them? Most of what's on the Bay now doesn't look better than your discards in this pair of pictures, so it's getting discouraging trying to build up some of these cars. I may have to settle for "work-alikes" as Rocky Russo described his motor choices to keep his cars operating.
Marcus
Marcus P. Hagen -- see below, my five favorite quotes: applicable to slot cars & life in general.
[ "Everyone is entitled to his own opinion, but not his own facts.". . Daniel Patrick Moynihan ]
[ "Time is the best teacher. Unfortunately, it kills all its students.". . . . . . . . Hector Berlioz ]
[ "There is a very fine line between 'hobby' and 'mental illness." . . . . . . . . . . . Dave Barry ]
[ "Build what you like to build, they are all doomed." . . . . . . . . . . . . . . . . . . . . Prof. Fate ]
[ "The less rules the more fun. Run what you brung." . . . . . . . . . . . . . . . . . . . . . Larry LS ]
#70
dc-65x
-
- Subscriber
-
- 6,979 posts Joined: 14-February 06
Grand Champion Poster
- Gender:Male
- Location:Captain Rick: The only vintage slot car nut in SW Oregon?
Posted 14 March 2019 - 09:57 AM
Hi Marcus,
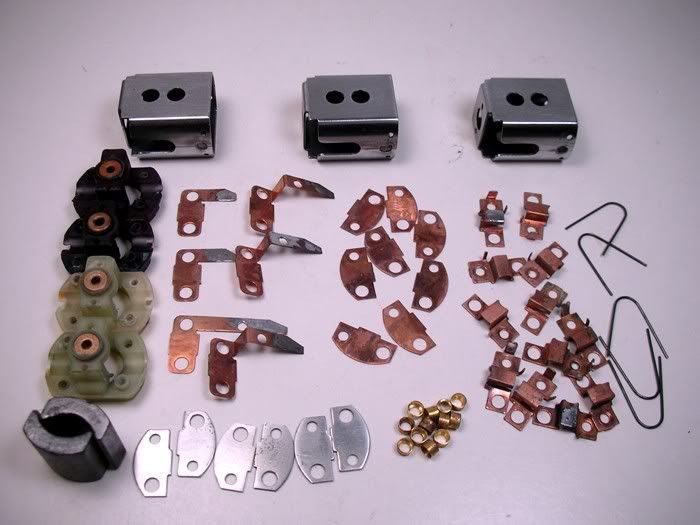
I sold off lots of my extra C-can motors and parts over the last couple of years for cheap.......unfortunately! I even struggled to get $20 for "kits" like this with nice new parts:

I guess it's just a matter of timing. When I was selling my surplus the demand didn't seem to be there. 
- boxerdog likes this
Rick Thigpen
Check out Steve Okeefe's great web site at its new home here at Slotblog:
The Independent Scratchbuilder
There's much more to come...
#71
olescratch
-

- Subscriber
-
- 977 posts Joined: 19-July 13
olescratch
- Gender:Male
- Location:Ravenna, OH
Posted 15 March 2019 - 02:11 PM
Rick, you gotta learn how to hoard better lol!
John Stewart
#72
Bill from NH
-
- Full Member
-
- 14,762 posts Joined: 02-August 07
Age scrubs away speed!
- Gender:Male
- Location:New Boston, NH
Posted 15 March 2019 - 03:57 PM
John, what Rick has that we don't know about would probably surprise us.
- olescratch likes this
Bill Fernald
I intend to live forever! So far, so good.
I intend to live forever! So far, so good.


