Jump to content


Photo

How to build slot car tracks


  • Please log in to reply
405 replies to this topic

#401 Bigdogbro1

Bigdogbro1

    Rookie Keyboard Racer

  • Full Member
  • Pip
  • 46 posts
  • Joined: 23-April 24
  • Gender:Male
  • Location:near Hell, MI

Posted 24 April 2024 - 11:54 AM

I have a quetion about Steve Ogilvie's method of joint building.


Posted 13 April 2016 - 06:02 PM

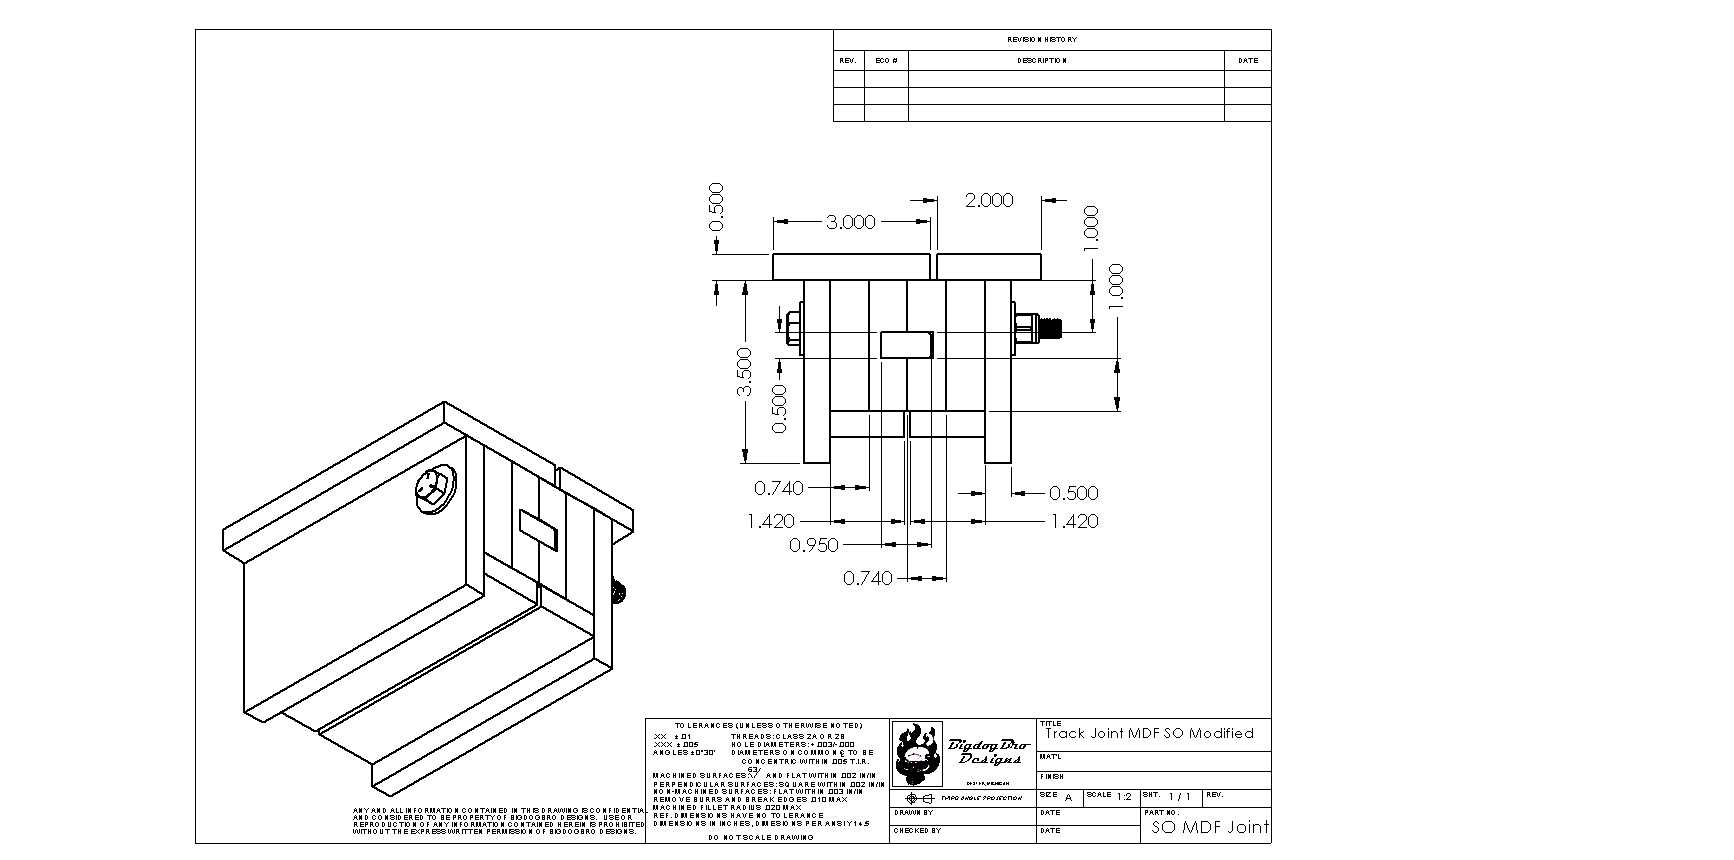
To build these joints , you need a table saw , dado blade for 1/2" slots , a motorised thickness plainer and some clamps .

Start with a straight 2X4 and cut it to the width of your track plus 1/4" .

Cut the height down to 3" .Use a table saw with a long fence and cut a little off the top and bottom to make it as straight as possible .

Put your dado blade in the saw , set at 1/2 " thickness . You can't use the guard when you are dadoing .This is dangerous especially for someone not used to table saws .As a safer alternative , a router table with a 1/2" two flute carbide bit can be used .

Practice cutting a slot on some scrap until you are happy with the fit of the tongue .Cut a 1/2" deep slot down the middle  of the 3" side of each 2X3 .Cut with  the straightest side against the fence of the saw or router table .

Check your cuts with a piece of 1/2 " MDF from the sheets you are going to use for your track .Usually you use track off cuts for this .

The tongue is going to be 1/2 " by 7/8" .With the 1/2" slot lightly beveled the tongue should fit very snug but not to the point that is spreading the wood .

If you need to , run the 2 x 3 's through the cutter again .

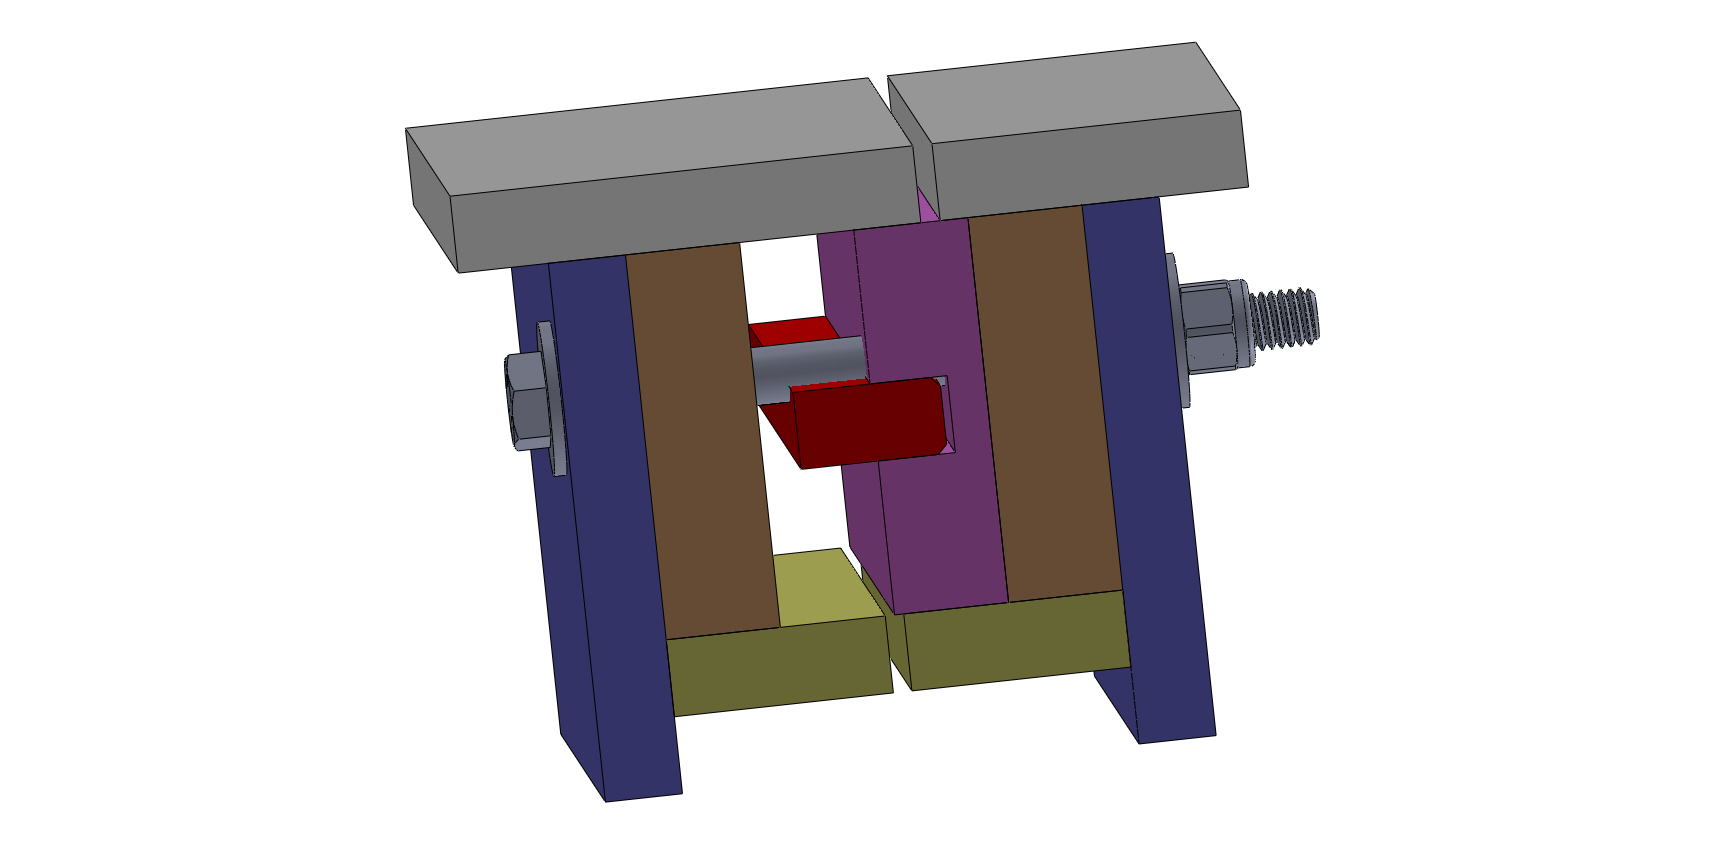
Run some glue in the bottom of one of the slots and push the tongue in .Tap it with a block and hammer to get it all the way in .

Wipe off all excess glue . Let the glue dry overnight .

Cut lengths of 3 1/2" MDF to the same length as your joints .

Push your 2X3's together and put the smoothest top down on a flat surface .

Glue the MDF sides on flush with the flat surface .

Clamp them all together .A Workmate style clamping bench works well for this .

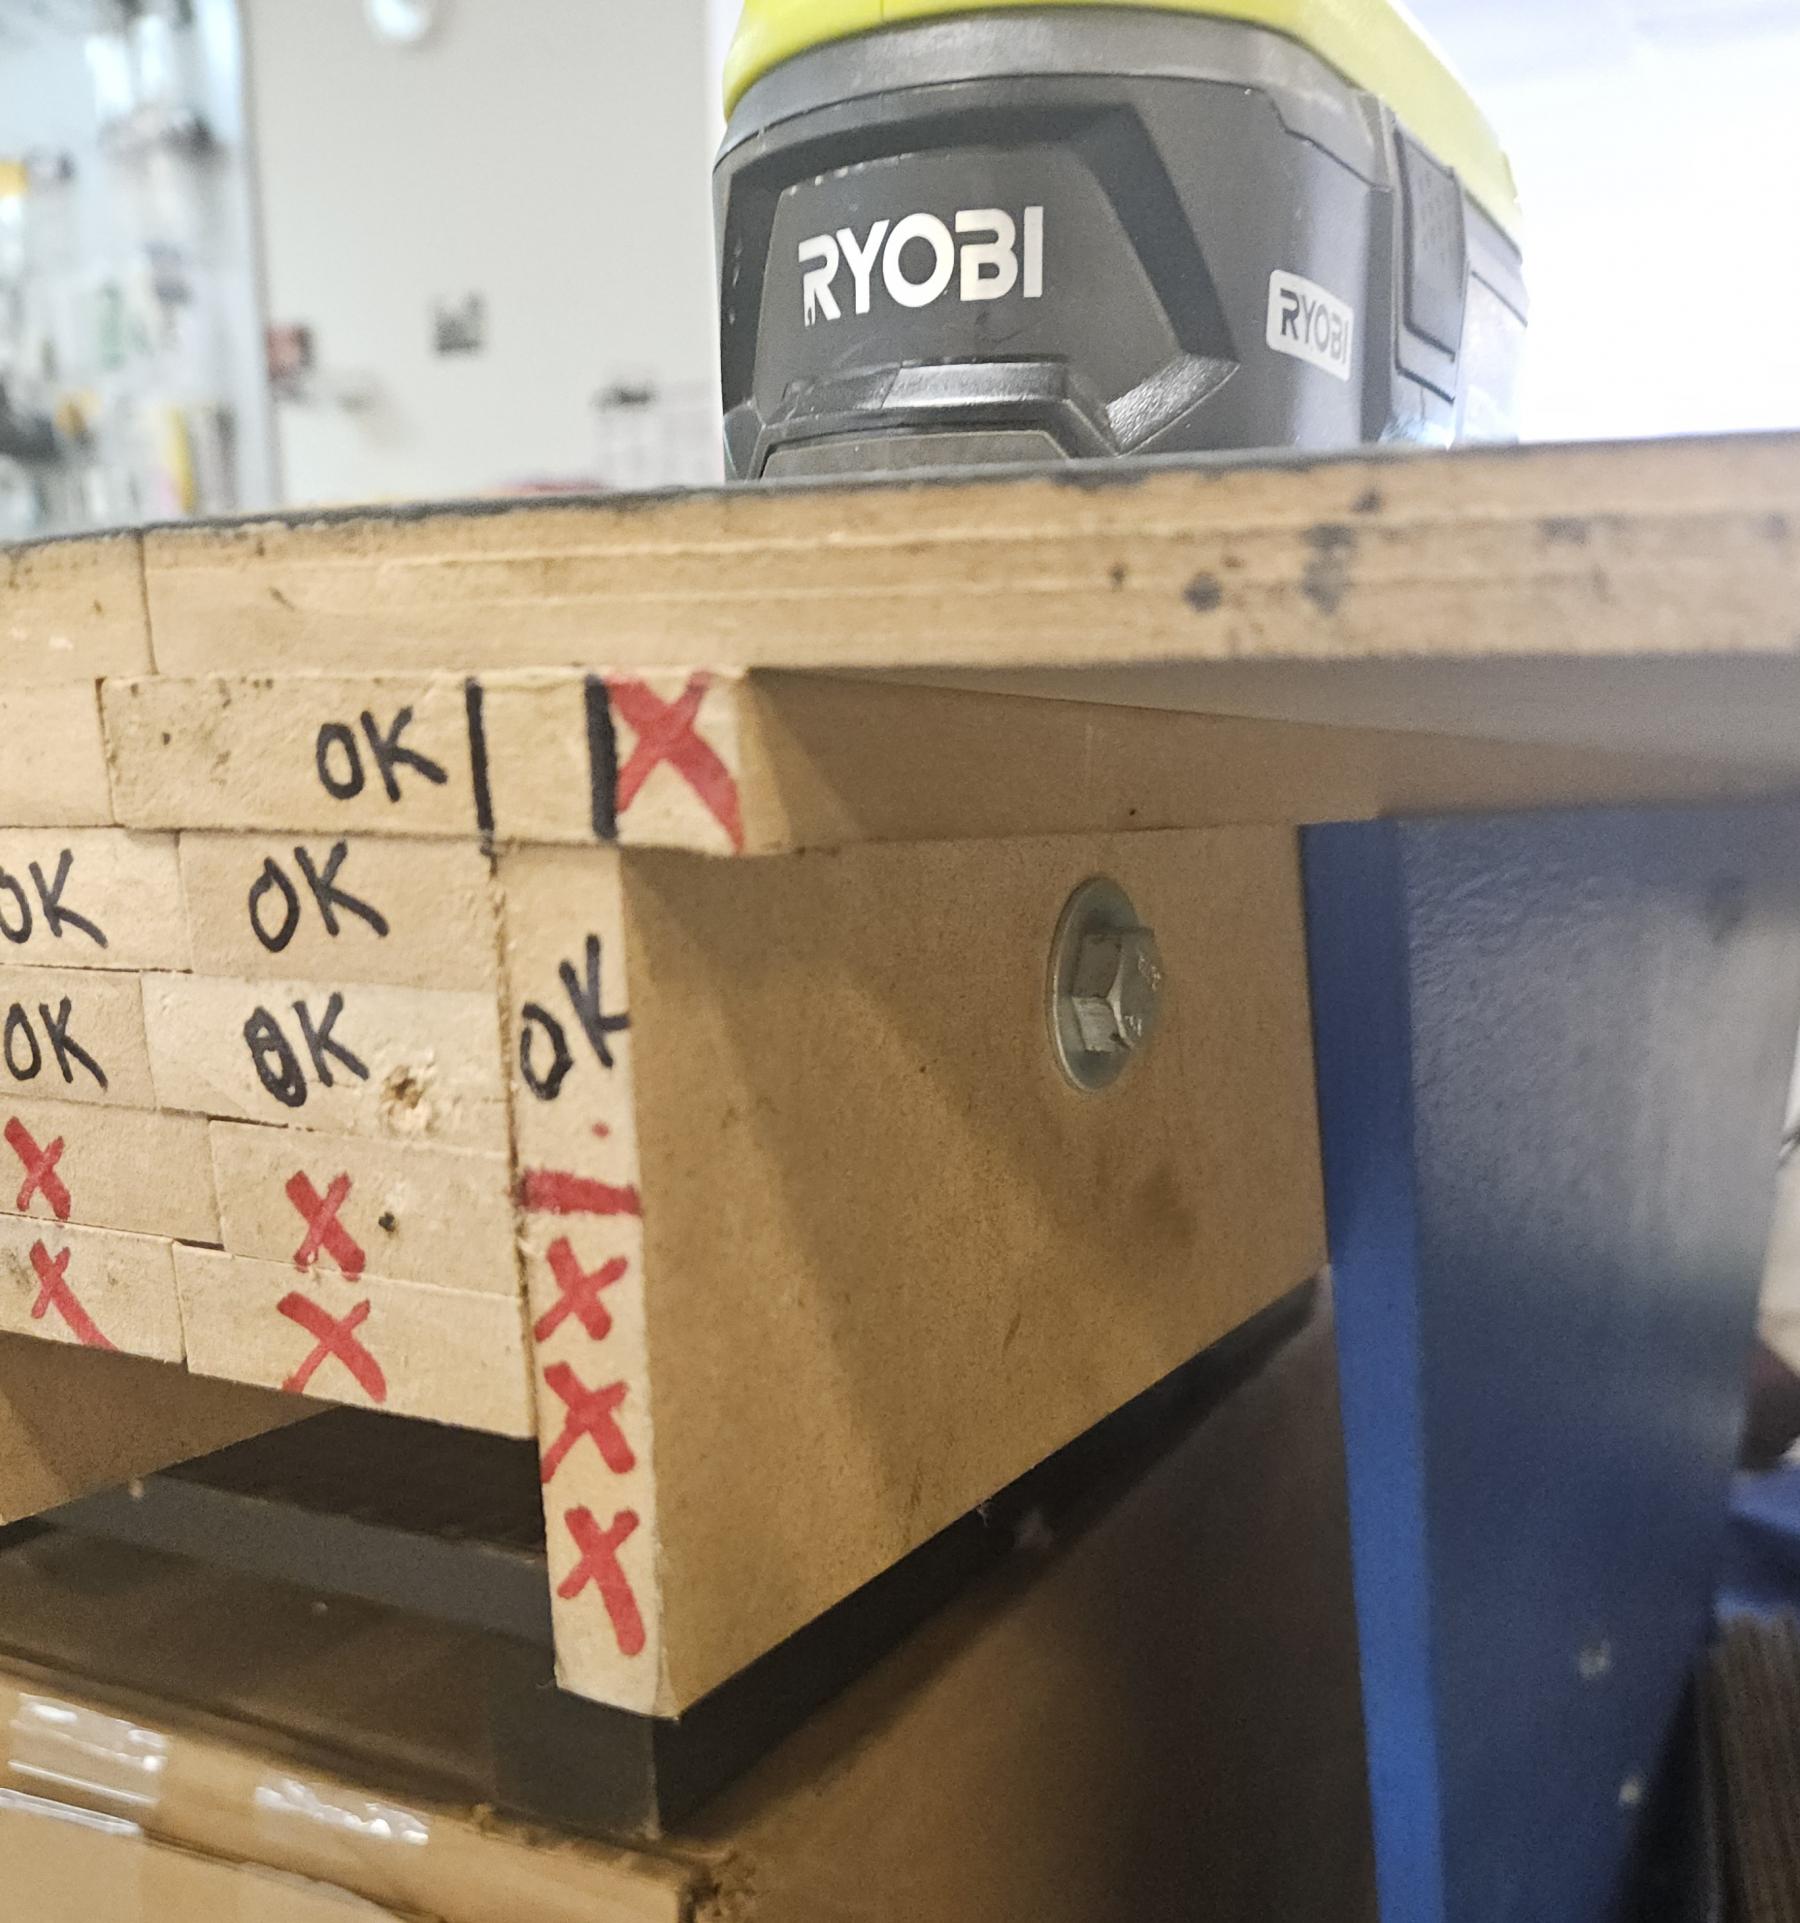
Drill  three 3/8" holes for the 5 1/2" long blots that are going to hold this together  One at each end and one in the middle .Use your slot marker to avoid putting a bolt directly under a slot .Tighten the bolt to around 30 ft lbs .Not critical , you just don't want to crush the MDF .

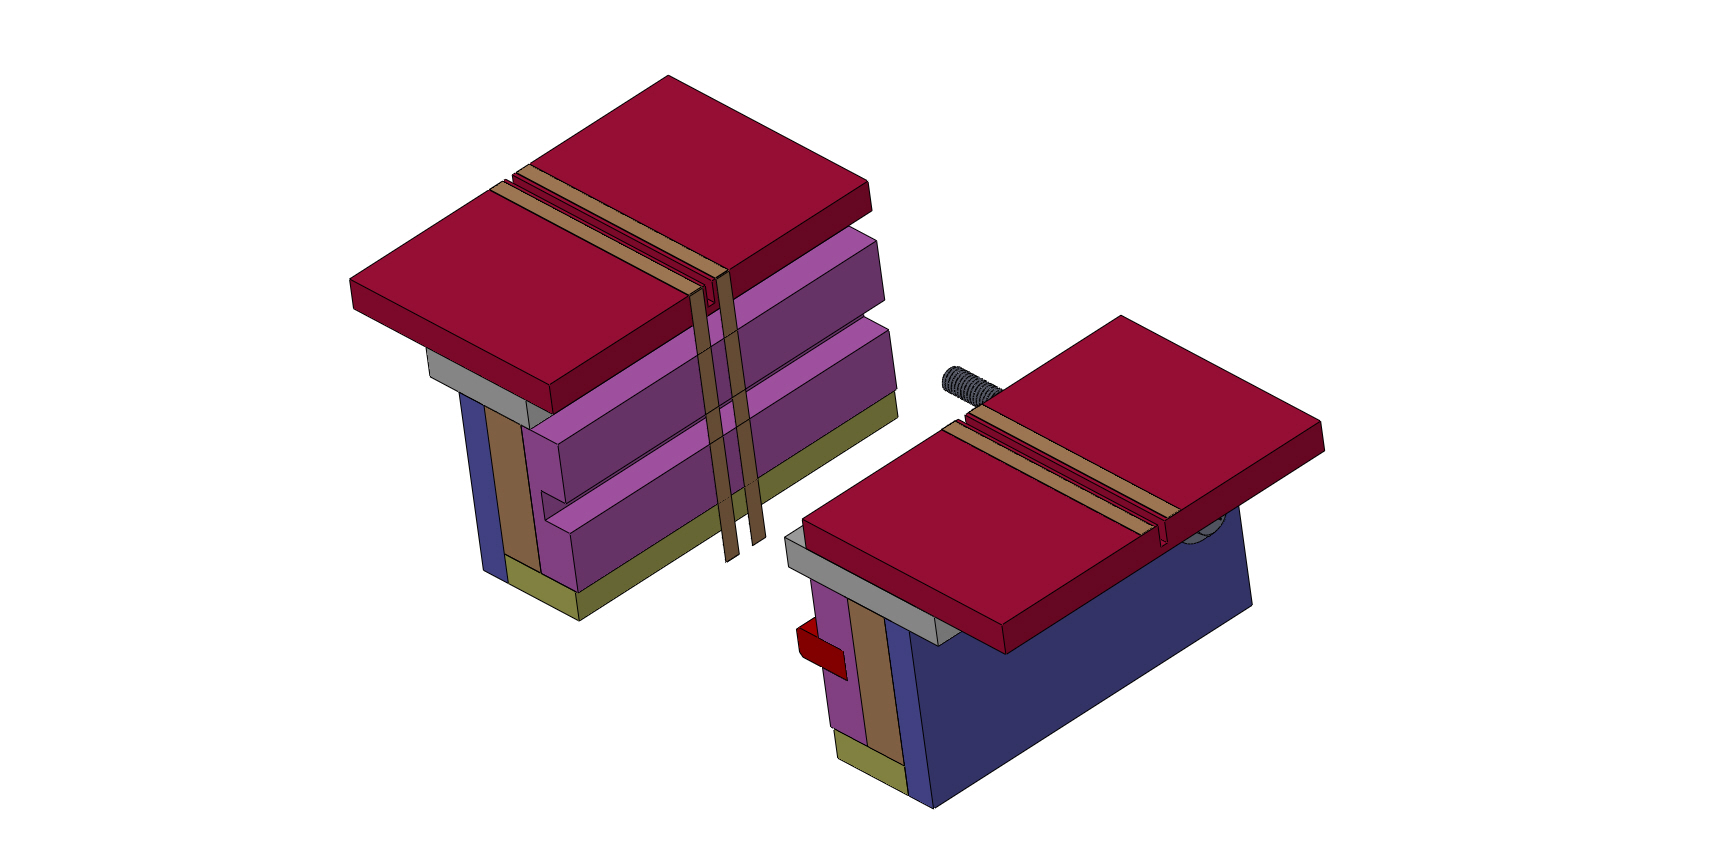
Let dry for an hour . Run it through the thicknes plainer with the overhanging MDF on the bottom rollers of the plainer to have a perfect surface to glue your track pieces to.

Would the planer cutter not hit the staples or brads.  Not sure which surface Steve is actually planing.  Is it the top joint overlap that gets glued to the underside of the track MDF.  Any help here would be appreciated.  Thanks.


Update:  I think Steve is planing the top of the side plates and the top of the inner T&G block before adding (stapling) on the top 1/2" MDF plates for the underside track glue.  Is he using staples or brad nails and what size?


 The overhanging MDF I think what Steve speaks of are the side outer MDF plates that extend down past the T&G block.


Attached Images

  • SO Track Joint MDF lam.JPG
  • Steve Ogilvie Track Joint MDF lam.JPG

Rob Armbruster


#402 MSwiss

MSwiss

    Grand Champion Poster

  • IRRA National Director
  • PipPipPipPipPipPipPipPip
  • 25,712 posts
  • Joined: 16-April 06
  • Gender:Male

Posted 24 April 2024 - 01:11 PM

Steve is kind of an all the way On, all the way Off, guy, here on Slotblog. 


I used Steve's triple tongue and groove design on both of my road courses and they have worked great for me through my 2 moves in 2010 and 2014.


It's what he had used on the test track he built for my old employer, Koford Engineering. 


Not sure why he went with something that different on the track he built in that Slotblog thread.


The tongue and groove ones were fairly straightforward to construct and didn't require a planer.


In retrospect,  if I built another road course, I would eliminate 2 layers of 1/2" MDF and go with a double tongue and groove as shown in the pic, just to eliminate some of the weight.


My removable soft walls affords me the ability to show you the construction.


With eliminating 2 layers, it would also require moving the 3/8" bolts up one board. 


20240424_132609.jpg


20240424_132629.jpg


  • Rob Voska likes this

Mike Swiss
 
Inventor of the Low CG guide flag 4/20/18
IRRA® Components Committee Chairman
Five-time USRA National Champion (two G7, one G27, two G7 Senior)
Two-time G7 World Champion (1988, 1990), eight G7 main appearances
Eight-time G7 King track single lap world record holder

17B West Ogden Ave., Westmont, IL 60559, (708) 203-8003, mikeswiss86@hotmail.com (also my PayPal address)

Note: Send all USPS packages and mail to: 692 Citadel Drive, Westmont, Illinois 60559


#403 Bigdogbro1

Bigdogbro1

    Rookie Keyboard Racer

  • Full Member
  • Pip
  • 46 posts
  • Joined: 23-April 24
  • Gender:Male
  • Location:near Hell, MI

Posted 24 April 2024 - 06:34 PM

The joint I have drawn up is slimmed down to what I had seen Steve's MDF version.  Double layered 3/4" MDF on the sides with 1/2" MDF side plates.  Thought that for a four lane track it should be robust enough.  Any thoughts on this joint?  Thanks for your pics and input.

Steve is kind of an all the way On, all the way Off, guy, here on Slotblog. 


I used Steve's triple tongue and groove design on both of my road courses and they have worked great for me through my 2 moves in 2010 and 2014.


It's what he had used on the test track he built for my old employer, Koford Engineering. 


Not sure why he went with something that different on the track he built in that Slotblog thread.


The tongue and groove ones were fairly straightforward to construct and didn't require a planer.


In retrospect,  if I built another road course, I would eliminate 2 layers of 1/2" MDF and go with a double tongue and groove as shown in the pic, just to eliminate some of the weight.


My removable soft walls affords me the ability to show you the construction.


With eliminating 2 layers, it would also require moving the 3/8" bolts up one board. 


attachicon.gif 20240424_132609.jpg


attachicon.gif 20240424_132629.jpg


Rob Armbruster

#404 MSwiss

MSwiss

    Grand Champion Poster

  • IRRA National Director
  • PipPipPipPipPipPipPipPip
  • 25,712 posts
  • Joined: 16-April 06
  • Gender:Male

Posted 25 April 2024 - 10:54 AM

I'm not a fan of your joint.


IMO, too bulky for a 4 lane track, too many pieces, and using a heavier, different thickness, MDF.


I built my drag strip using 3/4" MDF and I figured out early on, if I wanted to work by myself, I couldn't use 4' x 8' sheets.


It's too heavy for one person to safely handle.


I wound up using 2' × 4'  "handy panels" from Menards.


That's not to say you couldn't do the same thing, but you'll already have scrap 1/2" MDF.


I would make something like my abbreviated "OK" joint in the picture.


8 pcs., all the same thickness.


  • SpeedyNH likes this

Mike Swiss
 
Inventor of the Low CG guide flag 4/20/18
IRRA® Components Committee Chairman
Five-time USRA National Champion (two G7, one G27, two G7 Senior)
Two-time G7 World Champion (1988, 1990), eight G7 main appearances
Eight-time G7 King track single lap world record holder

17B West Ogden Ave., Westmont, IL 60559, (708) 203-8003, mikeswiss86@hotmail.com (also my PayPal address)

Note: Send all USPS packages and mail to: 692 Citadel Drive, Westmont, Illinois 60559


#405 Bigdogbro1

Bigdogbro1

    Rookie Keyboard Racer

  • Full Member
  • Pip
  • 46 posts
  • Joined: 23-April 24
  • Gender:Male
  • Location:near Hell, MI

Posted 25 April 2024 - 03:33 PM

Thanks Mike,


Refining the joint somewhat.  


1/4" copper adhesive tape 1.0 mills thick / 1oz can carry about 8.5 amps 10 degree C rise. 


Venture 1mil 7/32" copper tape looks popular for tracks.  

https://www.hollande...il_p_18248.html


Doesn't sound like enough power.  I will have 13 or so track joints that could be used for more power taps to the slot.


May need to go with braid and higher cost to get better performance.   Modifiy the track slot and joint for the braid. 


Any input from you guys....

Attached Images

  • Steve Ogilvie Track Joint MDF lam.JPG
  • Steve Ogilvie Track Joint MDF lam2.JPG
  • Steve Ogilvie Track Joint MDF lam3.JPG

Rob Armbruster

#406 Steve Ogilvie

Steve Ogilvie

    Race Leader

  • Subscriber
  • PipPipPipPipPip
  • 622 posts
  • Joined: 17-November 14
  • Gender:Male
  • Location:Kincardine, Ontario, Canada

Posted 02 May 2024 - 12:18 PM

On page 13 of this thread you can see how I built the joints for Ernie Mossetti's newest track. The only difference between that joint and my last most common commercial track style joint was the bottom plate went right across the bottom and was offset cut  and 1/2" thick. We also made the blocks wide enough that we dispensed with the side plates. We cut the pieces, dadoed the slots, glued in the tongues, oiled the inner faces, bolted them together with 4  3/8" bolts and planed top and bottom with a thicknes planer. Then we put on the strip of tape top and bottom so the top and bottom pieces would not glue the whole assembly together, Both the top and bottoms were then glued and stapled down to the planed blocks and stacked to dry. The next day we would cut the slots in the top and bottoms, give a few swipes with a piece of wood wrapped in sand paper to knock the little bumps off from the staples, bevel the top cut slot with the sanding block. Then take them apart to make sure they would, bolt them back together and attach to the waiting track pieces.We developed methods over the years to the point where we cut everything with very tight tolerances and the planing was minimal.

    The reason I stopped making the triple T&G joint was occasionally a small dip would form at the joint on tighter banked corners. And they were too much work for little gain.All our tracks were taken apart at our shop and put back together at the customer's and we never had any touble with the joints. And they were two T&G joints plus a lap joint so there was no possibility of shifting.

    As far as dado cutting on a table saw yes you can't do it with a guard on. But your work is the guard, just make sure that your hands stay safely in from the ends and keep them there as you slide the piece over the blade. And yes, I still have all my fingers.

    I usually check this thread once a week for new posts but we were on holidays and I missed these posts. Thanks for the comments.


  • SpeedyNH, Paul Menkens and Dfsmith001 like this


Electric Dreams Online Shop