

PM Bryan Warmack

1967 Gurney Indy Eagle 1/24 build
Started by
Pablo
, Oct 08 2016 01:44 PM
104 replies to this topic
#76

Pablo
-
- Administrator
-

- 18,454 posts Joined: 20-February 06
Builder
- Gender:Male
- Location:Cleveland, Tennessee
Posted 04 November 2016 - 01:23 PM
Paul Wolcott
#77
Pablo
-
- Administrator
-
- 18,454 posts Joined: 20-February 06
Builder
- Gender:Male
- Location:Cleveland, Tennessee
Posted 05 November 2016 - 11:55 PM
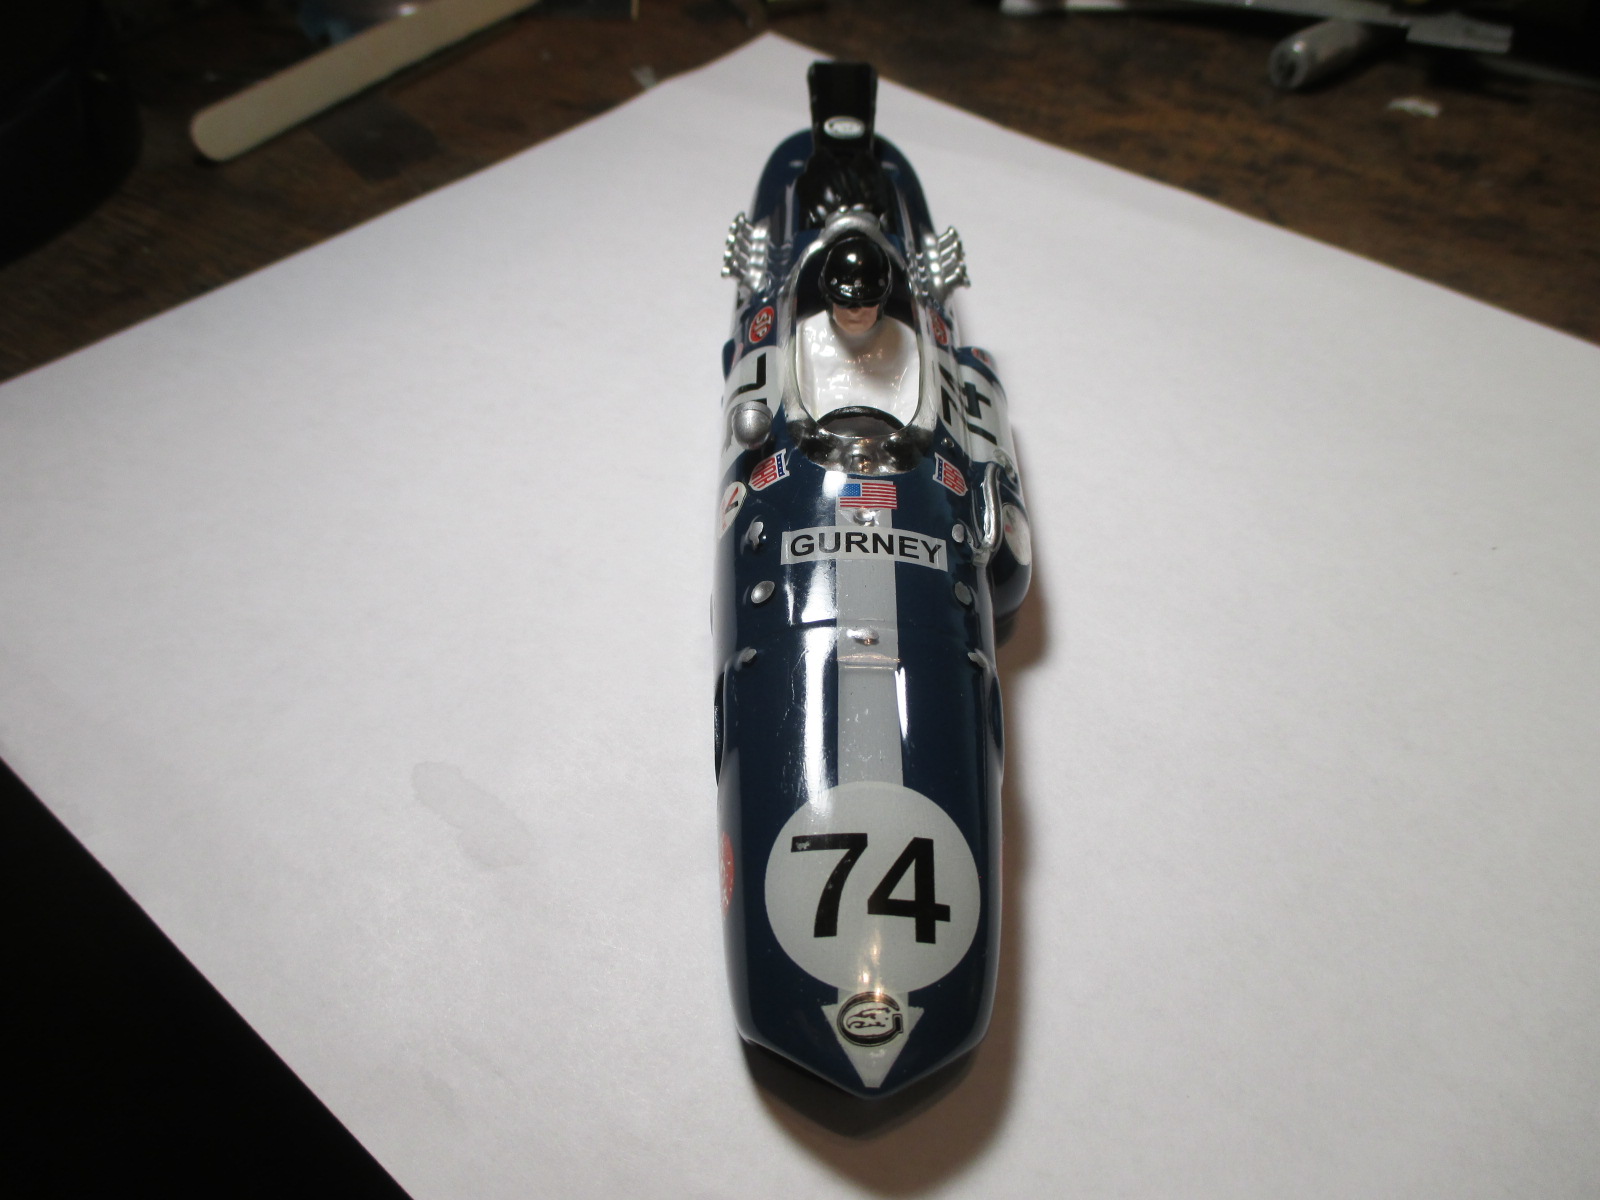
On the real car, I'm guessing the platform type device atop the exhaust "stingers" was an attempt at air control.
I placed an Eagle waterslide decal on a piece of painted Lexan.
"Hose clamps" on the stingers are thin strips of Pactra silver trim tape.

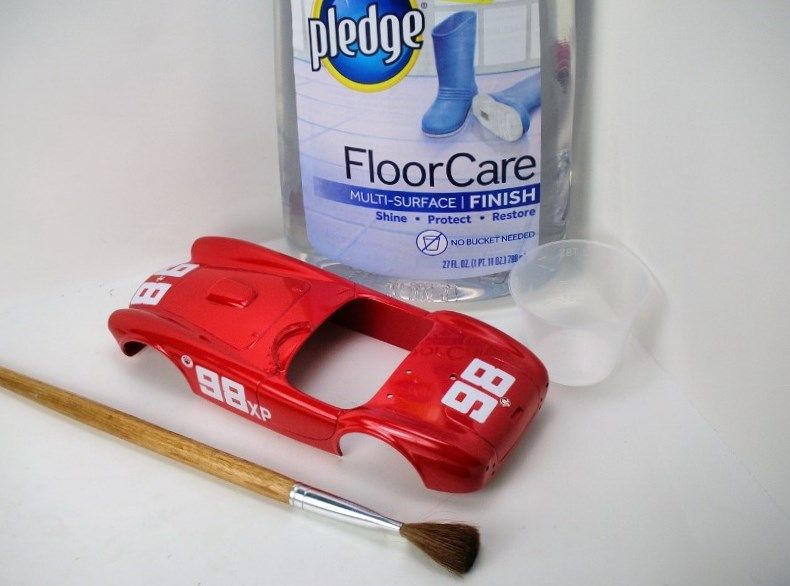
At this point, body is 100% done so I applied a coat of Mop N Glo to shine, protect, and seal
- slotbaker and Jencar17 like this
Paul Wolcott
#78
Bill from NH
-

- Full Member
-
- 14,782 posts Joined: 02-August 07
Age scrubs away speed!
- Gender:Male
- Location:New Boston, NH
Posted 06 November 2016 - 08:17 AM
Is Mop-N-Glo an acrylic wax? I picked up a bottle of LA's Mop N Shine at Dollartree. It was recommended but several west coast model car builders.
Bill Fernald
I intend to live forever! So far, so good.
I intend to live forever! So far, so good.
#79
Pablo
-
- Administrator
-
- 18,454 posts Joined: 20-February 06
Builder
- Gender:Male
- Location:Cleveland, Tennessee
Posted 06 November 2016 - 11:49 AM
I assume it's acrylic but it doesn't say on the bottle. My bottle is several years old and this formula probably isn't even sold any more.
In tests with new "Future" (it has recently changed in formula also) the ol' Mop N Glo outperforms it. On slot car bodies, anyway.
Floors may be a different story 
Paul Wolcott
#80
MattD
-

- Full Member
-
- 3,561 posts Joined: 13-August 11
Posting Leader
- Gender:Male
- Location:IN
Posted 06 November 2016 - 01:48 PM
The old "Future" is now Pledge in a somewhat weaker formula. It can be found at Ace hardware stores. I've used it, but still prefer either clear lacquer or Rustoleum clear enamel, which actually dries hard and completely in a day.
Matt Bishop
#81
Pablo
-
- Administrator
-
- 18,454 posts Joined: 20-February 06
Builder
- Gender:Male
- Location:Cleveland, Tennessee
Posted 07 November 2016 - 09:58 AM
Last step - inserts - probably the biggest challenge of the build.
After trying some paint experiments with the Pattos, I doubt I'll end up using them.
I did, however, find a good method to trim them to size in an almost perfect circle - Red Valantine suggested it.
Even though I'll probably not use the Pattos this time, I'll show you Red's idea.
Find a hub with an OD slightly bigger than the ID you need.

Attach an axle, chuck it up to your poor man's lathe, spin it up and stick a spinning Dremel sanding arbor inside it to remove material to sharpen the end.
Place it against the insert over a surface that won't dull the edge much, like wood. Smack it with a hammer a couple three times

Comes out like a round cookie. It can be made even better with some sandpaper. Hub will probably need a sharpening touch up before doing the next one.

Hoping the mailman brings me some rare and unavailable BWA Halibrands today 
- Jencar17 and Tex like this
Paul Wolcott
#82
SlotStox#53
-

- Full Member
-
- 4,084 posts Joined: 13-March 13
Posting Leader
- Gender:Male
- Location:TX
Posted 07 November 2016 - 10:10 AM
How simple is that?  Great idea from Red, noted for future insert issues
Great idea from Red, noted for future insert issues
#83
Bill from NH
-
- Full Member
-
- 14,782 posts Joined: 02-August 07
Age scrubs away speed!
- Gender:Male
- Location:New Boston, NH
Posted 07 November 2016 - 10:40 AM
The insert's resin didn't crack when you tried this method. I've got a set of Chinese arch punches that might work too.
Bill Fernald
I intend to live forever! So far, so good.
I intend to live forever! So far, so good.
#84
Pablo
-
- Administrator
-
- 18,454 posts Joined: 20-February 06
Builder
- Gender:Male
- Location:Cleveland, Tennessee
Posted 07 November 2016 - 11:04 AM
There is no resin, just PETG.
Paul Wolcott
#85
Bill from NH
-
- Full Member
-
- 14,782 posts Joined: 02-August 07
Age scrubs away speed!
- Gender:Male
- Location:New Boston, NH
Posted 07 November 2016 - 01:58 PM
I wasn't aware anyone was making wheel insert from PETG. I don't use them, but was familiar with resin ones. This must be Patto's,since his bodies are PETG.
When you used the Mop N Glo, how did you apply it? Did you airbrush it, dip the body in it, or brush it on. I've read of Future being successfully applied using all three methods by 1/32 guys. It's pretty much self-leveling, so application means isn't that important.
Bill Fernald
I intend to live forever! So far, so good.
I intend to live forever! So far, so good.
#86
Pablo
-
- Administrator
-
- 18,454 posts Joined: 20-February 06
Builder
- Gender:Male
- Location:Cleveland, Tennessee
Posted 07 November 2016 - 02:15 PM

Paul Wolcott
#87
dc-65x
-

- Subscriber
-
- 6,985 posts Joined: 14-February 06
Grand Champion Poster
- Gender:Male
- Location:Captain Rick: The only vintage slot car nut in SW Oregon?
Posted 07 November 2016 - 05:55 PM
Your project is looking great Pablo. Thanks for the tip on the wheel inserts too. 
Bill,
Here's my limited experience with Future/Pledge wax. It worked great for me on this one:
I tired something to help my crappy paint and decal job look better and it worked beyond my wildest dreams:
A brushed on coat of floor wax worked miracles. The paint took on a high gloss. The decals blended much better into the paint and the cast resin windscreen became crystal clear...........amazing!
- Jencar17 likes this
Rick Thigpen
Check out Steve Okeefe's great web site at its new home here at Slotblog:
The Independent Scratchbuilder
There's much more to come...
#88
Bill from NH
-
- Full Member
-
- 14,782 posts Joined: 02-August 07
Age scrubs away speed!
- Gender:Male
- Location:New Boston, NH
Posted 07 November 2016 - 07:34 PM
I would say it worked okay!
Bill Fernald
I intend to live forever! So far, so good.
I intend to live forever! So far, so good.
#89
Pablo
-
- Administrator
-
- 18,454 posts Joined: 20-February 06
Builder
- Gender:Male
- Location:Cleveland, Tennessee
Posted 10 November 2016 - 09:49 AM
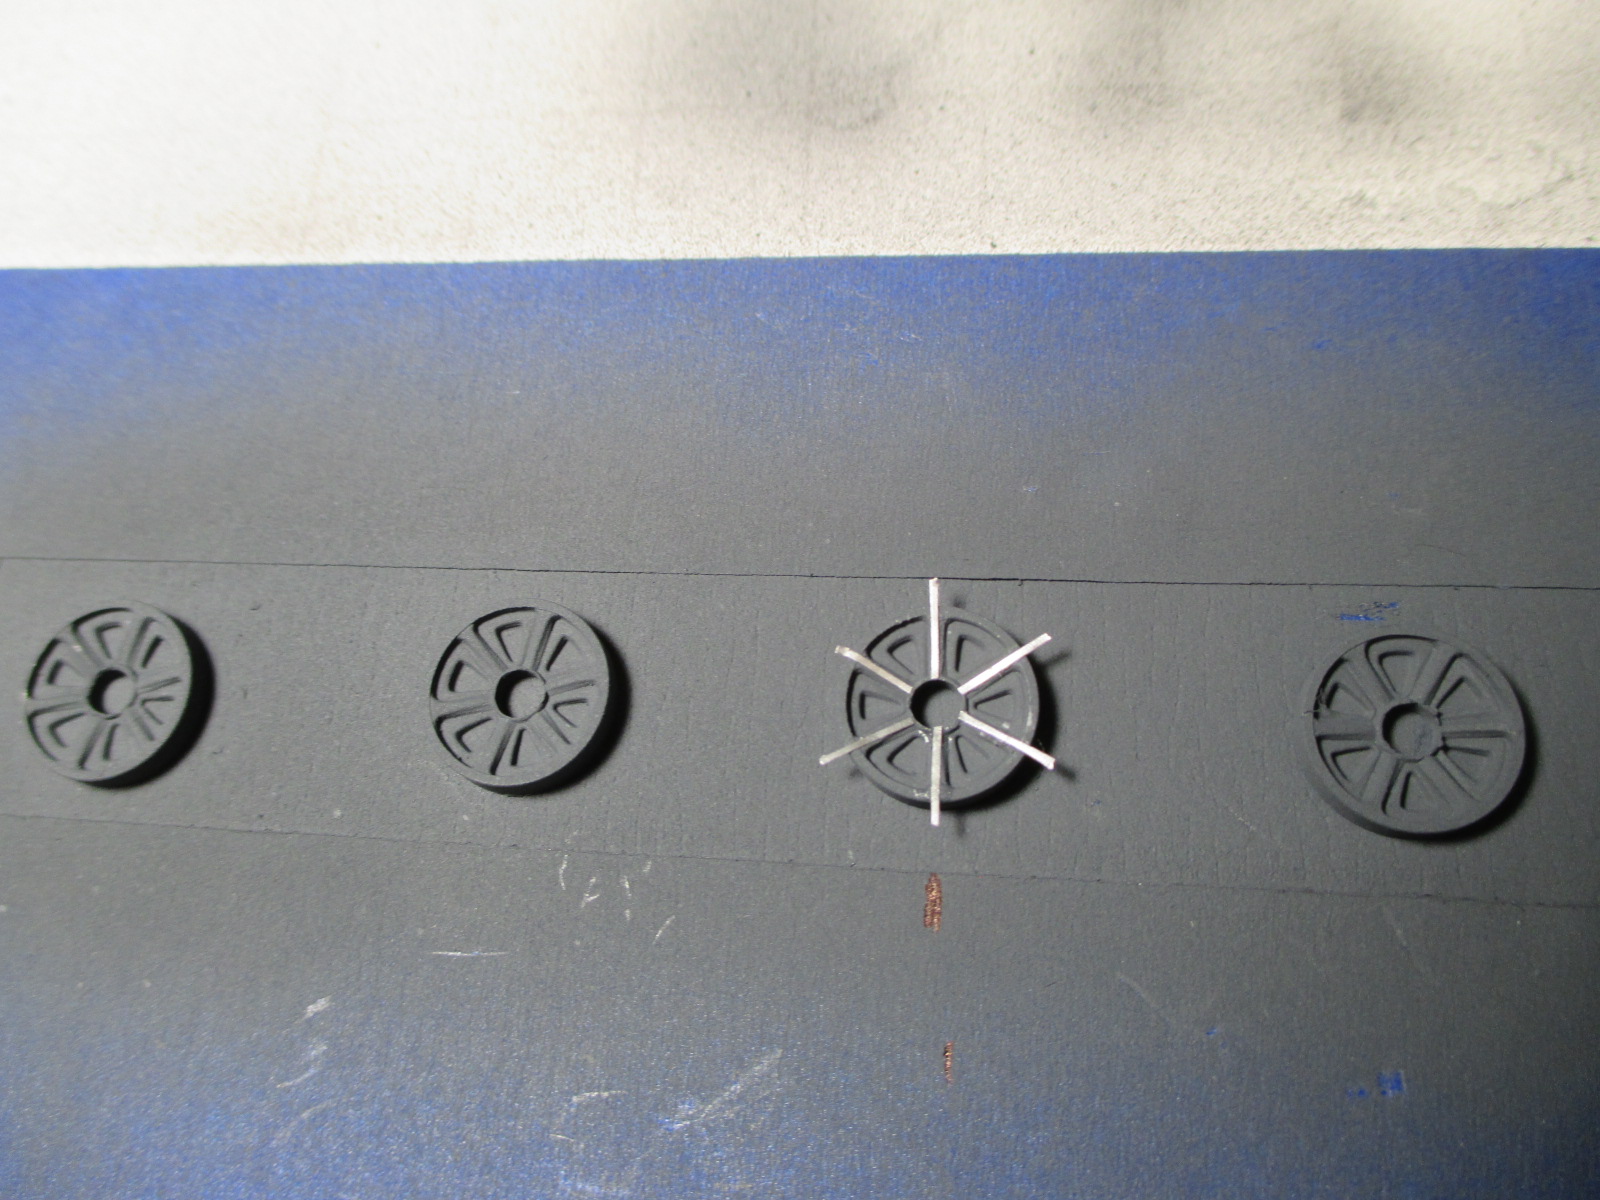
These BWA Halibrand inserts cannot be replaced, so the prudent thing is to experiment with other inserts to perfect my plan.
The left one is the Halibrand, the right a test monkey. I plan to use a 3" threaded axle lightly snugged to the wheels.
Nylon spacers to set the depths, 1/8" holes through the inserts, then knockoffs screwed down onto them, finished with a drop of black paint on the axle ends.

To narrow the knockoffs, I threaded both onto the axle backwards to the point I wanted to stop trimming them.
Then snugged a nut up against them with my vintage wrench
Fed them into the disc sander until it reached the axle ends. Now they are about .065 thickness as opposed to .133 stock.
- Jencar17 likes this
Paul Wolcott
#90
Bill from NH
-
- Full Member
-
- 14,782 posts Joined: 02-August 07
Age scrubs away speed!
- Gender:Male
- Location:New Boston, NH
Posted 10 November 2016 - 10:28 AM
Wheels are looking good. Cox included those those wrenches with all their slot cars. I have a couple I once used. Do as you want, but I would take an impression of those BWA Halibrand inserts so I would have some for future projects, if needed..
Bill Fernald
I intend to live forever! So far, so good.
I intend to live forever! So far, so good.
#91
Pablo
-
- Administrator
-
- 18,454 posts Joined: 20-February 06
Builder
- Gender:Male
- Location:Cleveland, Tennessee
Posted 10 November 2016 - 12:47 PM
Drilling the holes worked fine, I put them in a set of old wheels and just pushed the bit through the hub and insert.
I used .178" long spacers behind the inserts and a pair of brand new Model-Rama 3" axles
Mechanically I think I'm set

- Jencar17 and Tex like this
Paul Wolcott
#92
Pablo
-
- Administrator
-
- 18,454 posts Joined: 20-February 06
Builder
- Gender:Male
- Location:Cleveland, Tennessee
Posted 10 November 2016 - 05:31 PM
I tried to match the color of the wheels in this photo
Testors enamel flat black with some flat white looks pretty close to me. Sprayed with my Iwata Eclipse at about 40 PSI.
I cut (the finest) strips of Pactra silver tape in half to highlight the outer edges
I'm hoping it works out nice
- Jencar17 likes this
Paul Wolcott
#93
n.elmholt
-

- Moderator
-
- 1,114 posts Joined: 06-May 06
Checkered Flag in Hand
- Gender:Male
- Location:Denmark
Posted 10 November 2016 - 06:58 PM
Try Testor/ModelMaster Metalizer exhaust colour - you can buff the surface to create dept - highly recommendable range of colours for engine, exhaust etc
Niels, DK
http://www.testors.c...r-paint/bottles
Niels Elmholt Christensen, DK
Former Neckcheese Racing
www.racecars.dk - my Picasa Photos
#94
dc-65x
-
- Subscriber
-
- 6,985 posts Joined: 14-February 06
Grand Champion Poster
- Gender:Male
- Location:Captain Rick: The only vintage slot car nut in SW Oregon?
Posted 10 November 2016 - 08:33 PM
Looking good Pablo 
Rick Thigpen
Check out Steve Okeefe's great web site at its new home here at Slotblog:
The Independent Scratchbuilder
There's much more to come...
#95
Pablo
-
- Administrator
-
- 18,454 posts Joined: 20-February 06
Builder
- Gender:Male
- Location:Cleveland, Tennessee
Posted 11 November 2016 - 09:40 PM
Thank you, gentlemen I sprayed a second coat of enamel on the inserts today

and experimented with the Pactra silver tape. I tried several different products, and it looks like the tape by itself with no coating will work fine.
- Jencar17 and Bud Greene like this
Paul Wolcott
#96
Pablo
-
- Administrator
-
- 18,454 posts Joined: 20-February 06
Builder
- Gender:Male
- Location:Cleveland, Tennessee
Posted 12 November 2016 - 10:00 PM
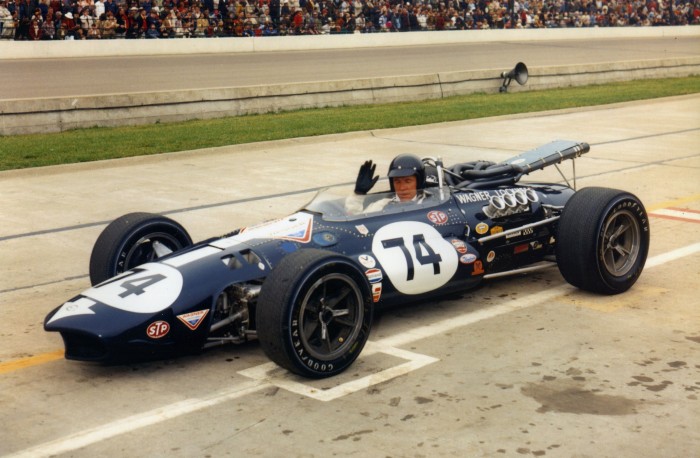
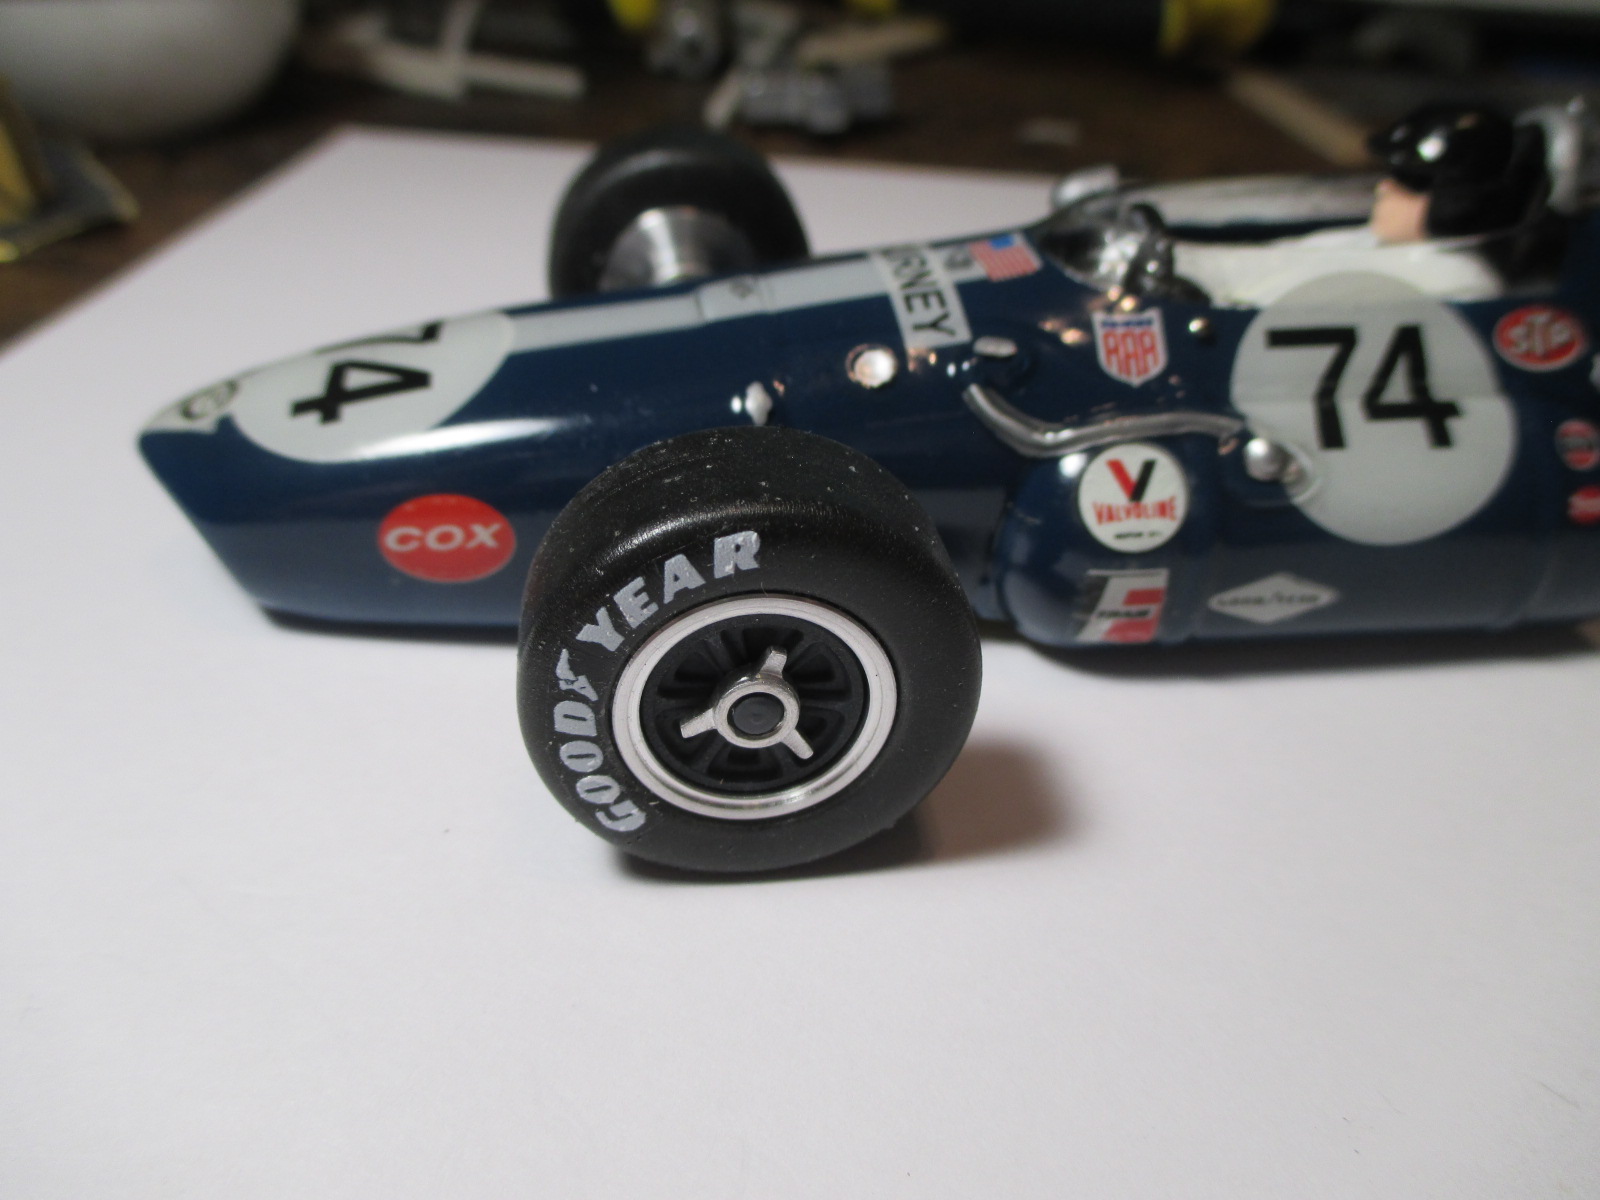
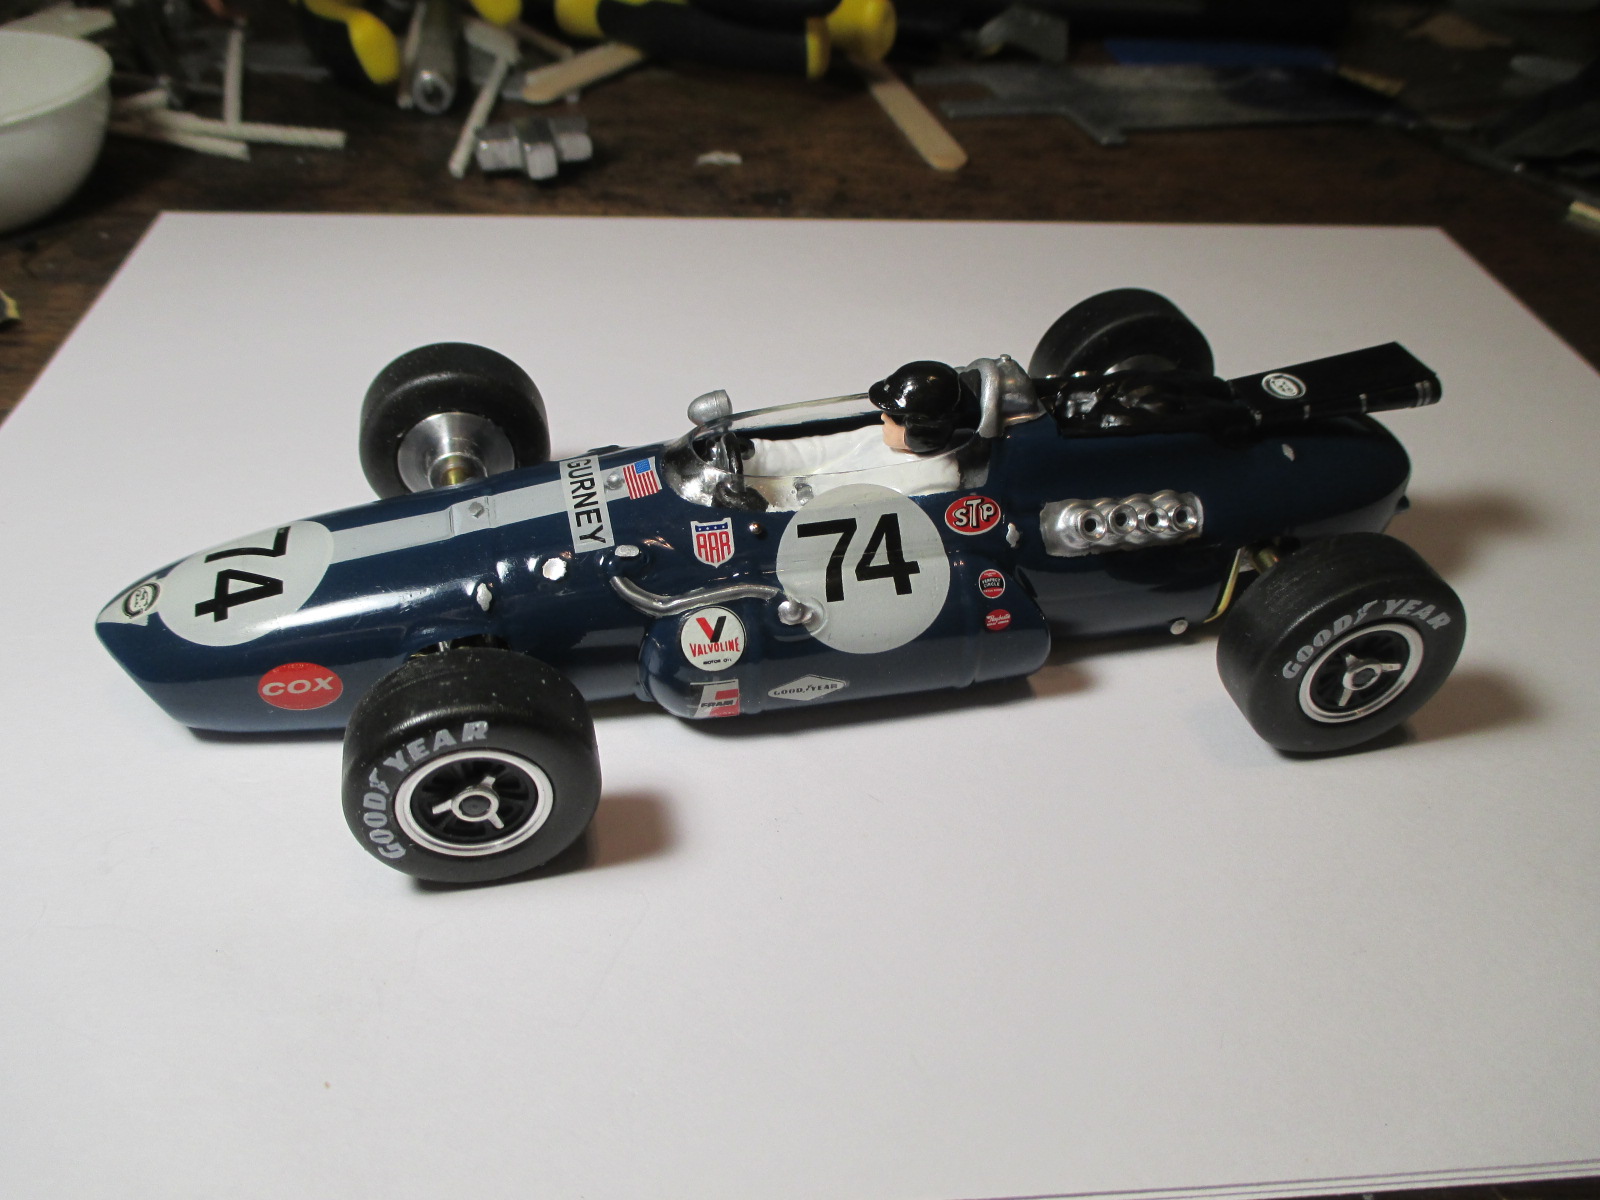
Dan Gurney's 1967 Indianapolis 500 car:

Pablo Gurney replica car:

- Jencar17 and n.elmholt like this
Paul Wolcott
#97
Bill from NH
-
- Full Member
-
- 14,782 posts Joined: 02-August 07
Age scrubs away speed!
- Gender:Male
- Location:New Boston, NH
Posted 13 November 2016 - 12:42 AM
The car came out nice! The wheel inserts really set it off. do you recall where the Goodyear tire decals came from? One suggestion I might make, is to put some sort of patina on the brass axle tubes where they stick out from the body.The shiny brass makes it look like the new built, which of course it is.
Bill Fernald
I intend to live forever! So far, so good.
I intend to live forever! So far, so good.
#98
Pablo
-
- Administrator
-
- 18,454 posts Joined: 20-February 06
Builder
- Gender:Male
- Location:Cleveland, Tennessee
Posted 13 November 2016 - 09:20 AM
Thanks Bill
The tire decals are waterslides from Pattos - I remember those because they were a special order just for this car
He makes them in stickers also, but the Ortmanns "liked" the waterslides better.

I got so wound up with the wheels and body.........

....that I almost forgot it has a chassis underneath

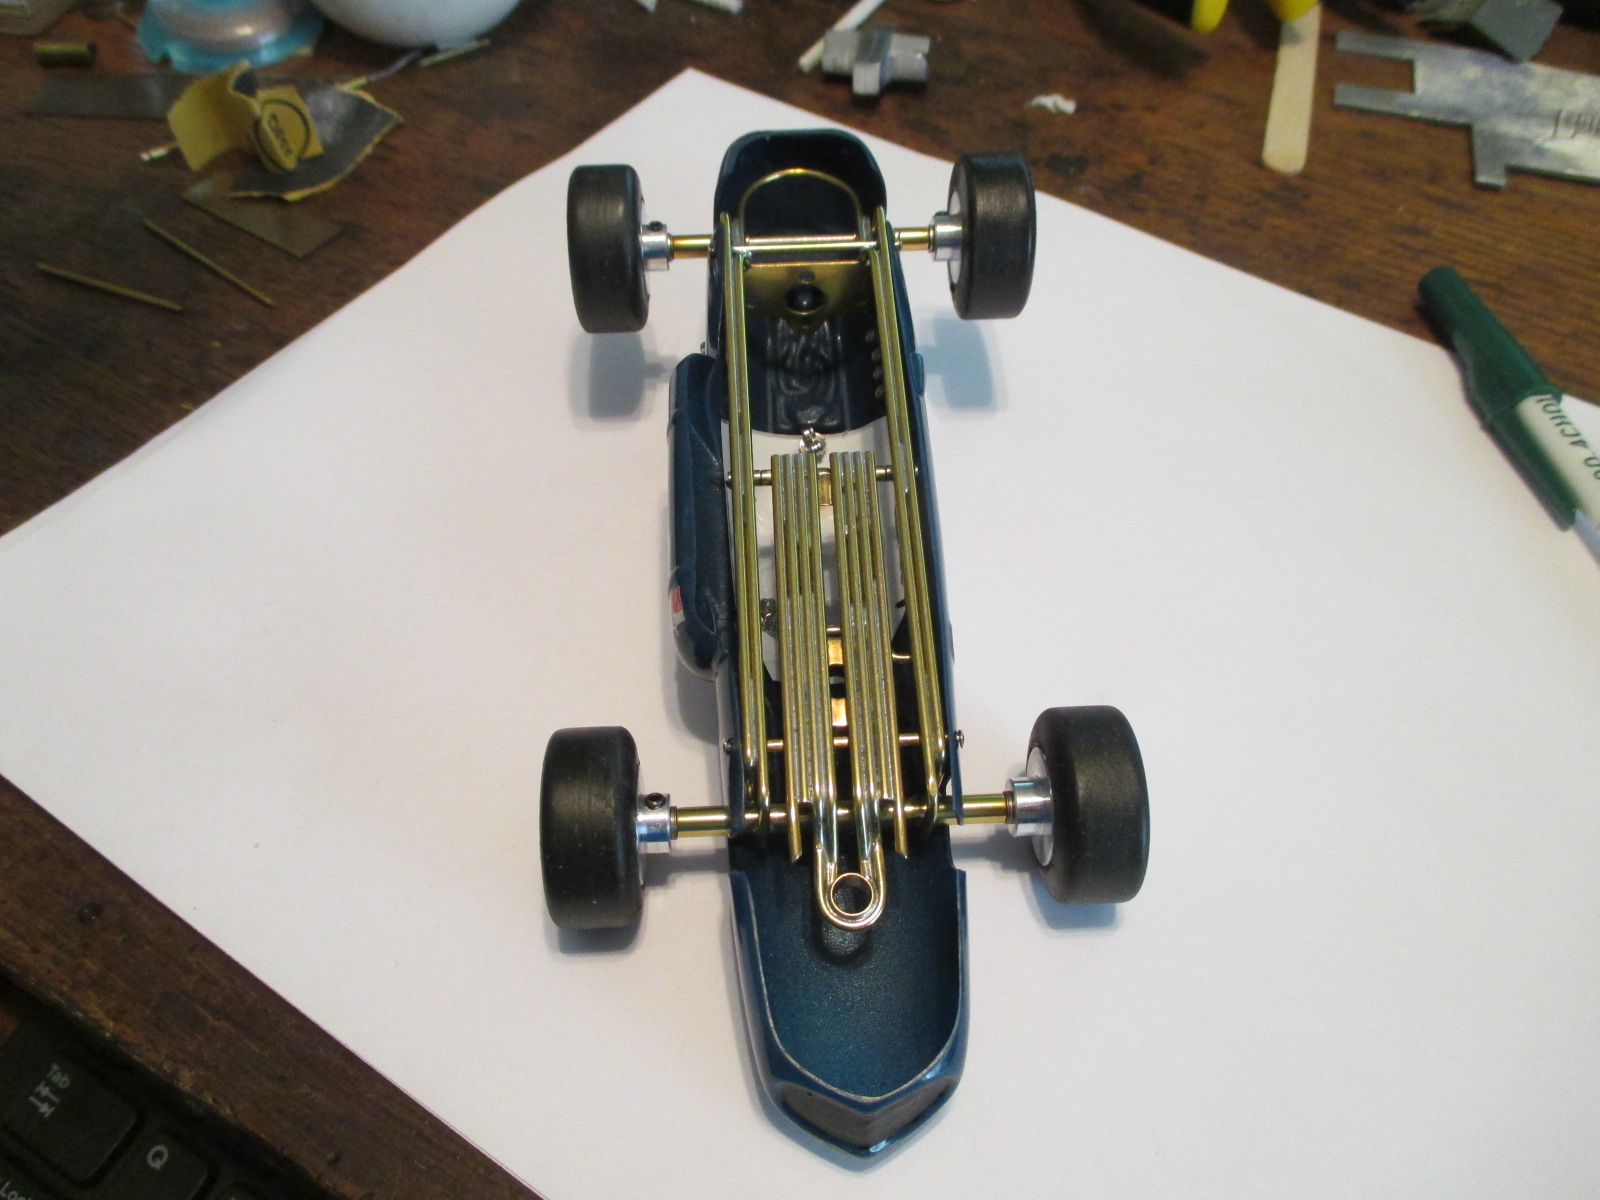
It is built to be assembled into a running slot car if desired with the addition of the following parts:
-Cox quickchange flag and braid
-16D endbell drive motor
-7/35 gears
-Non-threaded 1/8" OD axles
-#723 Russkit style set screw wheels with 1.0" front and 1.1" rear OD tires
- Jencar17 likes this
Paul Wolcott
#99
Dominator
-

- IRRA National Director
-
- 2,957 posts Joined: 19-September 07
Posting Leader
- Gender:Male
Posted 13 November 2016 - 09:31 AM
Beautiful!
A motor is only as fast as the chassis it's in.
Dominic Luongo
Like Dominator Custom Chassis on Facebook
NERR photos from 2012-April 2016
NERR photos from 2016 to now
#100
Pablo
-
- Administrator
-
- 18,454 posts Joined: 20-February 06
Builder
- Gender:Male
- Location:Cleveland, Tennessee
Posted 13 November 2016 - 09:50 AM
Thanks, and I forgot to mention another thing I learned on this build - sprayed enamel responds quite well to a blow dryer
Paul Wolcott


