Jump to content


Photo

Arm winding #1

Closed due to length

  • This topic is locked This topic is locked
3573 replies to this topic

#351 havlicek

havlicek

    OCD Rewinder

  • Subscriber
  • PipPipPipPipPipPipPipPip
  • 11,198 posts
  • Joined: 20-August 07
  • Gender:Male
  • Location:NY

Posted 04 May 2009 - 05:43 AM

Yeah, I was a little confused as well Gary :) and was having Rick make me a 26D clamp for my RGEO crank winder when yours came. So now I'm thinking about having a 36D clamp made if anyone expresses an interest in having some of the "fatties" rewound. I don't think that this arm will be too hot for the motor, but Jairus' advice is right on here. The 26D endbell is the weakspot as it is on the other Mabuchis but unlike the 16D, there aren't alternate choices readily available. So it's either do all the prudent upgrades (post protectors, spring insulation. shunted brushes), see about heavily modifying the endbell, or happening across one of those Champion "Superproofer" endbell setups (not likely).

On winding my first 26D (I'm all but certain I never did one as a kid), I ran across some challenges. Obviously, the stack diameter itself is quite large compared to 16D and the web profile leaves lots of room for wire. The problem is that the can (and therefore the arm) is short so when setting up the blank for winding, you don't get a lot of room under the com for wire. You also don't get much on the can end of the arm before you have the wire getting close to the can bearing and maybe getting damaged. So plenty of room inside the web and very little on either end of the arm.

The other thing is the endbell is kind of short so with upgraded coms where there's an end cap like the Tradeship and Kirkwood, the brushes would be sitting partially on or very close to the non-conducting end of the com. The Kirkwood I used here had already been shortened by whoever gave it to me which was what I needed. Also, the taller the com...the less room there will be on the stack ends for wire, making things even tighter than they already are. I guess you could always shorten the stack by a few plates, but it already seems short. So a little planning and testing ahead of time was necessary for me to figure this thing out. The smaller 16D arms are actually easier (for me anyway) than these and I had to do some trial runs to work patterns out...tossing magnet wire in the trash each time.

-john
John Havlicek


#352 havlicek

havlicek

    OCD Rewinder

  • Subscriber
  • PipPipPipPipPipPipPipPip
  • 11,198 posts
  • Joined: 20-August 07
  • Gender:Male
  • Location:NY

Posted 04 May 2009 - 05:25 PM

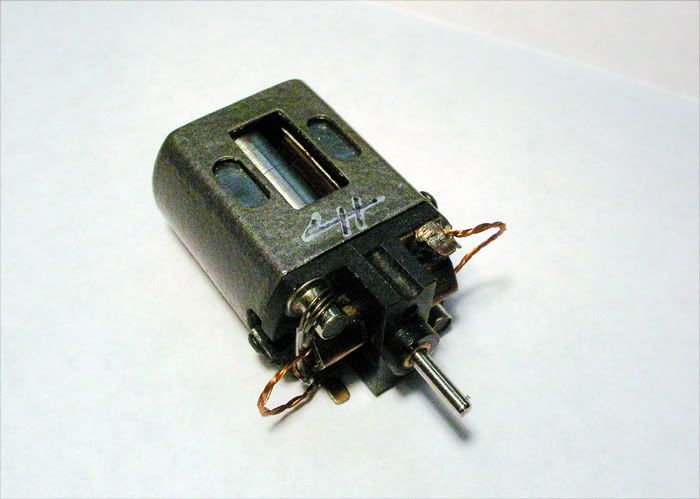
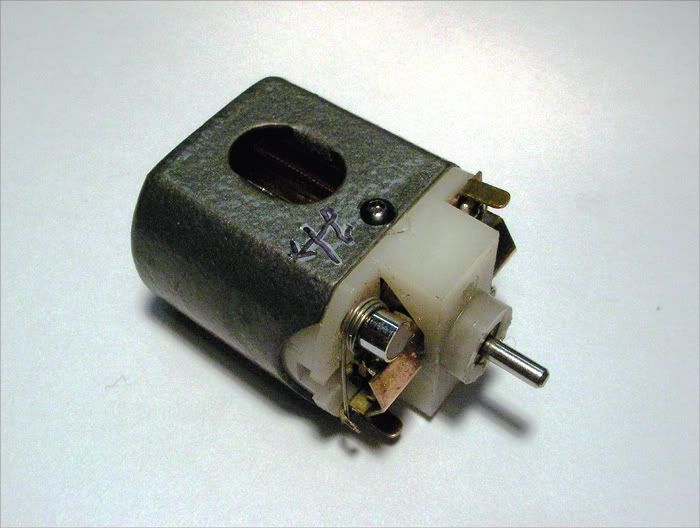
While waiting for some parts to get here for my Champion 26D project, I finished-off the "Maximum Mabuchi". Settled on light springs, rechecked the balance (fine) and insulated the springs. It sings really nicely and here it is all dressed-up for the party:

Posted Image

-john
John Havlicek

#353 Jairus

Jairus

    Body Painter Extraordinaire

  • Subscriber
  • PipPipPipPipPipPipPipPip
  • 10,174 posts
  • Joined: 16-February 06
  • Gender:Male
  • Location:Salem, OR

Posted 04 May 2009 - 07:32 PM

Beautiful !!!! :wub:

Now, build a chassis to go with it. :)

Jairus H Watson - Artist
Need something painted, soldered, carved, or killed? - jairuswtsn@aol.com

www.slotcarsmag.com

www.jairuswatson.net
http://www.ratholecustoms.com
Check out some of the cool stuff on my Fotki!


#354 havlicek

havlicek

    OCD Rewinder

  • Subscriber
  • PipPipPipPipPipPipPipPip
  • 11,198 posts
  • Joined: 20-August 07
  • Gender:Male
  • Location:NY

Posted 04 May 2009 - 09:23 PM

Thanks Jairus

Now, build a chassis to go with it.

I might just do that but...why don't you? ;)

-john
John Havlicek

#355 Rick

Rick

    Grand Champion Poster

  • Full Member
  • PipPipPipPipPipPipPipPip
  • 8,844 posts
  • Joined: 17-February 06
  • Gender:Male
  • Location:PA

Posted 04 May 2009 - 09:29 PM

Lowes is having a sale right now, John, saws are on special. :rolleyes:

Rick Bennardo
"Professional Tinkerer"
scrgeo@comcast.net
R-Geo Products
LIKE my Facebook page for updates, new releases, and sales: Rgeo Slots...
 
Lead! The easy equalizer...


#356 Horsepower

Horsepower

    **Numb Thumbs**

  • Full Member
  • PipPipPipPipPipPipPip
  • 4,343 posts
  • Joined: 16-February 06
  • Gender:Male
  • Location:Chicago

Posted 04 May 2009 - 10:32 PM

Which saw did you see? The last time I was at Lowes the prices were kind of high.
Gary Stelter
 
My life fades, the vison dims. All that remains are memories... from The Road Warrior

#357 havlicek

havlicek

    OCD Rewinder

  • Subscriber
  • PipPipPipPipPipPipPipPip
  • 11,198 posts
  • Joined: 20-August 07
  • Gender:Male
  • Location:NY

Posted 05 May 2009 - 05:16 AM

Lowes is having a sale right now, John, saws are on special. :rolleyes:

Ha Rick...I have to get mentally prepared for all that cutting at this point. Steel plate is a young man's material :blush: Besides, I have a few motors here that would be for the rod/tube period (thank heavens)

-john
John Havlicek

#358 havlicek

havlicek

    OCD Rewinder

  • Subscriber
  • PipPipPipPipPipPipPipPip
  • 11,198 posts
  • Joined: 20-August 07
  • Gender:Male
  • Location:NY

Posted 14 May 2009 - 02:27 PM

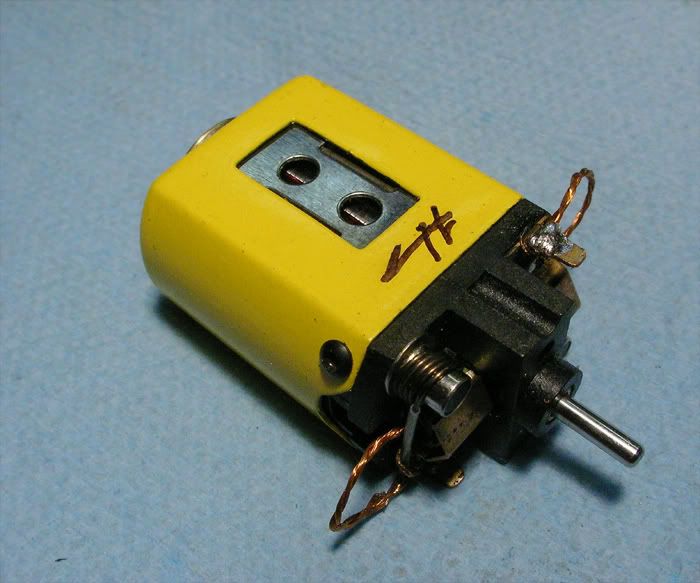
I finished up another Wildcat (ie...Yellow Mabuchi :) ). I had started this one out the other day and installed a set of D can magnets in a "can-in-a-can" shim after grinding them down. I wound a 26S for this one using a Tradeship arm blank and com and then finished it off with a Tradeship endbell. Draws about 1.25 amps, spins like a champ and doesn't get warm. Since it sounds so good, I'll go the rest of the way with shunted brushes and spring insulation just to be sure.

Posted Image

-john
John Havlicek

#359 havlicek

havlicek

    OCD Rewinder

  • Subscriber
  • PipPipPipPipPipPipPipPip
  • 11,198 posts
  • Joined: 20-August 07
  • Gender:Male
  • Location:NY

Posted 14 May 2009 - 04:17 PM

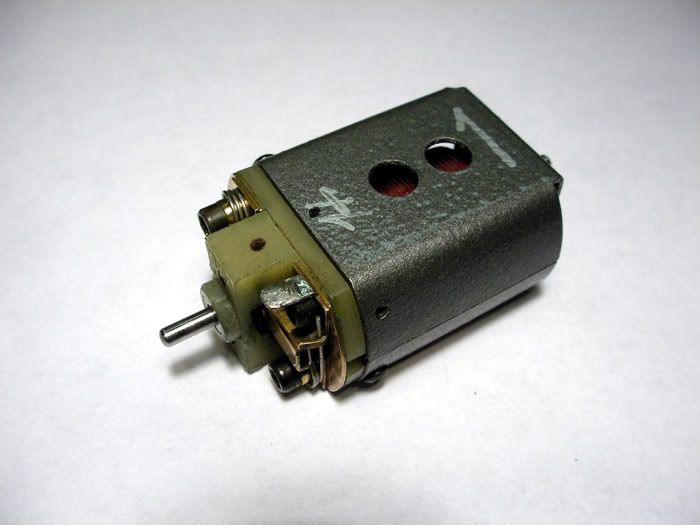
Complete. I wound up trading the light springs for regular tension ones, added the shunted brushes and spring insulation. The motor sounds even better and still only draws about an amp and a half. This 26awg wind seems like a great wind for the FT16D with good magnets, and is about as far as I would go with these things. I forgot to mention that the Tradeship com was a zero-timed one and I added about 20° advance. I was worried about truing the com, but it needed it and there was a LARGE difference in performance and current draw afterwards.

Posted Image

-john
John Havlicek

#360 havlicek

havlicek

    OCD Rewinder

  • Subscriber
  • PipPipPipPipPipPipPipPip
  • 11,198 posts
  • Joined: 20-August 07
  • Gender:Male
  • Location:NY

Posted 15 May 2009 - 08:43 PM

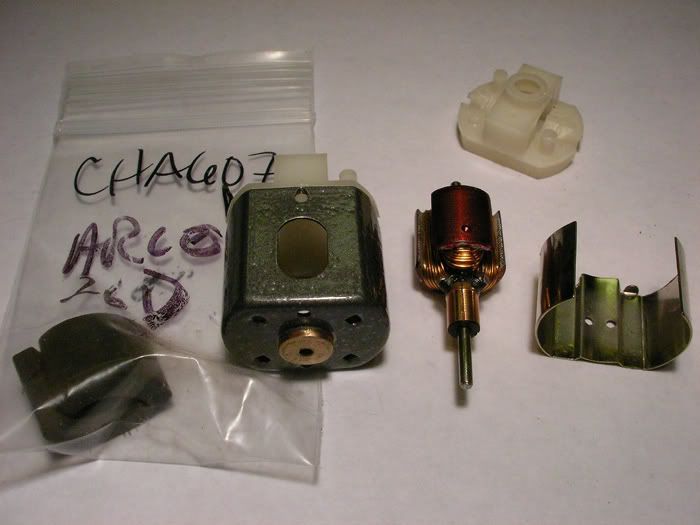
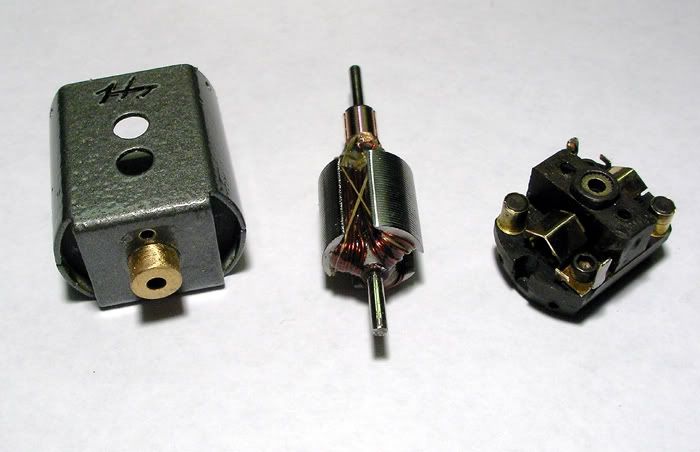
Back to my 26D project. First efforts (after winding the arm) went into the can. The junk ball bearing had to go, but getting a replacement bushing centered would be difficult as I have only hand tools. I figured the best way to go was to look for something large enough to fill the enormous hole that the ball bearing was installed in as precisely as possible. After grinding off the inner retainers and removing the ball bearing, I came across what I guess was a 36D bushing. With just a touch of reaming, it popped perfectly into the can hole so I doused it with acid and silver soldered it in. Then to reduce this for a .078" shaft, I carefully drilled that out and finished it with a reamer until a Champion bushing was a press fit (you can still see the outline of it in the larger bearing). I got it sitting so that the arm would spin perfectly, and then more solder and acid. Afterwards, I cleaned it up and polished it a little to try and make it look like one piece. There was an extra set of screw holes in the sides of this can so I reshaped the sides to remove those and the remnants of the broken tabs. This can had some rust on it so I sanded it off, cleaned the can in acetone and shot some Rustoleum "hammered finish" grey paint and into the oven it went.

So I have a nice can with a snug bearing installed and all gussied-up. I have a nice arm that's zippy...but not white-hot. I have a set of Arcos and a shim to go with all that. Now for the dreaded endbell...GAK. I wound up with two because there was a slight problem with the first one I got and Electric Dreams was nice enough to send me another. I figure if I "go in" for surgery and attempt to make something stouter, I always have a back-up in case Mr. Murphy comes calling. :unsure: Thing is, now that Jairus showed me that slick "super proofer" setup, I'm having a hard time completing this build with an endbell made of a material that's pretty much guaranteed to fail. If anyone out there has some 26D endbell bulletproofing stuff, PM me and I'll return the favor with an arm or whatever . Anyway, this is what I've assembled so far:

Posted Image

-john
John Havlicek

#361 Jairus

Jairus

    Body Painter Extraordinaire

  • Subscriber
  • PipPipPipPipPipPipPipPip
  • 10,174 posts
  • Joined: 16-February 06
  • Gender:Male
  • Location:Salem, OR

Posted 15 May 2009 - 10:49 PM

I got pretty much the same setup here buddy! Champion can, Arco mag's, Champion endbell and hardware. The arm is from ED back when they were selling NOS vintage arms. (Before you showed up)
Posted Image

I am just soldering the hoods to the brush tubes with brush protectors and spring insulation. Not like I am going racing with this one anyway.... LOL! :laugh2: :D

Jairus H Watson - Artist
Need something painted, soldered, carved, or killed? - jairuswtsn@aol.com

www.slotcarsmag.com

www.jairuswatson.net
http://www.ratholecustoms.com
Check out some of the cool stuff on my Fotki!


#362 havlicek

havlicek

    OCD Rewinder

  • Subscriber
  • PipPipPipPipPipPipPipPip
  • 11,198 posts
  • Joined: 20-August 07
  • Gender:Male
  • Location:NY

Posted 16 May 2009 - 07:25 AM

Hi Jairus,

I suppose I could just go that way, but since I have two new endbells I may experiment on one of them...or not :laugh2: OOPS!, that reminds me, I have to get some more spring insulation. Every little bit will be important! Of course you're right too in that these will only be "casual runners"...no enduro's for these things!

-john
John Havlicek

#363 havlicek

havlicek

    OCD Rewinder

  • Subscriber
  • PipPipPipPipPipPipPipPip
  • 11,198 posts
  • Joined: 20-August 07
  • Gender:Male
  • Location:NY

Posted 17 May 2009 - 09:50 PM

I assembled the 26D and will add some brush spring insulation when it gets here...I'm all out for now. I settled on light springs for this one, but it's a tough call as it runs really well with regular tension springs but draws just a bit more current. Right now it seems pretty much right in the zone especially for a #26S awg wind. Starts turning at around .33 Volts :shok: and draws around 1.5 amps after a couple of minutes of light break-in. It doesn't get at all hot and really winds like crazy. With the brush heat sinks soldered to the hoods and my cut-up Radio Shack antenna post protectors, the springs don't seem to be getting hot either, so that's kind of a relief. Sorry about the button-head screws for the purists out there, but they work fine and I always have some lying around :blush:

Posted Image

-john
John Havlicek

#364 Slotgeezer

Slotgeezer

    Posting Leader

  • Full Member
  • PipPipPipPipPipPipPip
  • 2,090 posts
  • Joined: 09-June 06
  • Gender:Male
  • Location:Fullerton, CA

Posted 29 May 2009 - 12:26 PM

Well, I trust everyone has been doing well... I'm back on-line, after three months without a functioning "confuser"... Life sometimes requires sacrifices, & if the $ ain't there, I need to pay the rent 1st, right? :unsure:

So, now... An update on my 22T24 that John sent me...

After realizing that the .015" air gap I was running in a late-production Mura C-can w/ Gp. 12-length magnets wasn't giving me enough brakes ( if any, thruthfully....) w/ that .511" dia. arm, I stripped a 3rd-generation Mura .035" C-can out of another car... This can is the last production motor can that Woody made, before he & Barney built the light-weight 2nd-generation Mura C-cans... It has the trapazoid-style air vents, top & bottom, & I installed a Gp. 15-length pr. of Red Dot mags, in hopes of a longer magnet giving me better braking... Used a home-made aluminum slug, turned down to .522 dia., w/ a 2mm drill bit super-glued into each end, to align w/ the bearings... THIS time, we'll use some of Barney's good epoxy, but the 1st test was using regular "stupid glue" to hold the magnets into the can, along w. a .005" steel shim, on each side along w/ the Mura magnet springs...

Well, 6-7 laps in, on the Buena Park King track, the "stupid glue" failed, & the motor "sucked" a magnet... The magnet spring lost tension, but still held the mag away from the motor enough to not produce permanent damage ( thankfully :rolleyes: )... So, now Barney will assemble the whole she-bang again, this time using the "right" magnet adhesive...

Now, trust me... For those 6-7 laps, I was INSTANTLY transported back to 1972, when I ran Lenz 27-28 D-can motors... the accelleration down the Gearding King straight-away was really awesome, like watching a Gp. 27 car without a wing kit! LOL!! :shok: .... It was EXACTLY the horsepower level I was looking for, so thanks again, John... Barney & I are goin' to keep after this motor, & get it right...

In passing, I'm running the high copper content Mura $1.90 a pr. 36D-sized motor brushes I have left over from 15 yrs. ago in these motors I'm building w/ John's arms... Why ?? ... :rolleyes: ... Well, the high-carbon motor brushes will disappear quickly, at these current-draw levels! LOL!... At least I might get 15-20 minutes run-time, before the brushes turn to copper-carbon dust! LOL! :laugh2:

Now... Here's the NEXT experiment...

H21T25.JPG

This reminds me of the "Kean Kan" motors I remember, from the late-70's...
1st-generation Mura C-can...
Mura full-length Red Dot magnets, installed w/ Loctite Black Max, once again set at a .522" air-gap...
White Mura endbell, w/ .235 dia. cooling hole drilled thru the bearing tower... Neat Things spring posts, Mura medium springs, shunt wire & insulation...
Ball bearings, both ends...
.511 dia. - H21T25, wound on a .485-length stack, timed 17 degrees...

On my 20-amp power supply, it sings REALLY well... Current draw? ... No clue, my supply won't measure current... So, I hold it between my thumb & fore-finger, & let 'er RIP !!!! :laugh2: .... If I can count " one .... two ..... three...." & get to five, & the motor can is warm, but I suffer no 3rd-degree burns, it's GOOD !!!! :laugh2: .... That's how we used to do it in the old days, so it'll still work today, eh? :D

So, that's my update.... More to follow.... Everyone take care, & good building & racing! ;)


Jeff Easterly


Jeff Easterly - Capt., Team Wheezer...
Asst. Mechanic, Team Zombie...
Power is coming on... NOW!!!


#365 havlicek

havlicek

    OCD Rewinder

  • Subscriber
  • PipPipPipPipPipPipPipPip
  • 11,198 posts
  • Joined: 20-August 07
  • Gender:Male
  • Location:NY

Posted 29 May 2009 - 04:14 PM

Hi Jeff,

First off, I want to say thanks for the report. Too often I send these things out and never hear about them again. I'm pleased as punch that the arm ran the way you wanted it to and can almost hear those wheels a-spinning down the straight :D I'm all about horsepower, just like the bad-old days...even when it's a little "on the edge" and it's great to see you are too! I'm sure Barney will get those magnets in there to stay (I haven't a clue what the best adhesive is for this but have used the same high-temp epoxy I use on the arms), and you should be golden. The only thing I wonder about is that those high-copper brushes will probably wear the com faster than the soft ones, but I suppose that's why they invented com lathes :laugh2:

The motor in your post is drop-dead gorgeous! I don't know where you get all these beautiful vintage setups, but you gotta tighten me up sometime! :wub: 21/25 @ 17° should be deadly as well (your tire bill is going to be going up)...maybe a bit more controllable than the 22/24, but choosing between them would be like choosing between Ursula Andress and Ann Margaret (oops!...I think I'm showing my age!). I think you're definitely doing the right thing with the long magnets too although you can probably work it either way a bit with gearing changes. Thanks again for the report Jeff.

-john
John Havlicek

#366 havlicek

havlicek

    OCD Rewinder

  • Subscriber
  • PipPipPipPipPipPipPipPip
  • 11,198 posts
  • Joined: 20-August 07
  • Gender:Male
  • Location:NY

Posted 02 June 2009 - 05:32 PM

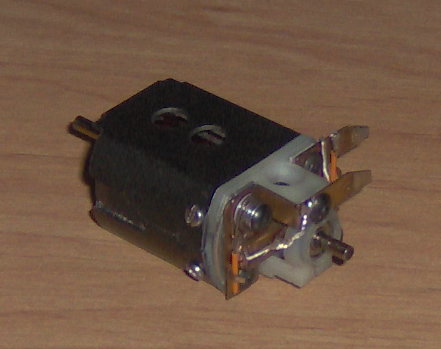
The first of 5 motors for a blogger, 3 Muras and two Champions. I won't bore you guys with all of them, but this is a good example as it really needed some TLC. I did a #28 rewind, stripped the can and gave it a couple of coats of Rustoleum "Hammered Finish" baking after each, stripped the endbell and cleaned straightened things out, zapped the magnets, recut the com... yada yada yada. Motor sounds very strong and draws just about 2 amps with almost no break-in. Starts turning at around .5 volts and things should improve as it settles in.

Posted Image

-john
John Havlicek

#367 havlicek

havlicek

    OCD Rewinder

  • Subscriber
  • PipPipPipPipPipPipPipPip
  • 11,198 posts
  • Joined: 20-August 07
  • Gender:Male
  • Location:NY

Posted 05 June 2009 - 06:24 PM

...another one. This time, I used a salvaged com from an old Mura motor...a bit of a bother getting it off, cleaned-up and all. #28 awg, about .2-.3 Ω. Rustoleum "Hammer Finsh" baked on the can, the endbell still needs some TLC

Posted Image

-john
John Havlicek

#368 Slotgeezer

Slotgeezer

    Posting Leader

  • Full Member
  • PipPipPipPipPipPipPip
  • 2,090 posts
  • Joined: 09-June 06
  • Gender:Male
  • Location:Fullerton, CA

Posted 06 June 2009 - 03:14 AM

Mmmm - mmmm - mmmm !!!!

^_^

That arm just looks SO sano, John....

Yet again, another great job....

Love the can color...

C-ya!!! :lol:


Jeff

Jeff Easterly - Capt., Team Wheezer...
Asst. Mechanic, Team Zombie...
Power is coming on... NOW!!!


#369 havlicek

havlicek

    OCD Rewinder

  • Subscriber
  • PipPipPipPipPipPipPipPip
  • 11,198 posts
  • Joined: 20-August 07
  • Gender:Male
  • Location:NY

Posted 06 June 2009 - 07:14 AM

Thanks buddy...most of the arms for this project are mid-level, nothing at all like the missles I've done for you :shok: as the setups are earlier vintage. I am going to do one of his Muras a little spicier (still not flamethrower hot) because it seems like it will hold up fine. I really like this Hammered finish paint for the cans as it's distinctive looking and when baked comes out really hard/shiny...seemingly much more than the other paints I've tried. It has an almost "ceramic" feel to it when cured. Catch you on the flip...

-john
John Havlicek

#370 havlicek

havlicek

    OCD Rewinder

  • Subscriber
  • PipPipPipPipPipPipPipPip
  • 11,198 posts
  • Joined: 20-August 07
  • Gender:Male
  • Location:NY

Posted 06 June 2009 - 02:19 PM

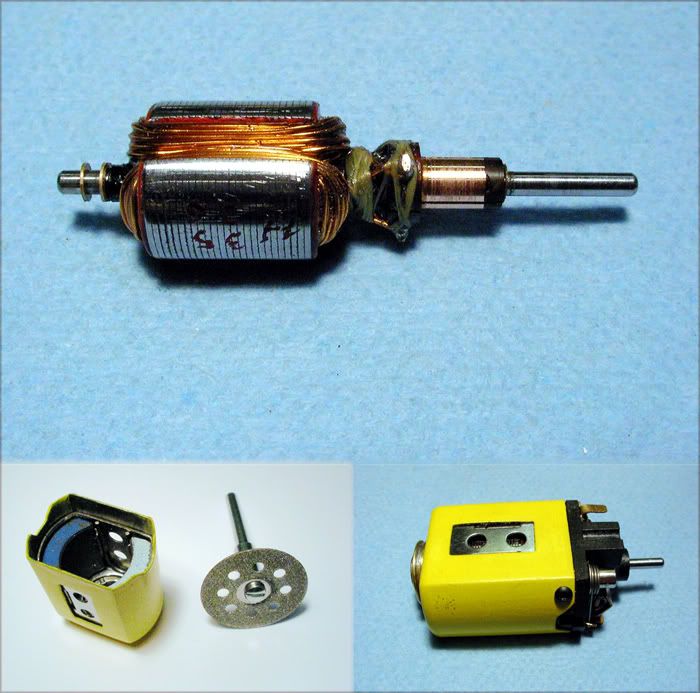
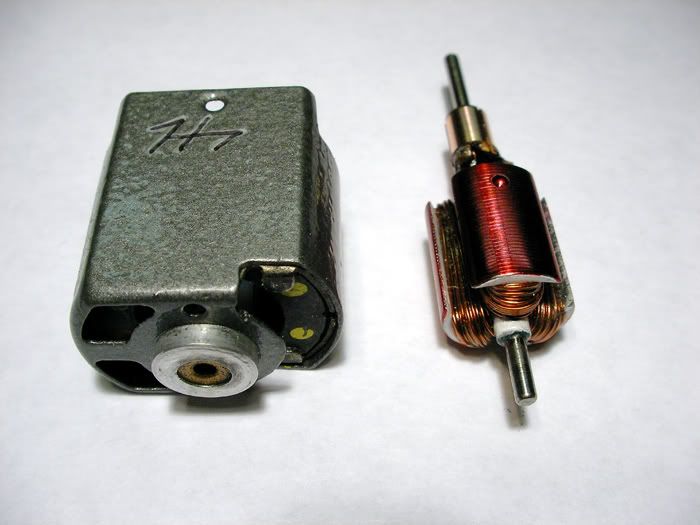
Last Mura for this project (3 of 5 motors). This one I went for the gusto and did a pretty hot 26 awg. Trying out different springs landed me on some light Pro Slots and I got the current draw down to around 2 amps. This one is a .2 Ω arm and it's definitely "on the edge"...a very spicy meatball! Just for grins, I tied the arm the way my I did it for a while "back then".
Posted Image

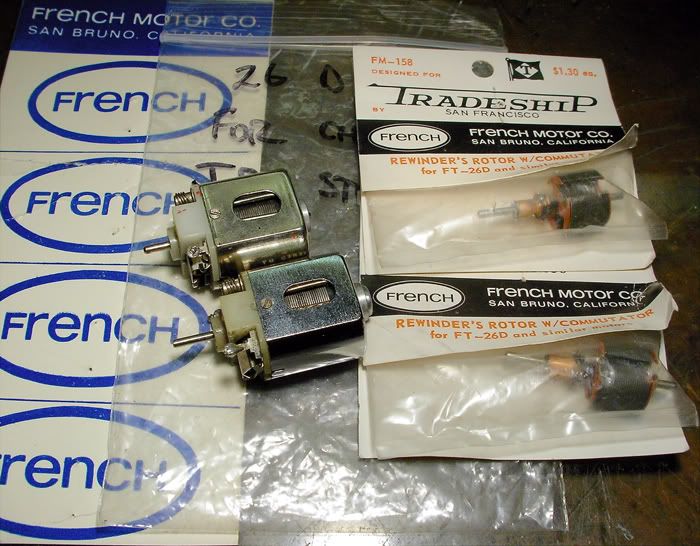
Next up to finish this project is a pair of Champion 26D motors. Some yummy Tradeship/French arm blanks and coms to go with them

Posted Image

-john
John Havlicek

#371 havlicek

havlicek

    OCD Rewinder

  • Subscriber
  • PipPipPipPipPipPipPipPip
  • 11,198 posts
  • Joined: 20-August 07
  • Gender:Male
  • Location:NY

Posted 07 June 2009 - 12:49 PM

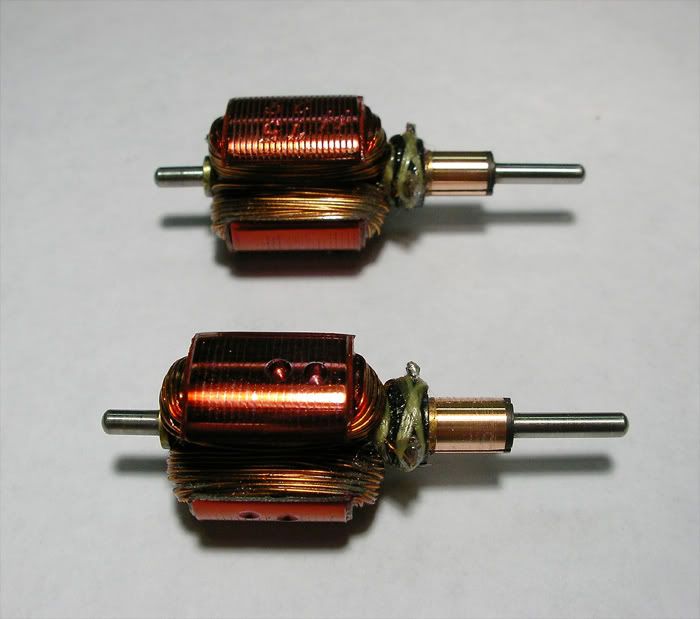
...and done. The one on the top is a #29awg and the one on the bottom is a #28awg. The setups don't need much more than cleaning-up and a few touches (soldering the brush hoods for sure) so the arms were the big deal with these two.

Posted Image

-john
John Havlicek

#372 Jairus

Jairus

    Body Painter Extraordinaire

  • Subscriber
  • PipPipPipPipPipPipPipPip
  • 10,174 posts
  • Joined: 16-February 06
  • Gender:Male
  • Location:Salem, OR

Posted 07 June 2009 - 09:15 PM

Very nice work John! I'll have to see if I can scare up one of those Tradeship arm blanks for meself...

Jairus H Watson - Artist
Need something painted, soldered, carved, or killed? - jairuswtsn@aol.com

www.slotcarsmag.com

www.jairuswatson.net
http://www.ratholecustoms.com
Check out some of the cool stuff on my Fotki!


#373 havlicek

havlicek

    OCD Rewinder

  • Subscriber
  • PipPipPipPipPipPipPipPip
  • 11,198 posts
  • Joined: 20-August 07
  • Gender:Male
  • Location:NY

Posted 08 June 2009 - 06:15 AM

Thanks Jairus. ED has the Tradeship 26D blanks/coms. I gotta say that there's VERY little room on these 26D motors at the bottom end of the stack. It's even worse on some depending on the way the can bearing/bushing and endbell are. Some of them have a bit more length in the endbell...slightly taller "tower", and some of them have the can bearing slightly recessed which puts the stack end windings REALLY close to inside of the can :shok: From what I've seen, the Champion setups are a little more forgiving but those bearings aren't very good and need to be replaced with either a nice tight bushing or a good quality bearing. All in all, the 26Ds are tougher to work on and setup.

-john
John Havlicek

#374 GTPJoe

GTPJoe

    On The Lead Lap

  • Full Member
  • PipPipPipPip
  • 448 posts
  • Joined: 26-July 07
  • Gender:Male
  • Location:Manch-Vegas NH

Posted 08 June 2009 - 09:30 AM

Hi John,

Sir, I've got that same paint for some old Mura cans. Could you describe how you bake them? Like how long and how hot?

Also do sand them at all between coats?

Those cans painted with that hammered paint look awesome, now I want to do some!

Thanks....

GTP Joe Connolly

In theory there is no difference between theory and practice.
In practice there is.


#375 havlicek

havlicek

    OCD Rewinder

  • Subscriber
  • PipPipPipPipPipPipPipPip
  • 11,198 posts
  • Joined: 20-August 07
  • Gender:Male
  • Location:NY

Posted 08 June 2009 - 11:18 AM

Hi Joe,

Over here, the Hammered Finish Rustoleum comes in a few colors and I just got some of the light silver for some Muras I have to do. The way the stuff works, if you spray really light coats, you get very little to almost no "dimpling". As soon as you spray a little heavier, the "hammered" look happens. I usually do two coats, starting with a light coat and bake each coat at 250° F for 15 minutes...letting the can cool down completely before handling it. It should come out very shiny and hard afterwards. I don't sand between coats since I usually shoot the second coat as soon as the first one has cooled down from the oven...neat stuff!

-john
John Havlicek


Electric Dreams Online Shop