
#926

Posted 26 December 2009 - 10:09 PM
John,
I hope you'll take pix of your Champion 26D project and share them with us please?! May I ask please, if you have any pix of the Mura coms you recovered? I love Mura motors!!!!
By the way John, the motor did arrive safely and it looks "hot" - pun intended - LOL!!! Thank you again!
#927

Posted 27 December 2009 - 07:44 AM
By the way John, the motor did arrive safely and it looks "hot" - pun intended - LOL!!! Thank you again!
Glad it got there OK Ernie...and the pleasure was all mine
I hope you'll take pix of your Champion 26D project and share them with us please?! May I ask please, if you have any pix of the Mura coms you recovered? I love Mura motors!!!!
...your wish is my command
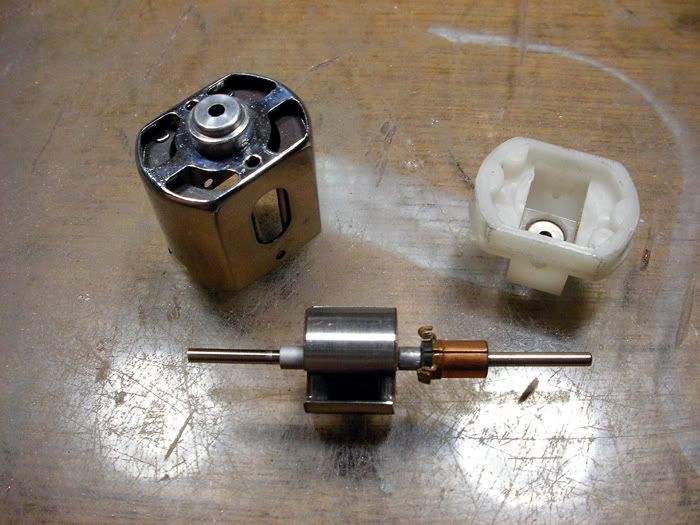
-the can was fairly misshapen, but since there's no paint on these things I did whatever "body work" I could that wouldn't make things look worse. After straightening it out as best as I could, I polished it up after some work with #600 and then #1200 sandpaper and then ground off the rough areas where the endbell retainer tabs used to be. After that, I removed what was left of the can bearing and installed one I had salvaged from another motor that was in good functional shape (I'm going for fairly period correct here, both with the parts and the wind). The can was finished-off with a nice set of Arcos in the Champion shim. The endbell is NOS from Roger at Mid America and I installed another reclaimed bearing in that, saving the bushing for another day.
I assembled the arm stack from loose plates/lams I had left over and made it the same length as the Tradeship blanks. The shaft is a new drill blank (OK...that isn't exactly "period correct") and the com is one of the salvaged Muras from the Wasp arms Jeff Easterly sent me. I have some Tradeship coms...but the Muras (even though also not "period correct") can be seen as the equivalent of the Champion "Blow Proof" coms. I also like the fact that the Mura com will better fill the hole in the endbell, leaving a smaller gap between the brush tubes/heatsinks and the com. Since I have no idea where this motor will go or who it's for yet, I left the shaft long on both ends so that the completed motor can go either endbell or can drive. The motor will be either a #28 awg single or a #29 awg single as I have some comfortable 26 winds worked up for either.
-john
PS, now that I look at the picture, that com isn't one of those from the wasp arms that Jeff sent me. Oh well...you get the idea
#928

Posted 27 December 2009 - 12:49 PM
Thank you for posting the picture. To me, the way you worked the arm stack looks as though it was machined from billet - Fantastic craftsmanship John!!
#929

Posted 27 December 2009 - 02:34 PM
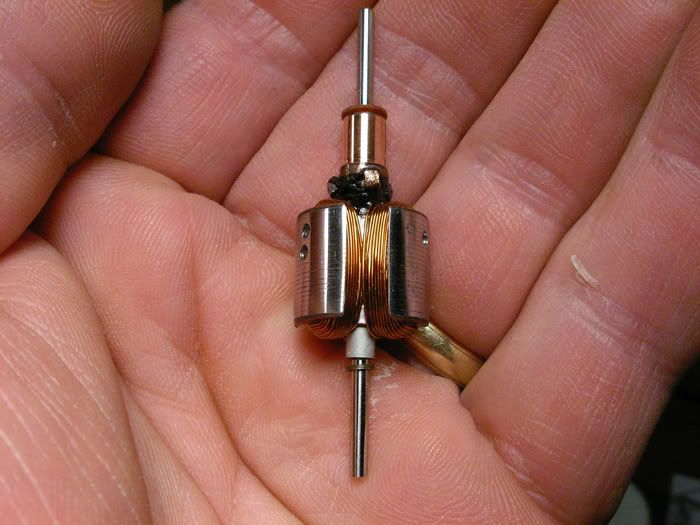
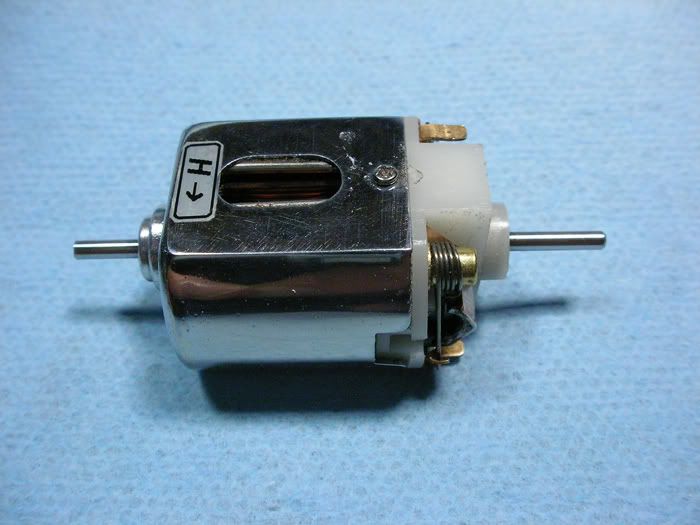
...and in it's new home. I wound up not using the endbell bearing as it was really making a racket and not spinning properly, so in went the bushing. I installed a pair of FT16D hoods over a pair of FT36D brush tubes/heatsinks so the motor can use the larger brushes that are more easily available. I finished it off with a pair of post protectors and Camen regular springs. The motor is much faster than the stock motor, but should be able to run all day no problemo. As I mentioned earlier, I left the shaft long on both ends so it can go either can or endbell drive for whoever gets it and whatever they put it in.
-john
#930

Posted 27 December 2009 - 10:45 PM
On a motor like this, if one were to set it up to run on a King, would a gear ratio of 4:1 be satisfactory or would you suggest gearing it taller like 3.5:1 or 3:1?
Another question please - if you "double wind" an armature, does this provide more torque to the motor and lower the rpms?
Ernie
#931

Posted 27 December 2009 - 11:05 PM
"We offer prompt service... no matter how long it takes!"
"We're not happy unless you're not happy"
"You want it when?"
#932

Posted 27 December 2009 - 11:13 PM
John, another masterpiece... Really love the idea of the 36D brush-barrels instead of the 26D sized ones... I have quite a few 36D barrels I should send your way... I won't be needed them, as I convert everything to Parma Death Star hardware, for availability issues...
Always loved 26D stock motors... Kinda like TSR - D3 motors, good bang-for-the-buck value! LOL!
(Yep ... shameless plug..... Hey, Dokk.... Got any spare TSRF's laying around, for Jaildoor class?
Onward, John! Onward! LOL!
Jeff Easterly
Jeff Easterly - Capt., Team Wheezer...
Asst. Mechanic, Team Zombie...
Power is coming on... NOW!!!
#933

Posted 28 December 2009 - 07:16 AM
On a motor like this, if one were to set it up to run on a King, would a gear ratio of 4:1 be satisfactory or would you suggest gearing it taller like 3.5:1 or 3:1?
Ernie, 4:1 had always been the starting point for most hotter-than-stock motors for me. So much depends on the track power, the chassis weight and type, the body...even the controller and driver that dialing things in afterwards is really a matter of trial and error. Most all of the Mabuchi and Mabuchi-type motors were short on brakes so numerically higher ratios can help that somewhat. Hotter winds (and this one isn't at all HOT) can get too warm if they're lugging and also if they wind out too early...so they need even more tweaking of the ratio to find the sweet spot. Still, starting at 4:1 should point you in the right direction pretty quick.
Another question please - if you "double wind" an armature, does this provide more torque to the motor and lower the rpms?
Doublewinds act effectively like bigger wire single wound arms and the thought is that a doublewind will act like a single that is three whole sizes larger...so a #29 double is something like a #26 single...more rpms and yes...less torque. Upping the magnets and closing the airgap will bring back more torque ...but will add heat. Sometimes for a vintage or vintage-type motor that's not going to be raced but simply enjoyed, it's probably better to keep the airgap a bit on the wide side and live with less torque and brakes for the sake of motor longevity...unless the person keeps it down to only a few laps at a time and monitors the motor for signs of "China Syndrome"
Jeff, yep, the 26Ds (especially the Champions) are neat motors and make cool cars in modded/hybrid Dynamic and straight scratchbuilt chassis. BTW I can use those 36D brush barrels for sure. I'm at the point here where I have some 36D motors with none because they wind up in 16D and 26D motors at times
-john
#934

Posted 28 December 2009 - 08:05 AM
Very nice work indeed. I following this thread with much interest.
I have a few questions though.
How do I press out a shaft from the stack?
Do I need heat or...?
The laminates is OK but the shaft is no good to much rust has made it kind of rough on the surface.
Should the laminates be glued back on a new shaft?
Also do you glue the com. on the shaft? and what glue to use if so?
Jens
#935

Posted 28 December 2009 - 10:43 AM
I intend to live forever! So far, so good.
#936

Posted 28 December 2009 - 11:00 AM
How do I press out a shaft from the stack?
This can be a very difficult thing to do with common hand tools, but it can be done. First you need to realize that the laminations of an armature will grip the shaft even tighter if they deform at all when pressing on the shaft. A great way to illustrate this is the locking mechanism of a bar clamp (like the Jorgensen "Pony" clamp). These are made of several layers of steel that are held at an angle to the bar that "grab" the bar as they are forced against it even though the hole in them is far larger than the diameter of the bar. The same exact thing happens with arm laminations when you deform them, and they will grab the arm shaft tightly. Any rust on the shaft will naturally make the process even more difficult. It's therefore important to keep the arm laminations as flat and undisturbed as possible when pressing against them. I use a carpenter's 6" "hand screw" clamp for pressing mine like this (but made by Jorgensen):

For pressing shafts, I closed the clamp and drilled a 7/64" hole through both sides close to the ends so that a shaft (including the larger 36D shaft) can pass through it. These clamps can exert a great amount of pressure and even though they're made of very hard wood, they can cause an arm stack to indent the wood and deform the stack which is bad...the harder you press the more difficult moving the shaft becomes. To prevent this, I place several steel washers with small center holes behind the arm stack to support the stack and prevent it from distorting as I exert pressure. The other thing working against you is that ypou can VERY easily bend even a drill blank shaft doing this and that will also prevent you from easily pressing out the shaft. To prevent this, I cut the shaft close to flush with the stack on the shorter end and then grind it flush with a slight center depression where it enters the stack. I then use a piece of hardened steel only a bit longer than the typical stack as a "pusher"...aligning that with the center of the stack and pressing against another piece of hardened steel between it and the face of the clamp so the "pusher" pin doesn't just drill itself into the wood face of the clamp as I exert pressure.
Sometimes when a shaft is being particularly difficult, I will push a bit from both sides to try and make the stack loosen it's grip on the shaft...finally exerting the most pressure on the side I cut off. Frequently, you'll hear a "pop" as the shaft begins to move and feel the movement. Most shafts will come out...some I just can't budge. I'm sure that a "press" such as are used by machinists properly fitted for the task would make short work of replacing shafts, but I don't own one
Do I need heat or...?
I've never used heat more than a couple of times just to see if it helps and it didn't seem to so I don't bother with the additional problems associated with handling a heated arm.
The laminates is OK but the shaft is no good to much rust has made it kind of rough on the surface.
Spinning the arm in a Dremel tool or even a drill while pinching some Scotchbrite around the free end will clean that up pretty well if it's not too bad...without changing the diameter of the shaft very much. It will leave a dull finish on the shaft that would make static balancing difficult if you wanted to do that. If the rust is more than just a little surface rust, then changing the shaft is a better idea.
Should the laminates be glued back on a new shaft?
In many cases, you'll find that the lams all separate when you remove the shaft...much more often with Mabuchi arms than with the later thin-lam and powder coated Mura and other arms. You'll also find that the lams, because of how they're fabricated, definitely have a more "concave" side and a "convex" side. You can see this when you look at each lam closely under good light. This makes it important to assemble them on the new shaft with all the like sides facing the same way so you get a nice tight stack with no gaps. Once assembled and oriented so all the poles line-up (along with any stack insulators if you use them), you need to clamp the stack assembly together. I use battery clips like these:

They exert enough pressure as long as the stack hasn't been deformed, are inexpensive and fit nicely but any appropriate clamp is fine. I also use these because the whole stack plus the three clamps will still fit in a small oven. To glue the stack together again, I use epoxy applied only to the interior faces of the three poles and only enough to cover so it doesn't drip and make a mess. Of course, care needs to be taken not to glue the clamps to the stack. Epoxy works very well for this because as it thins out with heat, it will get into all the little spaces of the stack and really bond it well. Often it will penetrate well enough to bond the stack not only to itself...but also to the new shaft.
Also do you glue the com. on the shaft? and what glue to use if so?
Yes I do glue the com both so it doesn't move around while winding...but also to keep the arm's timing set. I also use a tiny drop of epoxy for this...as well as the tail spacer and the com spacer (if used). To be sure the epoxy does it's job, I rotate the com and spacers as I seat them so that a bit will even get inside between the shaft and the hole. They won't move after curing...at all! I'm sure some cyanoacrylate ("Krazy Glue") would be fine for this, but I try not to use the stuff on arms as when the arm gets heated with use (and/or oven curing of any epoxy) it may release some cyanide fumes.
I hope this helps and if I need to be clearer, just ask.
-john
#937

Posted 28 December 2009 - 05:14 PM
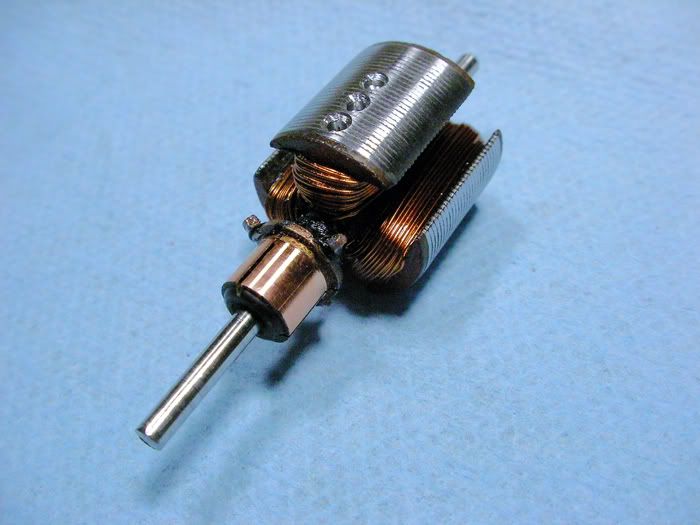
I cleaned-up and repainted a setup I had here that wasn't in too bad a shape...metallic red seemed neat and was the color closest to me at my bench so...
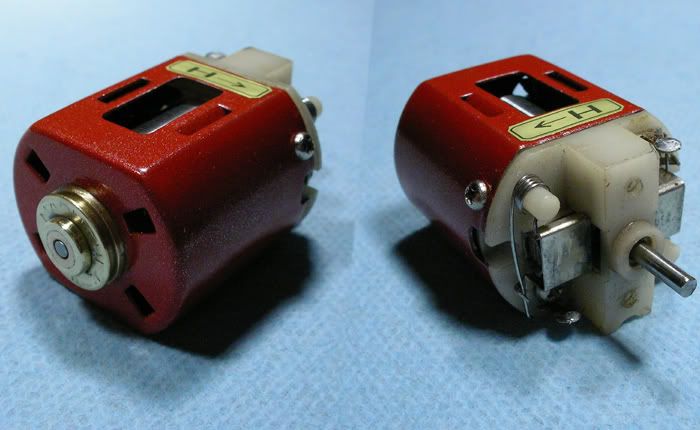
The caged bushing was worn and fell out of the can so I soldered-in a new bushing. The magnets are the stock Mabuchis (complete with the dried-on masking tape "shims" from decades ago), and the motor sounds great! I'll probably add some post protectors to the setup when I change the springs, but it seems to run cool-ish
-john
PS...the com is (I believe) a Champion piece I had kicking-around. There are several other options including the stock Mabuchi which seems a lot stouter than the 16D sized ones as well as the Tradeship which is really nice.
#938

Posted 28 December 2009 - 06:25 PM
Back in 67/68. We had one track that had a power supply rather than batteries. Everybody hated to run that track. Most of us would run single 26 on the battery tracks....some Maybe 25
OLPHRT
PHIL I.
#939

Posted 28 December 2009 - 08:13 PM
Phil, years ago I ran wing cars on a power pack track in Maine similar to what you described. With 7 or 8 cars running, I ran my Steube 22s(hand-wound Grp. 20s) & was very competitive. These guys ran open wing cars weekly on both Fri. & Sat. nights. A couple weeks I won both nights. With fewer cars, I usually ran a Camen 27/28 on that track, but I don't remember it being all that outstanding.
I intend to live forever! So far, so good.
#940

Posted 29 December 2009 - 06:43 AM
There's nothing at all wrong with .078" piano wire as 16D/26D shaft material. It's usually straight enough in 2" lengths and is fairly hard. The only gotcha I see is that it may not be dimensionally right for some bearings/bushings. The thing is that when I can manage it, I figure I should do my best on every arm and drill blanks are stronger AND have a better finish which makes balancing easier. Little by little, I'm trying to get better and more consistent and the easiest part of that is using better parts. It's the actual winding that takes work
-john
#941

Posted 29 December 2009 - 07:46 AM
I do have a question now though. Where to get drill blank shafts to stacks?
Jens
#942

Posted 29 December 2009 - 07:55 AM
I have gotten them (2mm drill blanks for FT16D and FT26D) from here:
McMaster Carr
The part # is : 2900A234, so just put that into the search ("find") box up top. As an alternate on say Mabuchi motors that won't be too hot, you can use .078" piano wire cut to length. This works fairly well and is very inexpensive. This is also a good choice for unusually long shaft motors (like four wheel drive), as you can make the shaft any length.
For the big motors (FT36D), you can get 3/32" drill blanks from McMaster Carr as well...or use 3/32" drill blank axles.
-john
#943

Posted 31 December 2009 - 02:30 PM
-john
#944

Posted 31 December 2009 - 02:47 PM
Anthony 'Tonyp' Przybylowicz
5/28/50-12/20/21
Requiescat in Pace
#945

Posted 31 December 2009 - 03:37 PM
-john
#946

Posted 31 December 2009 - 04:38 PM
MINE!
Thank You, John
Slots-4-Ever
Brian McPherson
REM Raceway
"We didn't realize we were making memories, we just knew we were having FUN!"
#947

Posted 31 December 2009 - 04:59 PM
-john
#948

Posted 31 December 2009 - 07:39 PM
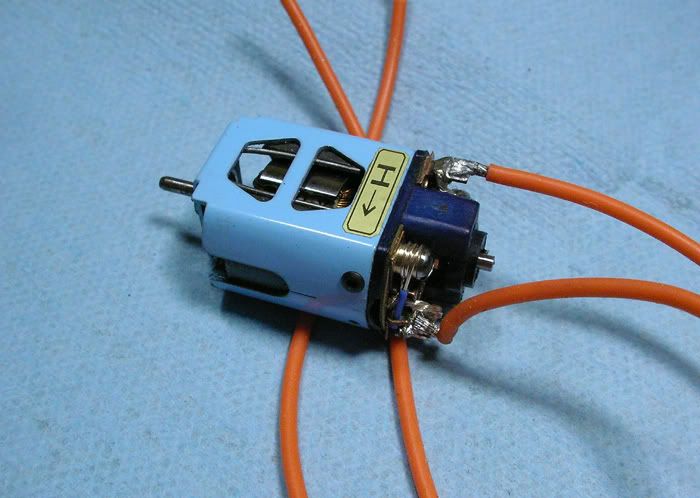
Nice mill, bro. What brand and color paint did you use? It's obviously light blue but did the manufacturer give it some special name?
"We offer prompt service... no matter how long it takes!"
"We're not happy unless you're not happy"
"You want it when?"
#949

Posted 31 December 2009 - 07:45 PM
I intend to live forever! So far, so good.
#950

Posted 31 December 2009 - 08:49 PM
-john


 This topic is locked


