

 This topic is locked
Vic is looking at the Duralco 4461 which is great stuff in case anyone is interested.
-john

3573 replies to this topic
#2126

havlicek
-
- Subscriber
-

- 11,198 posts Joined: 20-August 07
OCD Rewinder
- Gender:Male
- Location:NY
Posted 19 November 2010 - 08:53 PM
John Havlicek
#2127
Victor Poulin
-

- Full Member
-
- 2,097 posts Joined: 04-March 08
Posting Leader
- Gender:Male
- Location:Raymond, NH
Posted 19 November 2010 - 08:59 PM
Hey John,
THAT'S ONE BAD MAMA JAMA !!! So what have you got in mind for it?? Inquiring minds need to know
Good thing I sent those motors off to you today, because the way your tearing into these things, your gonna need them I didn't get a chance to work on my next build today, but now you got me jealous again lol.
Vic
THAT'S ONE BAD MAMA JAMA !!! So what have you got in mind for it?? Inquiring minds need to know
Good thing I sent those motors off to you today, because the way your tearing into these things, your gonna need them
I didn't get a chance to work on my next build today, but now you got me jealous again lol.Vic
Alright, who cut the cheese?
#2128
Kim Lander
-

- Full Member
-
- 601 posts Joined: 06-June 09
Race Leader
- Gender:Male
- Location:Macon, GA
Posted 19 November 2010 - 10:20 PM
That looks like a Euro-sport to me...damn John, you just keep getting better and better, I REALLY like the one piece strap/can type ....the one piece goes right along with the focusing of the magnetic field theory that I was talking to you about...when you have a break in the field containment you lose some of the magnetic focus on the leading and trailing edge ....I dont think you are "getting there" any more, I think you are "THERE"....keep it up John.
#2129
Robert V.
-

- Full Member
-
- 350 posts Joined: 14-November 09
On The Lead Lap
Posted 19 November 2010 - 10:38 PM
Hi John
As always great work, i to am interested to see what goes in there, i agree Kim John has been there for a while now.
As always great work, i to am interested to see what goes in there, i agree Kim John has been there for a while now.
Robert Vaglio
#2130
havlicek
-
- Subscriber
-
- 11,198 posts Joined: 20-August 07
OCD Rewinder
- Gender:Male
- Location:NY
Posted 20 November 2010 - 07:15 AM
Thanks Robert, you're doing great work yourself and we can all help to inspire each other and share what we know.
Kim, the one-piece cans like the mini motors and whatever this was (maybe a small RC motor?) can be done this way because, after cutting the top and bottom, there's still something left to carry the bushing. We'll see if this thing works...I sure hope so because there's a fair amount of work in it already. These things are kind of fragile after cutting, although screwing the endbell on does tighten them up significantly. Best would be bracing the can to the rear axle carrier using either a piece of piano wire soldered directly or a hinge tube to a wire brace so the motor could be removed easily. For casual running, it's probably OK as is...but the real question is whether it will work well enough to have justified all the effort. A can like this machined out of a solid billet could be made to be both way more accurate as well as strong, without sacrificing too much in the weight department. After all, this thing barely weighs anything at all as it is.
-john
John Havlicek
#2131
Victor Poulin
-
- Full Member
-
- 2,097 posts Joined: 04-March 08
Posting Leader
- Gender:Male
- Location:Raymond, NH
Posted 20 November 2010 - 10:11 AM
Not gonna tell us what's going in there for an arm huh? You tryin to keep us on the edge? Well hey, 2 can play that game mister
Oh wait I know,,, you could tell us, but then you'd have to kill us right?
What ever you choose to install, I'm sure that little thing is gonna scream !!!
Vic
Well hey, 2 can play that game mister Oh wait I know,,, you could tell us, but then you'd have to kill us right?
What ever you choose to install, I'm sure that little thing is gonna scream !!!
Vic
Alright, who cut the cheese?
#2132
Alchemist
-

- Full Member
-
- 2,704 posts Joined: 11-November 09
Posting Leader
- Gender:Male
- Location:Far, far away
Posted 20 November 2010 - 08:53 PM
Hi John!
That looks like it's gonna be a mighty "baaad" motor!!! Is this your version of a "wing car" motor? it kinda reminds me of one. Is it about the same size also?
Very nice work as usually. I really like the "buss bars" - is this the correct terminology for the "positive/negative" blade connectors protruding from the end bell please?
Thanks for granting my request John. I want one now - pleassssseeee - LOL!!!!
Ernie
Ernie Layacan
#2133
havlicek
-
- Subscriber
-
- 11,198 posts Joined: 20-August 07
OCD Rewinder
- Gender:Male
- Location:NY
Posted 21 November 2010 - 09:17 AM
Hi Ernie,
I have no clue how well this motor will do, but can't see it being a total dog...maybe just a partial dog I tossed the first can as it really seemed too fragile and remade the can from a TSR motor. The can material is significantly stronger and seems much better after cutting it out. Having to "backwards engineer" the thing was a major PITA, but I got it done. The next one I do, I may leave just a little radius in the back corners of the can where the sides meet the bushing carrier end to give it some more rigidity, but this one seems fine for now. I'll wind a #26 for this one as I don't know what effect removing so much can material will have on the balance between the permanent field of the magnets and the field(s) produced by the armature. I'd be bummed if it just vaporized after all this If it goes well, I may do a #25 for the next one. I'm still in awe that the tiny little ridiculously hot winds that I've done for Bill Bugenis' projects are able to live so well, but those motors/setups (and the cobalt magnets) that Lou Pirro has them in are no doubt freakin' aces. Waaaaay above my pay-grade, and I don't even know what those motors look like.
-john
I have no clue how well this motor will do, but can't see it being a total dog...maybe just a partial dog
I tossed the first can as it really seemed too fragile and remade the can from a TSR motor. The can material is significantly stronger and seems much better after cutting it out. Having to "backwards engineer" the thing was a major PITA, but I got it done. The next one I do, I may leave just a little radius in the back corners of the can where the sides meet the bushing carrier end to give it some more rigidity, but this one seems fine for now. I'll wind a #26 for this one as I don't know what effect removing so much can material will have on the balance between the permanent field of the magnets and the field(s) produced by the armature. I'd be bummed if it just vaporized after all this If it goes well, I may do a #25 for the next one. I'm still in awe that the tiny little ridiculously hot winds that I've done for Bill Bugenis' projects are able to live so well, but those motors/setups (and the cobalt magnets) that Lou Pirro has them in are no doubt freakin' aces. Waaaaay above my pay-grade, and I don't even know what those motors look like.-john
John Havlicek
#2134
wbugenis
-

- Full Member
-
- 330 posts Joined: 17-December 09
On The Lead Lap
- Gender:Male
- Location:Brooklyn, NY
Posted 21 November 2010 - 09:56 AM
Pictures of eurosport motors, chassis and players here:
http://www.lslots.co...worlds2010.html
Chassis are scratchbuilt: Send a CAD drawing and some pieces of Swedish or German Cutlery steel to an EDM house and back comes a eurosport chassis kit. Solder it together and there you go.
The EDM machine can cut anything in 2 dimensions you can draw.
Bill
http://www.lslots.co...worlds2010.html
Chassis are scratchbuilt: Send a CAD drawing and some pieces of Swedish or German Cutlery steel to an EDM house and back comes a eurosport chassis kit. Solder it together and there you go.
The EDM machine can cut anything in 2 dimensions you can draw.
Bill
William Bugenis
#2135
havlicek
-
- Subscriber
-
- 11,198 posts Joined: 20-August 07
OCD Rewinder
- Gender:Male
- Location:NY
Posted 21 November 2010 - 01:09 PM
 ...I gotta get out more often and catch-up on my current events!
-john
John Havlicek
#2136
wbugenis
-
- Full Member
-
- 330 posts Joined: 17-December 09
On The Lead Lap
- Gender:Male
- Location:Brooklyn, NY
Posted 21 November 2010 - 01:36 PM
No, John, don't get out - stay home and wind!! The 23/25 arms you did that work so well went into setups just like those.
Bill
Bill
William Bugenis
#2137
havlicek
-
- Subscriber
-
- 11,198 posts Joined: 20-August 07
OCD Rewinder
- Gender:Male
- Location:NY
Posted 21 November 2010 - 03:51 PM
Okey dokey Bill ...and here's the arm for the new one I call "Strap-Nut" next to it's new home:
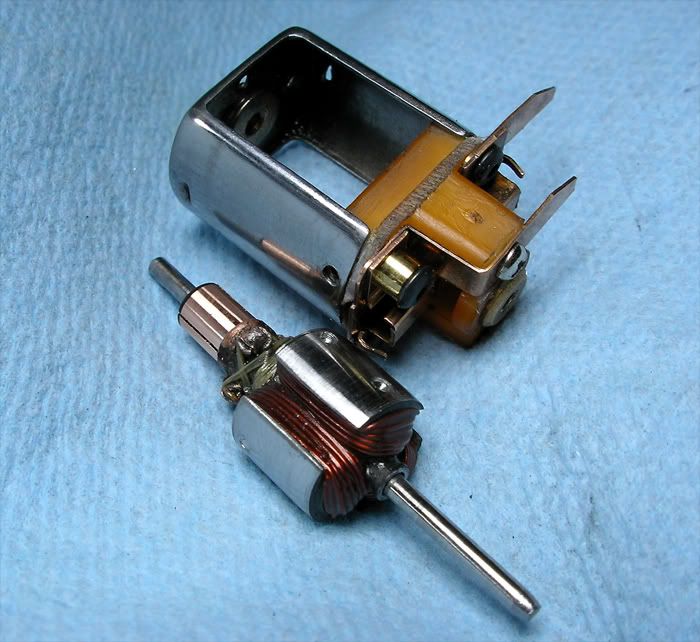
With the bits I've been able to pick up here and there doing all these arms, even the thick web Muras are getting a little easier and more consistent.
-john (ready to wind a bunch more of those 25's)
...and here's the arm for the new one I call "Strap-Nut" next to it's new home:With the bits I've been able to pick up here and there doing all these arms, even the thick web Muras are getting a little easier and more consistent.
-john (ready to wind a bunch more of those 25's)
John Havlicek
#2138
Robert V.
-
- Full Member
-
- 350 posts Joined: 14-November 09
On The Lead Lap
Posted 21 November 2010 - 04:25 PM
Hi John
wow that motor is awsome i love everything about it, the arm looks like it's chrome plated as does the can, itshould really have some power it looks fast just sitting there.
wow that motor is awsome i love everything about it, the arm looks like it's chrome plated as does the can, itshould really have some power it looks fast just sitting there.
Robert Vaglio
#2139
havlicek
-
- Subscriber
-
- 11,198 posts Joined: 20-August 07
OCD Rewinder
- Gender:Male
- Location:NY
Posted 21 November 2010 - 04:31 PM
Hi Robert and thanks. The can was wet-sanded to #400 and then polished, the arm was done with #320...'cause shiny stuff goes faster! I made some adjustments in how I epoxy these things and braze the com connections as well as got a new meter, so I see improvements coming...hopefully! 

-john
I made some adjustments in how I epoxy these things and braze the com connections as well as got a new meter, so I see improvements coming...hopefully! -john
John Havlicek
#2140
Victor Poulin
-
- Full Member
-
- 2,097 posts Joined: 04-March 08
Posting Leader
- Gender:Male
- Location:Raymond, NH
Posted 21 November 2010 - 05:05 PM
Look real perdy John I'm anxious to hear how it runs! That arm looks Da- Balls !! Every time I think you've out done yourself, you do it again
Vic
I'm anxious to hear how it runs! That arm looks Da- Balls !! Every time I think you've out done yourself, you do it again Vic
Alright, who cut the cheese?
#2141
havlicek
-
- Subscriber
-
- 11,198 posts Joined: 20-August 07
OCD Rewinder
- Gender:Male
- Location:NY
Posted 21 November 2010 - 08:31 PM
Thanks Vic. It's been a great help (even if Bill doesn't realize it) winding arms for Bill. It has forced me to look critically at this stuff.
-john
-john
John Havlicek
#2142
Robert V.
-
- Full Member
-
- 350 posts Joined: 14-November 09
On The Lead Lap
Posted 21 November 2010 - 09:03 PM
Hi John
Yes that is a very pretty motor let us know how it runs.
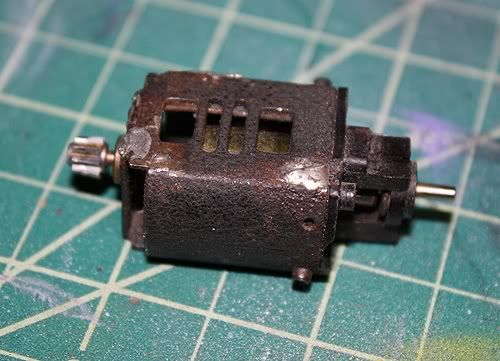
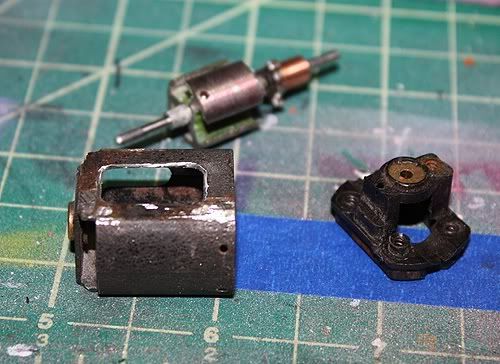
Ok it's time for a new build, first pic below shows an old Mura group 15 it does look a bit on the sad side but i think it's a good candidate for a hi po rebuild i would like to see just how much power i can get out of this motor without welding the comm tabs because i have no way of doing that, second pic shows the motor torn down and i opened up the cooling holes last pic show the arm i am going to use it's an old Koford group 15 it should work as the shaft is straight and it has a good comm. I am going to try 24 gauge wind as the magnets look to be pretty strong and they pull pretty hard without the brushes, with any luck it will stay together but i have my douts wish me luck.

Yes that is a very pretty motor let us know how it runs.
Ok it's time for a new build, first pic below shows an old Mura group 15 it does look a bit on the sad side but i think it's a good candidate for a hi po rebuild i would like to see just how much power i can get out of this motor without welding the comm tabs because i have no way of doing that, second pic shows the motor torn down and i opened up the cooling holes last pic show the arm i am going to use it's an old Koford group 15 it should work as the shaft is straight and it has a good comm. I am going to try 24 gauge wind as the magnets look to be pretty strong and they pull pretty hard without the brushes, with any luck it will stay together but i have my douts wish me luck.
Robert Vaglio
#2143
havlicek
-
- Subscriber
-
- 11,198 posts Joined: 20-August 07
OCD Rewinder
- Gender:Male
- Location:NY
Posted 21 November 2010 - 09:28 PM
Hi Robert,
That's a nice Mura/Koford platform to build on and it helps to start with quality materials. Be mindful that the arm was already balanced and that can either work for or against you. The blank has plenty of room inside to wind and the com looks hardly worn at all. Since you're not going to braze the com connections, it's a good idea to get the inside of the tabs clean to get room in there and then try and crimp them over the wire before soldering. The mechanical connection of the crimp can help keep things together some. I've done a lot of this type thing along the way and these things make really cool projects. They can be run for a lap or so with soldered connections, but a 24 is serious medicine. Do you have a wind in mind for the "big wire"?
-john
John Havlicek
#2144
Robert V.
-
- Full Member
-
- 350 posts Joined: 14-November 09
On The Lead Lap
Posted 21 November 2010 - 11:16 PM
Hi John
I am going to do what you said and clean the comm tabs before i start winding it's a good idea, i am not shore how many turns of 24 gauge i should use because i have never tried a wind this hot if you have any thoughts on it i am all ears. I am hoping it holds together with the solder, crimping and a few coats of epoxy either way it should have some power at least for a short time.
I am going to do what you said and clean the comm tabs before i start winding it's a good idea, i am not shore how many turns of 24 gauge i should use because i have never tried a wind this hot if you have any thoughts on it i am all ears. I am hoping it holds together with the solder, crimping and a few coats of epoxy either way it should have some power at least for a short time.
Robert Vaglio
#2145
Alchemist
-
- Full Member
-
- 2,704 posts Joined: 11-November 09
Posting Leader
- Gender:Male
- Location:Far, far away
Posted 22 November 2010 - 01:52 AM
Hi John,
Very nice arm - as usual!
Just curious - if you have an arm that has been previously balanced with no spare stacks available to replace the drilled stacks, would it be possible to use epoxy to fill in the drilled balance marks, "blocksand" the epoxy flush and rebalance the arm?
Robert,
I'm looking forward to seeing your rewind!!
Thank you.
Ernie
Ernie Layacan
#2146
havlicek
-
- Subscriber
-
- 11,198 posts Joined: 20-August 07
OCD Rewinder
- Gender:Male
- Location:NY
Posted 22 November 2010 - 06:32 AM
Hi Ernie,
Filling the holes won't work, first...it might let go and second the weight of the epoxy isn't nearly what the weight of the steel removed was so it's not worth it. I guess some solder might work but it weighs more than steel so it would likely cause errors in the other direction. Besides, to get a good solder bond, it's probably necessary to use acid and that might get between the laminations and cause a mess down the road.
Robert,
If you use a single continuous piece of wire when winding, you might want to plan what pole you start on accordingly. Oftentimes, the last pole can be slightly heavier than the other two, and the last com tab slightly heavier because of the two ends of magnet wire overlapping...depending on how you attach the wire at the tabs. You can also see what the balance condition is like without any wire on the arm and plan your winding sequence accordingly. It can help to mark the poles with a Sharpie ..."A< B< C or 1>2>3 " from heaviest to lightest or whatever code you want before winding. I've done some that were already balanced like yours and had them turn out OK with some balancing touch-up afterwards. If the arm is more than a little out after winding, it may be impossible to remove enough metal without weakening the arm because of it having been drilled already.
With #24 wire, you're going to be down in the 19-20 turns range with that arm and setup...even less believe it or not. When you're doing so few turns of such massive wire, neatness really counts. Think about it, if you're doing 80T/#30 on a FT36D, you can be off by as much as a couple of turns from pole to pole and it's a small change percentage-wise. It's not good, but it's not a deal breaker and you'd be surprised to find out how many factory arms are off, and that's not even looking the length of wire per pole. When you're doing only 19 turns, being off by length of only 1/2" (about a half turn) is way more significant. Try and match your winding patterns from pole to pole as well as the number of turns. Count how many turns are on the first layer before you "turn around and head back towards the com...the second layer etc. and also try to duplicate the way you make the turnarounds as you start on the next layer...which side of the pole you overlap the wire on and how you handle the pole ends when winding them. This project can be a GREAT help for future winds because seeing what's going on is easier with heavy wire...but actually winding is much more difficult. It's a little like training for track with ankle weights and then taking them off for the event People who don't know about winding might see doing such an heavy wind as useless, I see it as exactly the opposite and no matter what happens with the arm, that nice Mura setup will be there as a great test bed for future winds!
Plan on throwing away wire so you can work on patterns and technique. It's better to waste some wire than to have an arm all done and it not being what you planned.
Have fun!
-john
Filling the holes won't work, first...it might let go and second the weight of the epoxy isn't nearly what the weight of the steel removed was so it's not worth it. I guess some solder might work but it weighs more than steel so it would likely cause errors in the other direction. Besides, to get a good solder bond, it's probably necessary to use acid and that might get between the laminations and cause a mess down the road.
Robert,
If you use a single continuous piece of wire when winding, you might want to plan what pole you start on accordingly. Oftentimes, the last pole can be slightly heavier than the other two, and the last com tab slightly heavier because of the two ends of magnet wire overlapping...depending on how you attach the wire at the tabs. You can also see what the balance condition is like without any wire on the arm and plan your winding sequence accordingly. It can help to mark the poles with a Sharpie ..."A< B< C or 1>2>3 " from heaviest to lightest or whatever code you want before winding. I've done some that were already balanced like yours and had them turn out OK with some balancing touch-up afterwards. If the arm is more than a little out after winding, it may be impossible to remove enough metal without weakening the arm because of it having been drilled already.
With #24 wire, you're going to be down in the 19-20 turns range with that arm and setup...even less believe it or not. When you're doing so few turns of such massive wire, neatness really counts. Think about it, if you're doing 80T/#30 on a FT36D, you can be off by as much as a couple of turns from pole to pole and it's a small change percentage-wise. It's not good, but it's not a deal breaker and you'd be surprised to find out how many factory arms are off, and that's not even looking the length of wire per pole. When you're doing only 19 turns, being off by length of only 1/2" (about a half turn) is way more significant. Try and match your winding patterns from pole to pole as well as the number of turns. Count how many turns are on the first layer before you "turn around and head back towards the com...the second layer etc. and also try to duplicate the way you make the turnarounds as you start on the next layer...which side of the pole you overlap the wire on and how you handle the pole ends when winding them. This project can be a GREAT help for future winds because seeing what's going on is easier with heavy wire...but actually winding is much more difficult. It's a little like training for track with ankle weights and then taking them off for the event
People who don't know about winding might see doing such an heavy wind as useless, I see it as exactly the opposite and no matter what happens with the arm, that nice Mura setup will be there as a great test bed for future winds! Plan on throwing away wire so you can work on patterns and technique. It's better to waste some wire than to have an arm all done and it not being what you planned.
Have fun!
-john
John Havlicek
#2147
Robert V.
-
- Full Member
-
- 350 posts Joined: 14-November 09
On The Lead Lap
Posted 22 November 2010 - 08:18 AM
Hi John
I agree John even a small error with this large guage wire might cause a problem, i will mark the stacks to keep track of the heavy one and try not to start and end my wind on it, i think i will do a few winds on this arm for parctice first before i solder and try to keep track of my winding pattern before i commit to the final wind. Thanks for your help.
Hi Ernie
I hope it goes well we will see, i will post pics either way.
Robert Vaglio
#2148
Champion 507
-

- Full Member
-
- 1,521 posts Joined: 06-March 09
Checkered Flag in Hand
- Gender:Male
- Location:OK
Posted 22 November 2010 - 09:26 PM
Robert,
I, too, have a number of rusty Mura hulks (almost identical to what you've started here) that I want to return to pristine condition. As a matter of fact some of mine are in WORSE shape than yours. But I can see the potential beyond all the rust, so I know I can save them. I probably won't do any #24's (well maybe one) but most of mine will be #25's - #28's and maybe some doubles. I'm hoping to return to motor building next year and maybe even open Motor Shop up again. Gee, I'm only 101 pages behind John"s "Arm Winding" thread. Do you think I'll be able to catch up?....yeah, I don't think so either. Carry on Robert and John. You guys have some good things going on here.
I, too, have a number of rusty Mura hulks (almost identical to what you've started here) that I want to return to pristine condition. As a matter of fact some of mine are in WORSE shape than yours. But I can see the potential beyond all the rust, so I know I can save them. I probably won't do any #24's (well maybe one) but most of mine will be #25's - #28's and maybe some doubles. I'm hoping to return to motor building next year and maybe even open Motor Shop up again. Gee, I'm only 101 pages behind John"s "Arm Winding" thread. Do you think I'll be able to catch up?....yeah, I don't think so either. Carry on Robert and John. You guys have some good things going on here.
Doug Azary
"We offer prompt service... no matter how long it takes!"
"We're not happy unless you're not happy"
"You want it when?"
"We offer prompt service... no matter how long it takes!"
"We're not happy unless you're not happy"
"You want it when?"
#2149
Robert V.
-
- Full Member
-
- 350 posts Joined: 14-November 09
On The Lead Lap
Posted 22 November 2010 - 10:19 PM
Hi Doug
Thanks Doug for making mention of me in there with John but i am not even close to the level he is at as i am just starting the real high performance winds and have a lot to learn. I think you should get back into motor building and don't worry about catching up with any body just go at your own pace and a have a good time building, i like those old Mura motors they have good cans decent magnets and pretty good brush gear but they are a bit heavy, i am going to guess that this motor was made around the late 1980's to early 1990's.
Thanks Doug for making mention of me in there with John but i am not even close to the level he is at as i am just starting the real high performance winds and have a lot to learn. I think you should get back into motor building and don't worry about catching up with any body just go at your own pace and a have a good time building, i like those old Mura motors they have good cans decent magnets and pretty good brush gear but they are a bit heavy, i am going to guess that this motor was made around the late 1980's to early 1990's.
Robert Vaglio
#2150
Robert V.
-
- Full Member
-
- 350 posts Joined: 14-November 09
On The Lead Lap
Posted 22 November 2010 - 10:30 PM
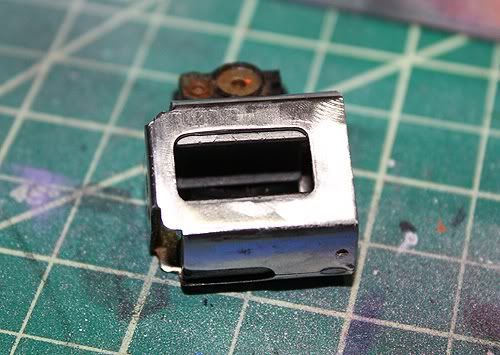
Well while i am on line a quick update on the motor i increased the hole size of the air vents and cleaned them up a bit than i stripped the paint off the can, i had to use epoxy to hold the magnets in because there isn't much left for the magnet clips to hold on to.
Robert Vaglio


