

This has been an amazing project. We all learned a lot. Glad you chronicled the build.

Building a four-lane MDF wood track
Started by
Bigdogbro1
, Apr 23 2024 03:59 PM
255 replies to this topic
#226

Dave Crevie
-

- Full Member
-

- 4,883 posts Joined: 16-February 09
Posting Leader
Posted 17 June 2025 - 11:41 AM
#227
Bigdogbro1
-
- Full Member
-
- 144 posts Joined: 23-April 24
Mid-Pack Racer
- Gender:Male
- Location:near Hell, MI
Posted 20 June 2025 - 06:18 AM
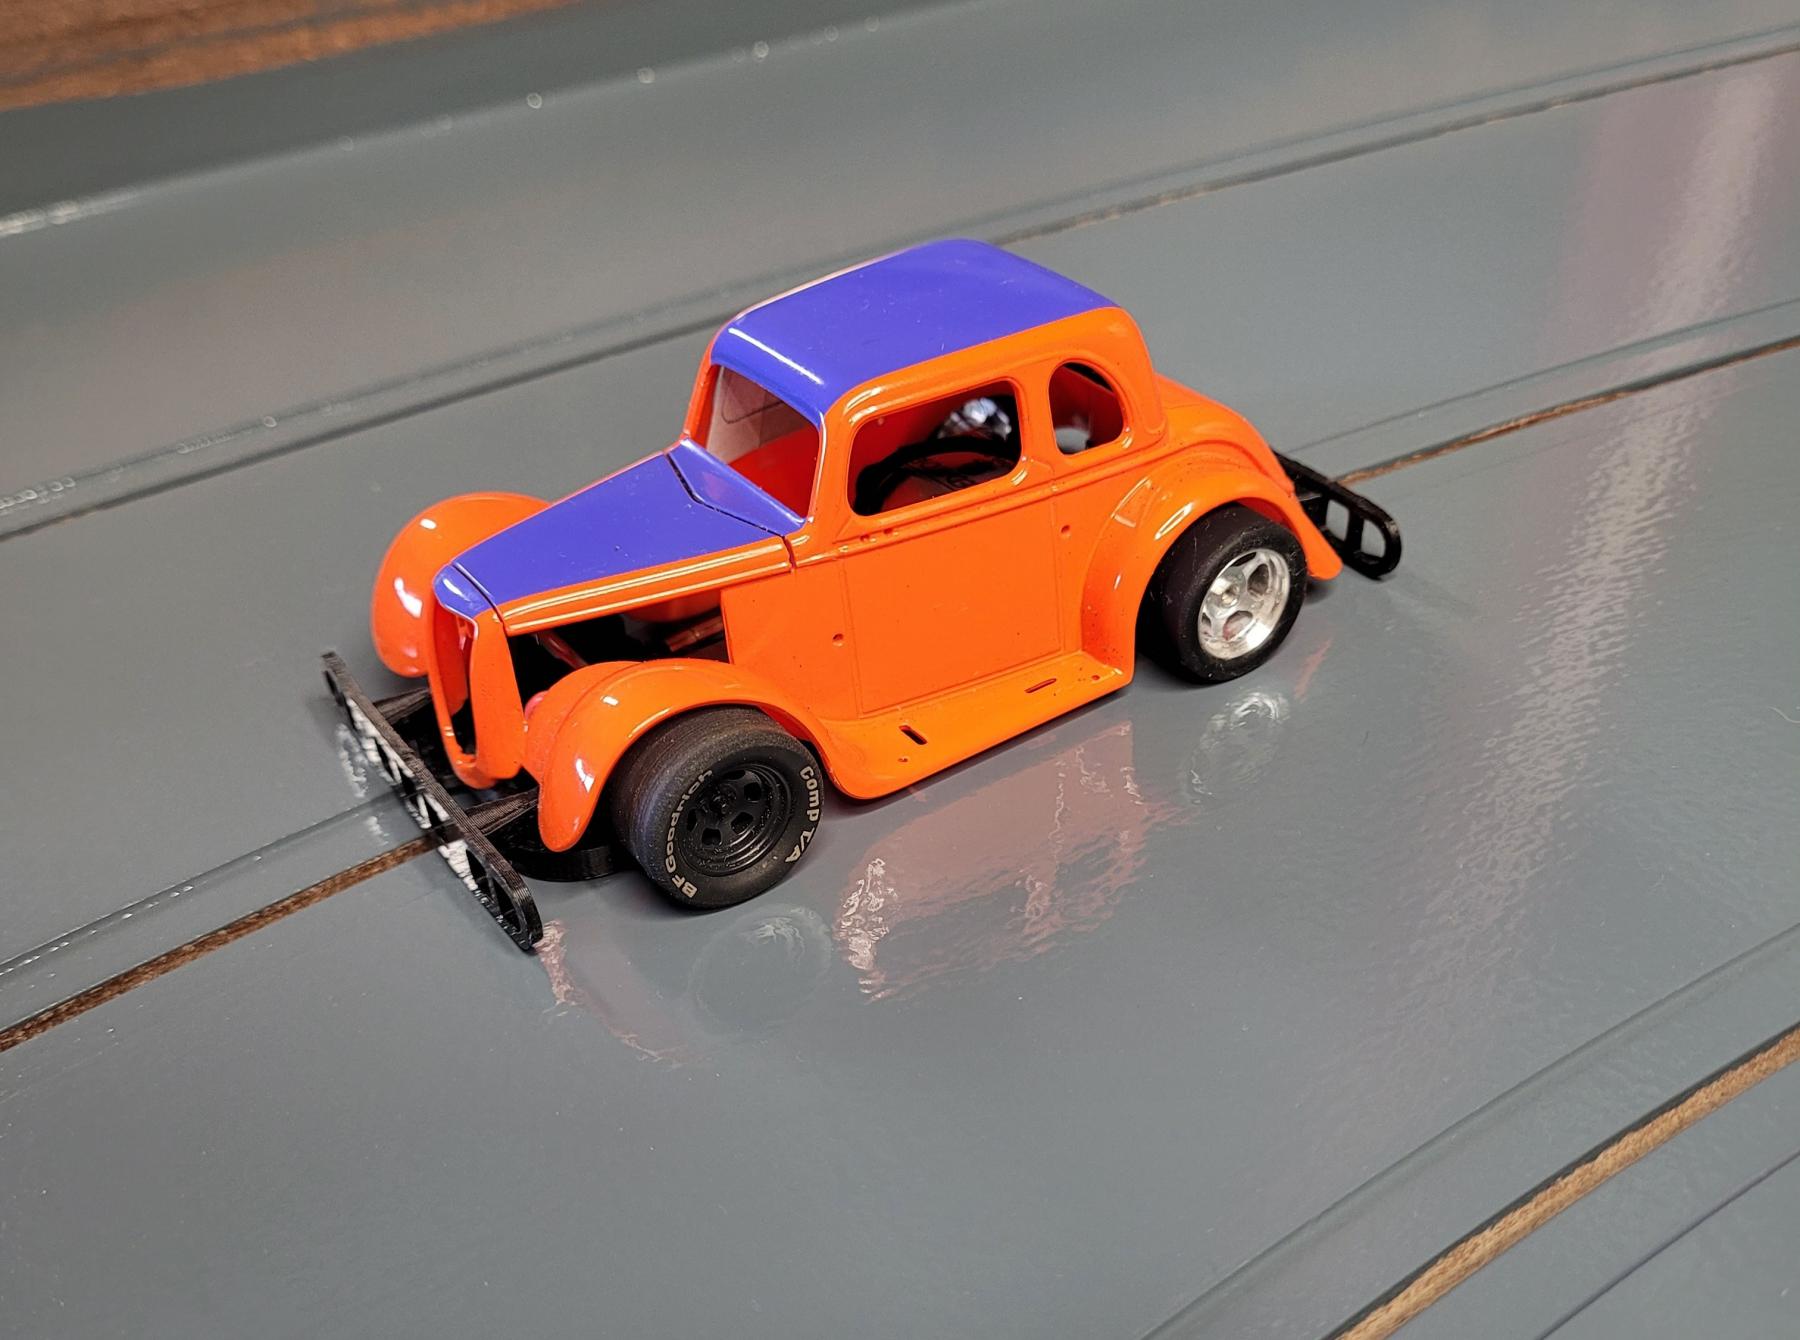
I did some silicone tire testing on the track surface and found that for now on virgin clean surfaces the silicone tires stick great. We'll see how good they are after the track and tires get dusty.
Attached Images
- vfr750 likes this
Rob Armbruster
#228
Bigdogbro1
-
- Full Member
-
- 144 posts Joined: 23-April 24
Mid-Pack Racer
- Gender:Male
- Location:near Hell, MI
Posted 20 June 2025 - 06:20 AM
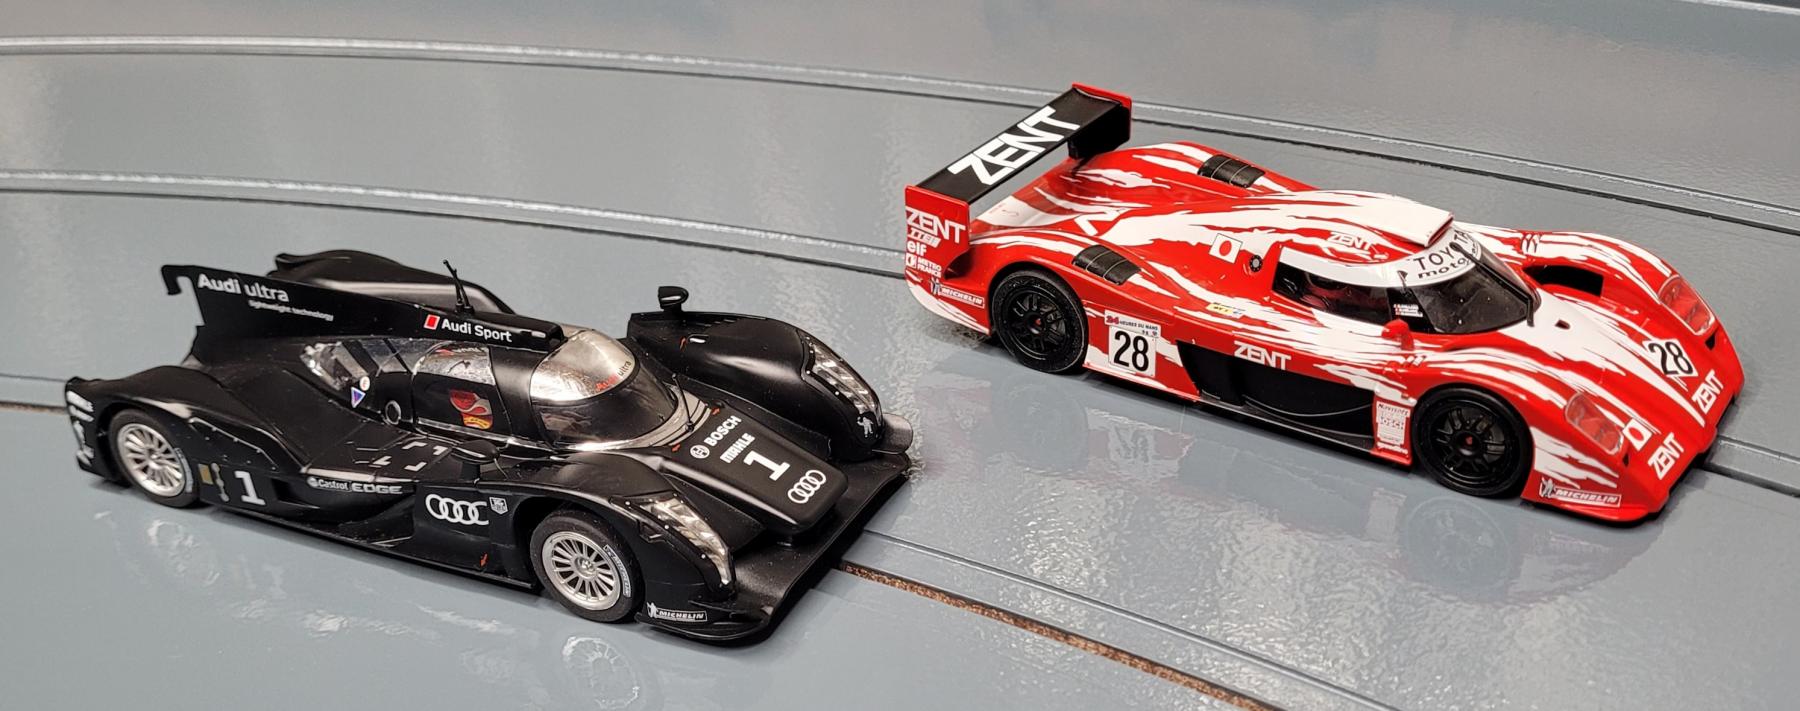
Here is an example of a black car on the darker gray track surface. The track surface in this picture looks lighter the overhead light reflection.
Attached Images
- vfr750 likes this
Rob Armbruster
#229
Bigdogbro1
-
- Full Member
-
- 144 posts Joined: 23-April 24
Mid-Pack Racer
- Gender:Male
- Location:near Hell, MI
Posted 20 June 2025 - 06:22 AM
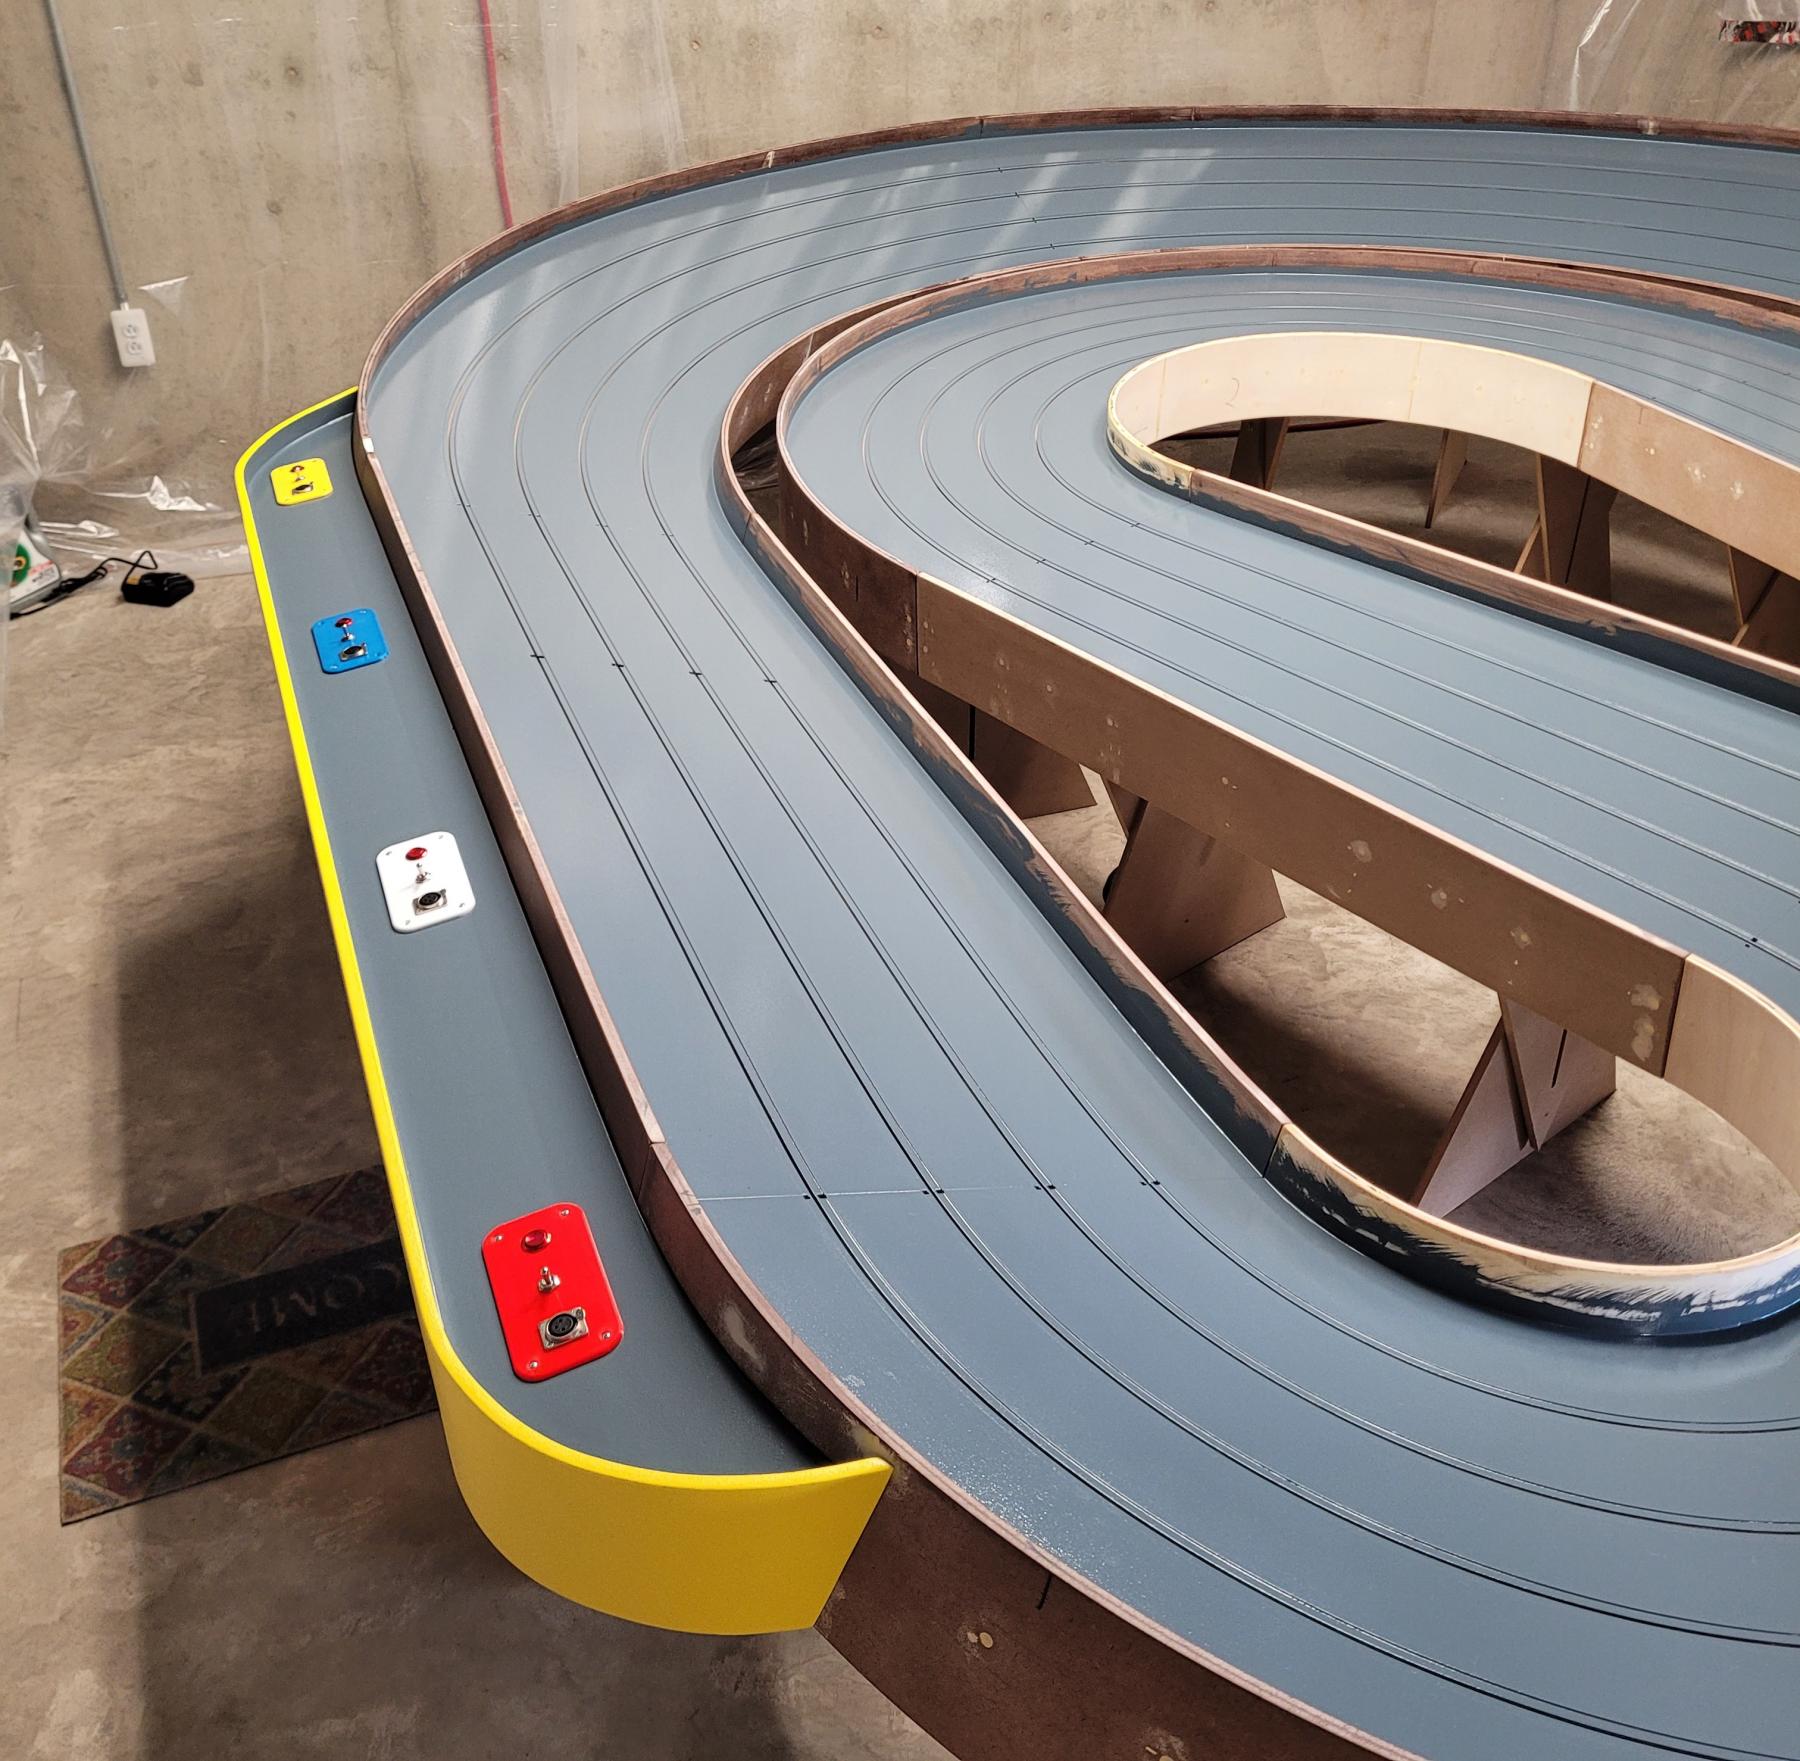
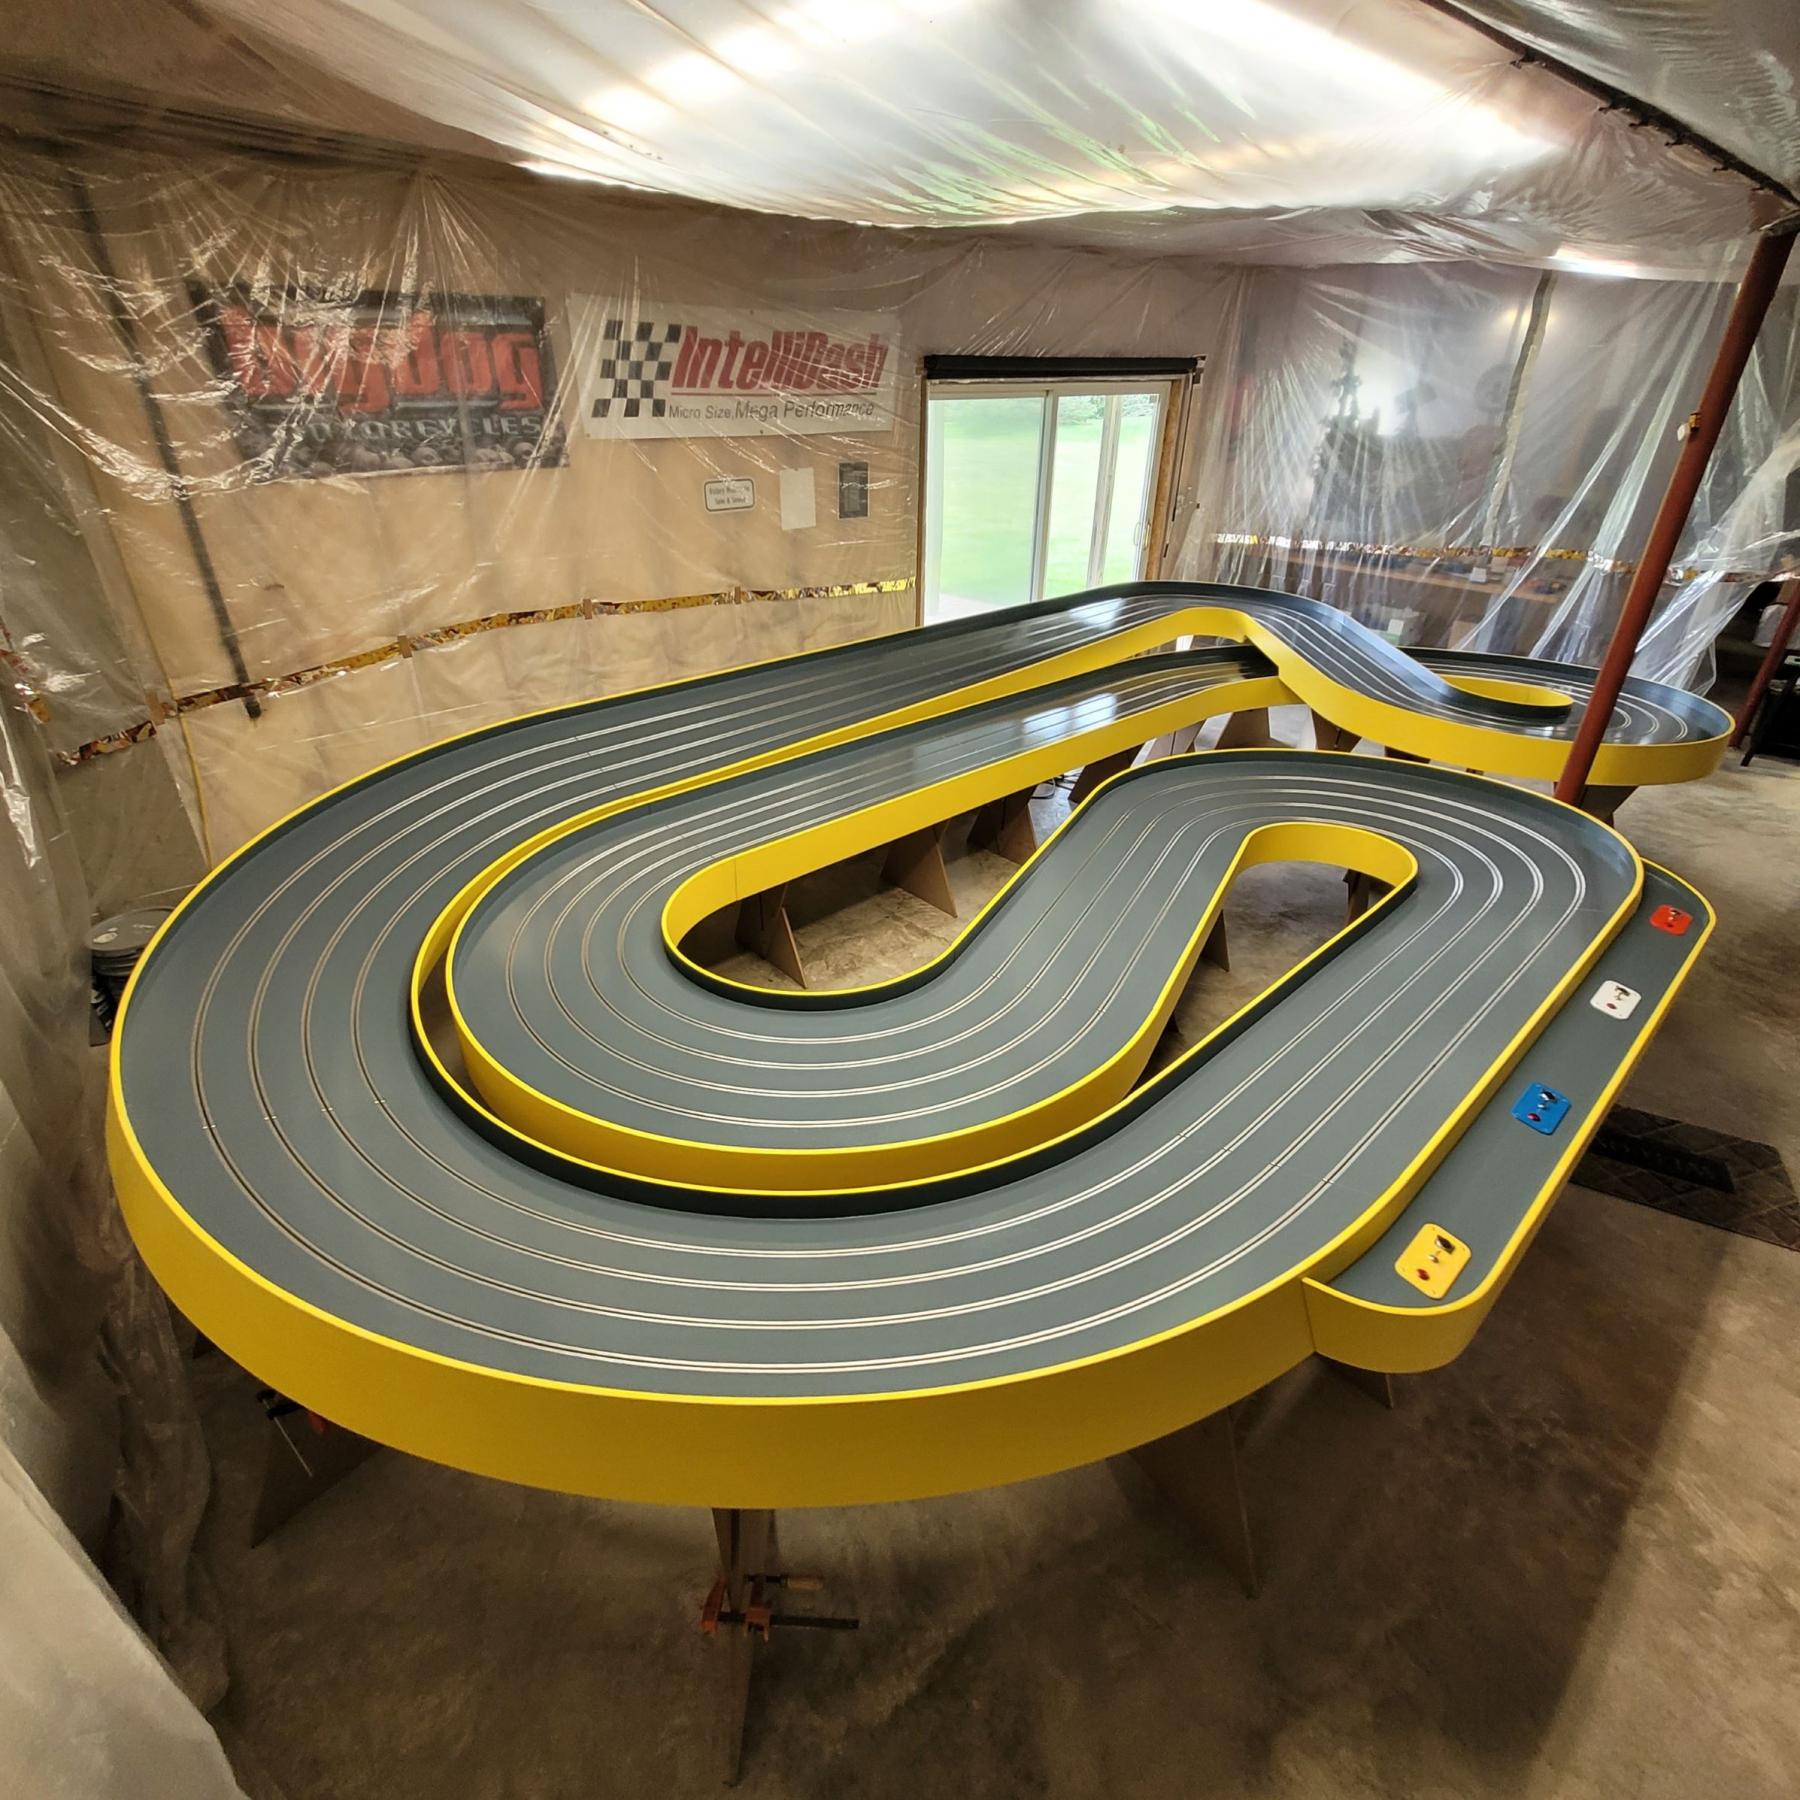
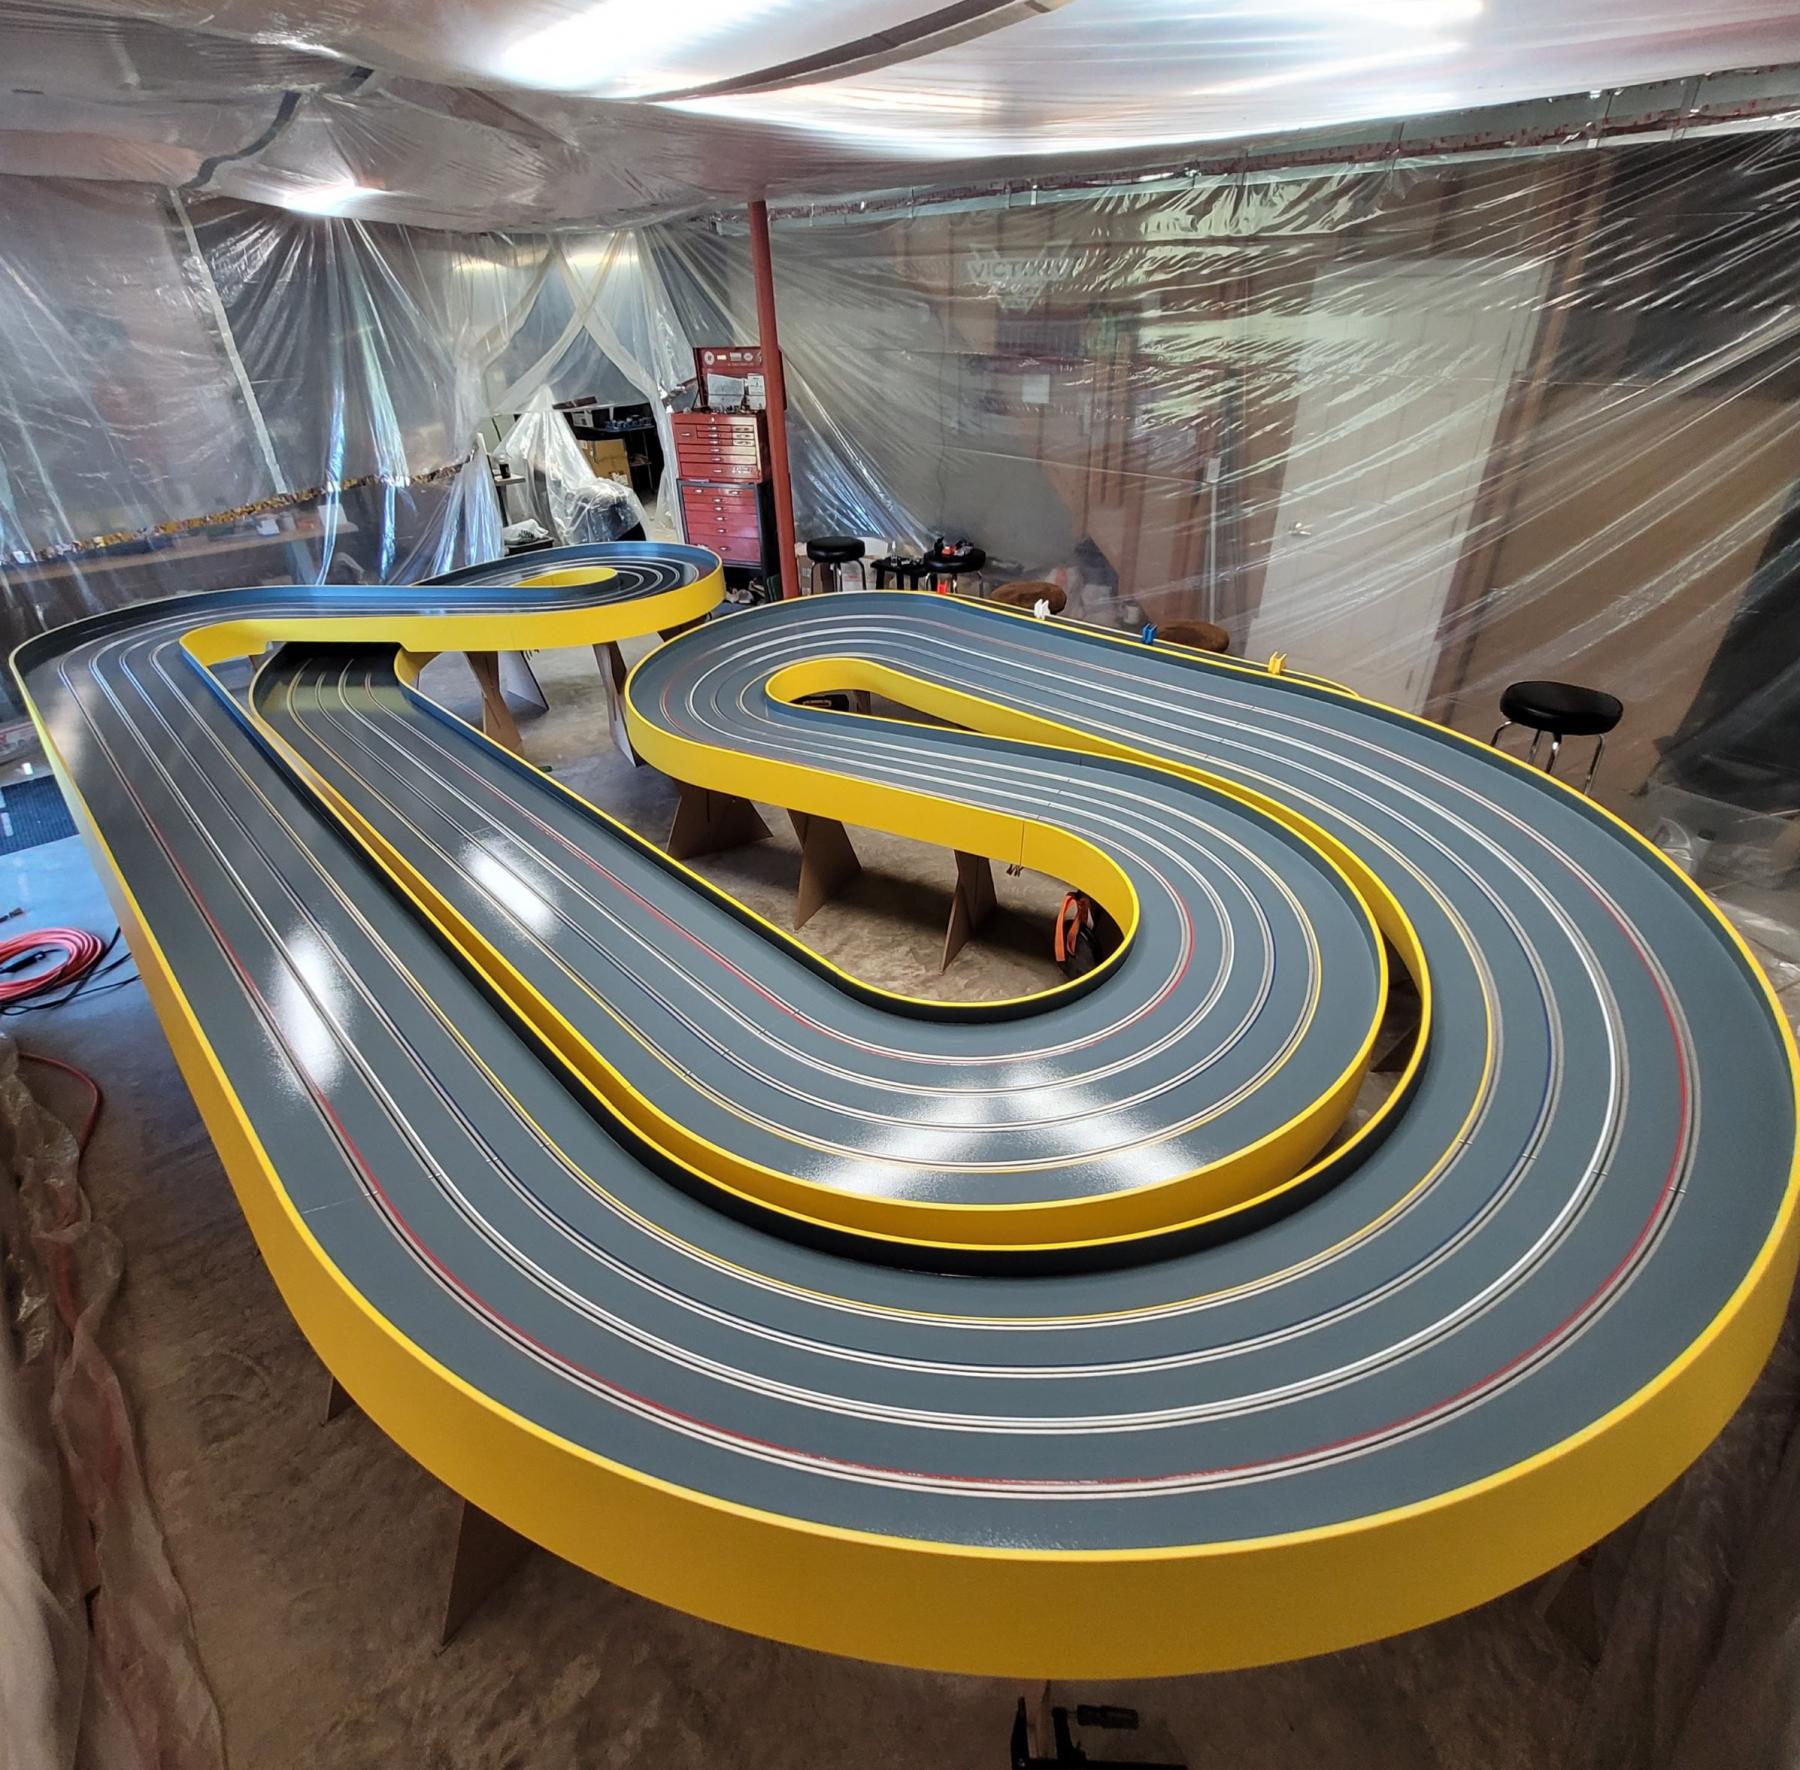
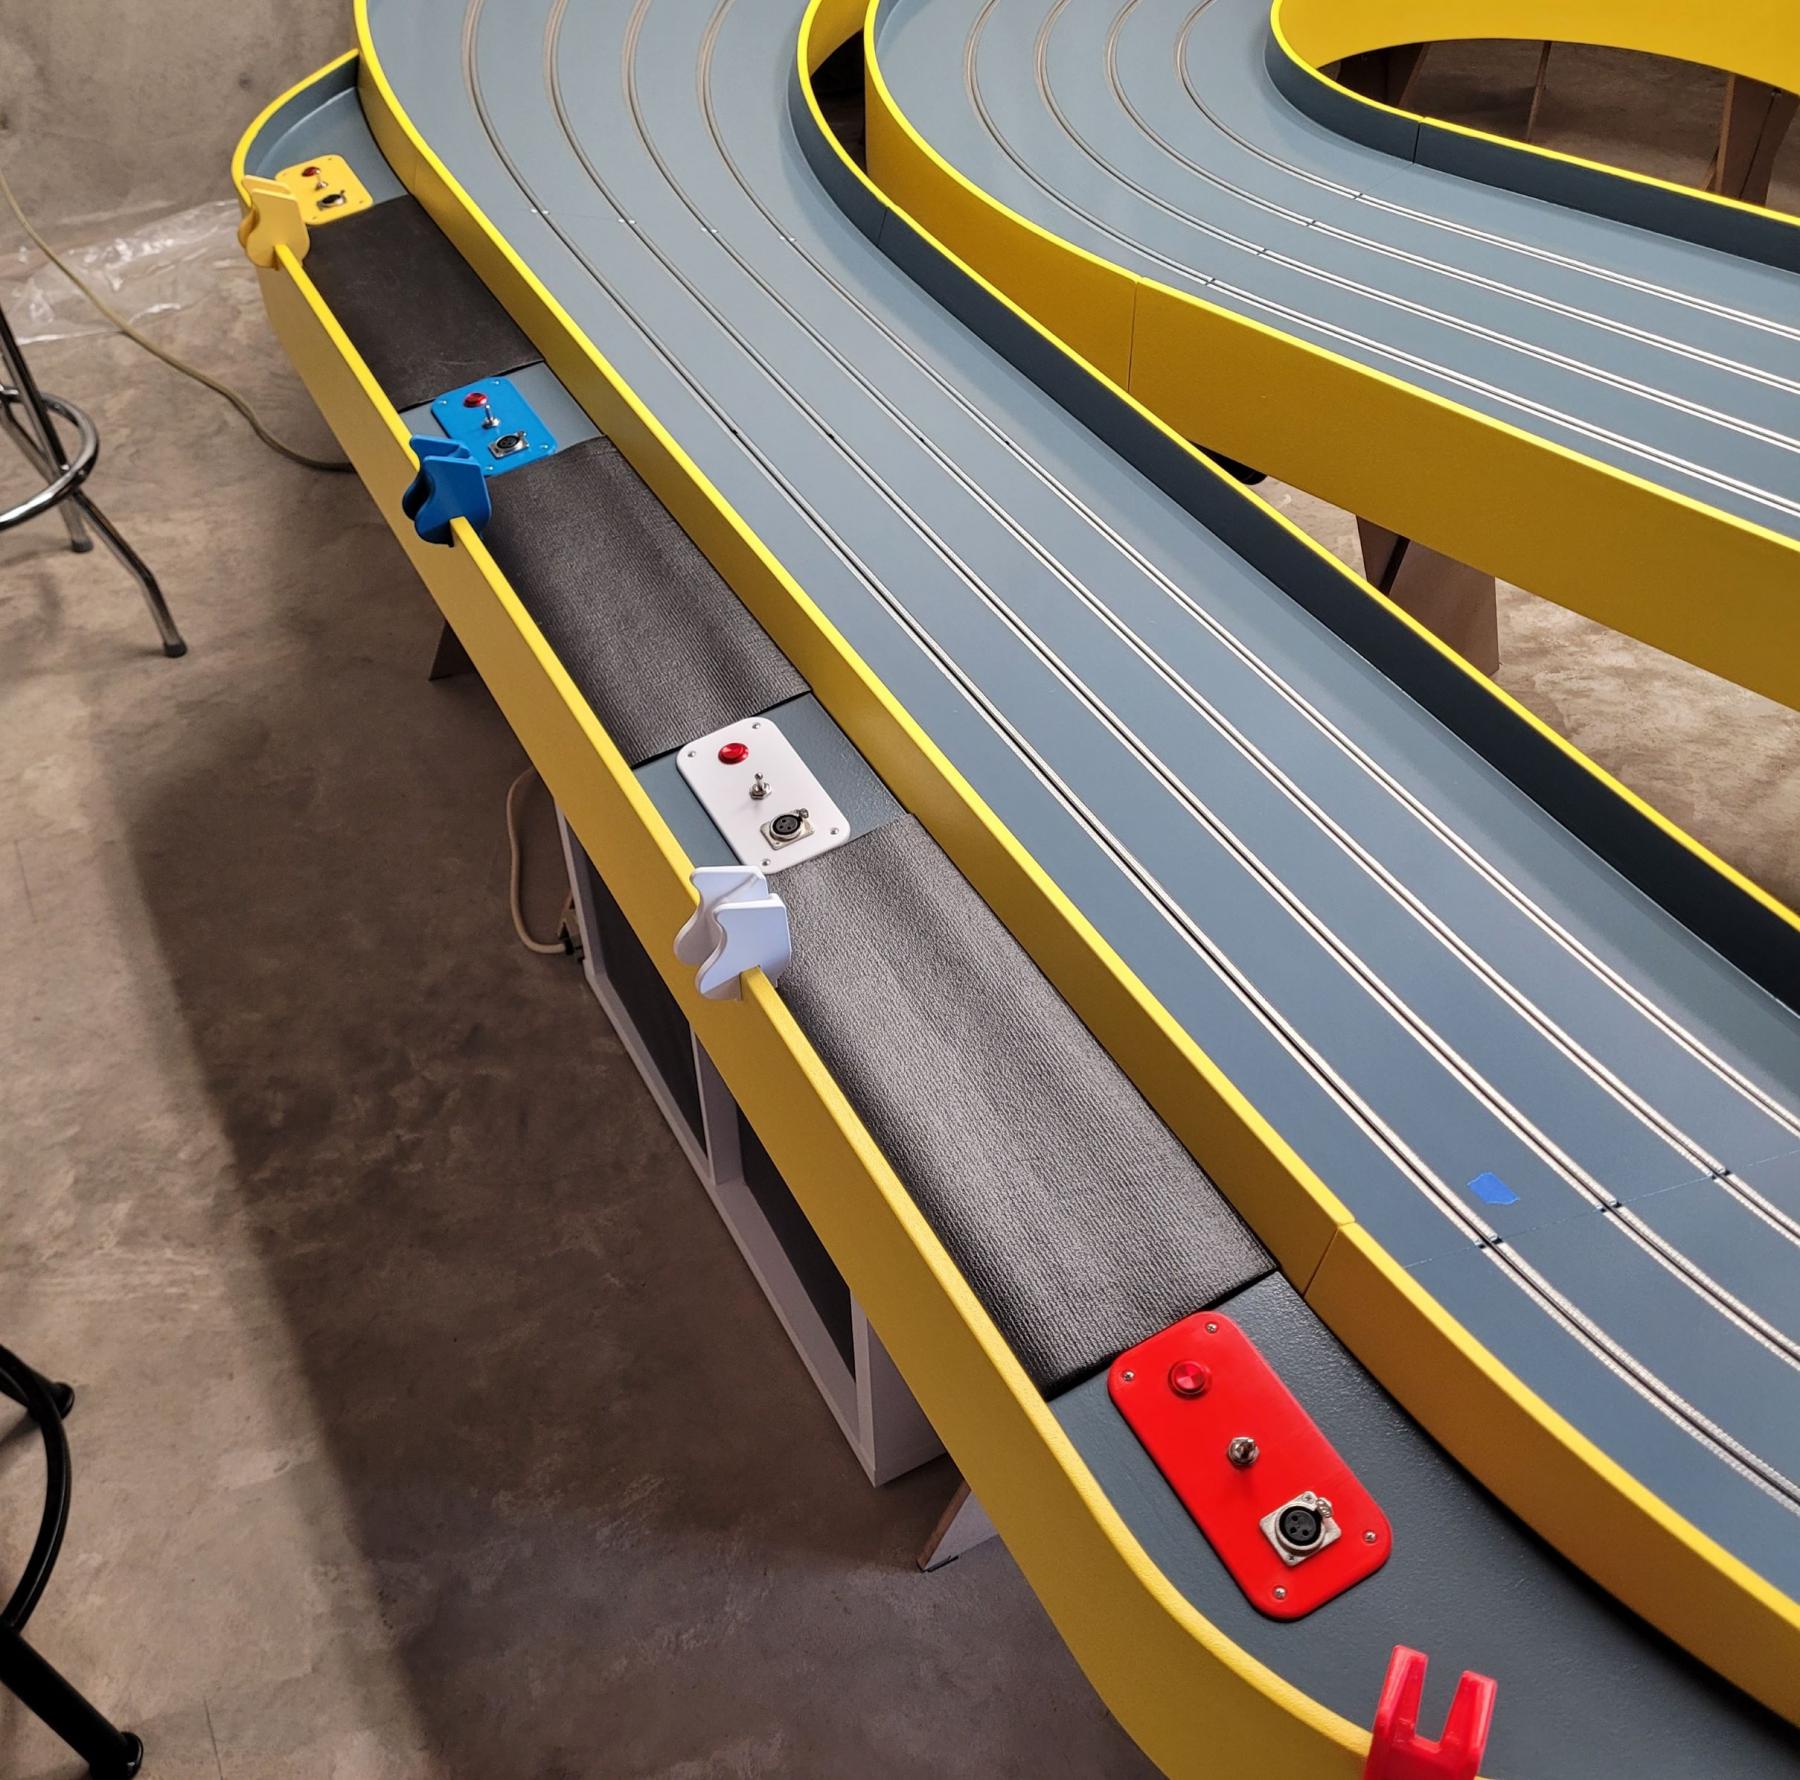
I wanted to see what the console looked like with the new track paint so I installed the console. I also finished the console wiring to the track and power supplies.
I will be breaking down the track into segments to paint the sidewalls so the sidewall gaps don't get filled with paint when it gets rolled on. I can also lay the braid down.
I spent some time during the build lately to determine the best driver station location and track lane position for visibility around the track.
Attached Images
- vfr750 likes this
Rob Armbruster
#230
Bigdogbro1
-
- Full Member
-
- 144 posts Joined: 23-April 24
Mid-Pack Racer
- Gender:Male
- Location:near Hell, MI
Posted 24 June 2025 - 02:10 PM
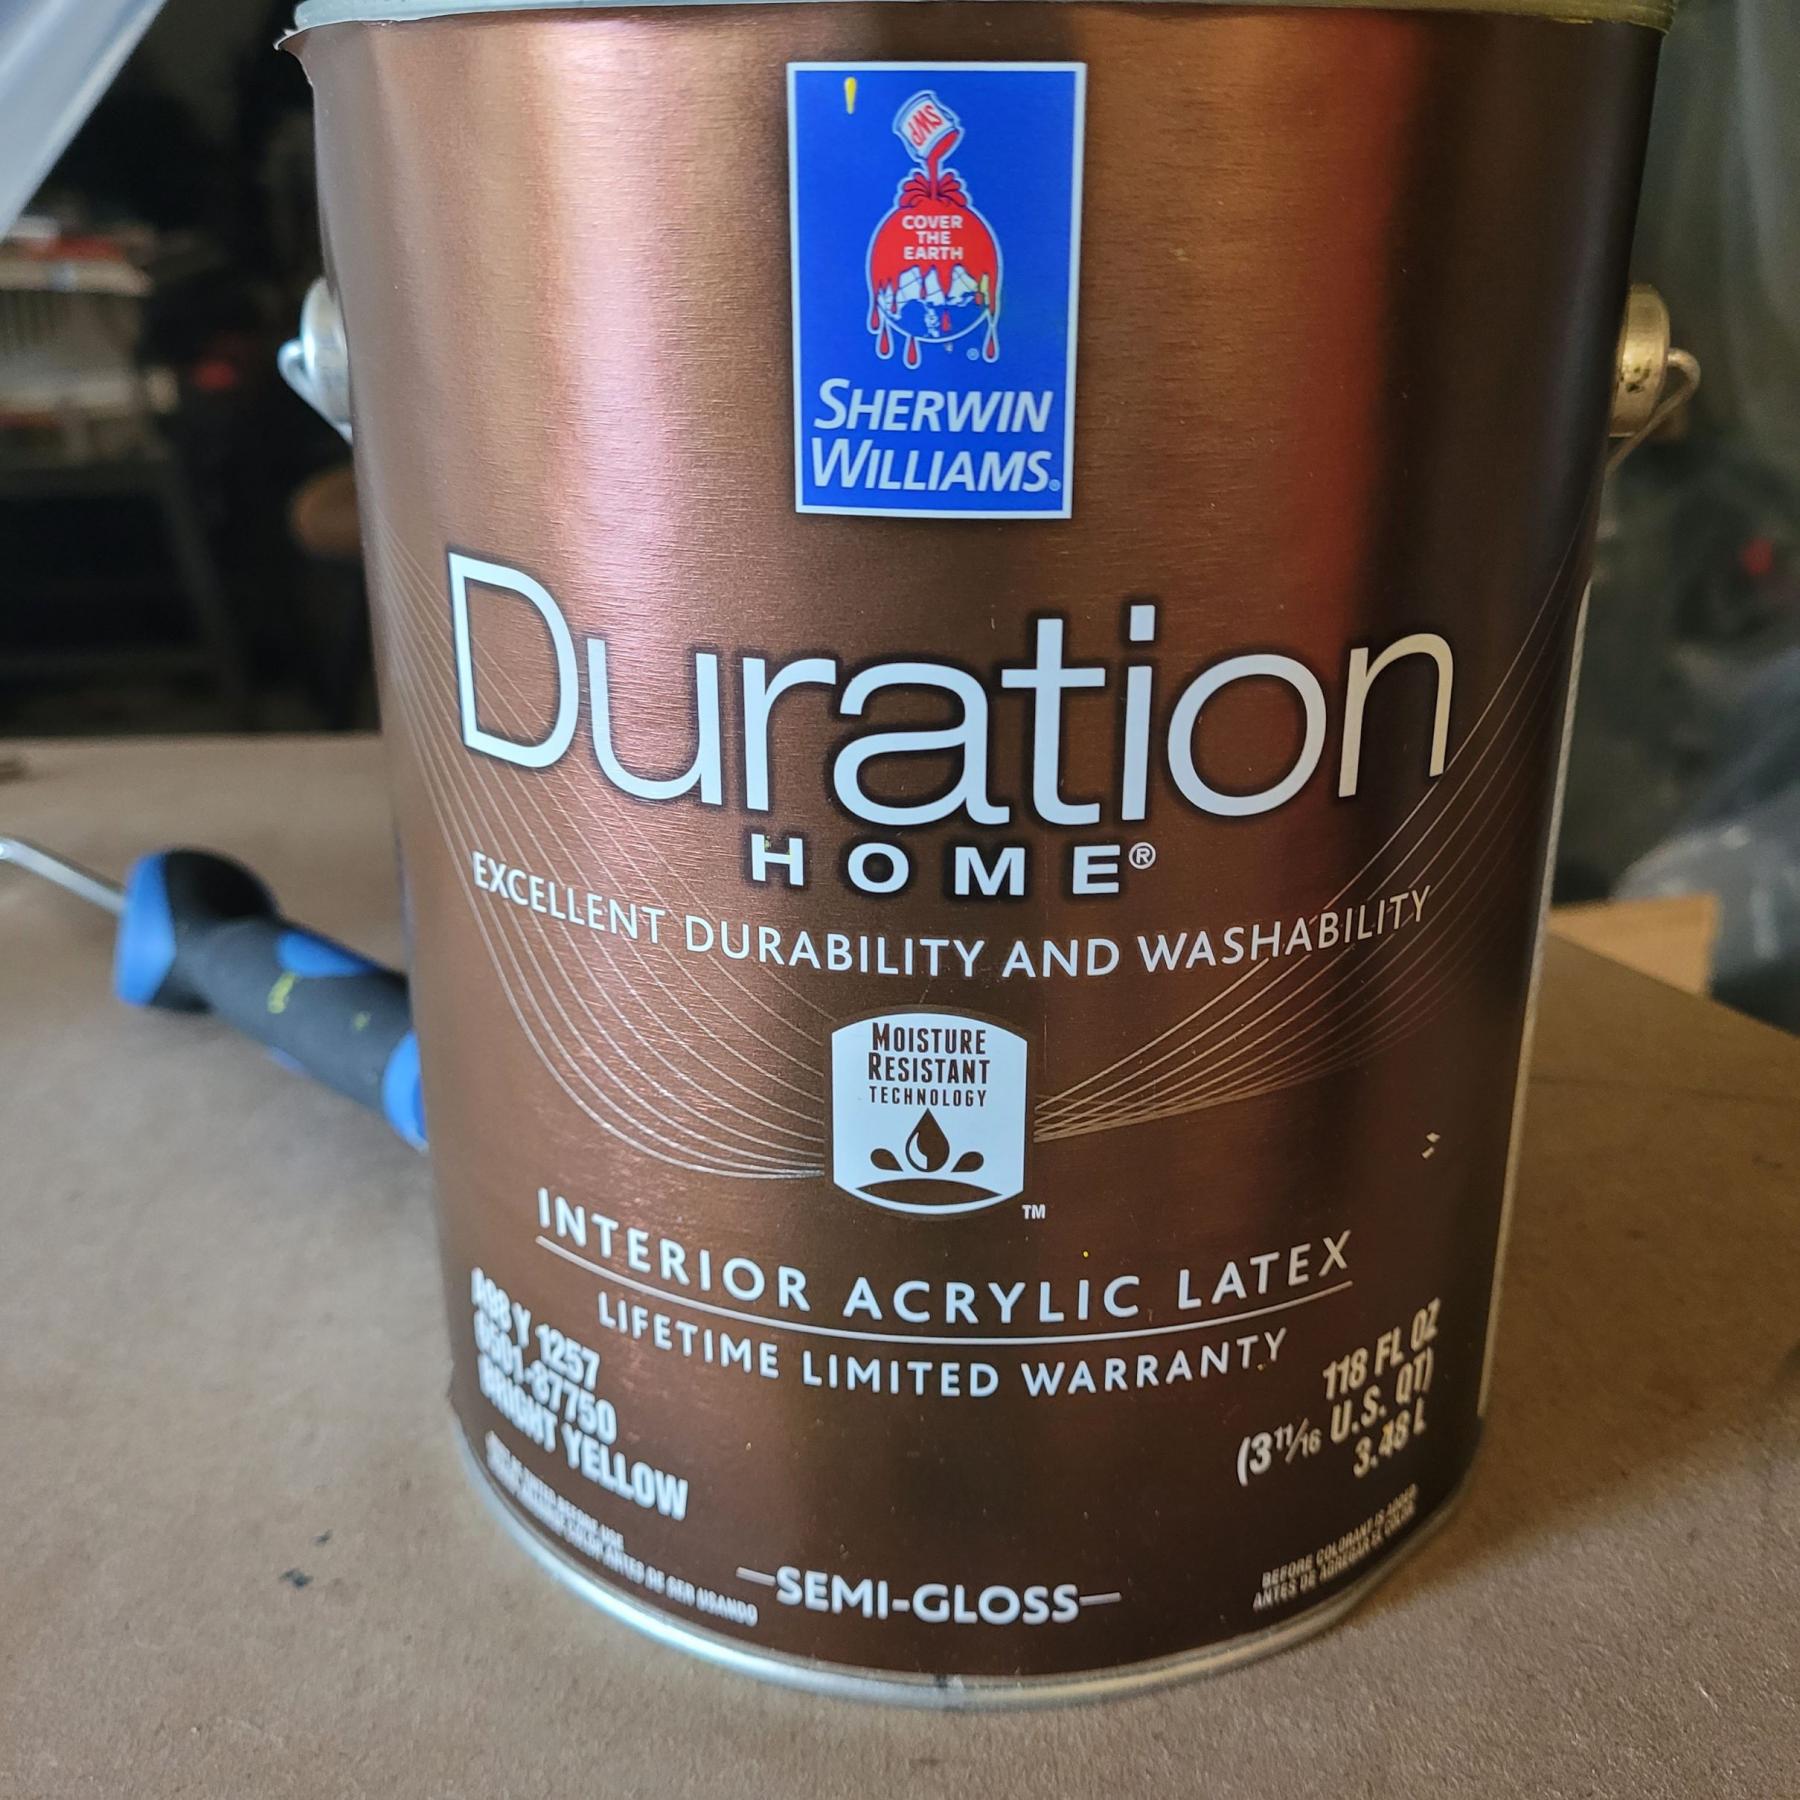
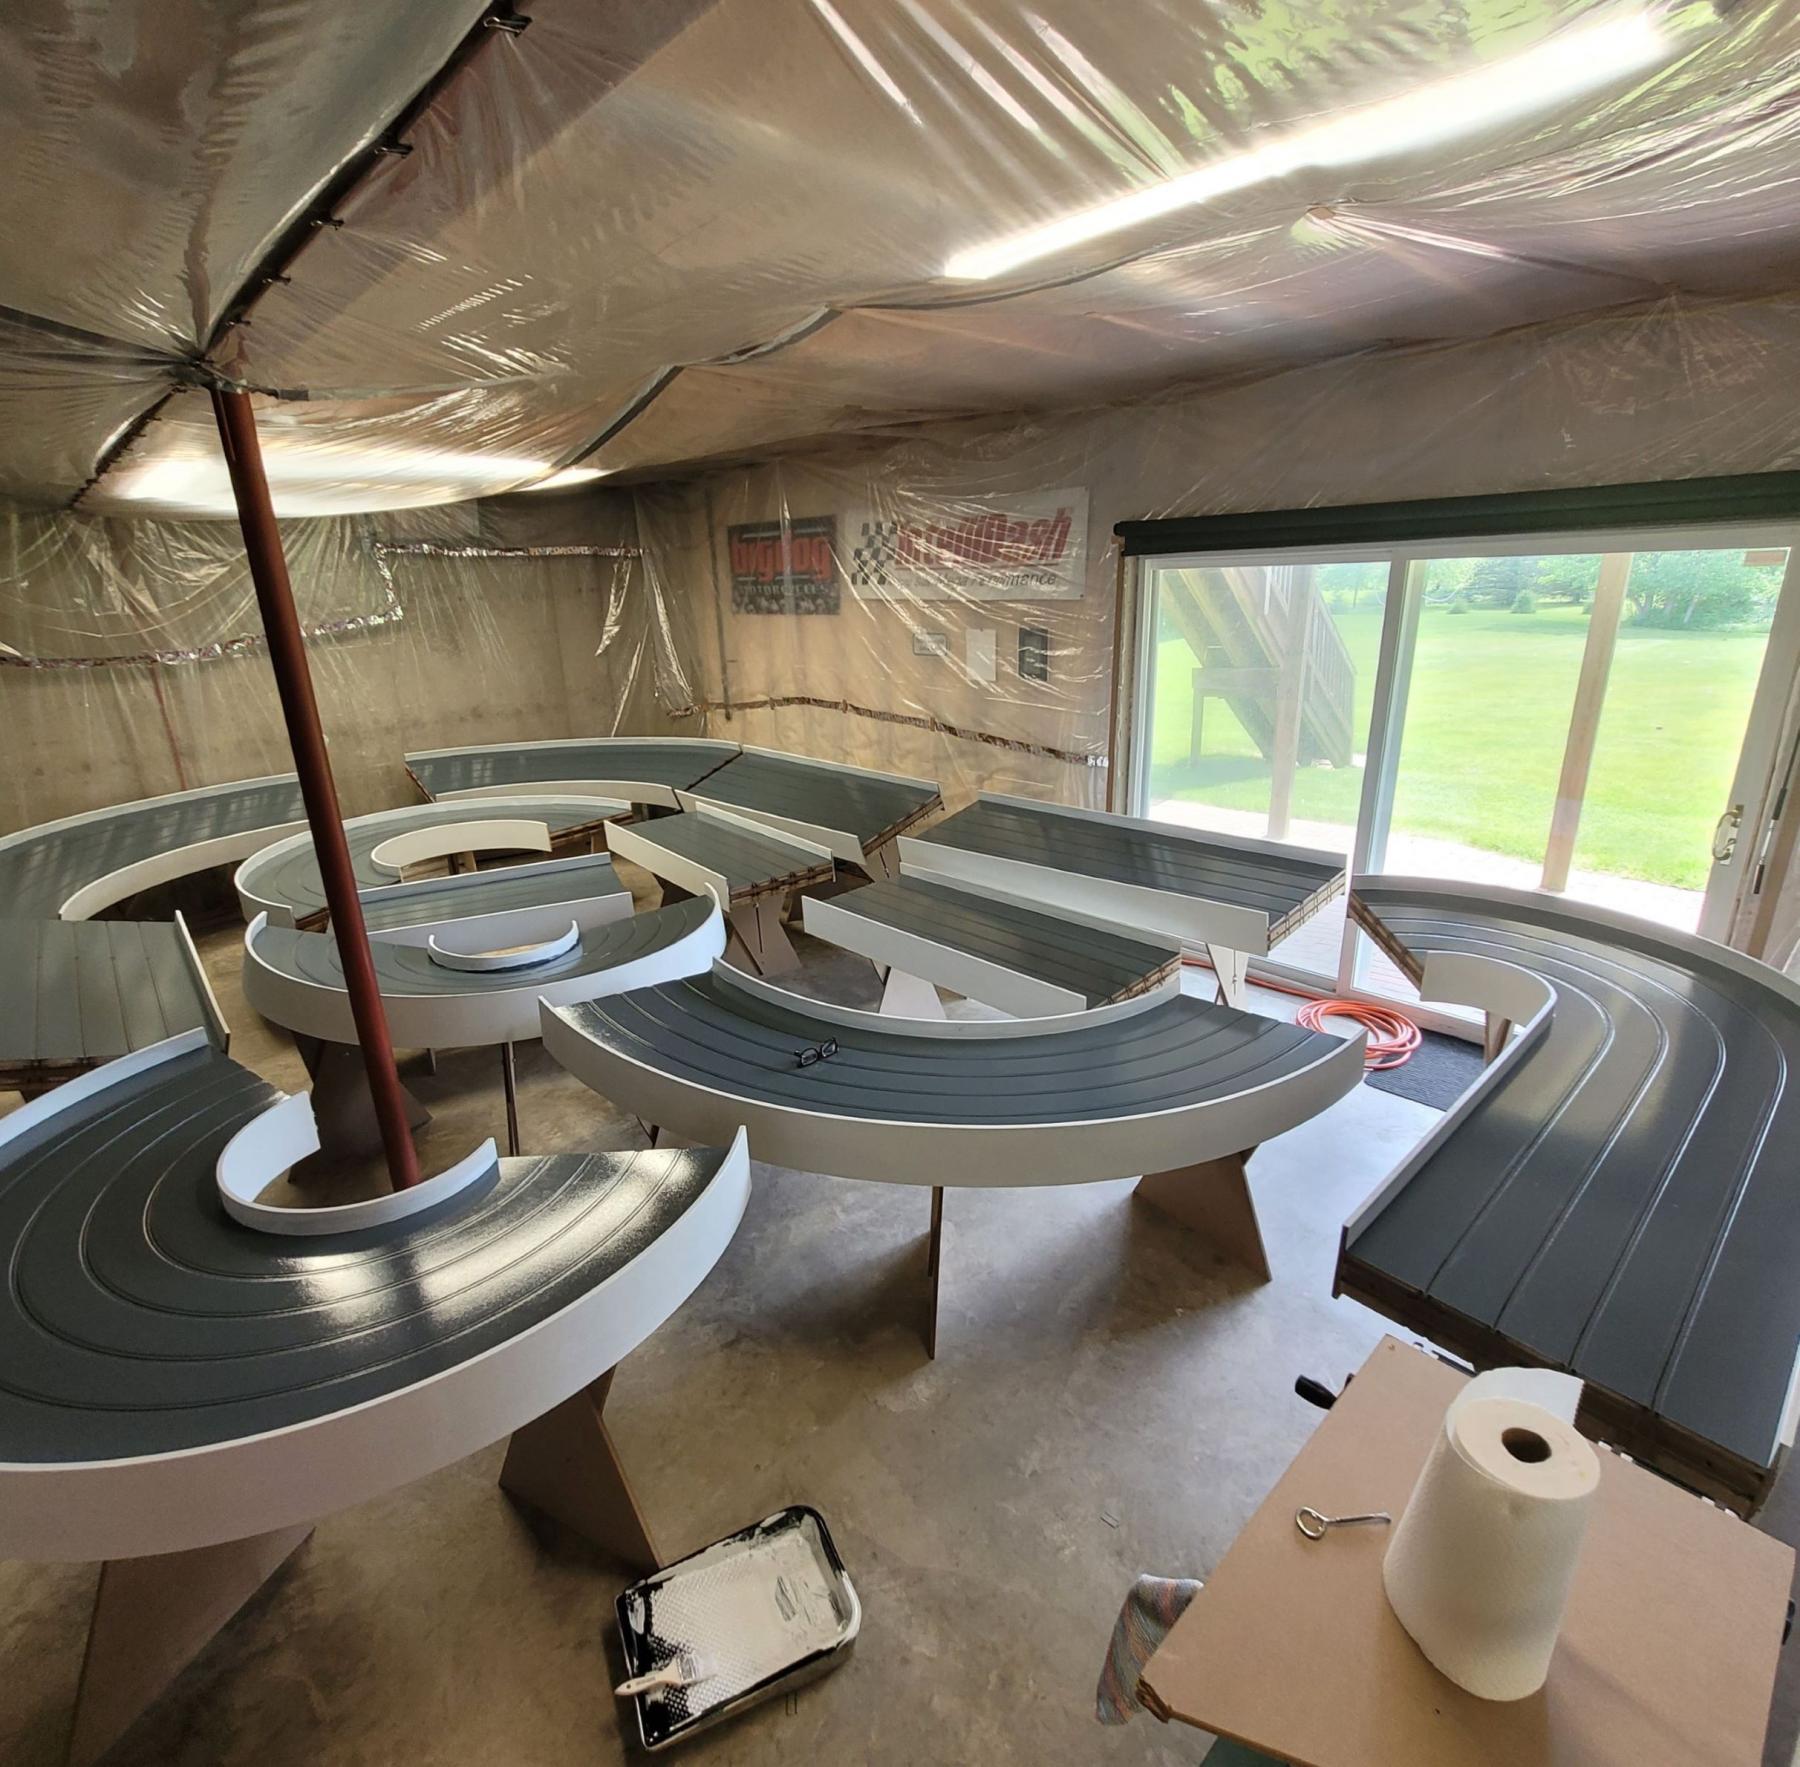
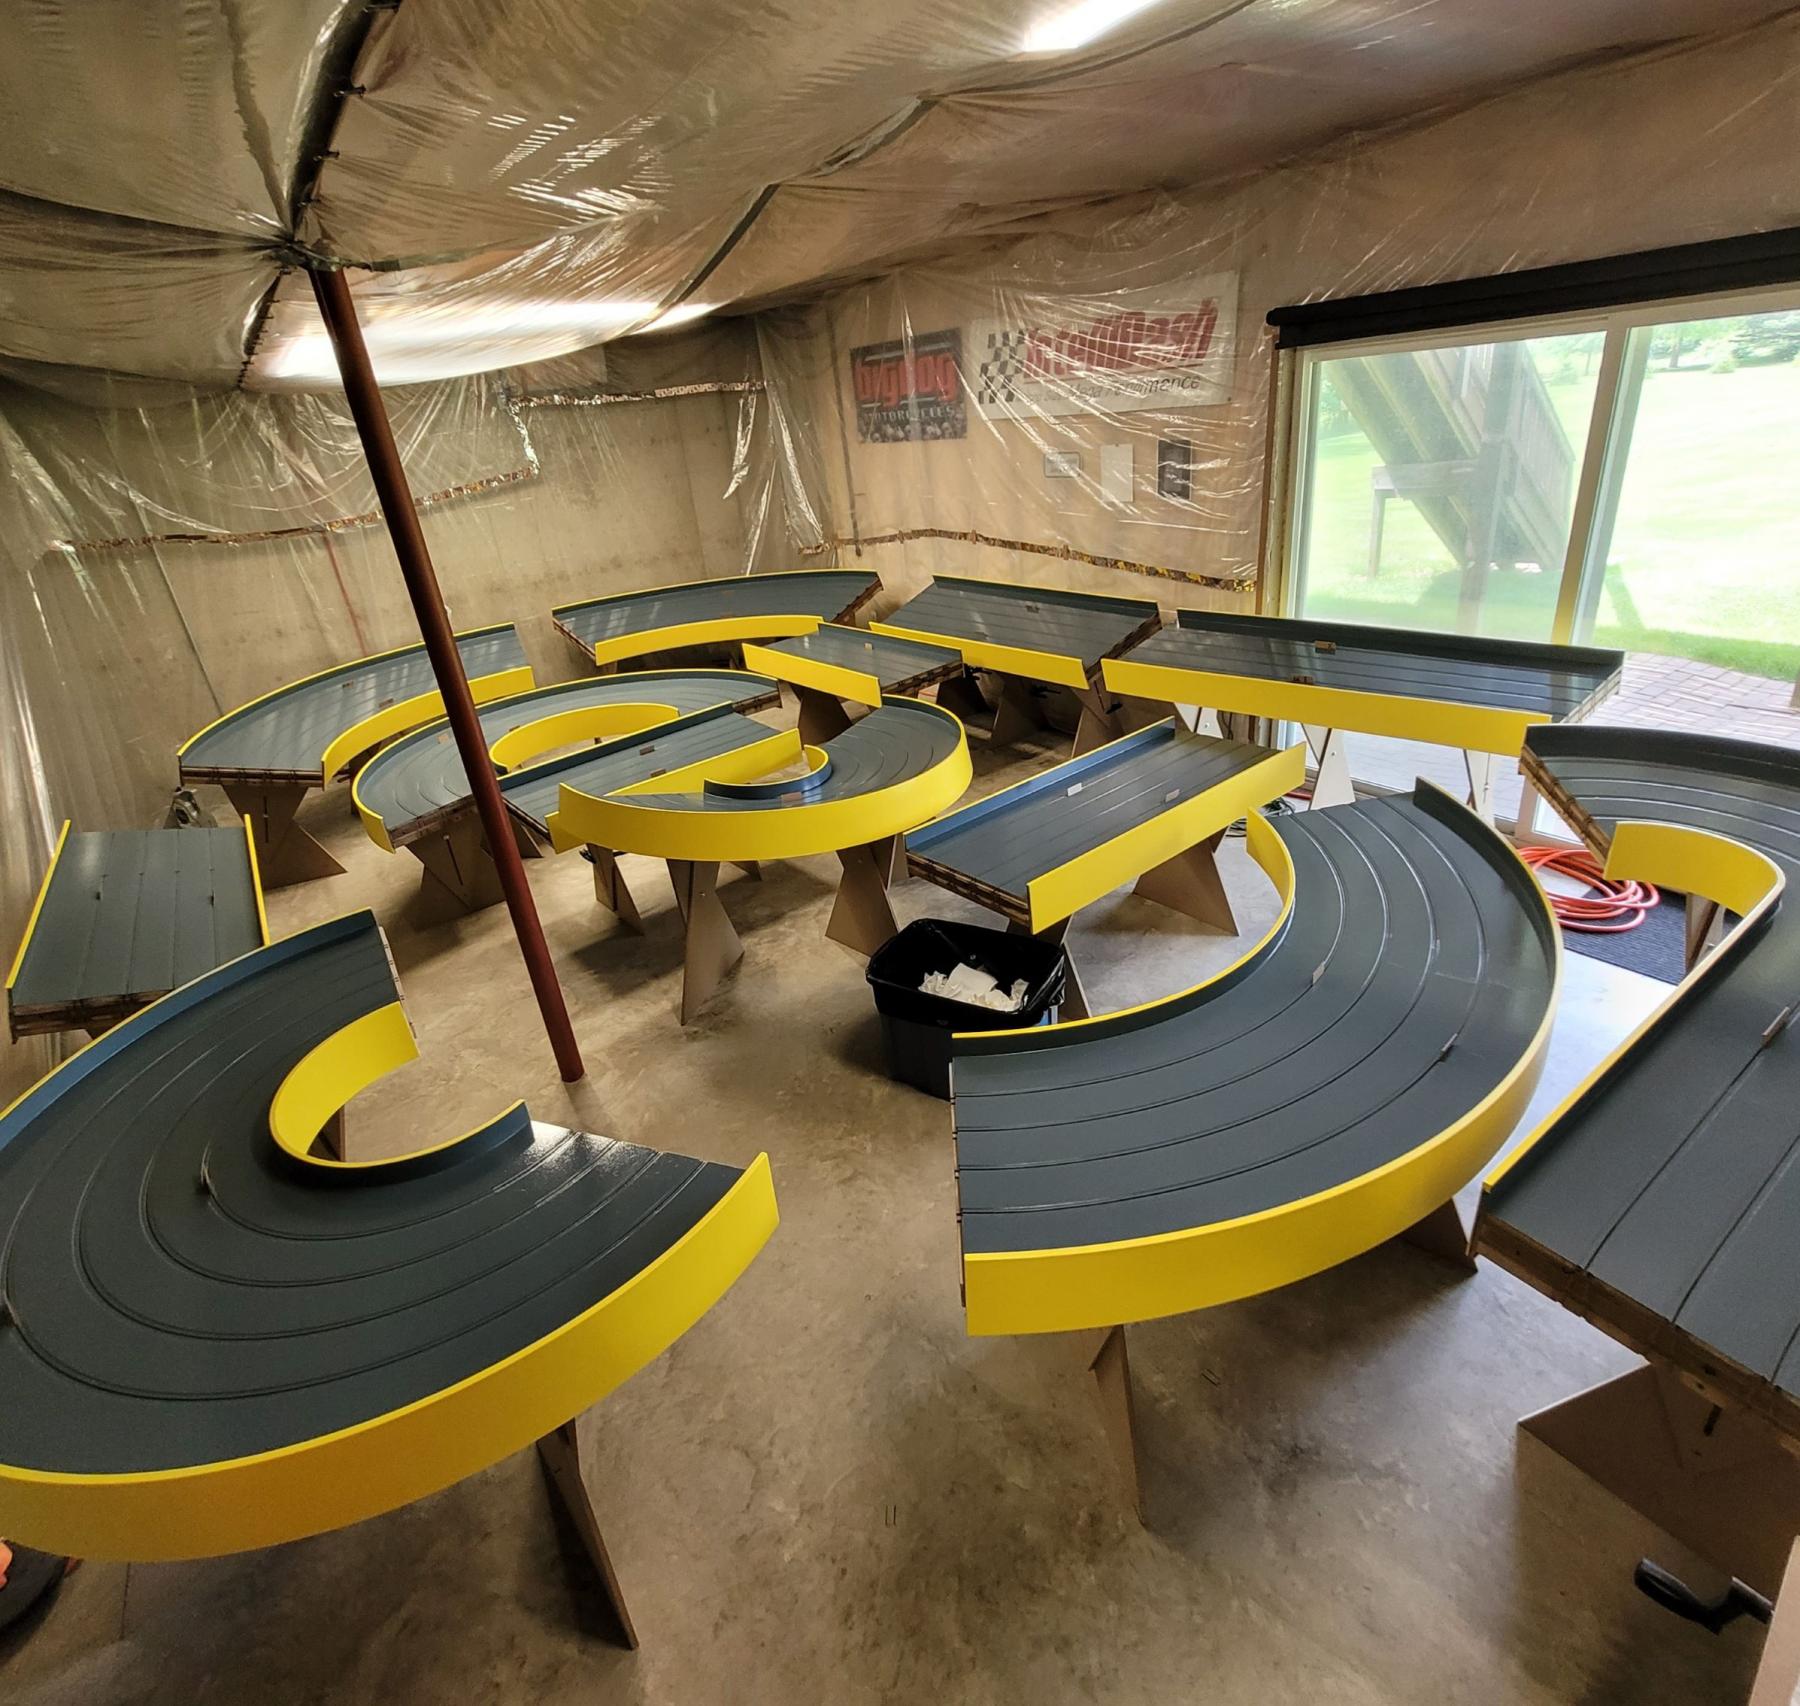
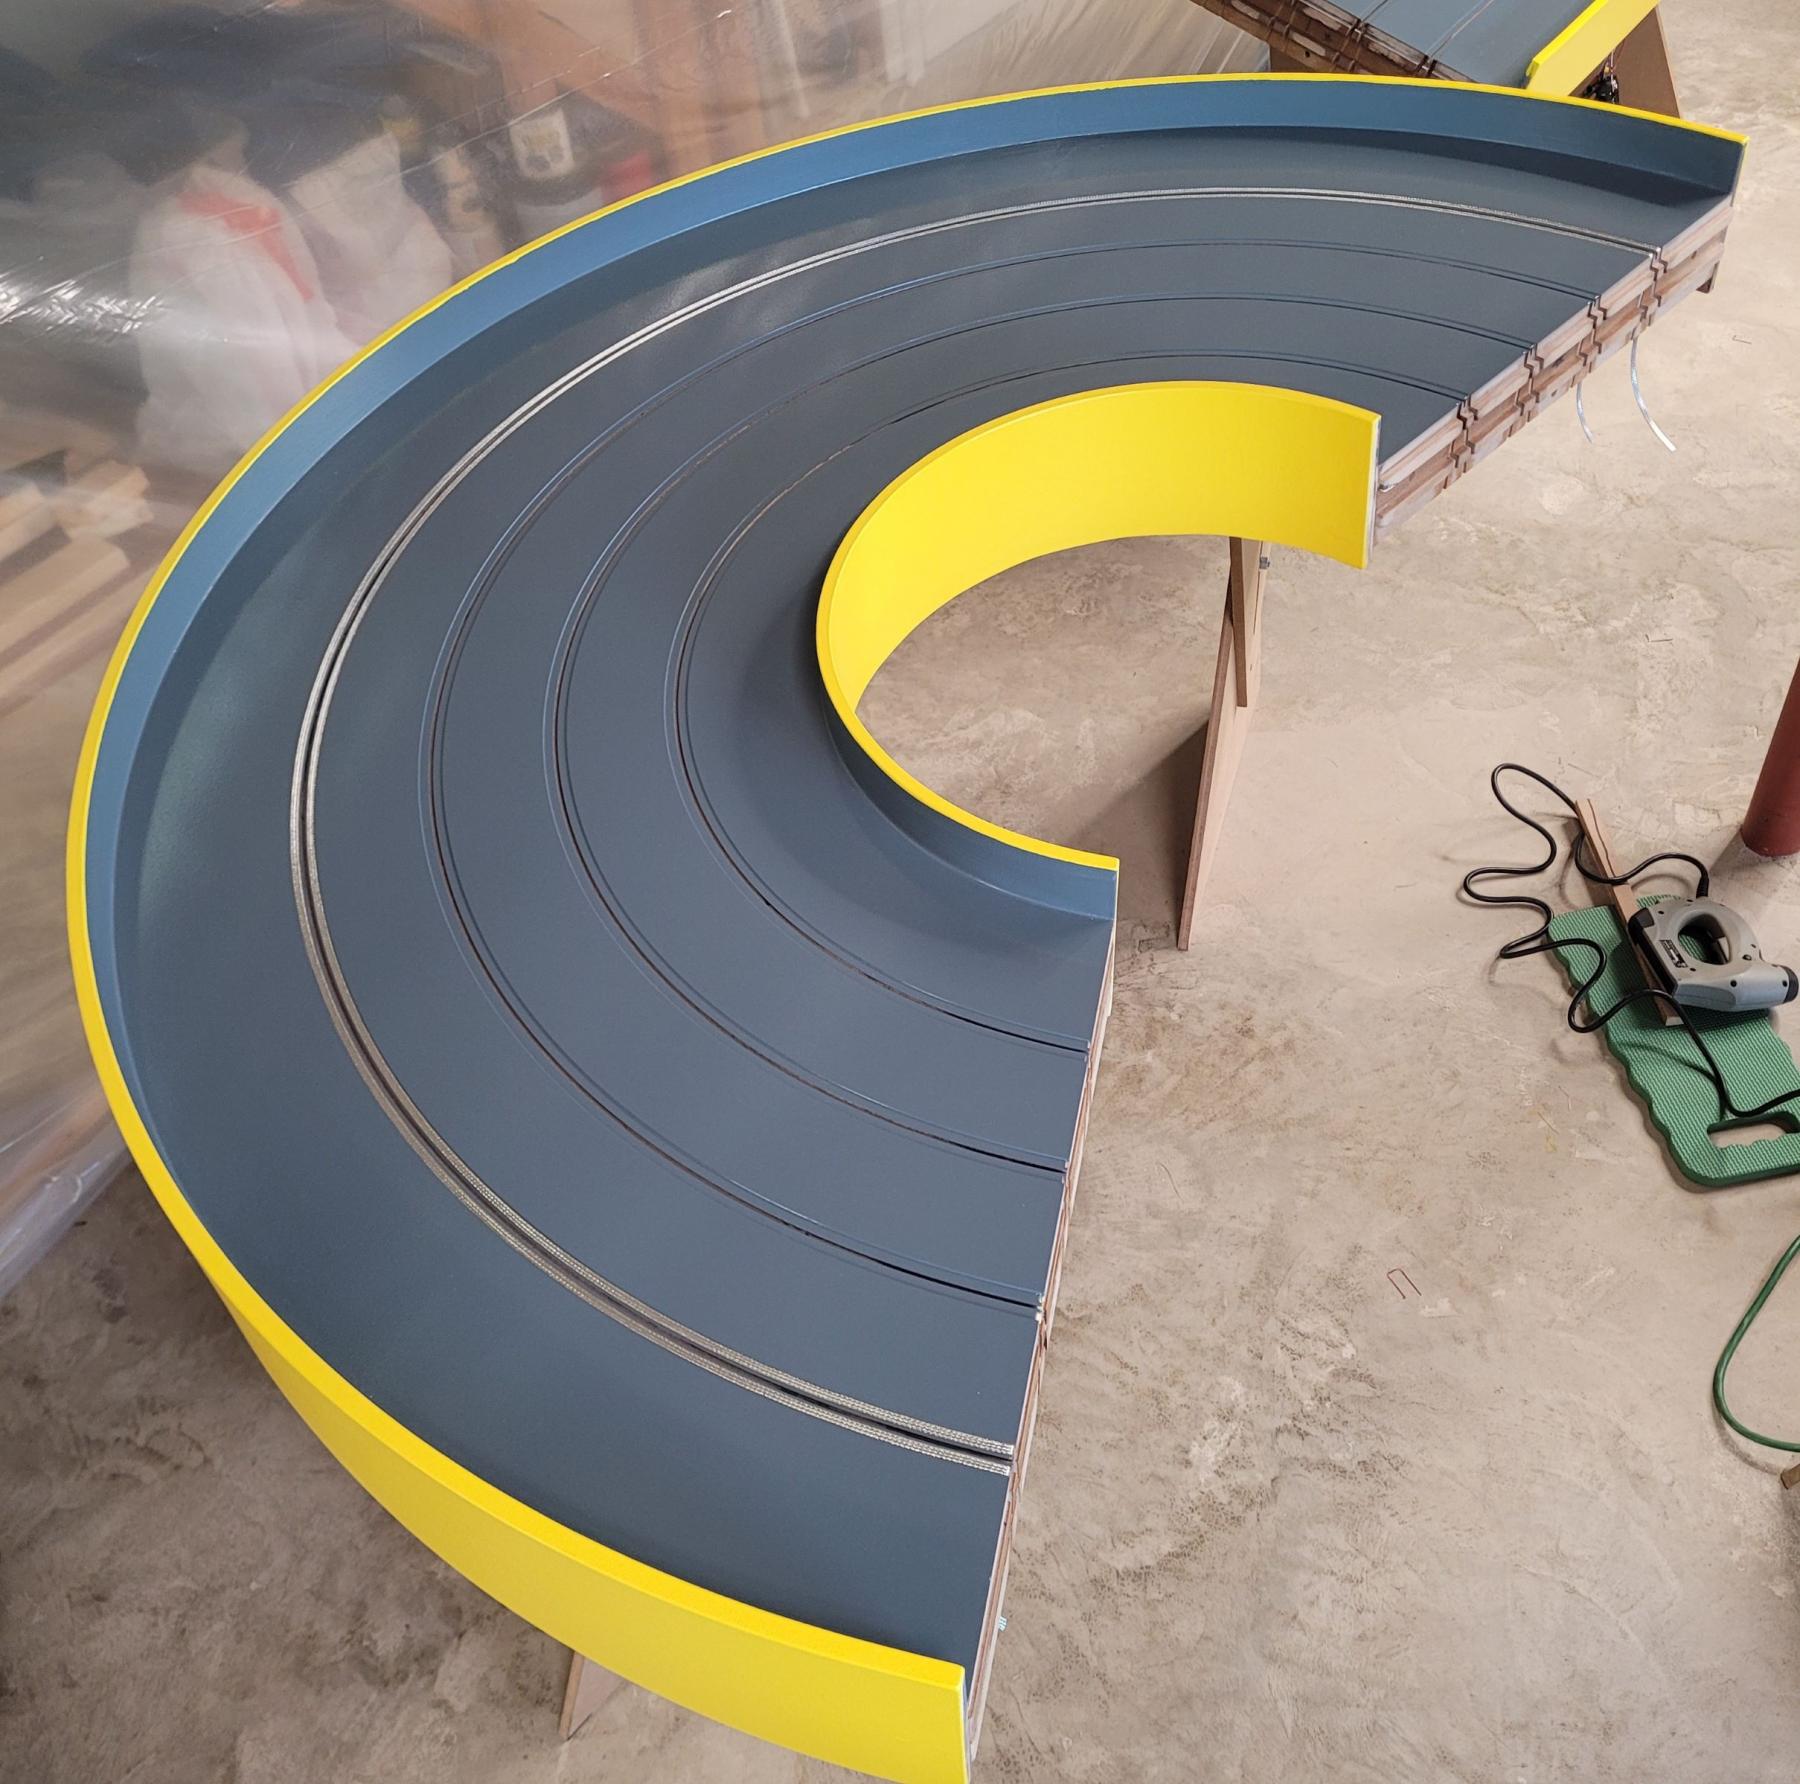
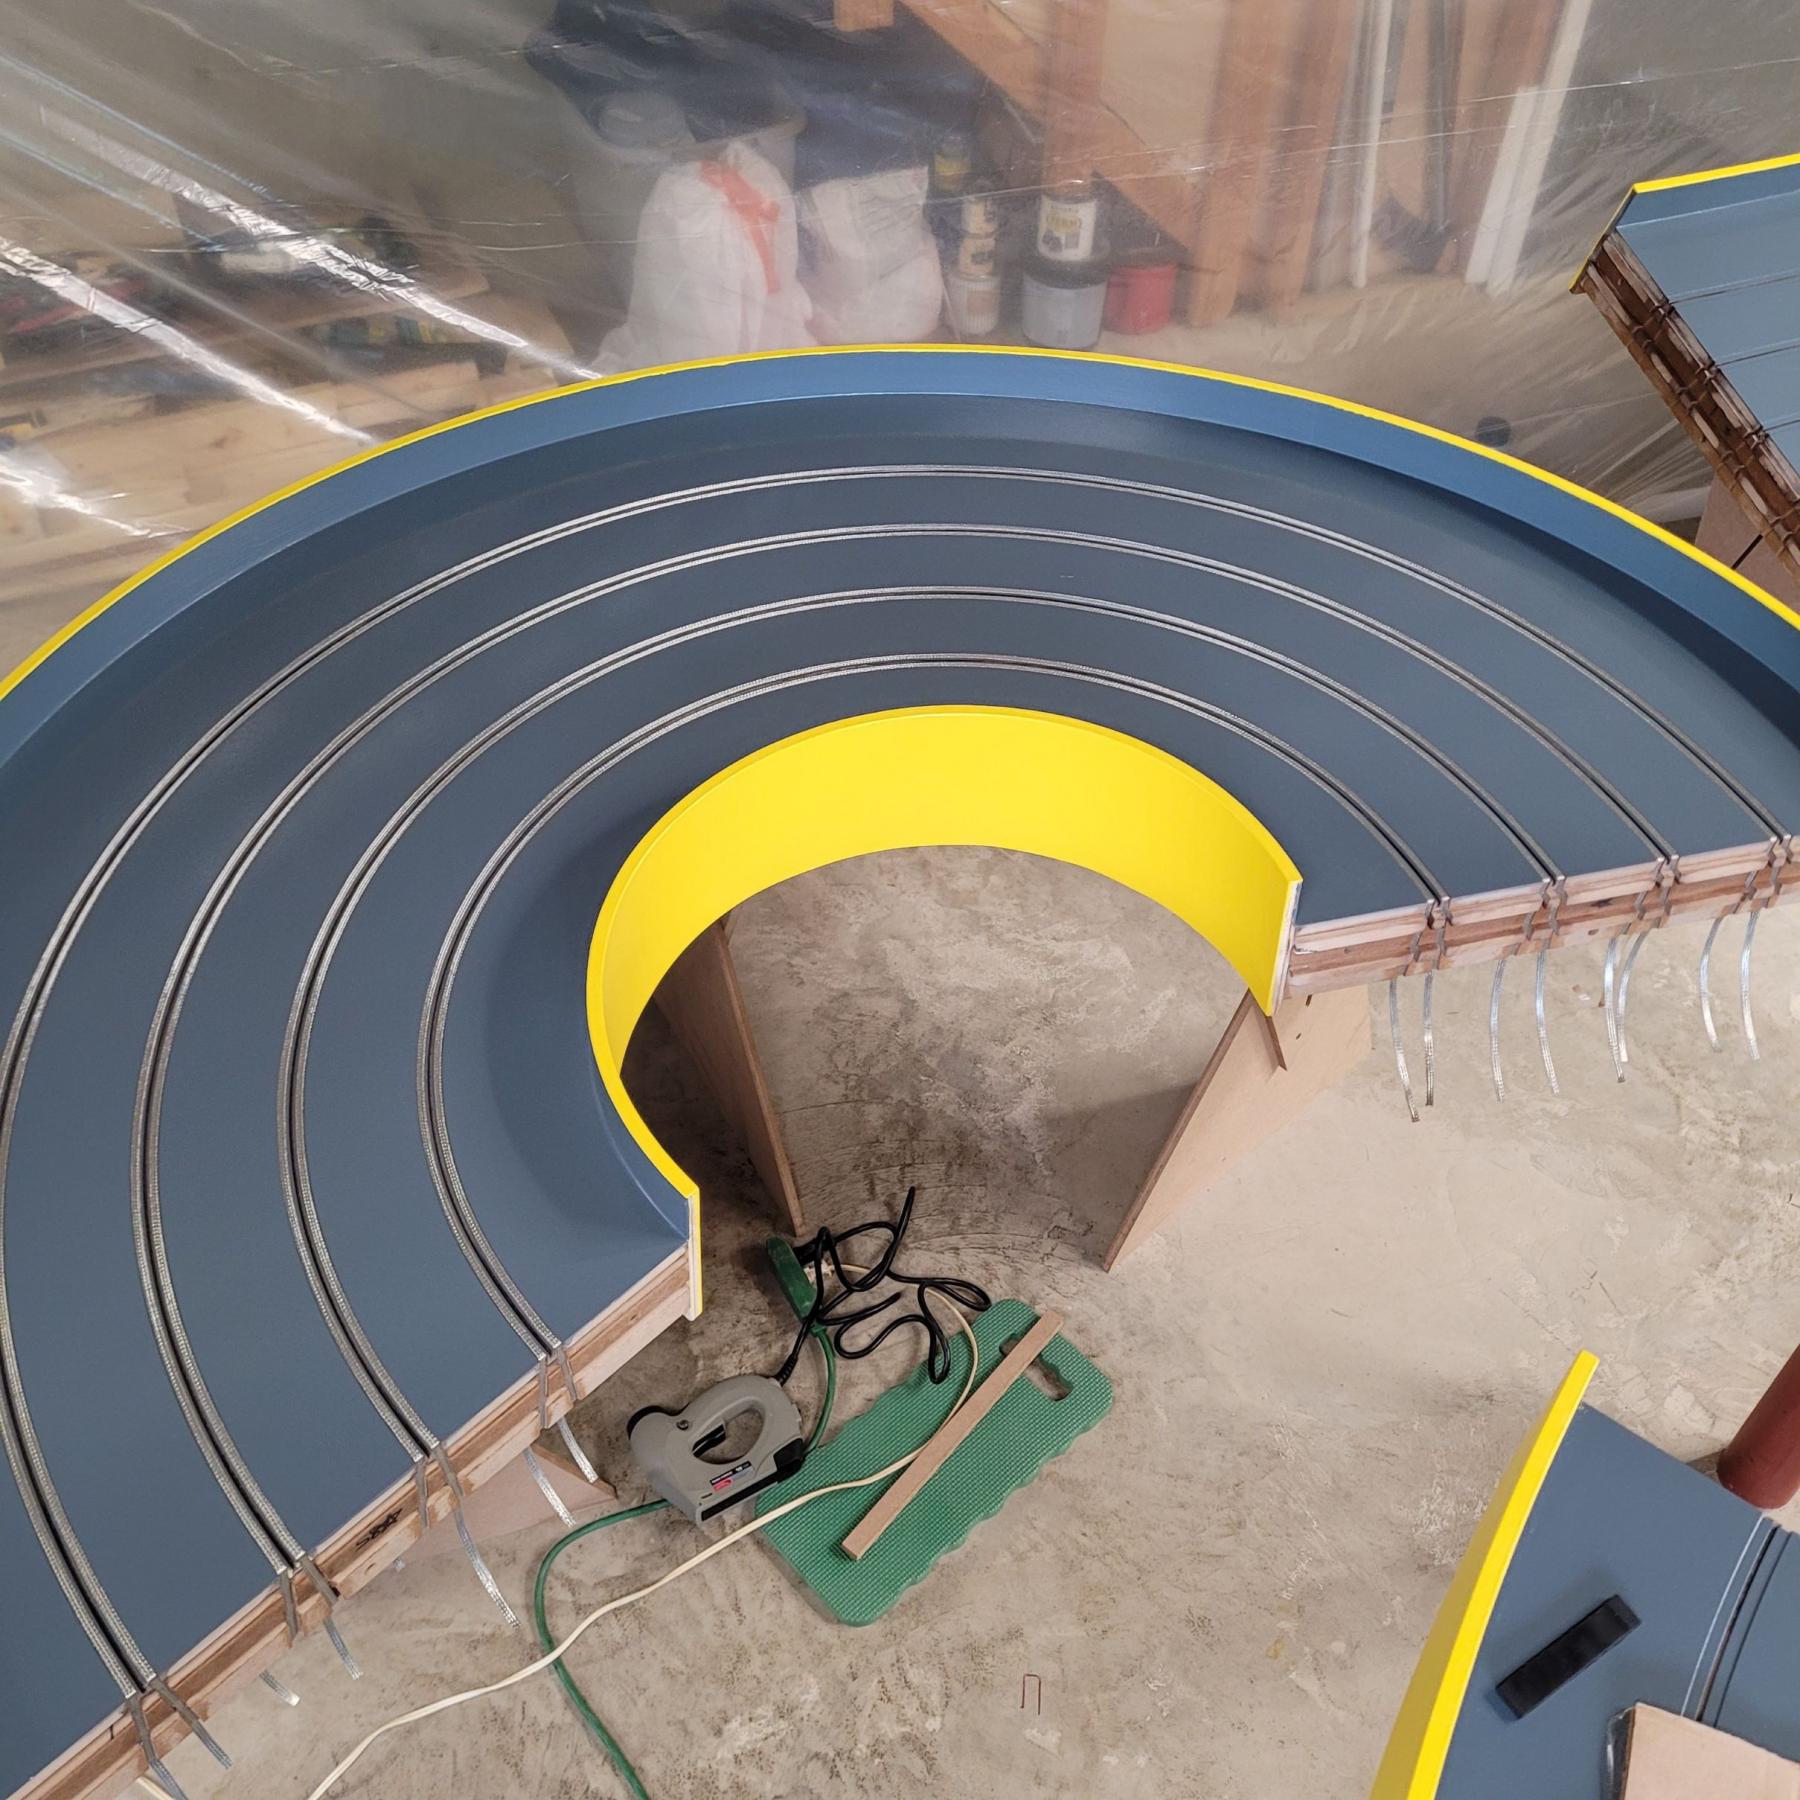
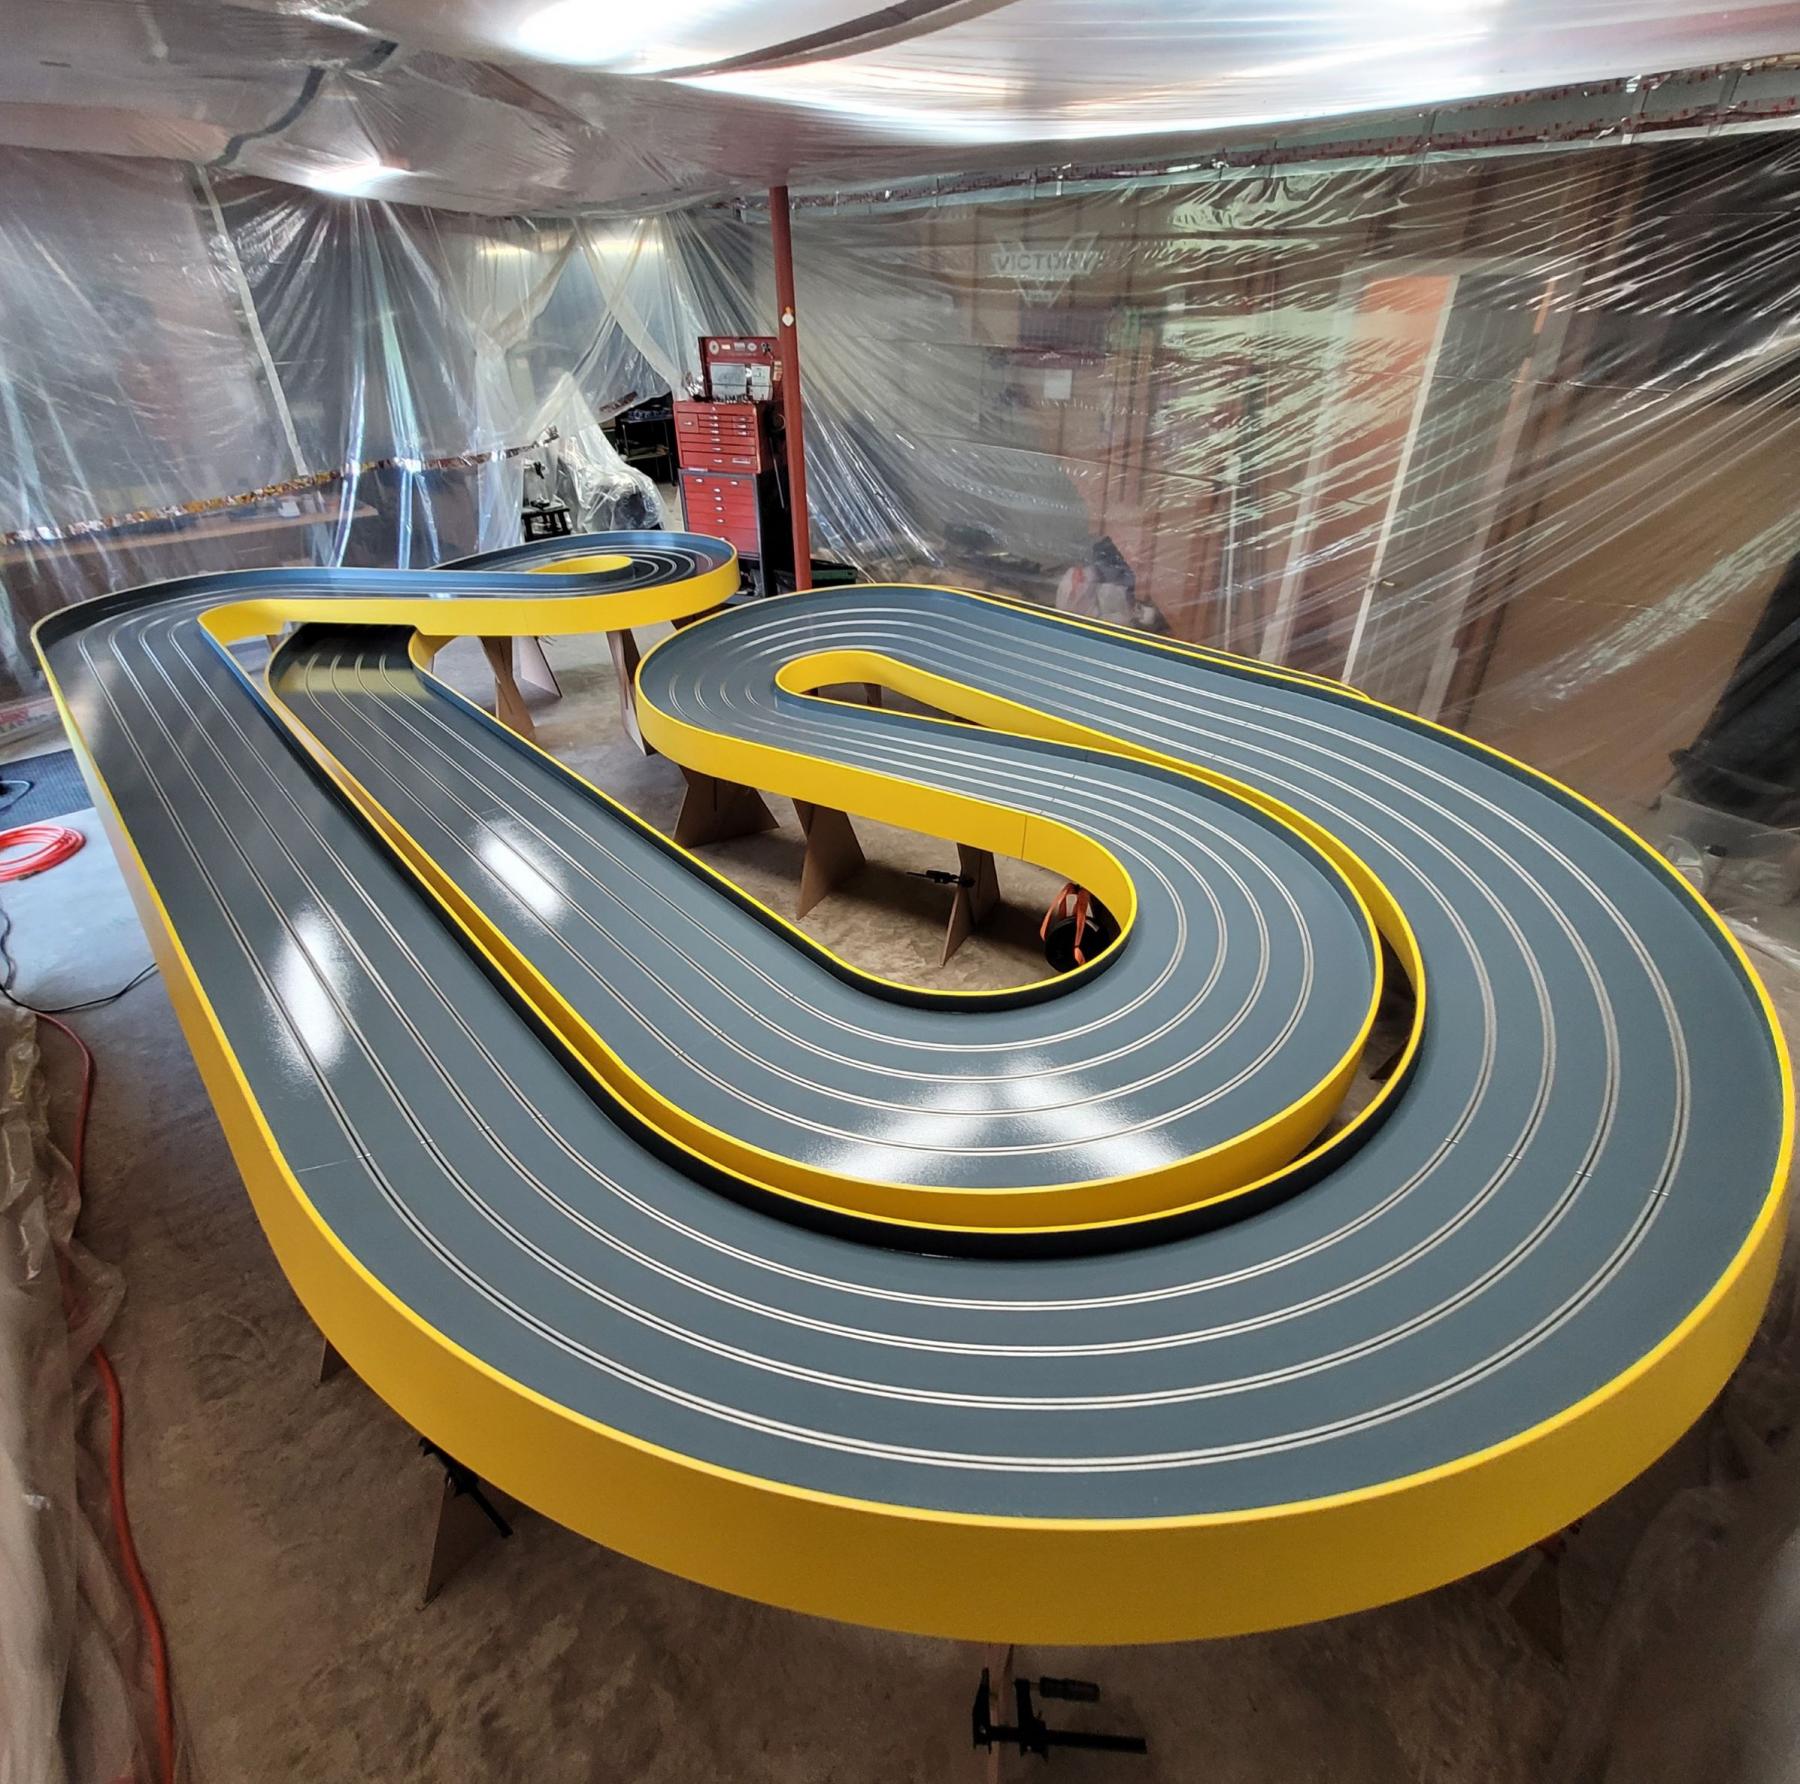
I have painted the inside of the sidewalls above the track surface and the outside sidewalls with a Sherwin Williams Primer (1coat) then their A98Y Duration Latex in the (2 coats) track semi-gloss gray and (3 coats) of the bright semi-gloss yellow outside. I am very happy with the outcome and will be getting on to the braid installation.
I used a Edger Pad with the wheels on it and fuzzy pad to cut in the inner walls to the track. I brushed on the gray latex onto the pad which worked quite well and kept the touch-up to a tiny amount in the wall corner.
I kept the paint at a minimum on the track wall butt joints so as to not interfere with the small butt gap clearance and still get the track to tighten together well. I did paint the the wall ends with only a 1/16" or so round-over from the roller.
Attached Images
- vfr750, MSwiss, Alchemist and 2 others like this
Rob Armbruster
#231
SpeedyNH
-

- Full Member
-
- 790 posts Joined: 18-July 15
Old Engineer
- Gender:Male
- Location:Cow Hampshire
Posted 24 June 2025 - 05:08 PM
nice!
Steve Lang
#232
Bill from NH
-

- Full Member
-
- 14,993 posts Joined: 02-August 07
Age scrubs away speed!
- Gender:Male
- Location:New Boston, NH
Posted 24 June 2025 - 07:50 PM
I've used those Edger Pads w/wheels for painting around finished window & door trims at my home. I thought it worked really well. I like your yellow sidewalls. They will add a lot of brightness to your track room.
Bill Fernald
I intend to live forever! So far, so good.
I intend to live forever! So far, so good.
#233
Mr. HP
-

- Subscriber
-
- 88 posts Joined: 08-October 07
Made in Detroit
- Gender:Male
- Location:Grosse Pointe Blank
Posted 26 June 2025 - 08:43 AM
Excellent work, the track looks fantastic. Thanks for sharing the build process. Lately this is the first thread I check for updates when I drop-in at Slot Blog to lurk around.
I have a similar layout 4-lane 80ft track in my basement that was built by the late great Rick Davis.
(This is a pic from when I first got the sections up on legs and bolted together).
- Alchemist and Sloter like this
Steve Grider
"In youth we run into difficulties. In old age difficulties run into us,"
rapid_slot
G3 Scale Auto Racing Club
"In youth we run into difficulties. In old age difficulties run into us,"
rapid_slot
G3 Scale Auto Racing Club
#234
Bigdogbro1
-
- Full Member
-
- 144 posts Joined: 23-April 24
Mid-Pack Racer
- Gender:Male
- Location:near Hell, MI
Posted 27 June 2025 - 07:24 AM
Excellent work, the track looks fantastic. Thanks for sharing the build process. Lately this is the first thread I check for updates when I drop-in at Slot Blog to lurk around.
I have a similar layout 4-lane 80ft track in my basement that was built by the late great Rick Davis.
(This is a pic from when I first got the sections up on legs and bolted together).
Thanks for hangin out and I love your track!

- Mr. HP likes this
Rob Armbruster
#235
Bigdogbro1
-
- Full Member
-
- 144 posts Joined: 23-April 24
Mid-Pack Racer
- Gender:Male
- Location:near Hell, MI
Posted 27 June 2025 - 07:28 AM
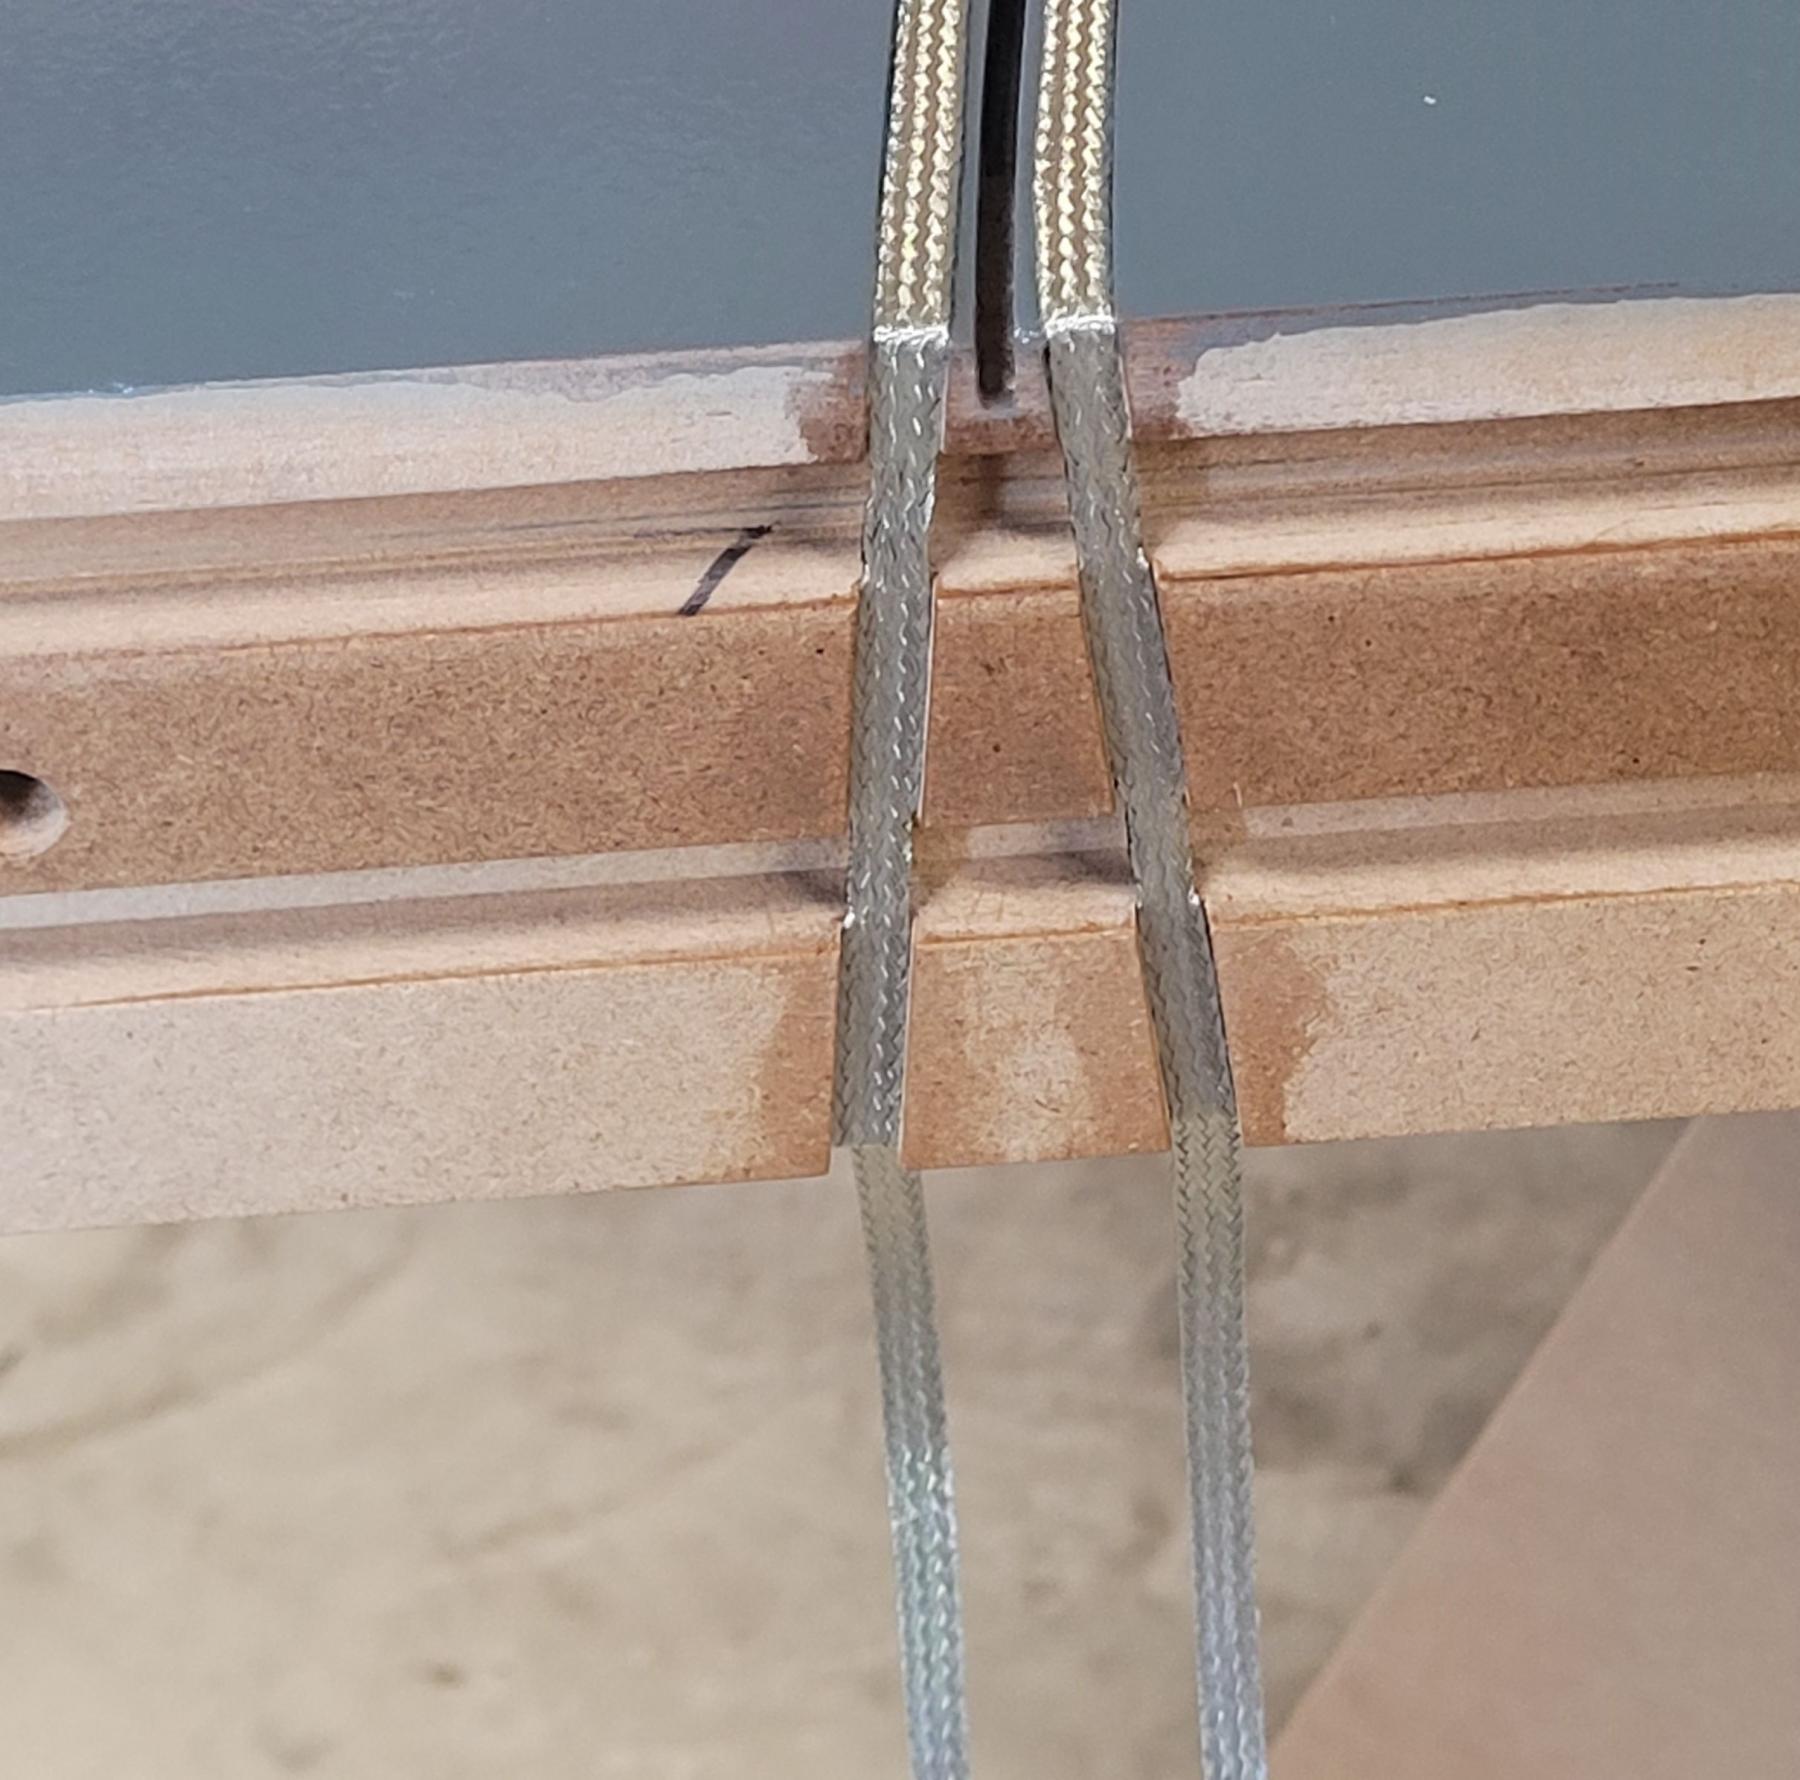
Two sections of braid finished. It does take some time to fit it just right into the gains slot, especially on the turns. Be careful not to let the exposed adhesive contact the track until it's properly positioned. The 3M adhesive is very agressive. The 1/4" wide pre-taped braid from Slot Car Corner is good quality and I have been pleased with it thus far. When applying the braid try not to pull the braid with much tension but just guide it into position when laying it down. I am leaving a 6" braid pigtail hanging at each joint for connections. On the groove end joints I lightly pinch the braid to make it narrower so it fits eaisier between the cutouts on the tounge ends.
It will take a 3-4 days to braid the entire track so I probably won't update this tread until I'm finished.
Attached Images
- Alchemist likes this
Rob Armbruster
#236
Brian Czeiner
-

- Full Member
-
- 564 posts Joined: 04-March 08
Race Leader
- Gender:Male
- Location:Tyler, TX
Posted 27 June 2025 - 11:30 AM
I just had a thought. Painting the braid area the lane color might be of interest. You would still have lane identity without the bold colors on the running surface. I hope you see this to consider the option before you get too far along with the braiding.
- Sloter likes this
If it's not a Caveman, It's HISTORY! Support Your local raceways!
#237
Bigdogbro1
-
- Full Member
-
- 144 posts Joined: 23-April 24
Mid-Pack Racer
- Gender:Male
- Location:near Hell, MI
Posted 28 June 2025 - 07:34 AM
I just had a thought. Painting the braid area the lane color might be of interest. You would still have lane identity without the bold colors on the running surface. I hope you see this to consider the option before you get too far along with the braiding.
Thanks Brian, I have considered it and decided not to go that route. I wanted the lane colors a bit more noticable after the track builds up with dust and dirt. I will be doing a 1/8" wide pinstripe on only one side of the lane with a sign paint enamel. Thanks for the suggestion.
- Alchemist likes this
Rob Armbruster
#238
Bigdogbro1
-
- Full Member
-
- 144 posts Joined: 23-April 24
Mid-Pack Racer
- Gender:Male
- Location:near Hell, MI
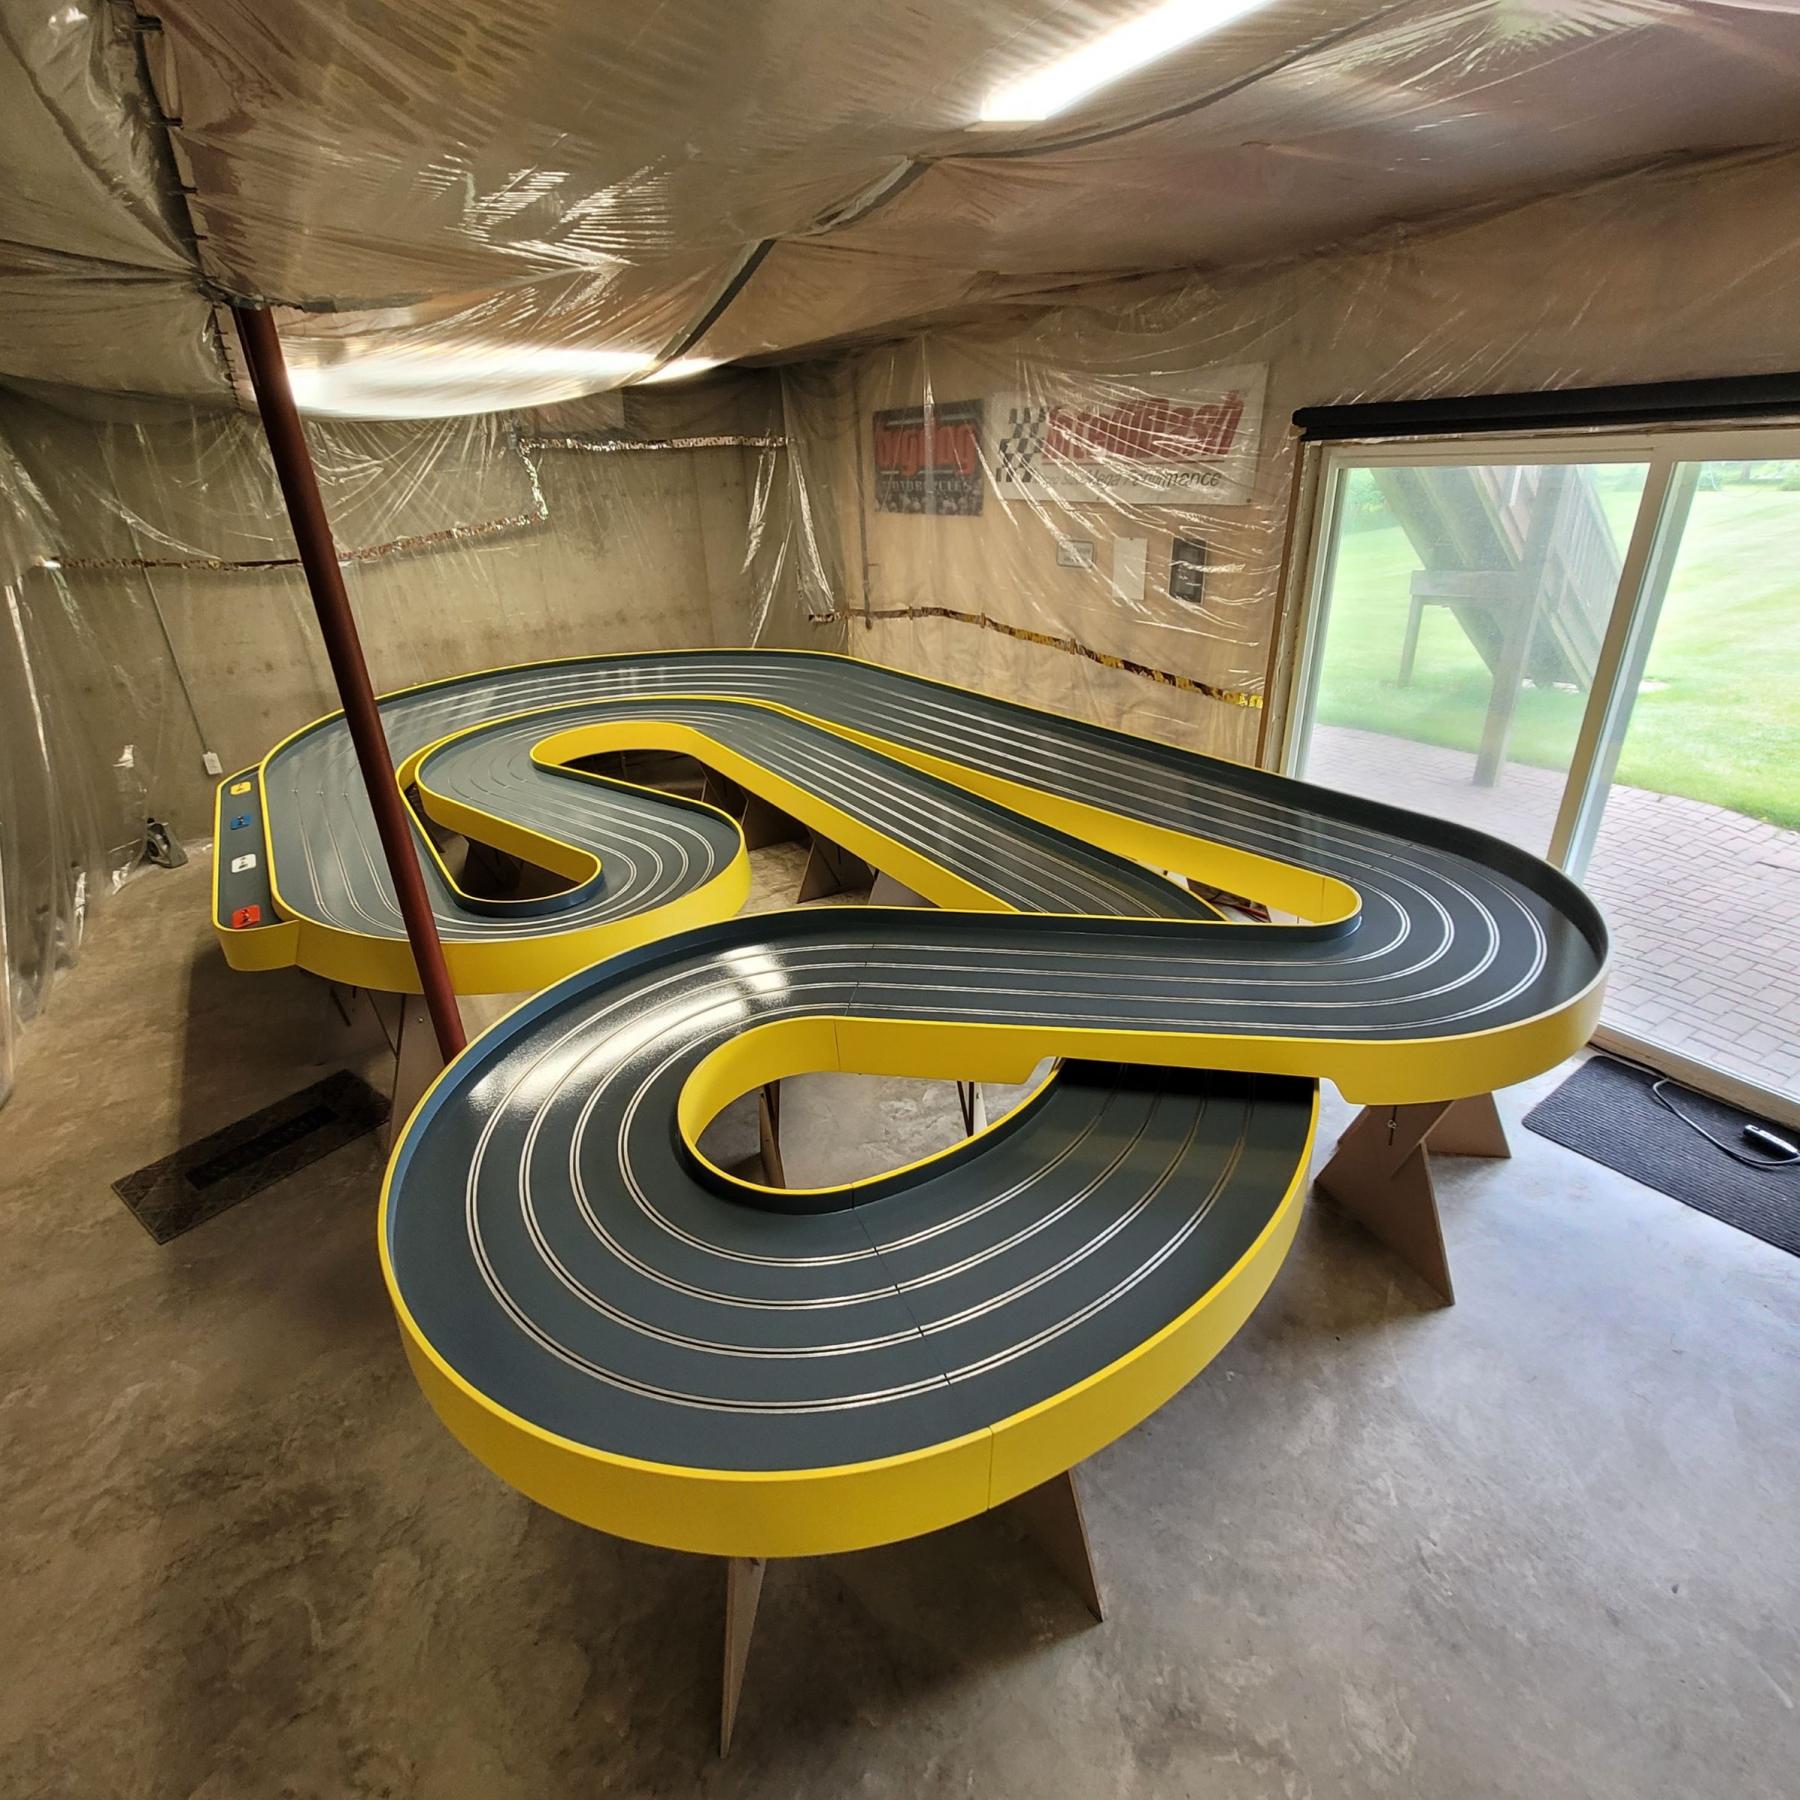
Posted 01 July 2025 - 07:13 AM
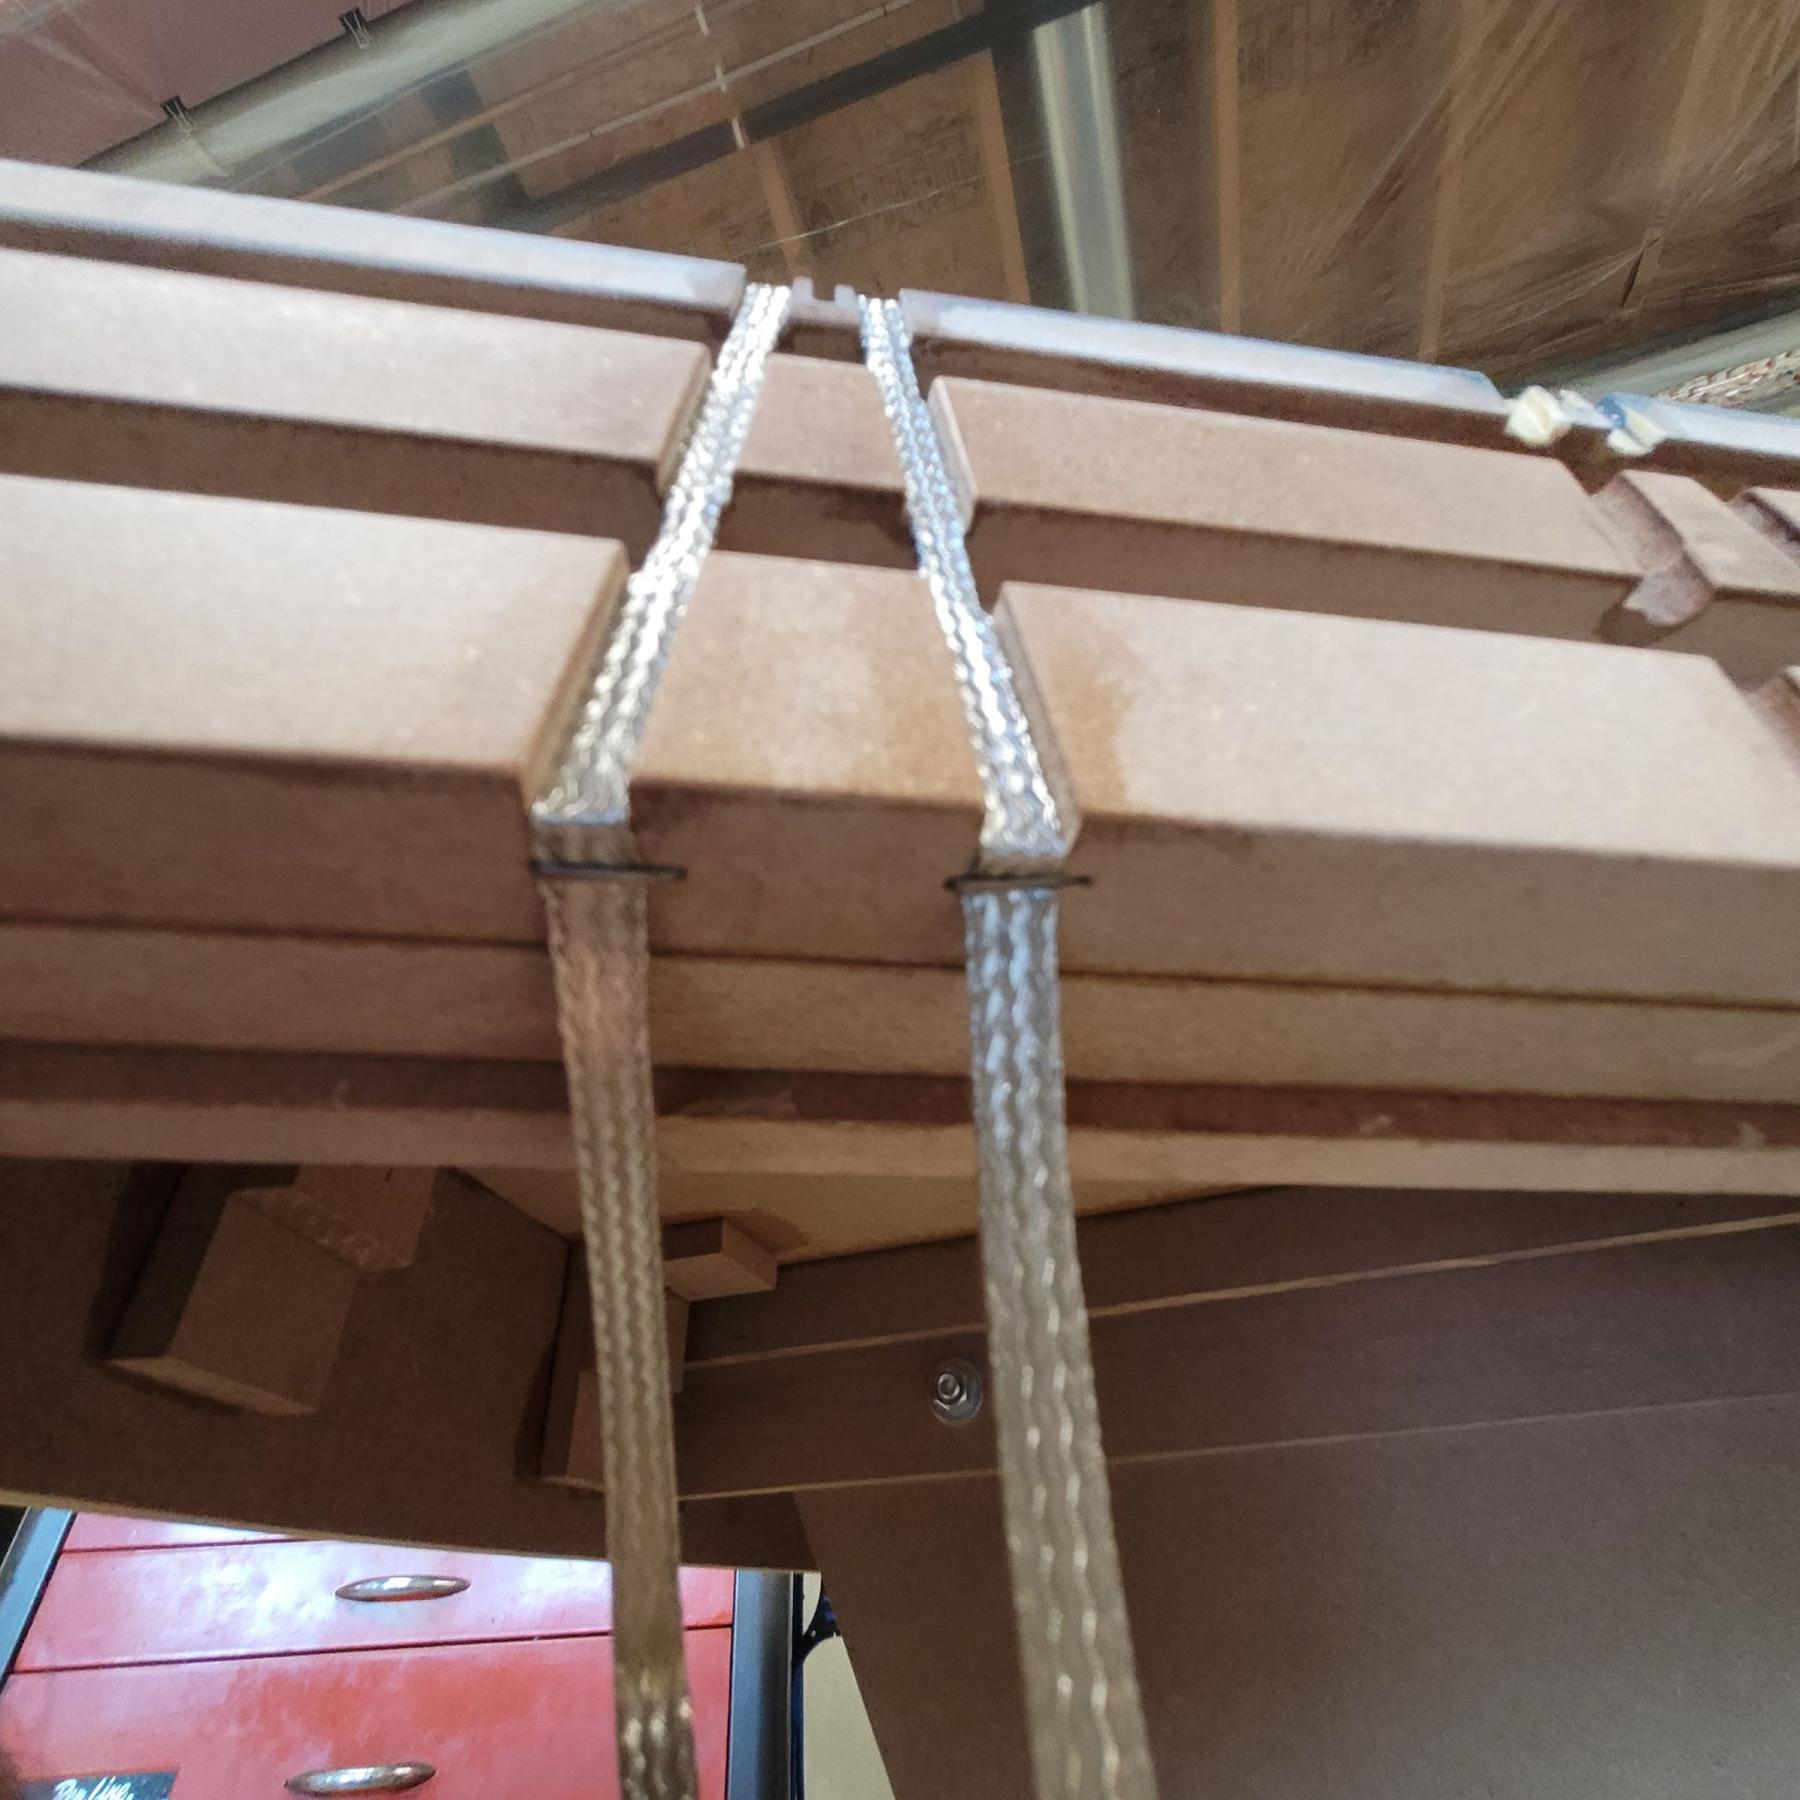
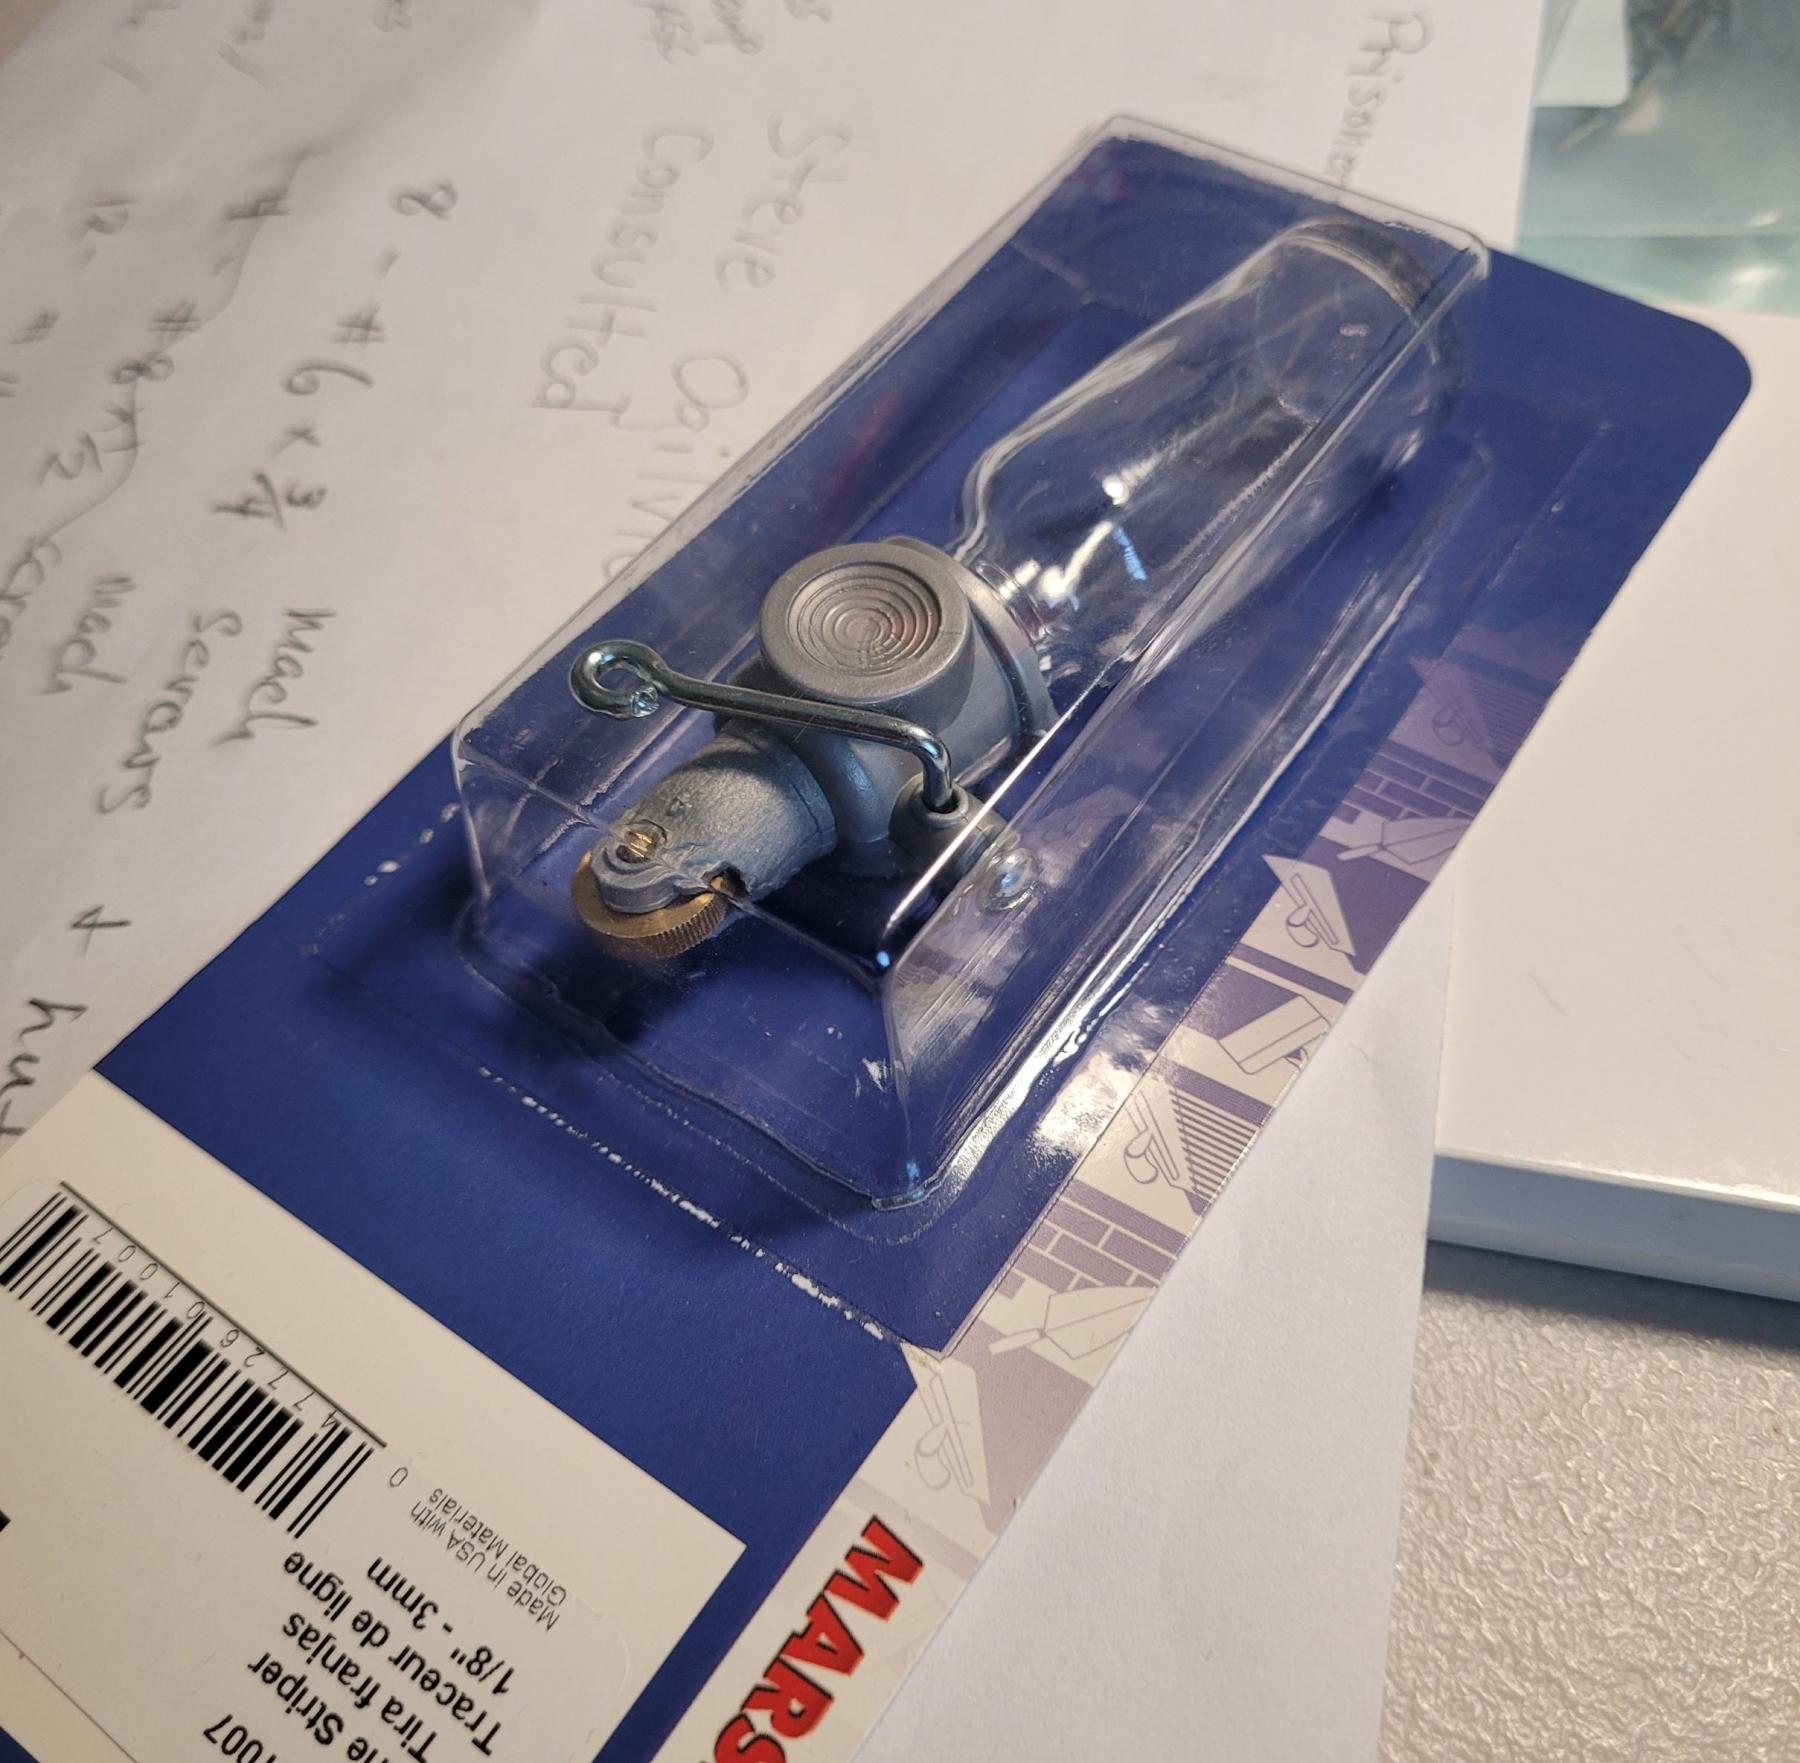
Milestone reached..........I have completed the braiding of the entire track and reassembled the 13 track sections. The reassembly went very smooth and all sections hooked up and aligned as they should. Flush track surface and tight section joints as expected with Steve Ogilvie's double tounge and groove joint block design.
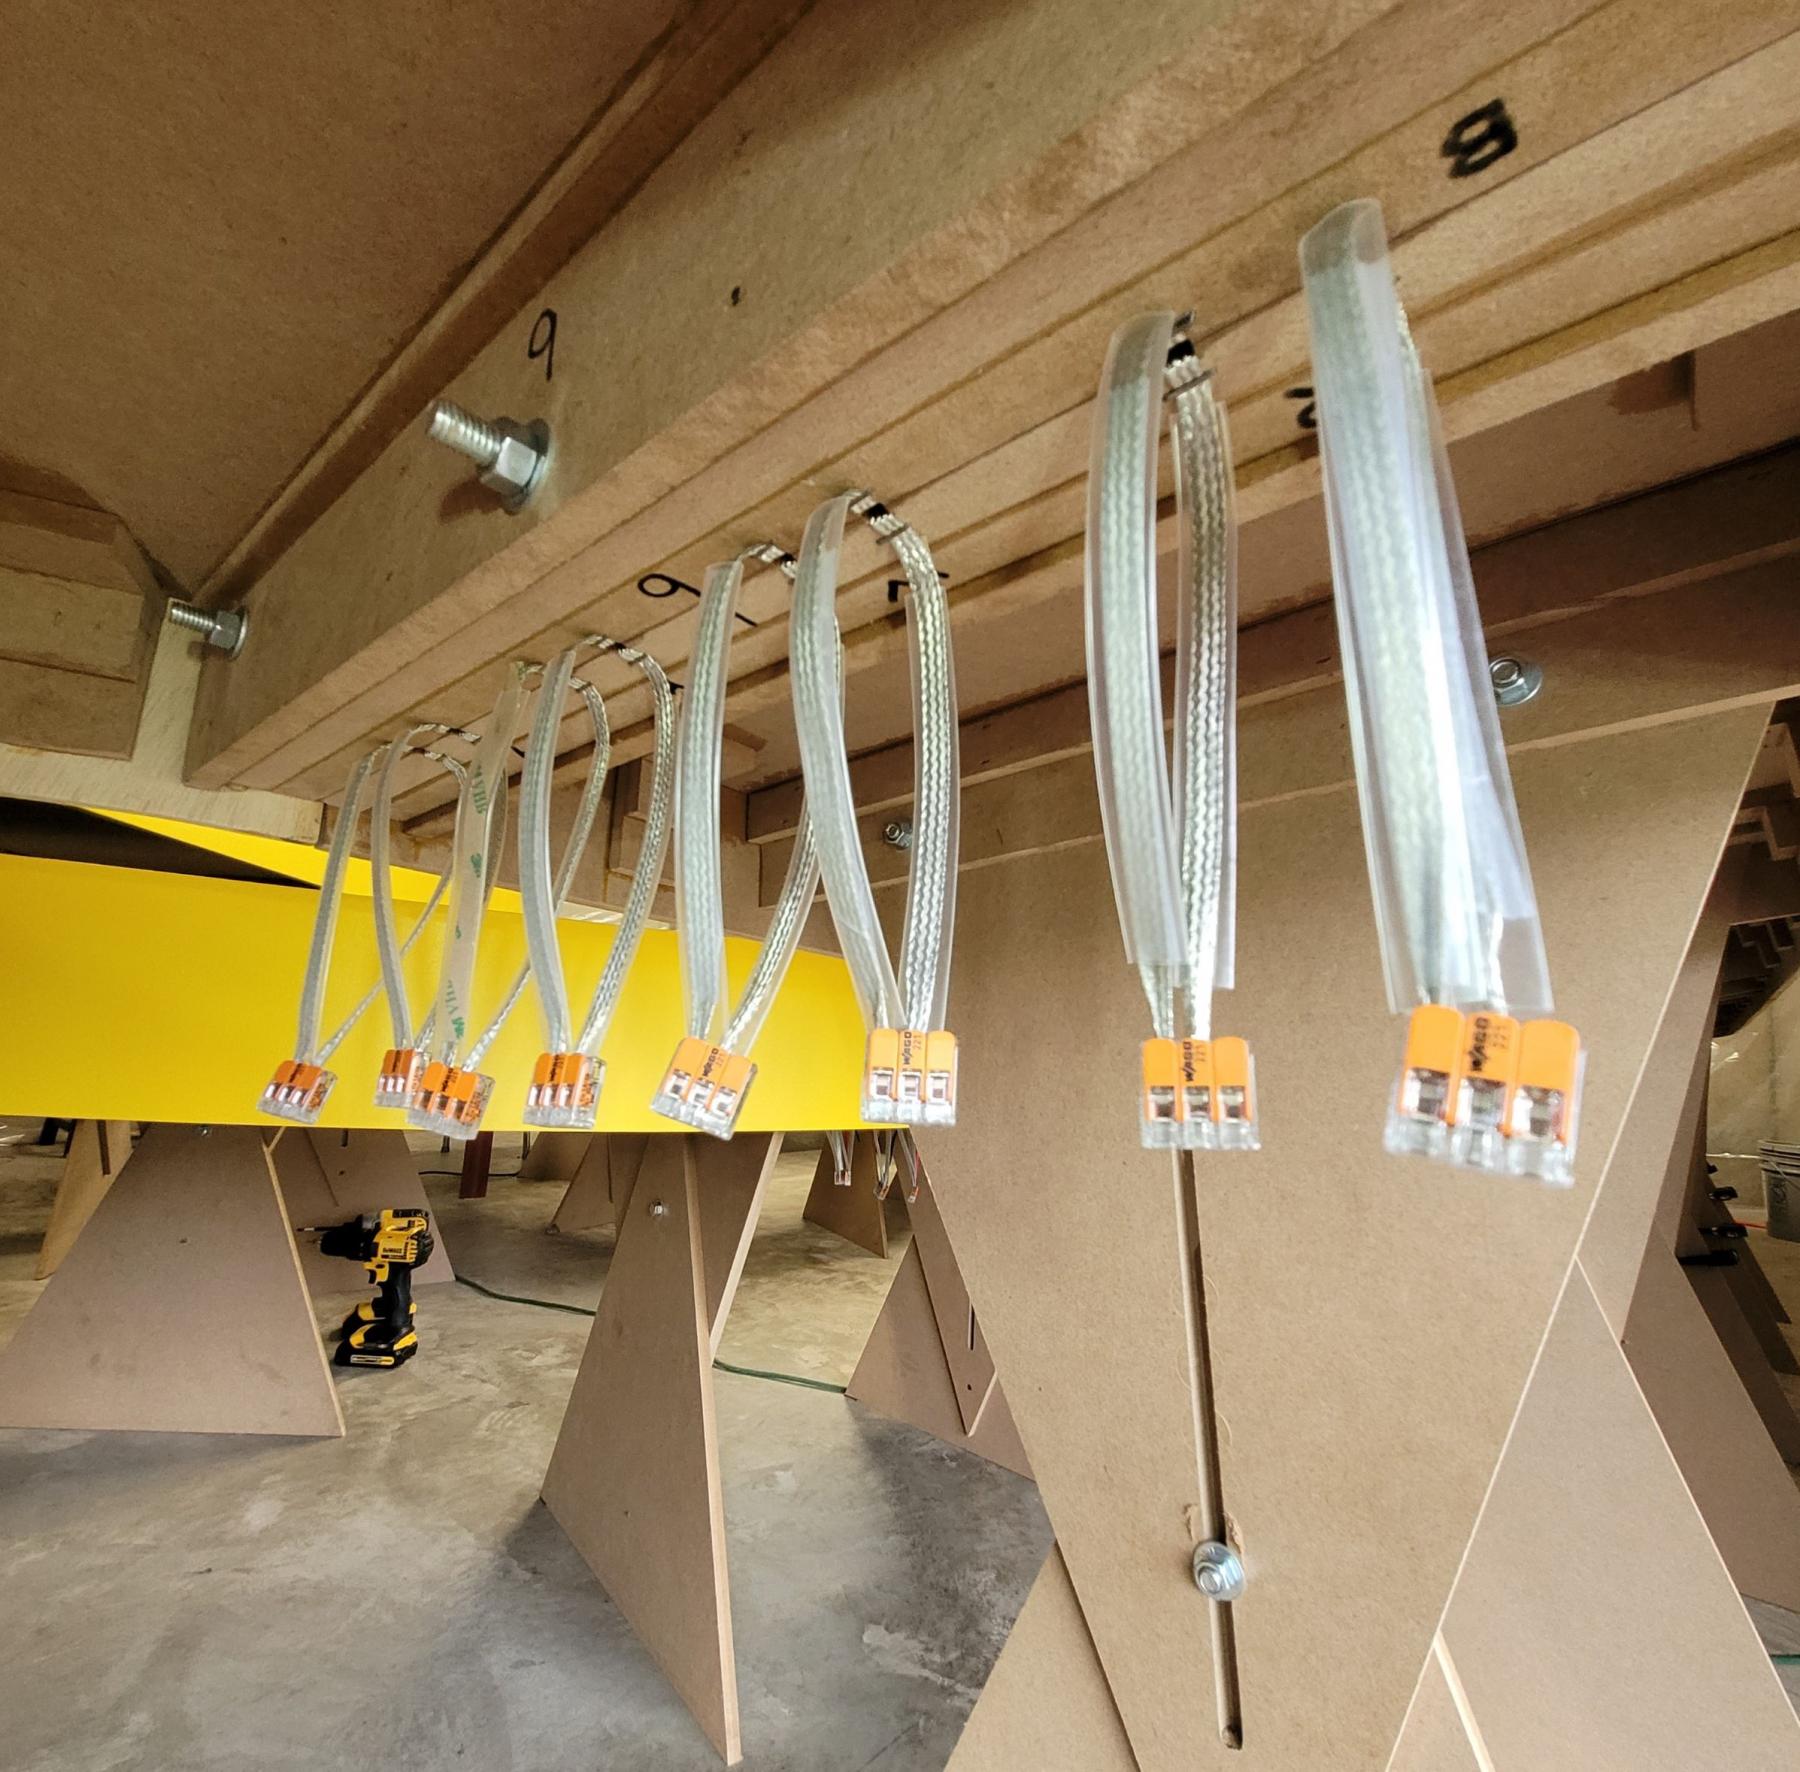
I plan on using mini binder clips for the joint section wiring connections. With multiple contact patches on the braid this method should provide good current flow for the power section to section.
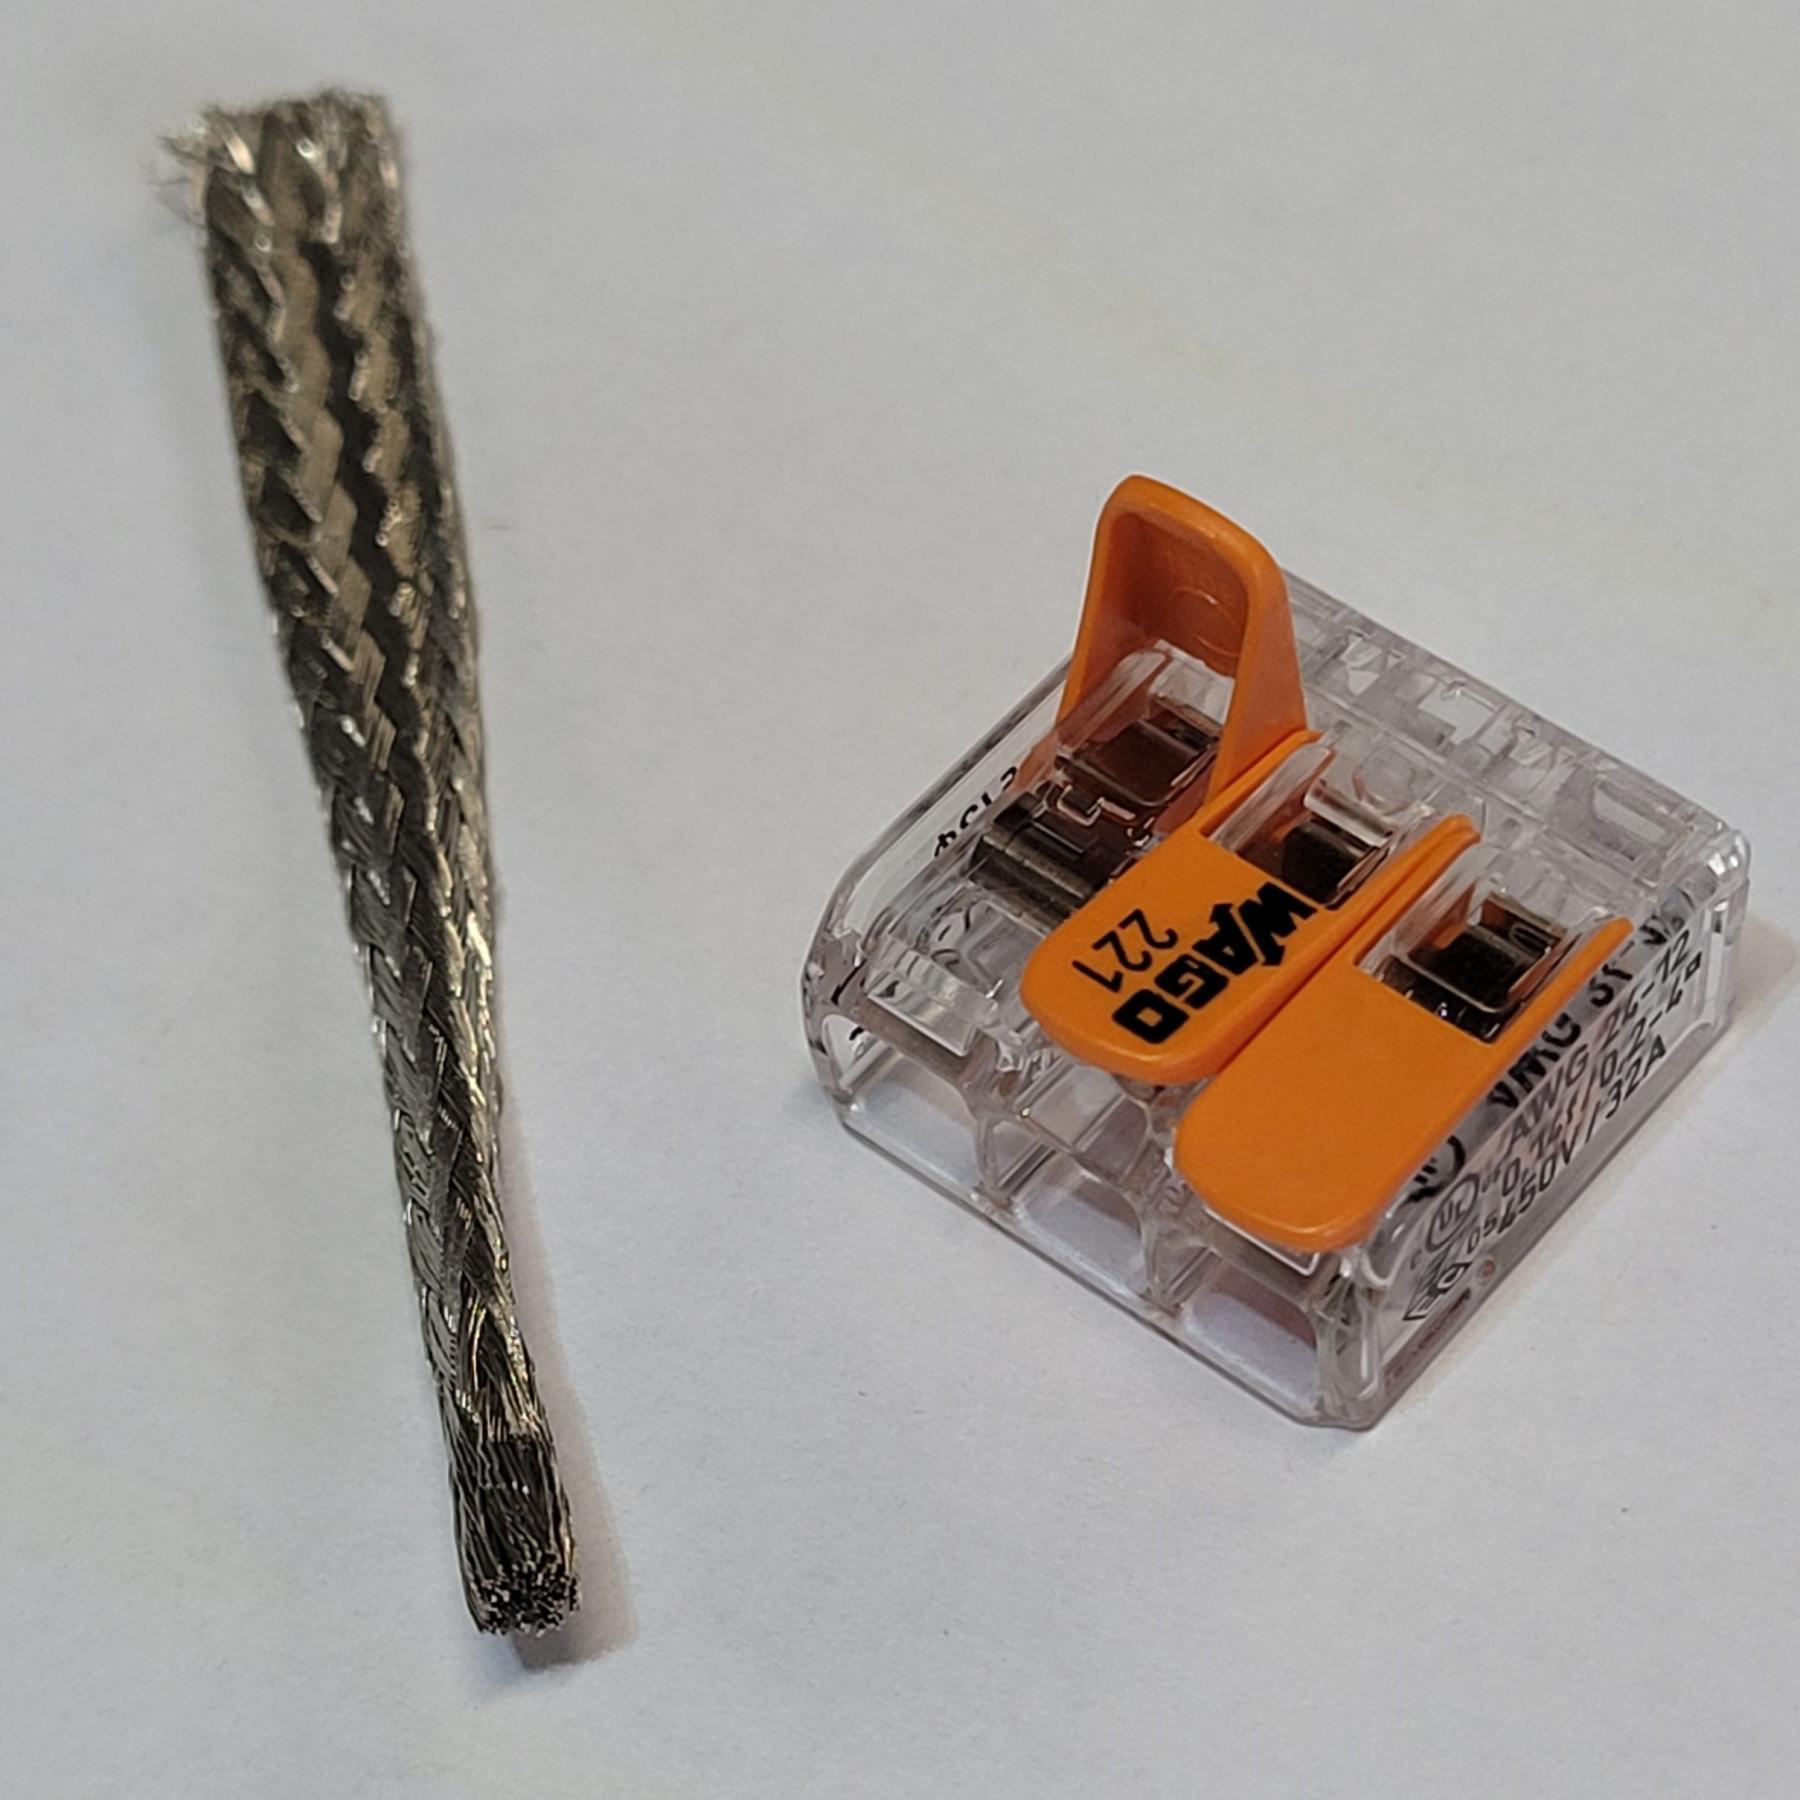
The track needs underside power wires routed and I'm using 12ga wire and Wago 221 3-hole connectors for the four track power taps.
https://www.amazon.c...51373703&sr=8-8
Attached Images
- dc-65x, vfr750, Half Fast and 6 others like this
Rob Armbruster
#239
dc-65x
-

- Subscriber
-
- 7,075 posts Joined: 14-February 06
Grand Champion Poster
- Gender:Male
- Location:Captain Rick: The only vintage slot car nut in SW Oregon?
Posted 01 July 2025 - 11:07 AM
WOW!
Rick Thigpen
Check out Steve Okeefe's great web site at its new home here at Slotblog:
The Independent Scratchbuilder
There's much more to come...
#240
Bill from NH
-
- Full Member
-
- 14,993 posts Joined: 02-August 07
Age scrubs away speed!
- Gender:Male
- Location:New Boston, NH
Posted 01 July 2025 - 11:54 AM
Nice job Rob! The track looks fast just sitting there.
Bill Fernald
I intend to live forever! So far, so good.
I intend to live forever! So far, so good.
#241
Bigdogbro1
-
- Full Member
-
- 144 posts Joined: 23-April 24
Mid-Pack Racer
- Gender:Male
- Location:near Hell, MI
Posted 04 July 2025 - 10:33 AM
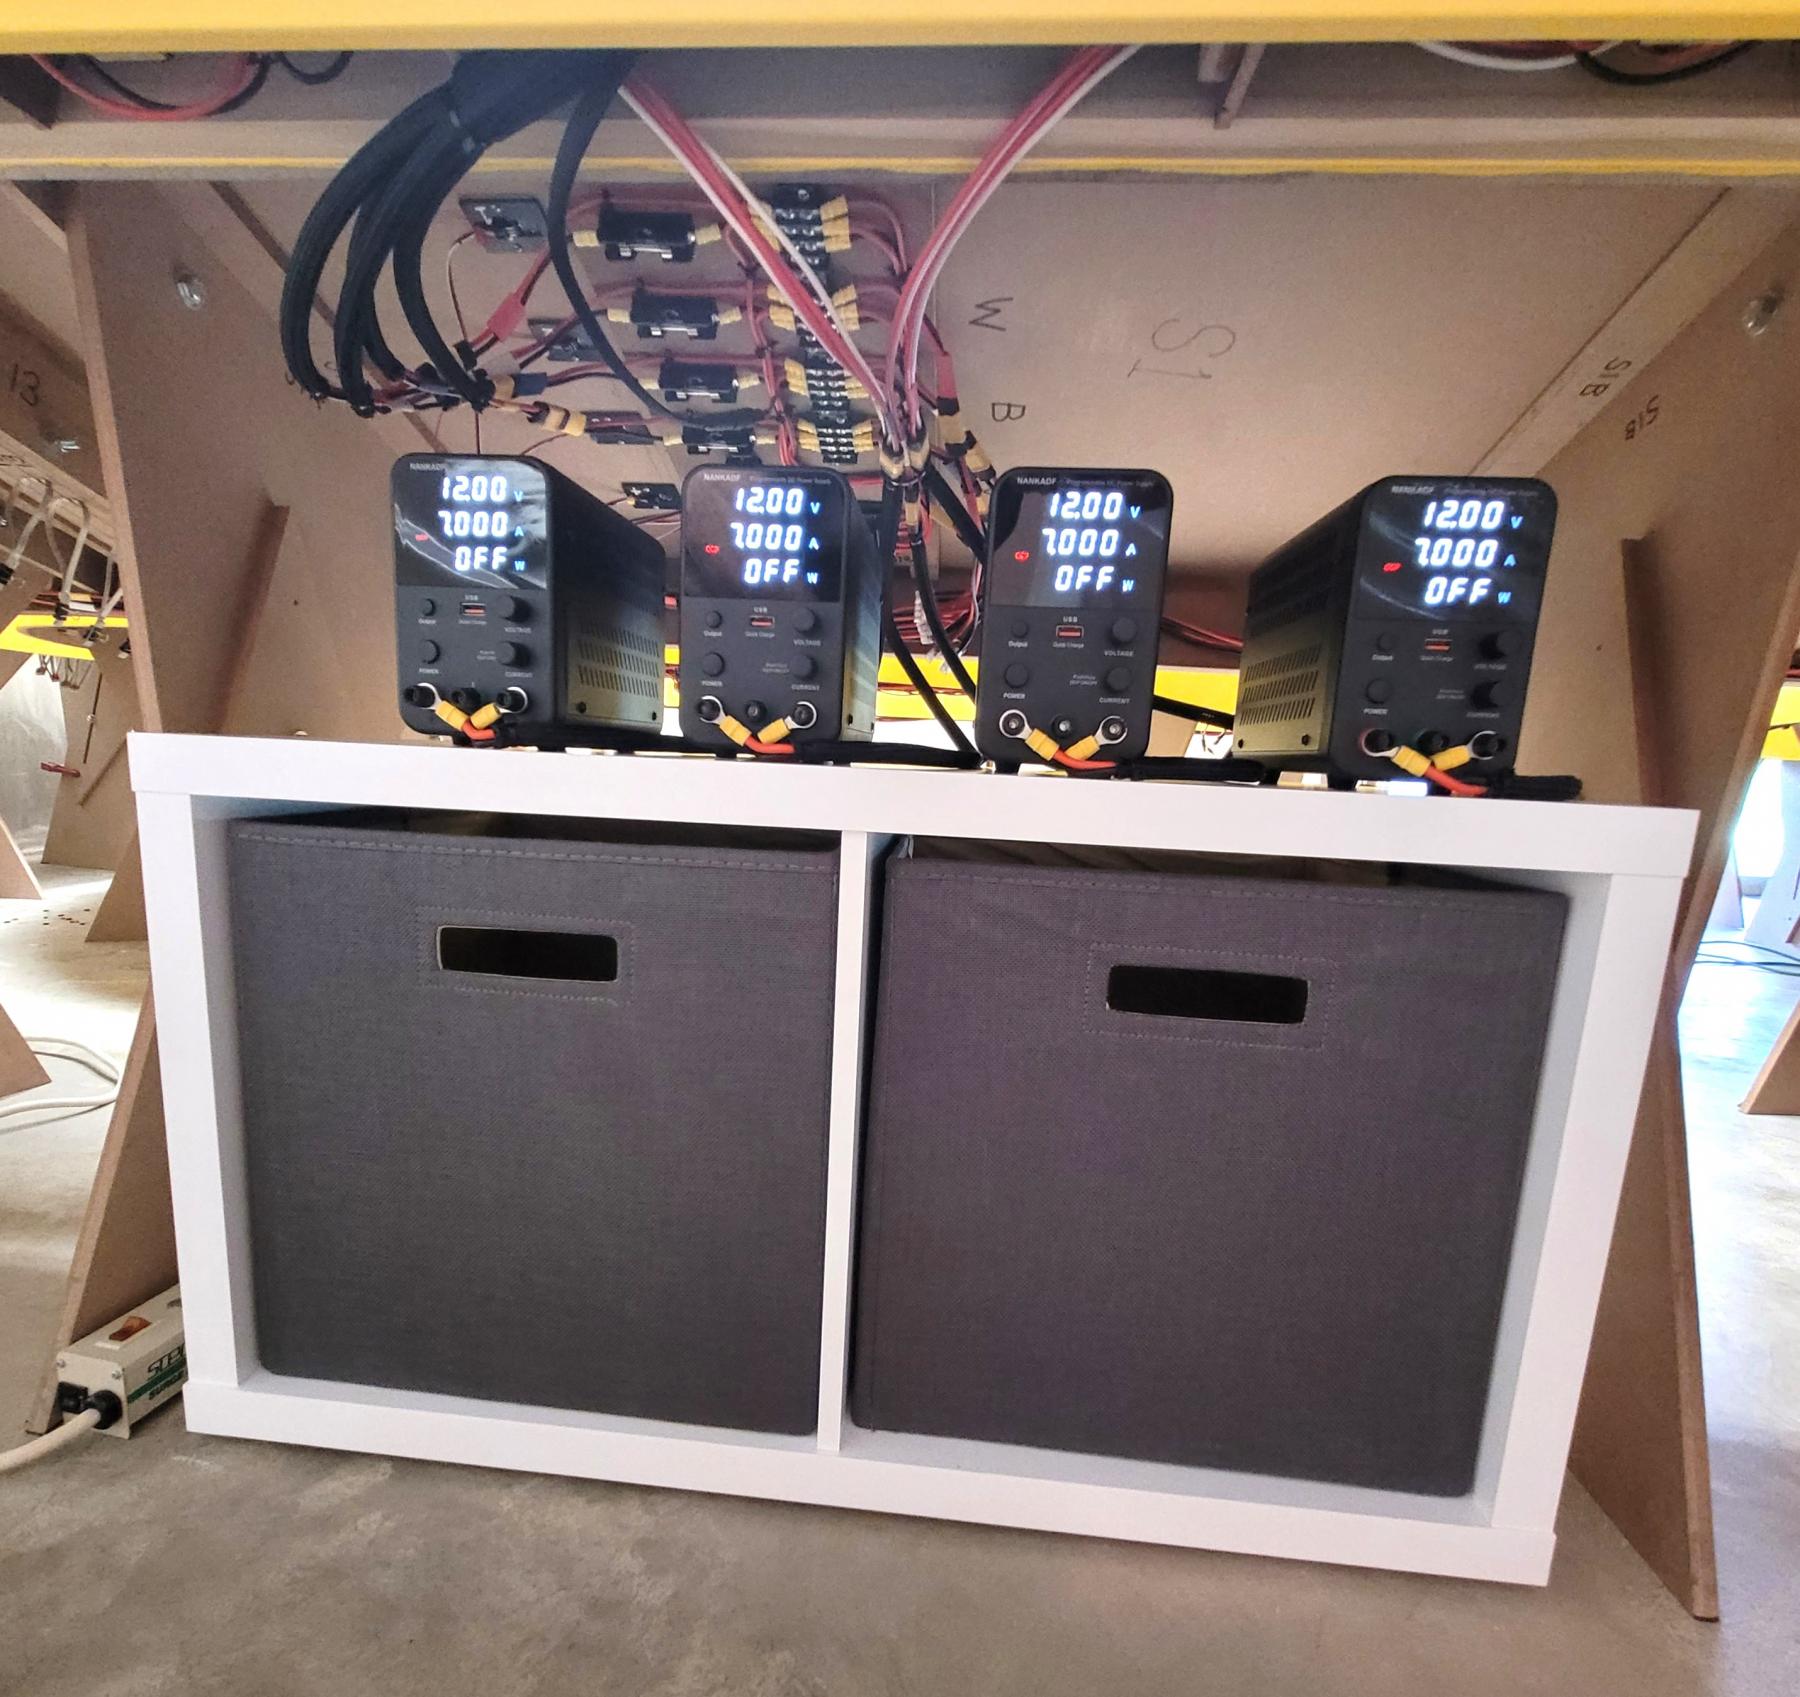
Working on the wiring over the last few days and getting a plan for installation. Waiting on some clear heatshrink tubing for the down drop power tap connections so they don't short out to each other. A few days of other life activities and the 4th weekend will burn up some build time on the track. I do have the first half of the RED lane main run and two power taps under the track now but waiting on the heatshrink.
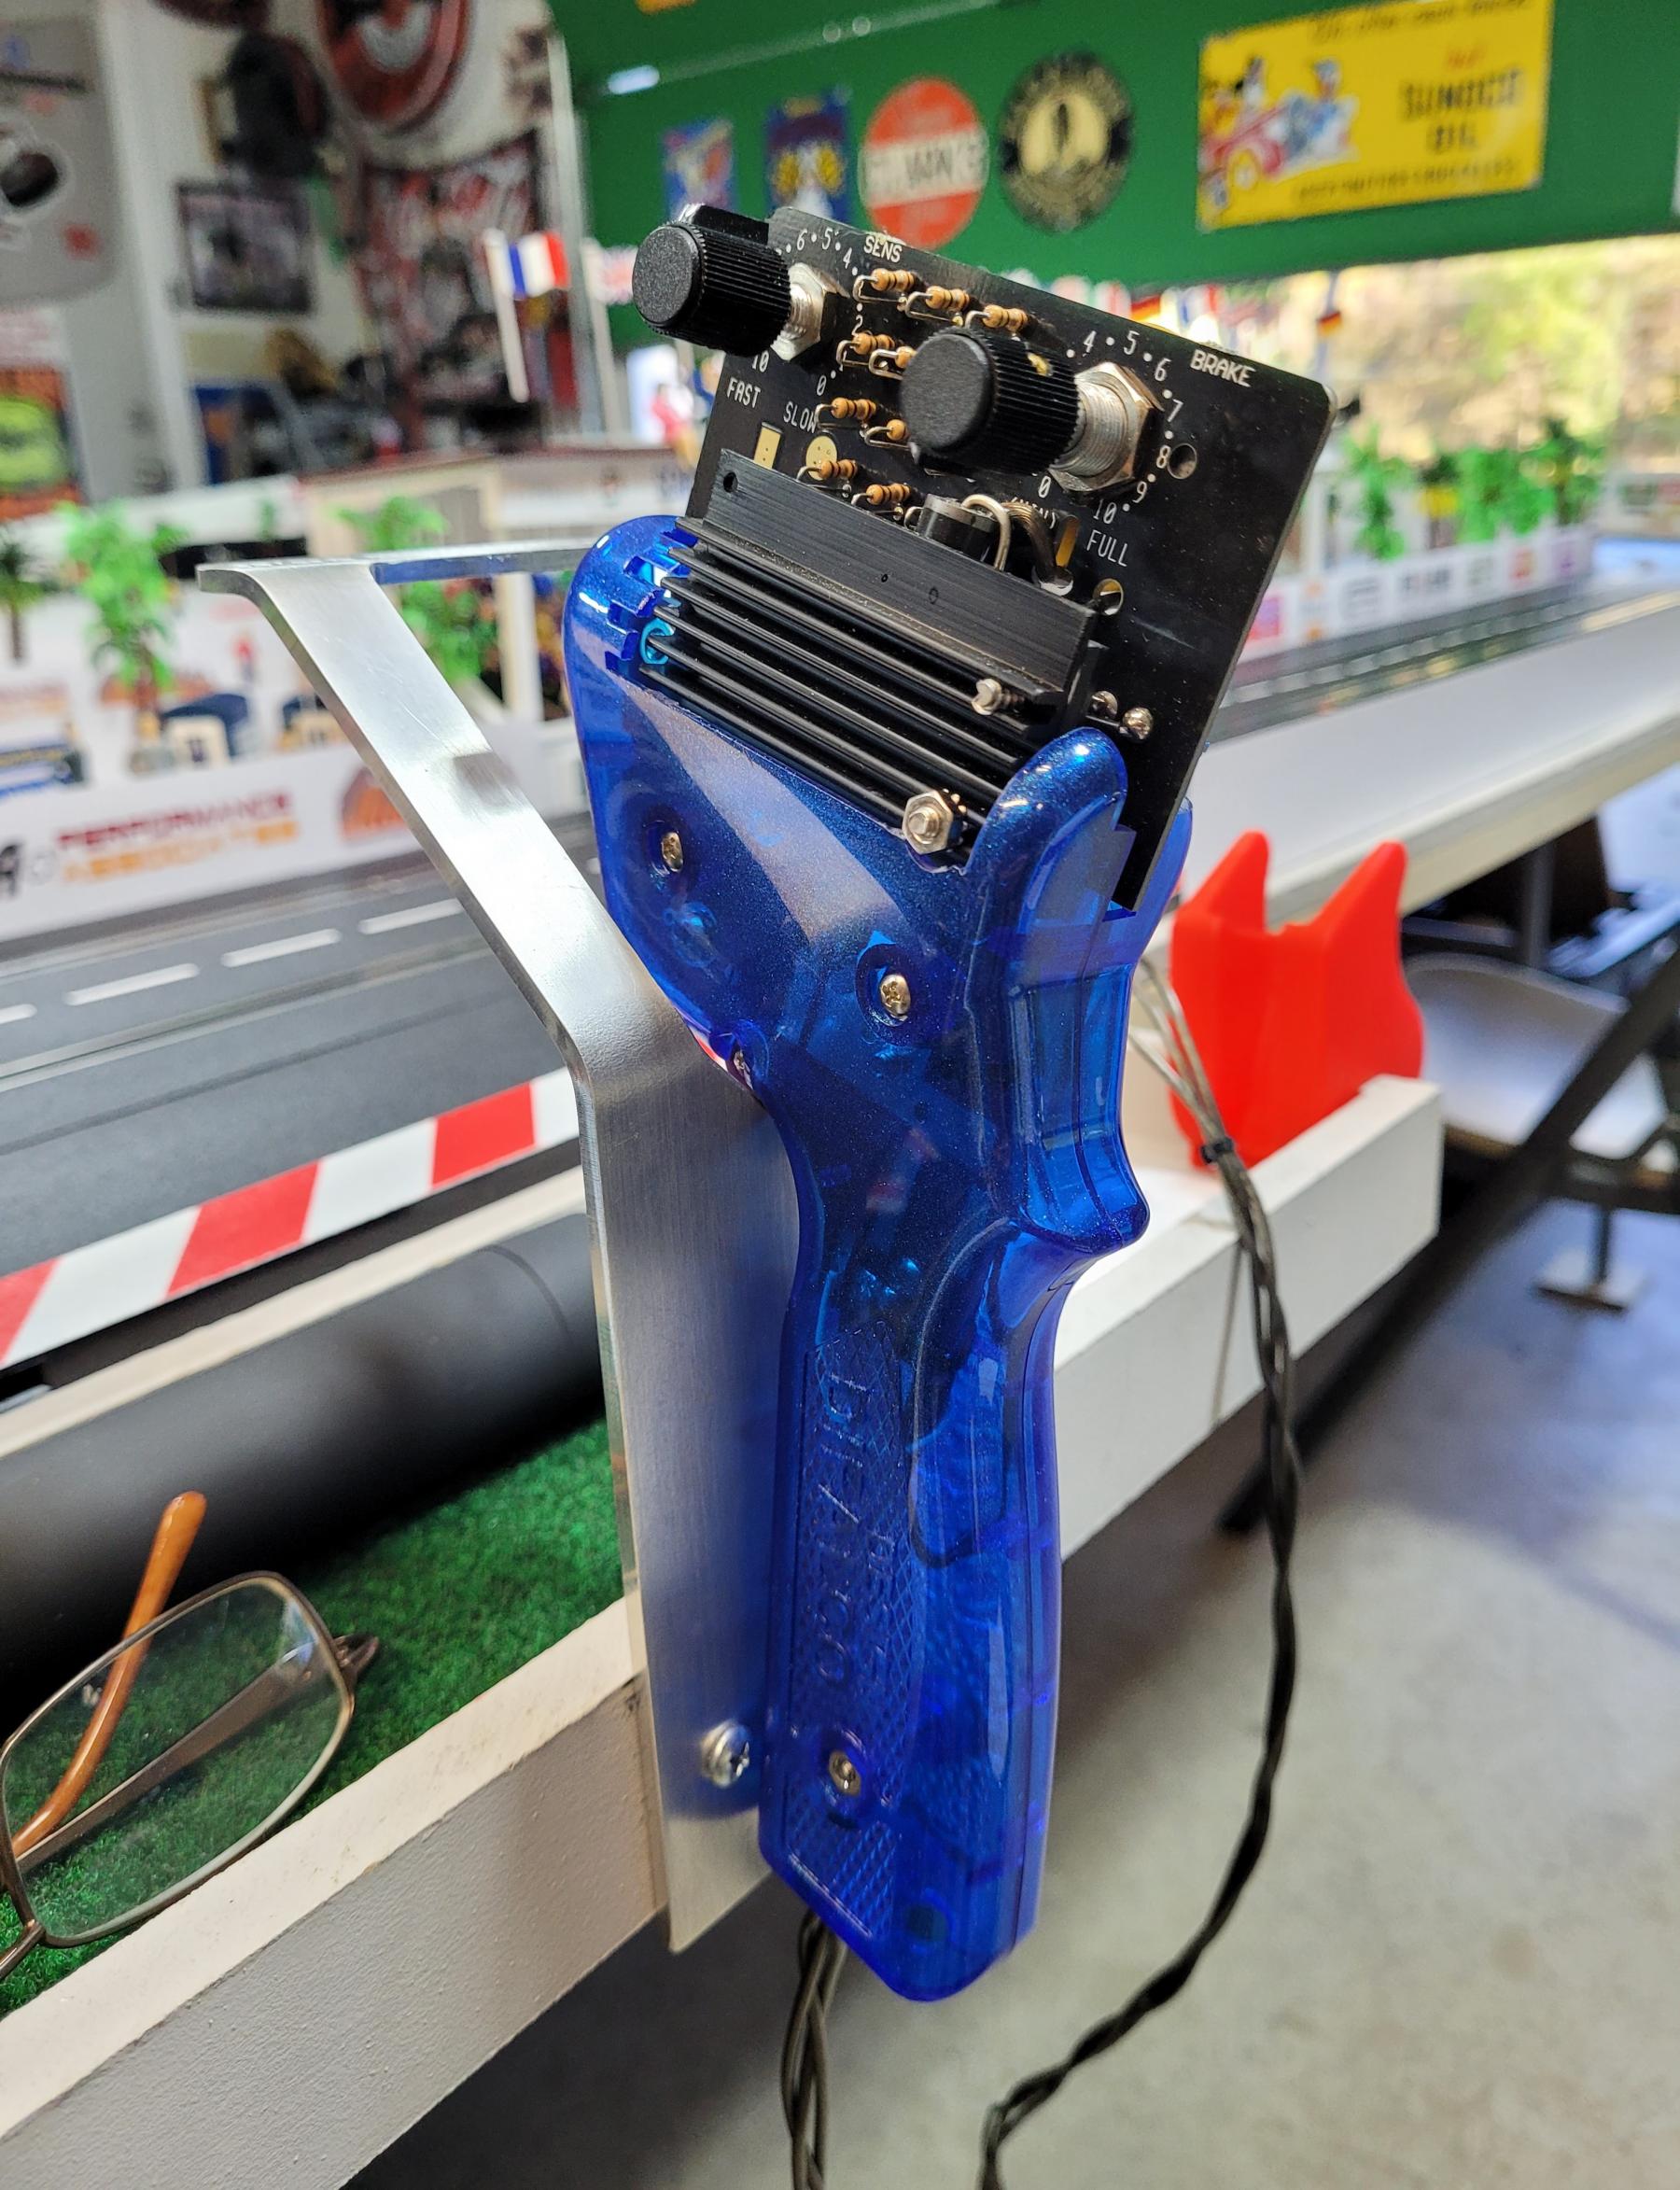
Ordered four Difalco DD300 hand controllers for guest and kids use. I have a DD302 but it's just for me to use. I will be installing XLR plugs on the new DD300s.
Attached Images
- vfr750 and Sloter like this
Rob Armbruster
#242
Bigdogbro1
-
- Full Member
-
- 144 posts Joined: 23-April 24
Mid-Pack Racer
- Gender:Male
- Location:near Hell, MI
Posted 07 July 2025 - 06:08 AM
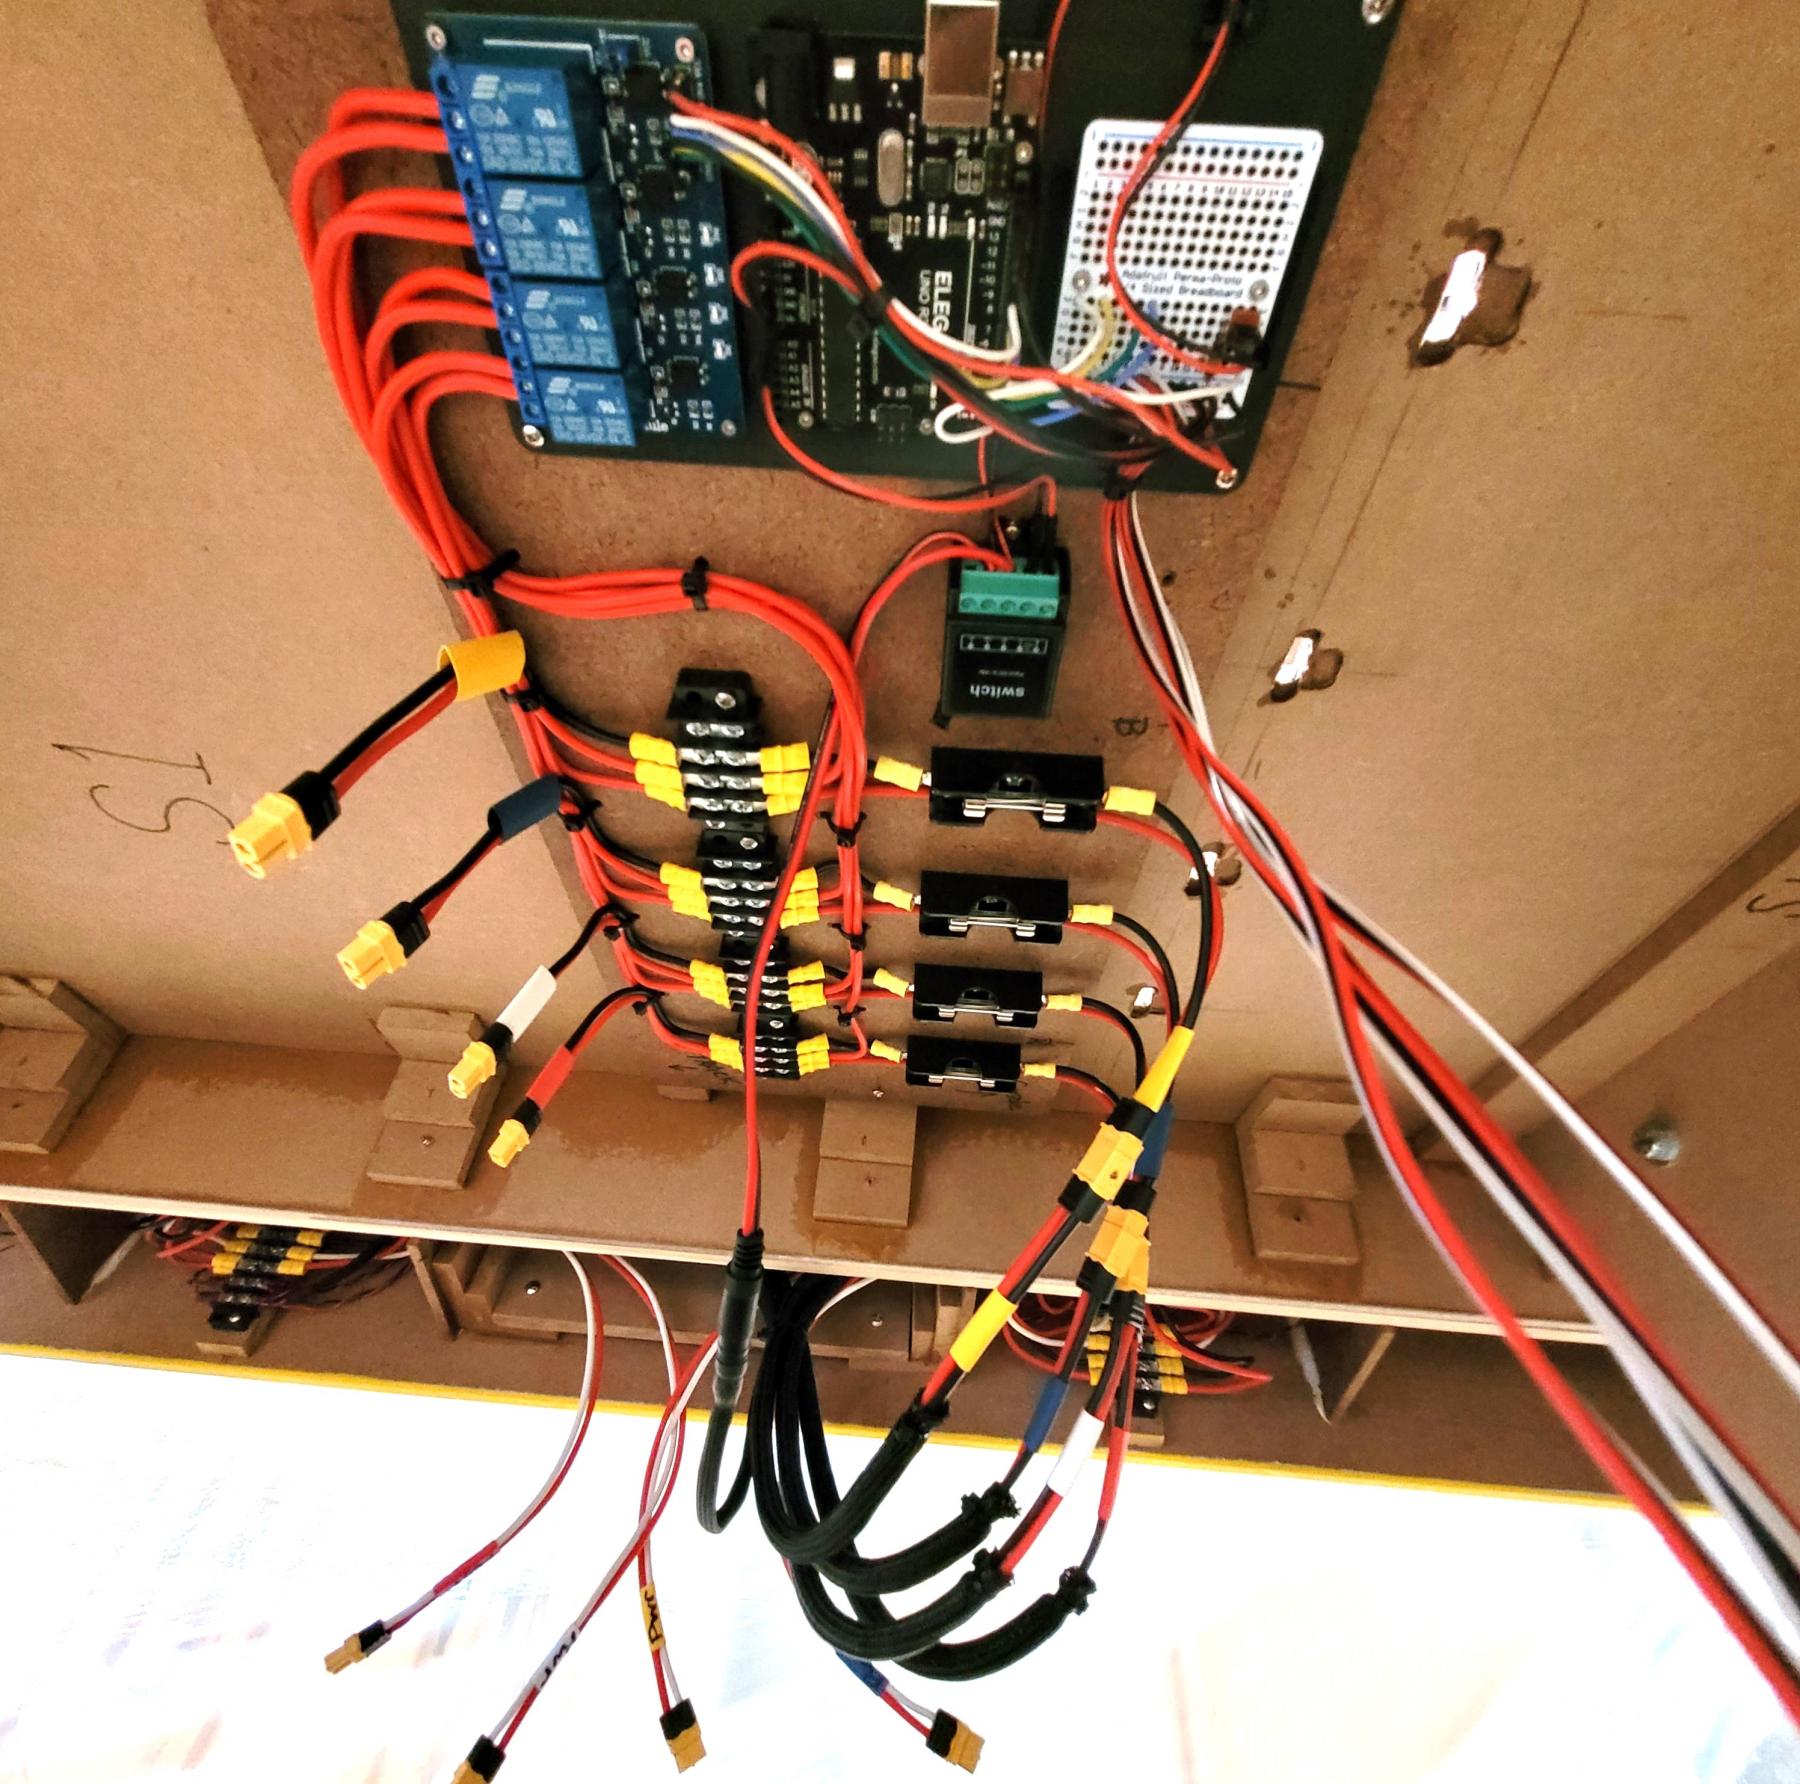
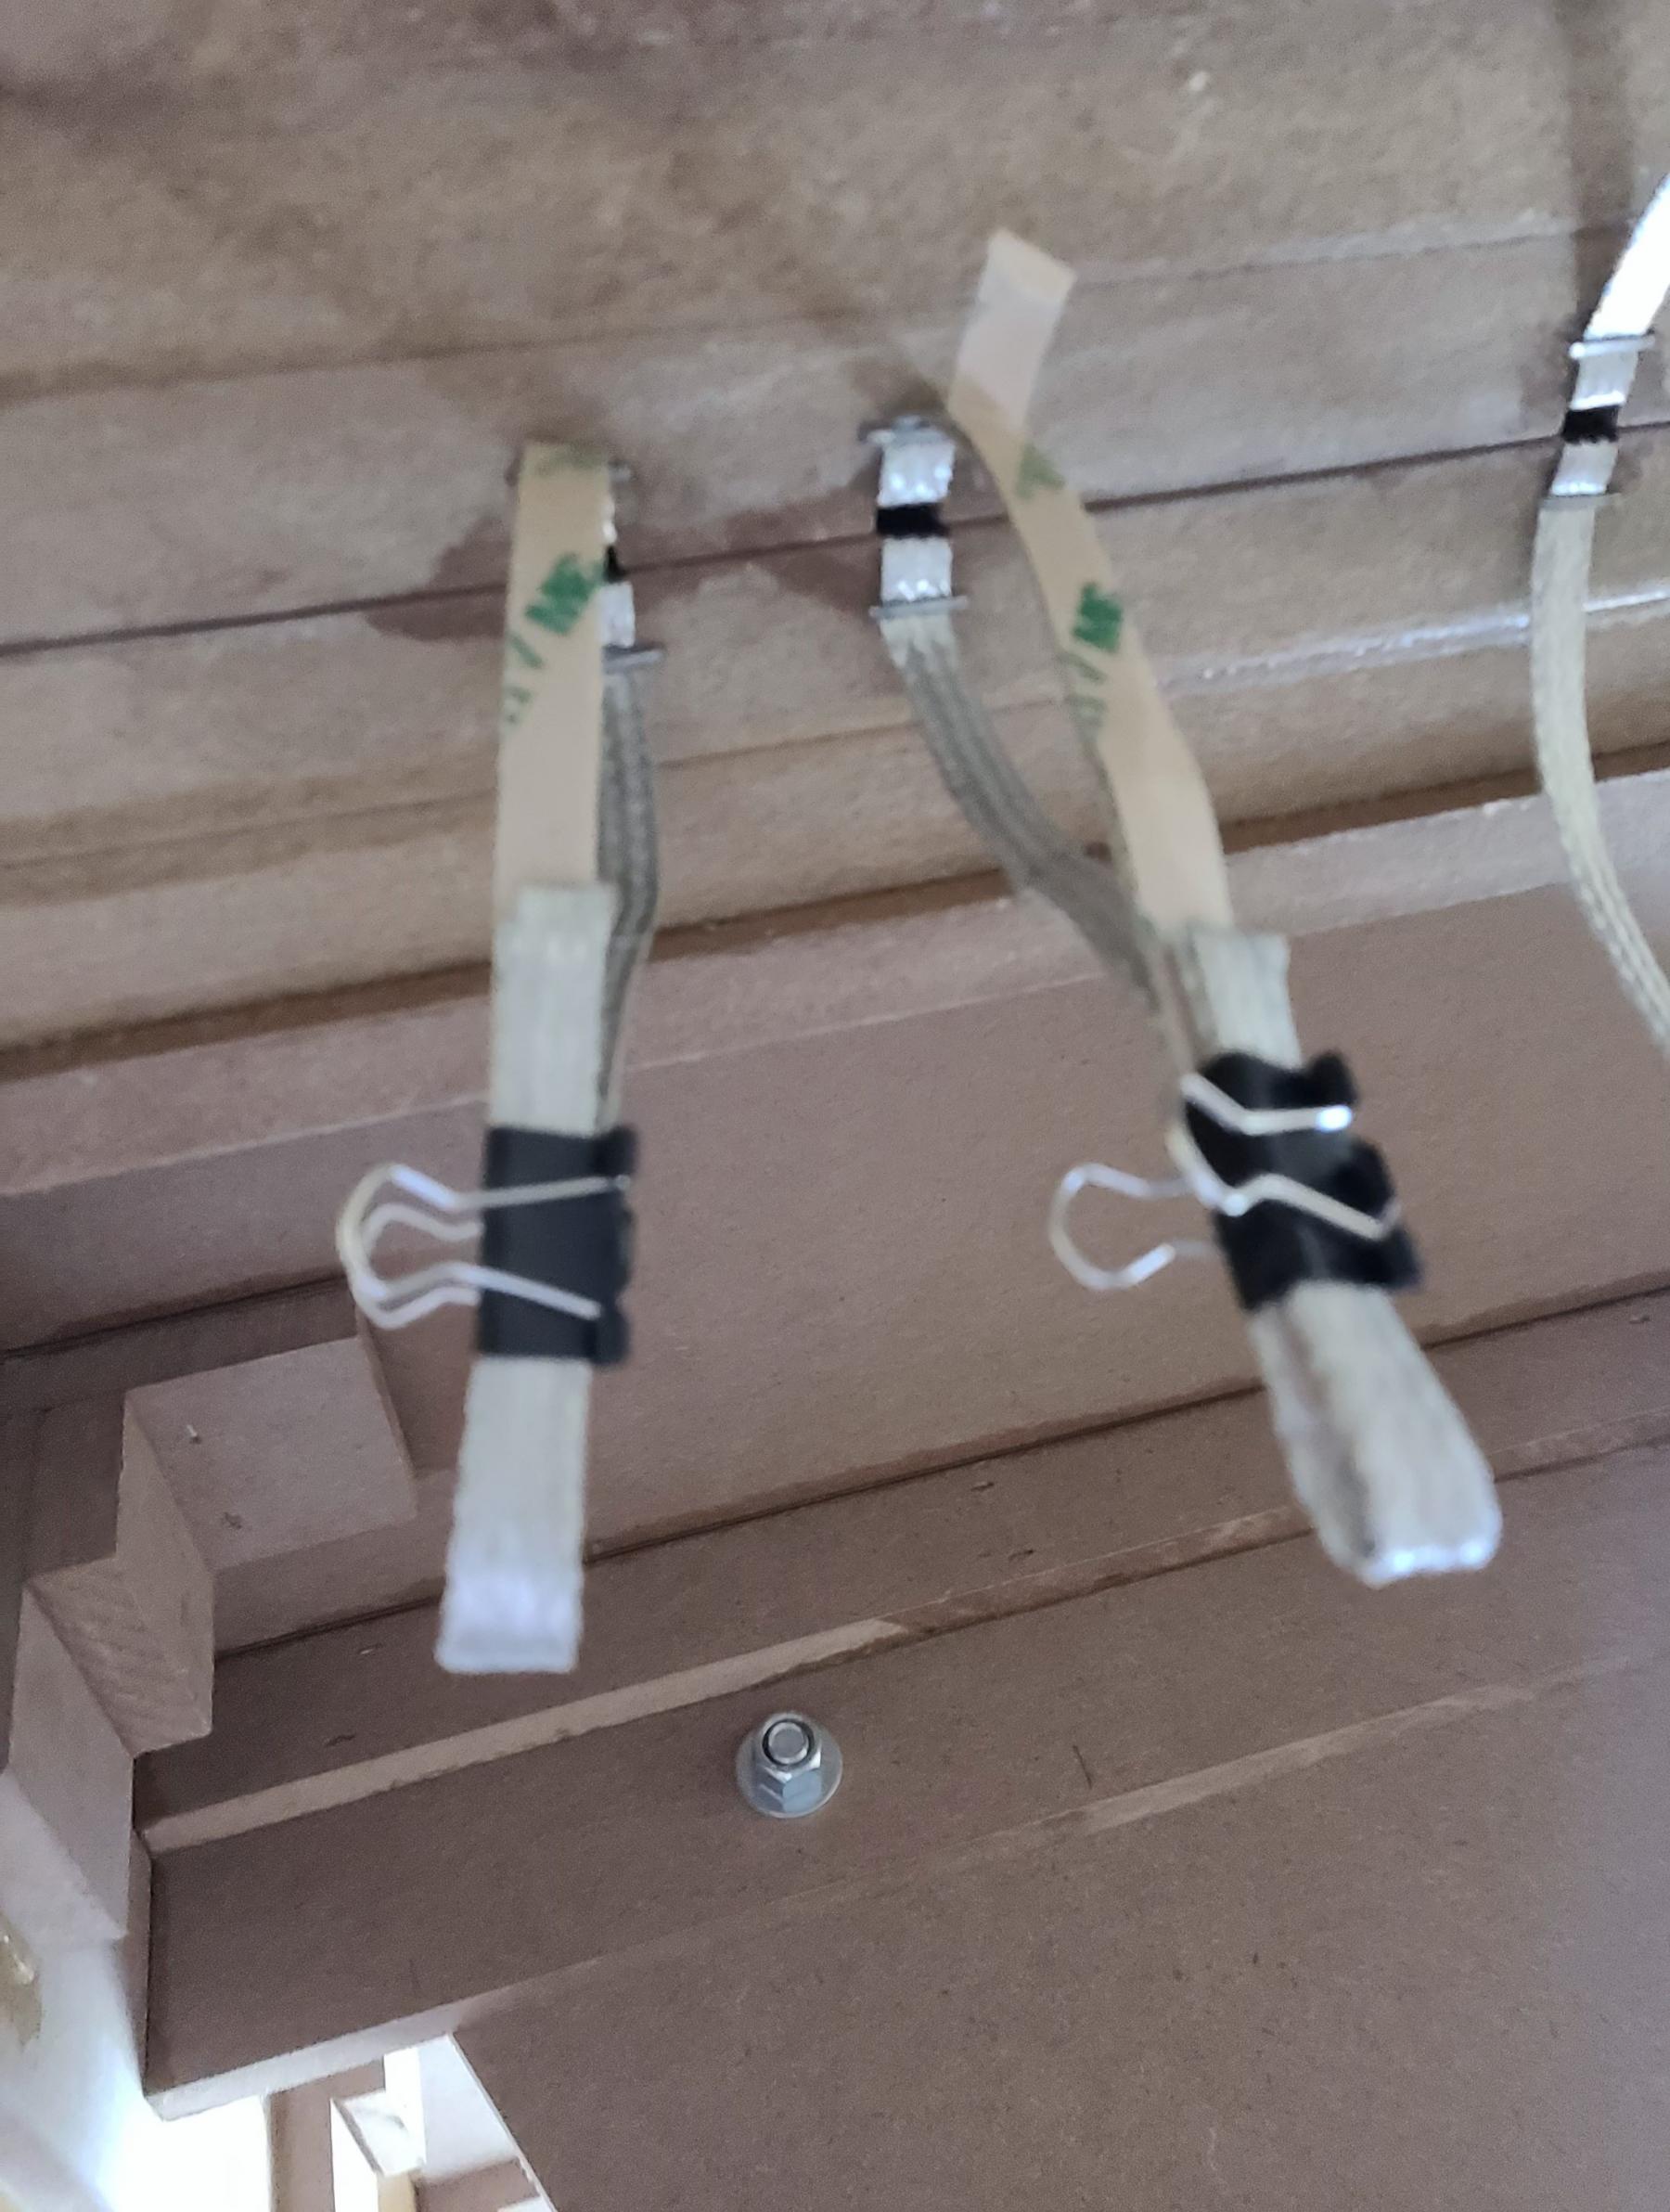
Building the power harnesses the last few days. 12ga wire from the Wire Depot on-line copper wire 19 strand I think, good stuff for this. I have four power taps at about every 20 feet or the closest track joint. Two harnesses of four RED/BLACk wire pair, 20 lane colored pieces of heat shrink for each pair and then tied together in a eight wire bundle.
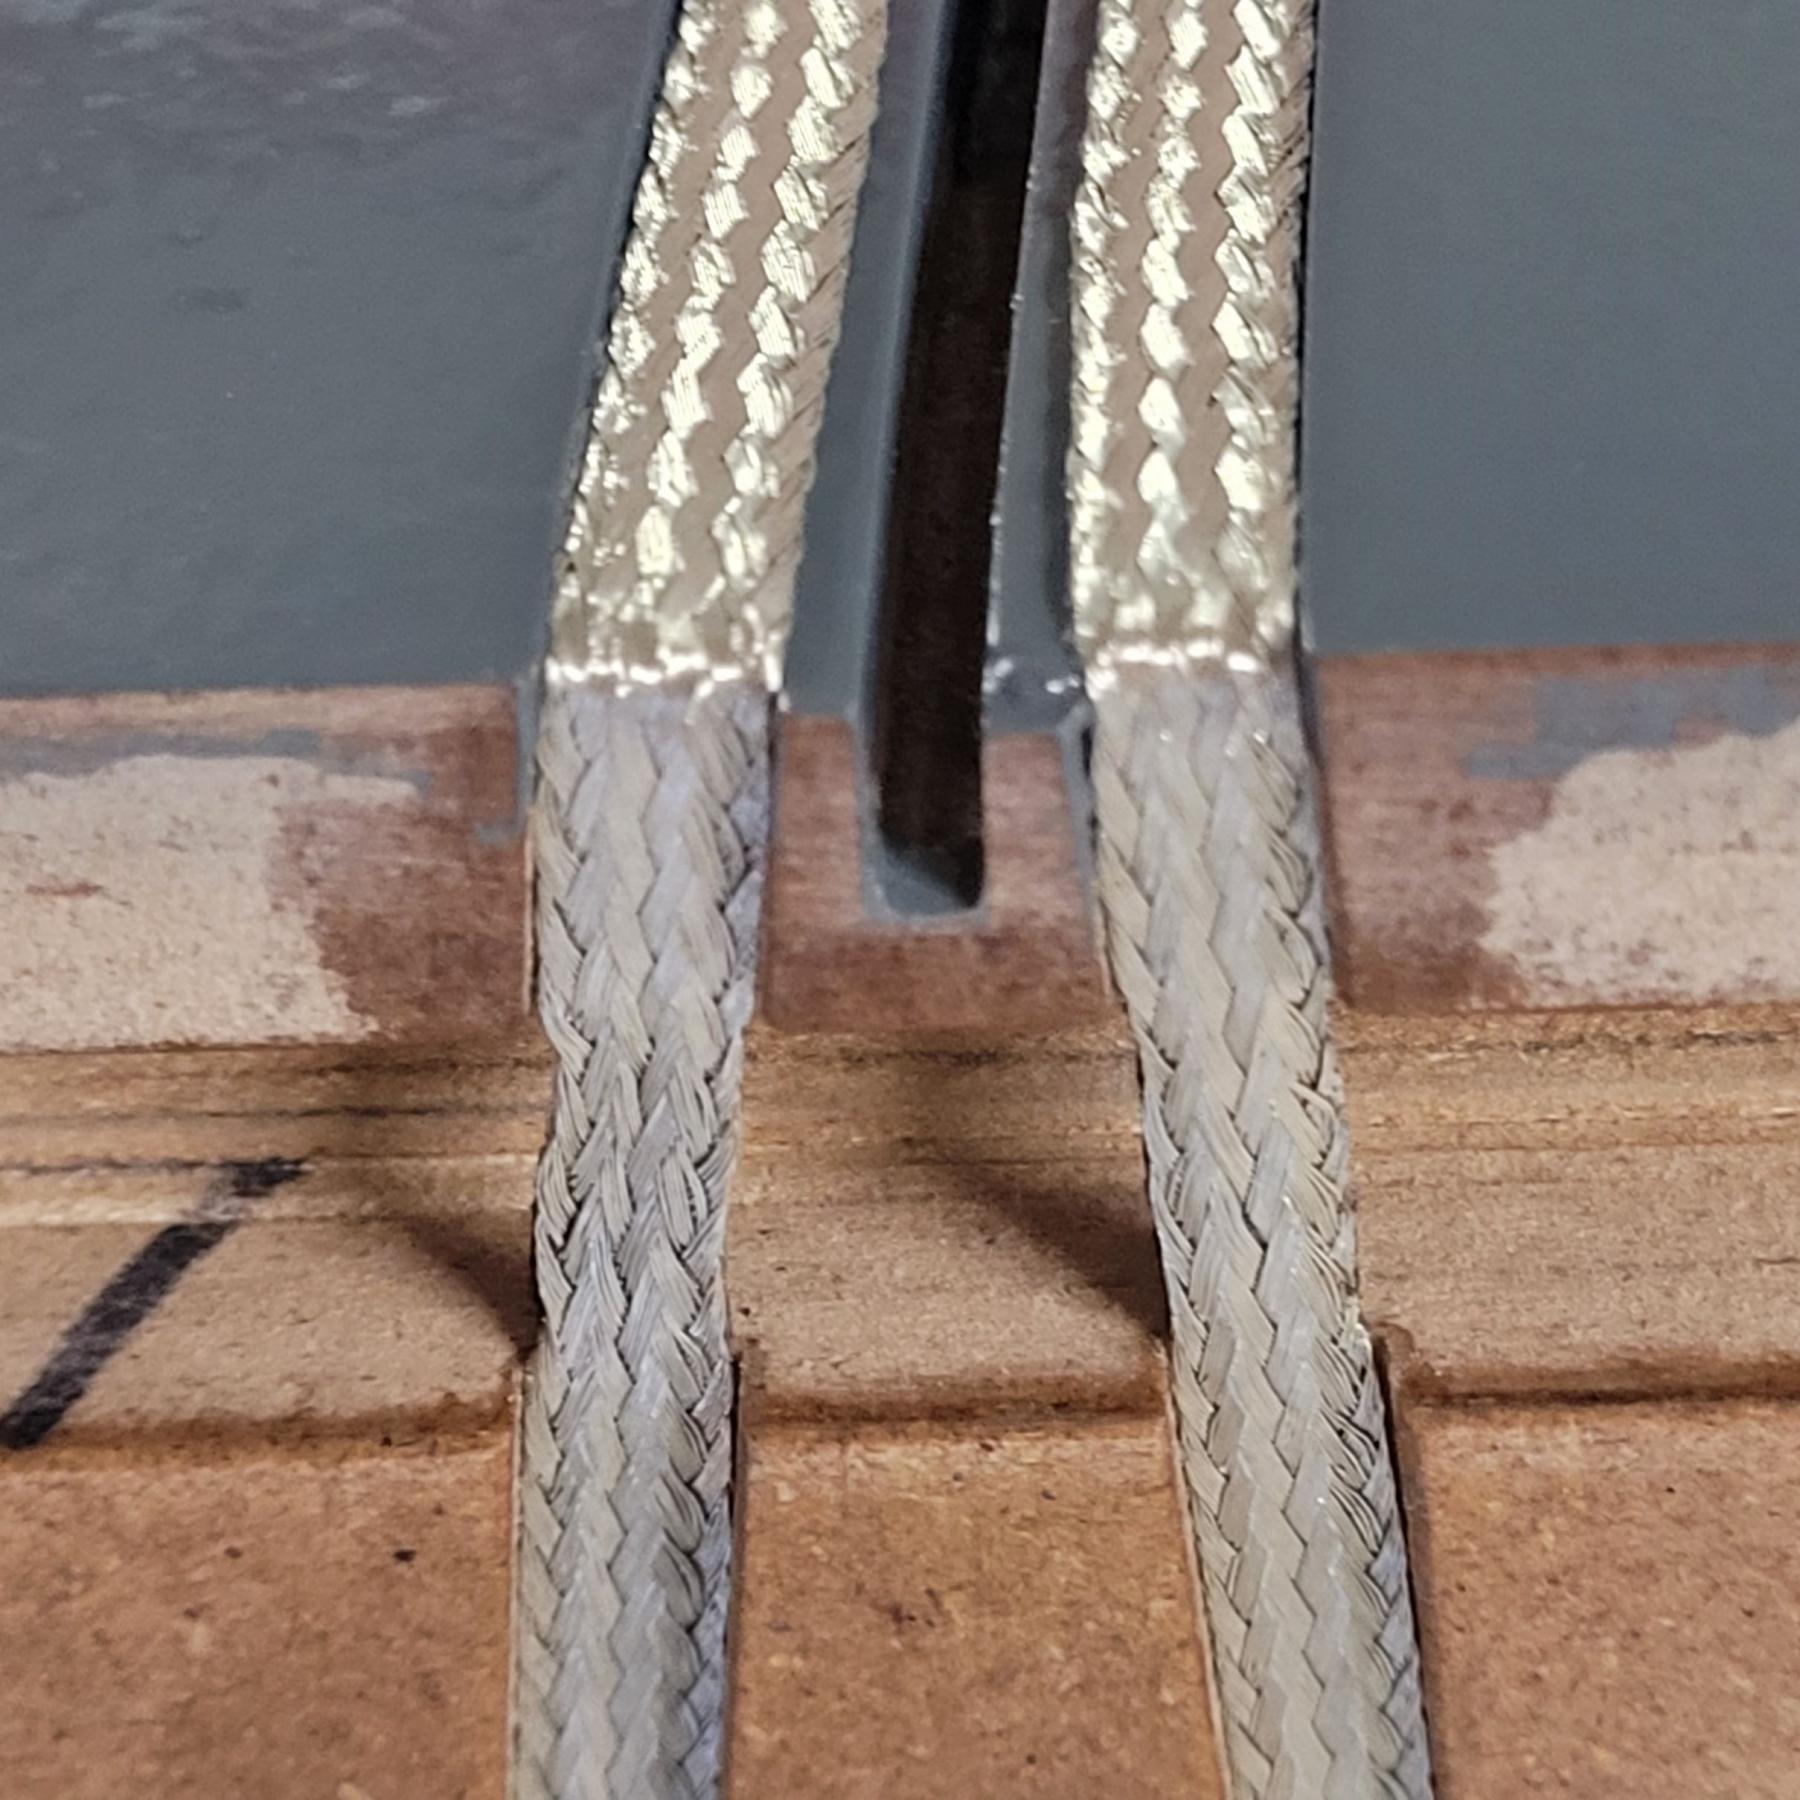
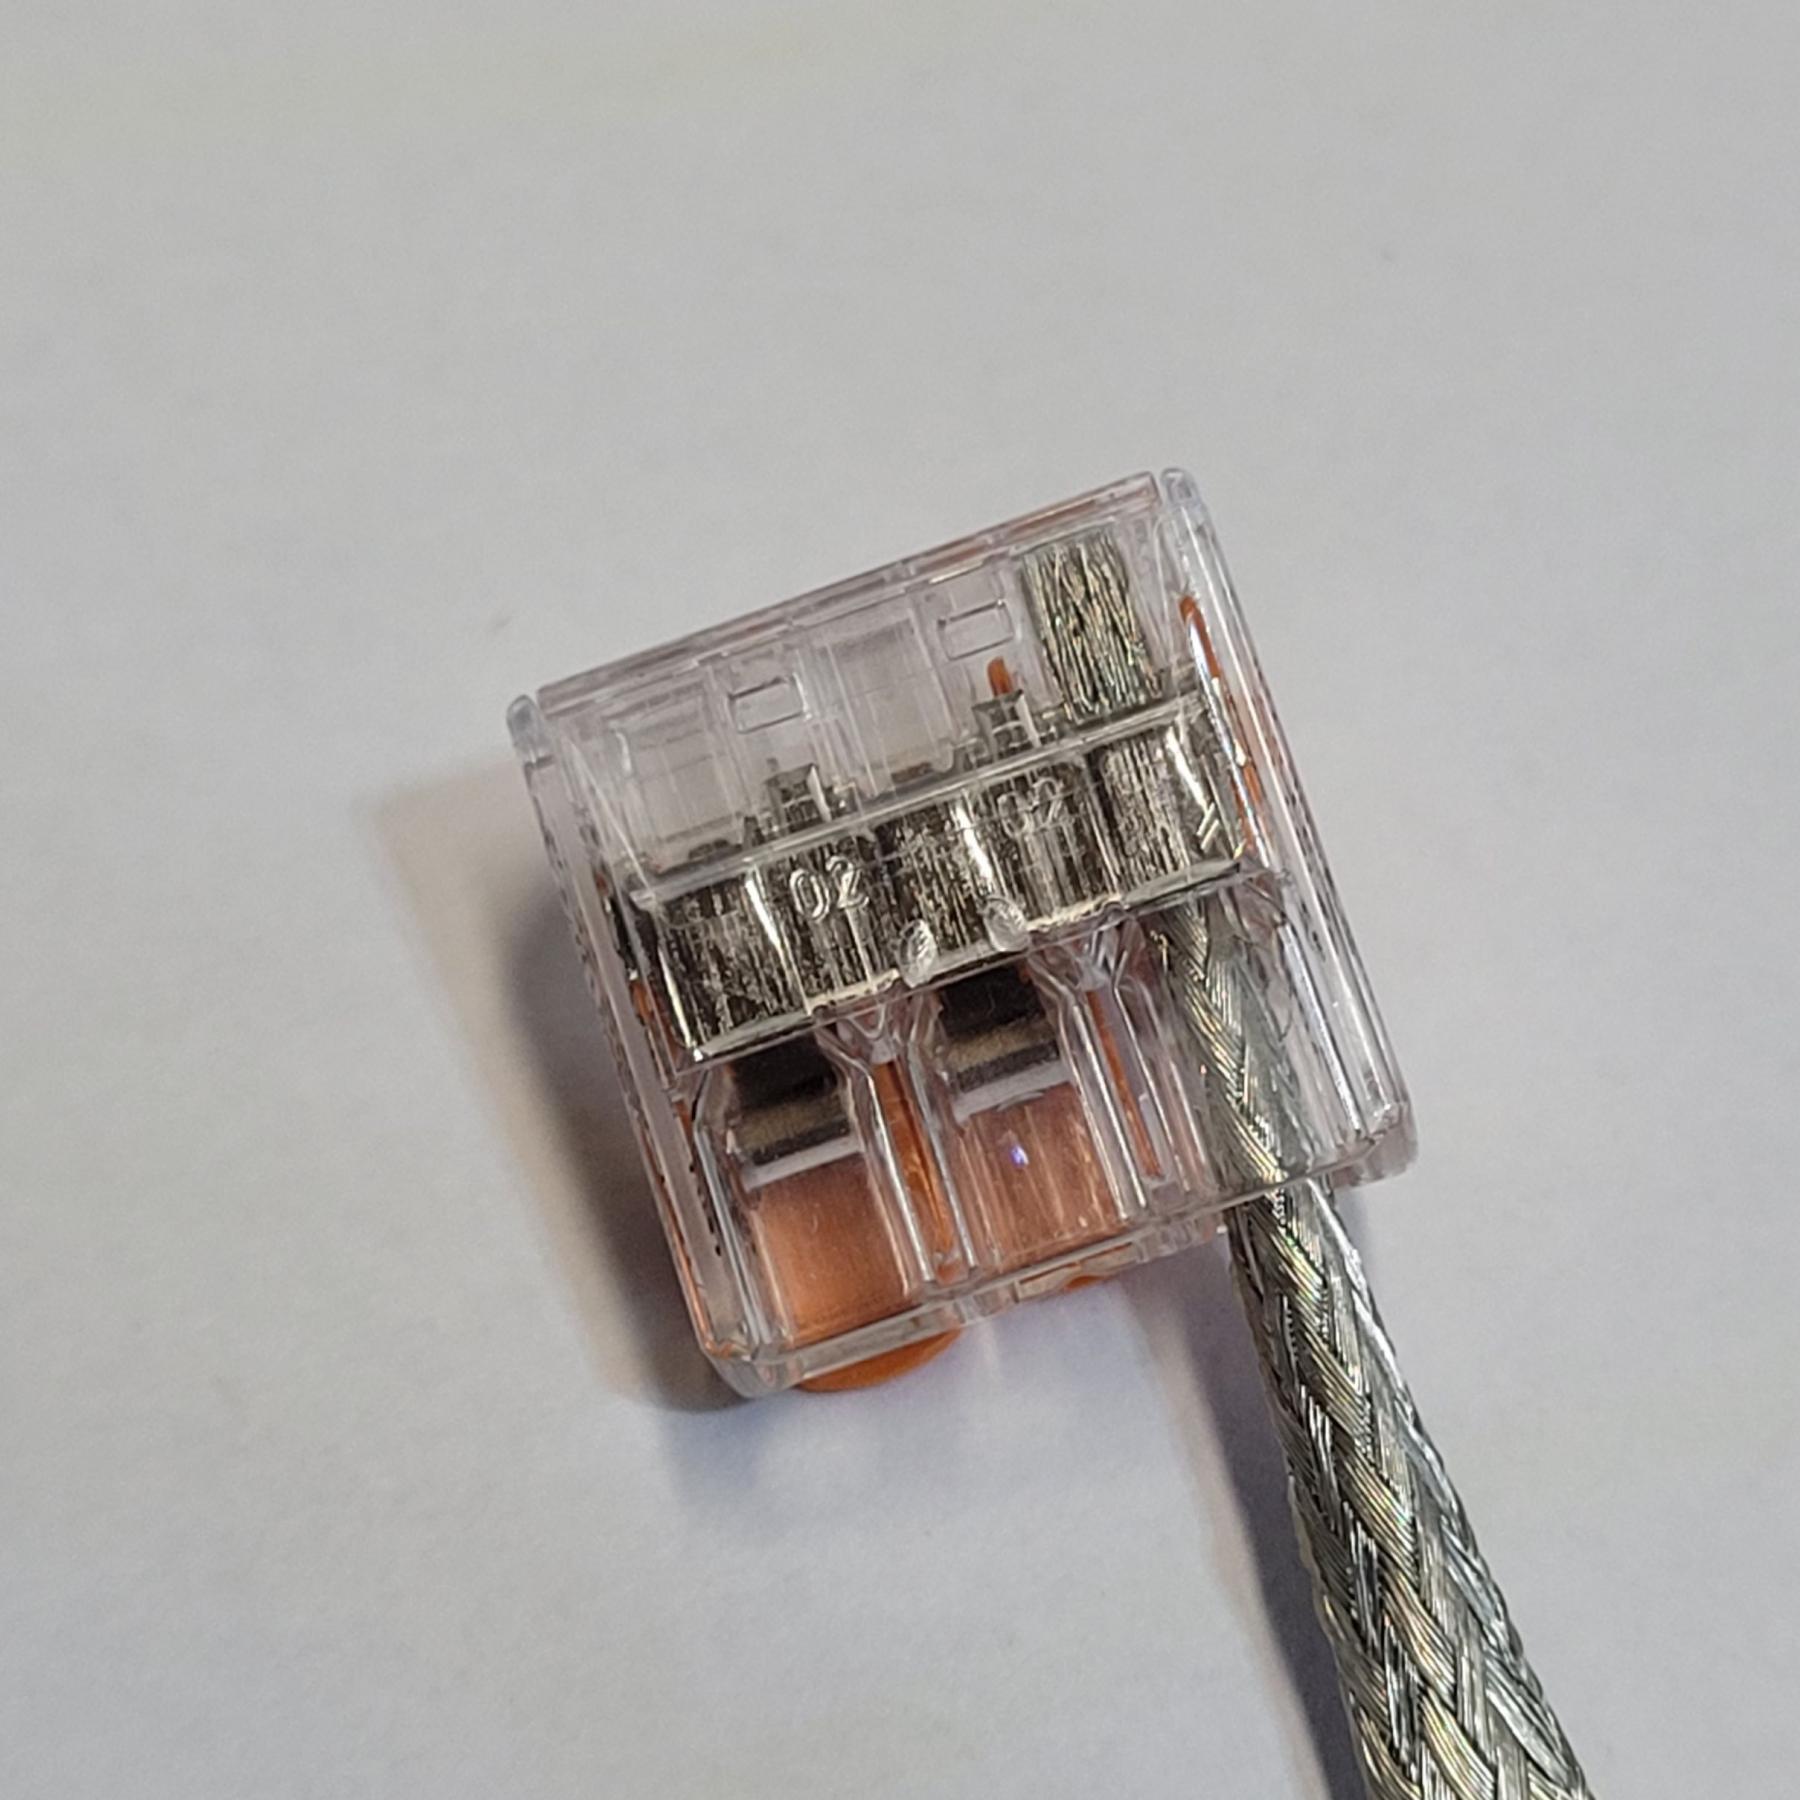
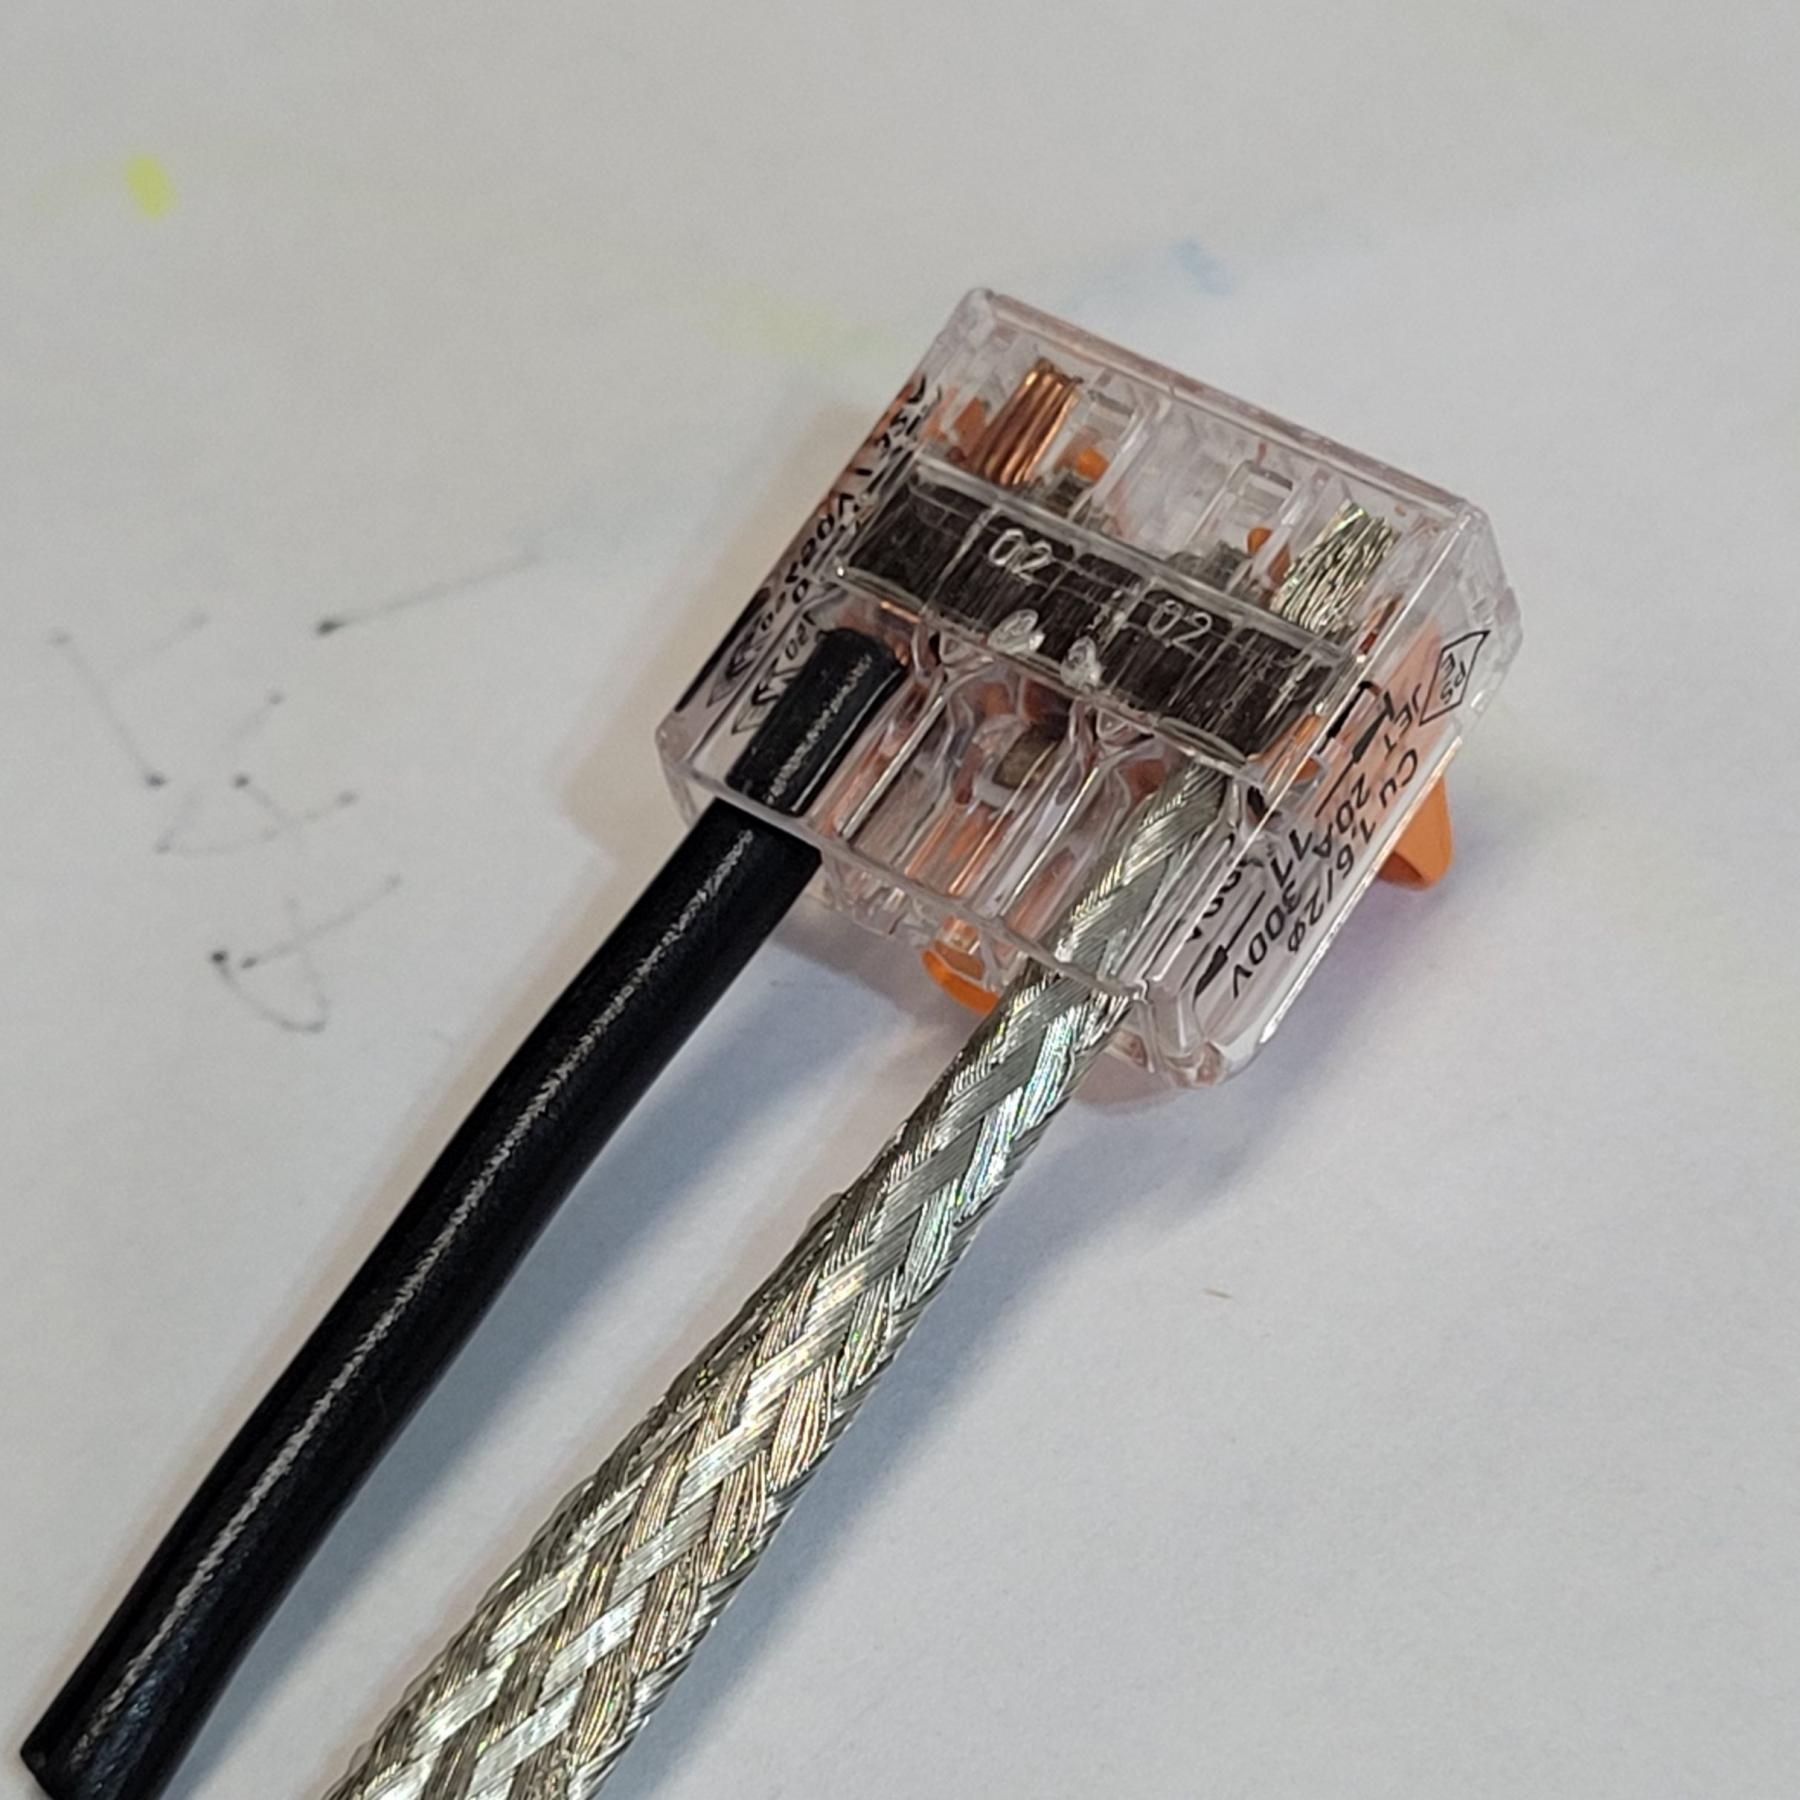
The first picture is the underside of the lead-in turn joint to the back straight-away and the end of the harness (last power tap) for the second half of the track harness. The following pictures show my method of connection to the braid on the track. I used Wago 221 (20A) 3-tap connectors for everything. I had to wrap Scotch tape around some of the braid tails because the 3M paper backing I removed would not allow me to slide over a 1/4" clear heatshrink tubing for shorting protection. I fortunately left most of the tape on and just removed about 3/4" of it to expose the braid end. I formed a U-shape bend in the braid using a putty knife blade on the adhesive side and bent it together to stick. It formed the end of the braid into a wire shape when I rolled it in my fingers to keep the strands together. I then inserted it into the open Wago connector and latched it in place.
This method seems to work great for my application and the connections can easily be taken apart. I'll have more pictures of the underside later. The entire harness is hanging from many 1" open screw in hooks using 1/8" wide x 6" Dollar store tie wraps loosely cinched.
Attached Images
- vfr750, SpeedyNH and Sloter like this
Rob Armbruster
#243
Bigdogbro1
-
- Full Member
-
- 144 posts Joined: 23-April 24
Mid-Pack Racer
- Gender:Male
- Location:near Hell, MI
Posted 07 July 2025 - 06:37 AM
Here you see the 2nd half of the power harness laying on the track before installing it. It gets power mid-point from under the console and goes to the 20 degree banked turn joint for the first of two taps. You can see the clump of Wago connectors there at the joint where individual 12ga wires will tap off and go to more Wago connectors at the braid connections. The other harness goes the opposite way around the track and endsat the joint just before the bridge.
Attached Images


- vfr750, Alchemist and Sloter like this
Rob Armbruster
#244
glueside
-

- Full Member
-
- 434 posts Joined: 07-February 12
On The Lead Lap
- Gender:Male
- Location:IA
Posted 08 July 2025 - 06:49 AM
From what I have understood "all" taps need to be the same length of wire used.
Jeff Strause
Owner, Strause's Performance Racing (SPR)
USSCA 2016 4" NASCAR Champion & 4 1/2" NASCAR Champion & Retro Can-Am Champion
USSCA 2017 All Around Champion
USSCA 2019 All Around Champion
#245
Bigdogbro1
-
- Full Member
-
- 144 posts Joined: 23-April 24
Mid-Pack Racer
- Gender:Male
- Location:near Hell, MI
Posted 08 July 2025 - 08:12 AM
From what I have understood "all" taps need to be the same length of wire used.
Hi Jeff,
Not sure why they would need to be the same length and from what starting point. This 81ft track has the four taps at about every 18 to 20 feet so the furthest distance from any power is about half that. A single car on a lane with 12ga wire and braid has at least 15amps available if the power source can deliver it. The voltage drop on this track would be nearly impossible to measure with common equipment. Besides all the lanes have the same advantage and disadvantage running the joint taps off from nearly equal length main feed runs.
Having the feeds the same length on a wood track would be nearly impossible and impractical in my opinion with only joint blocks available at unequal spots.
Thanks for mentioning it and congratulations on your past slot car racing records!
Attached Images
- Alchemist, Paul Menkens and Sloter like this
Rob Armbruster
#246
Sloter
-

- Full Member
-
- 165 posts Joined: 27-May 21
Mid-Pack Racer
- Gender:Male
- Location:Venice, FL
Posted 08 July 2025 - 10:55 AM
Power tap length has no effect. My 4 lane, 70ft Carrera track had 5 power taps. My new wood, 4 lane, 70ft track has no power taps and have no issues. I had like 400+ connections (Track Joints) with my Carrera track and that is why I used Power Taps on that track. With my wood track, I only have 6 joints. Talked to several track builders and was told that no need for power taps with that size of track and few connections. Power Taps are always a positive thing to have. We only run 1/32 cars, low amp draw. One Power unit , 25 amp pyramid. Max amp draw with 4 cars at the start is only 3 amps and 1.5 amps when under power. We run Carrera, Scalextric, Revell, Pioneer, ScaleAuto, NSR, Slot-It etc. and have had no power issues or power surges with deslots. Bigdogbro1 built his track like a pro and should be very proud of his work. Your craftsmanship is top notch.
Bob
- MSwiss, Alchemist, Eddie Fleming and 1 other like this
Bob Roberts
#247
mickey thumbs
-

- Full Member
-
- 195 posts Joined: 10-November 18
Mid-Pack Racer
- Gender:Male
- Location:Western NC
Posted 08 July 2025 - 08:14 PM
Super clean job on the electrical, but the everything else has been that way too. What a great job. A very humbling thread to follow.
- dc-65x and Paul Menkens like this
Mike Vernon
#248
Bigdogbro1
-
- Full Member
-
- 144 posts Joined: 23-April 24
Mid-Pack Racer
- Gender:Male
- Location:near Hell, MI
Posted 11 July 2025 - 11:28 AM
Milestone!
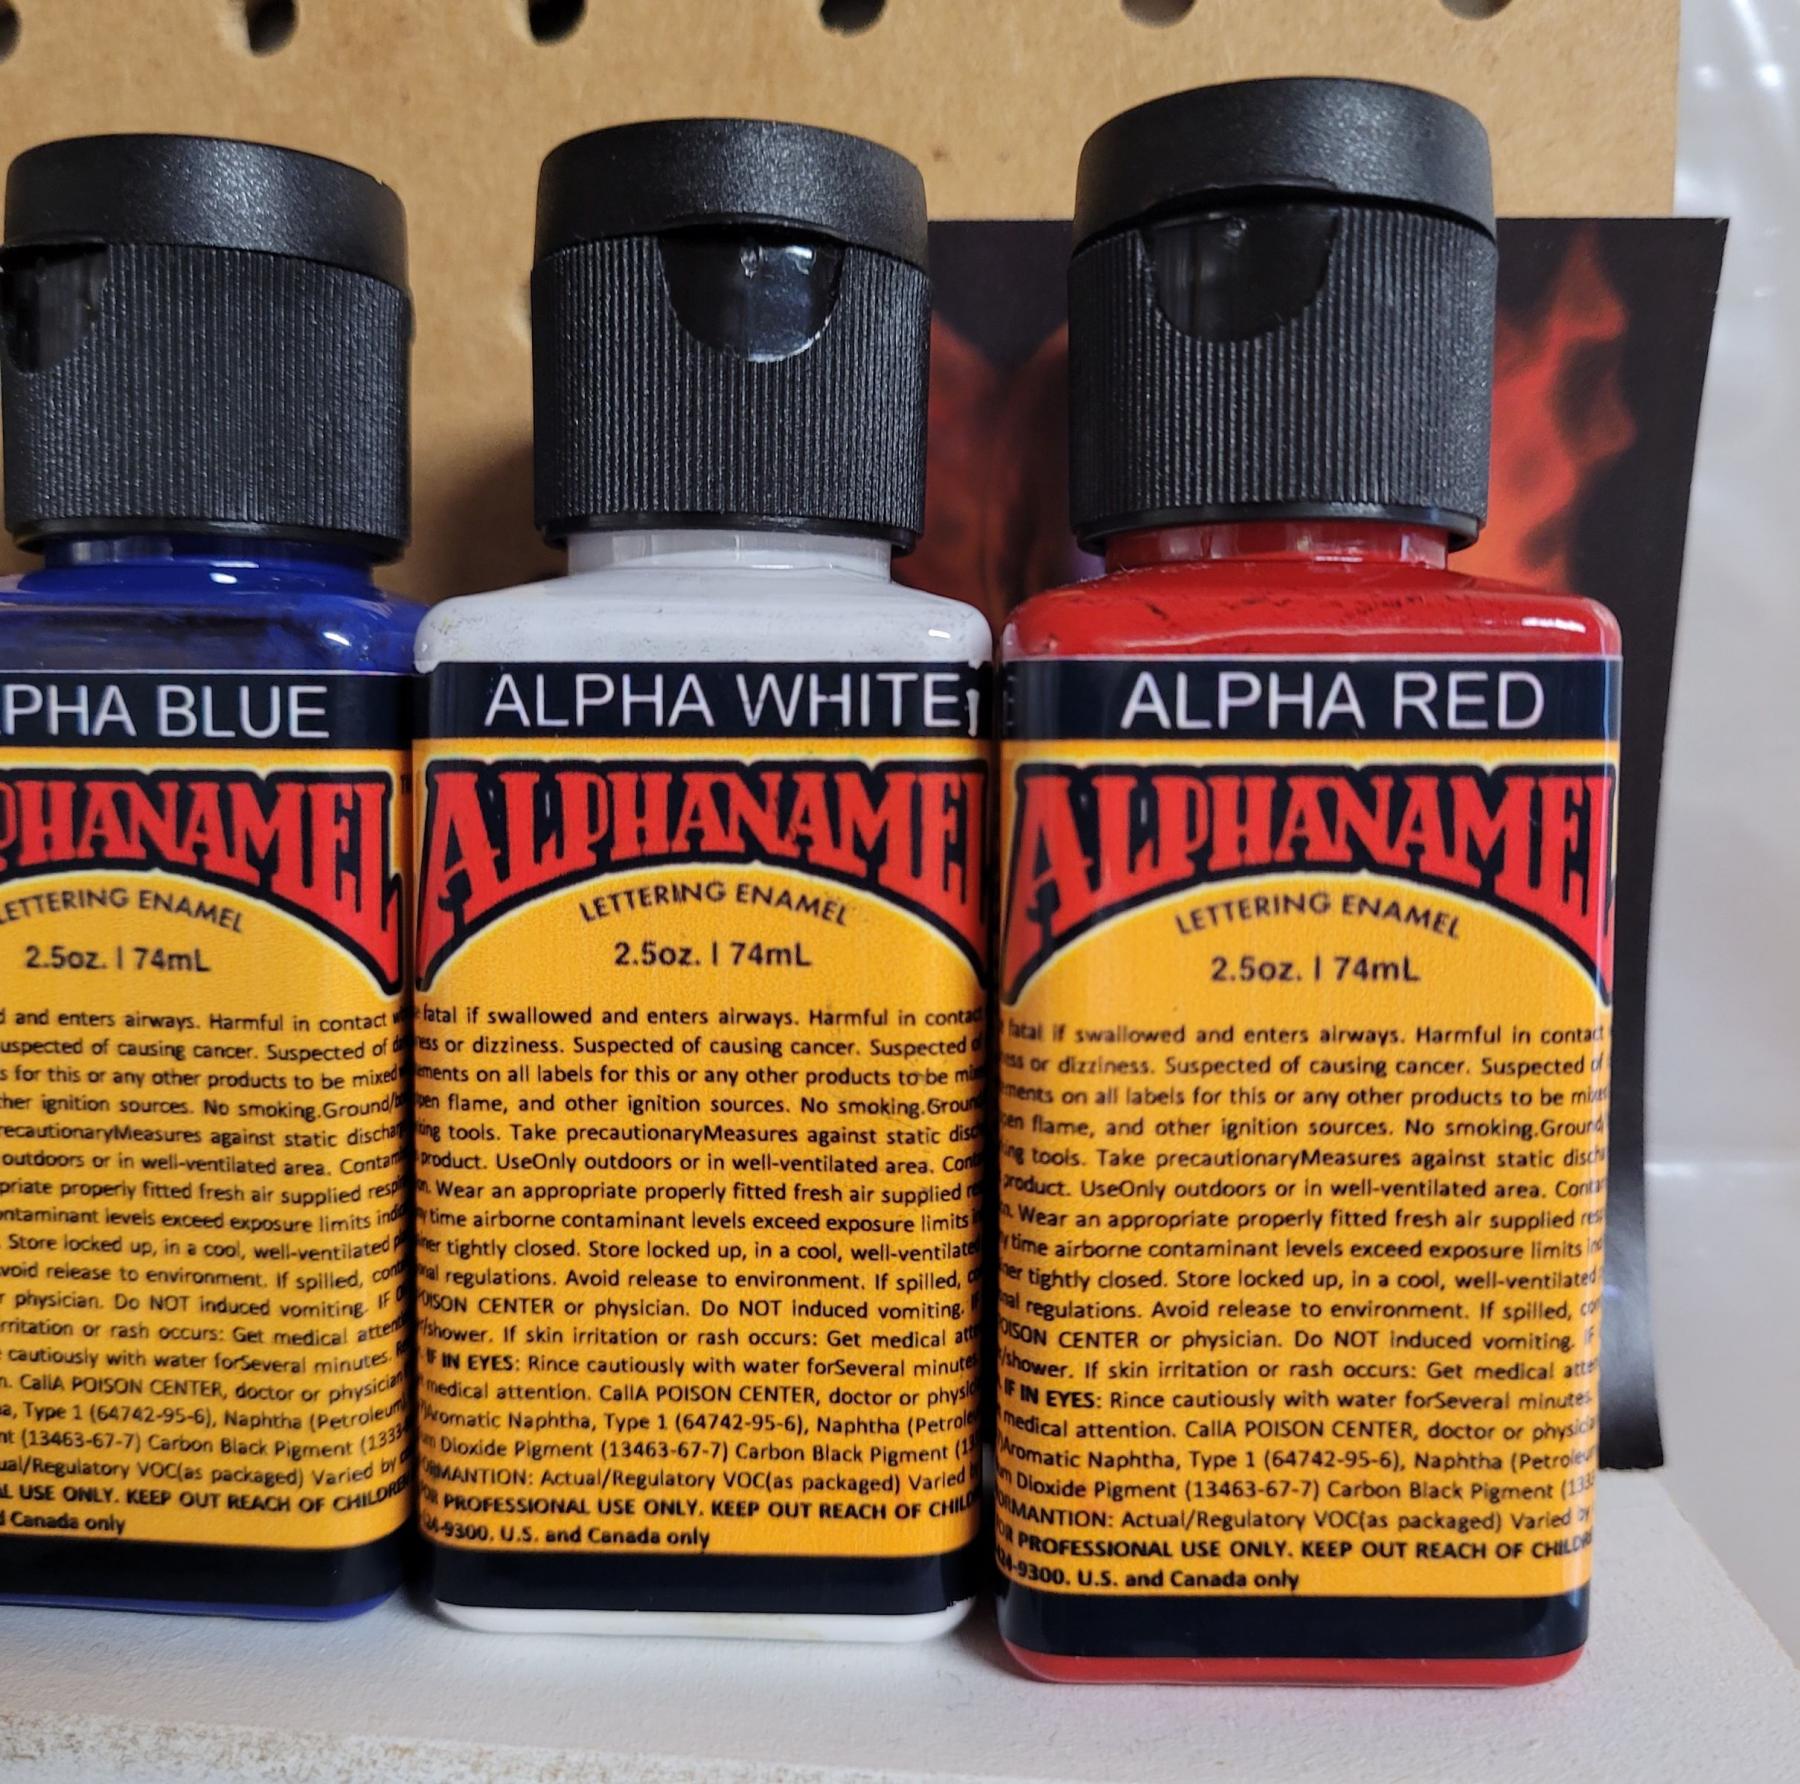
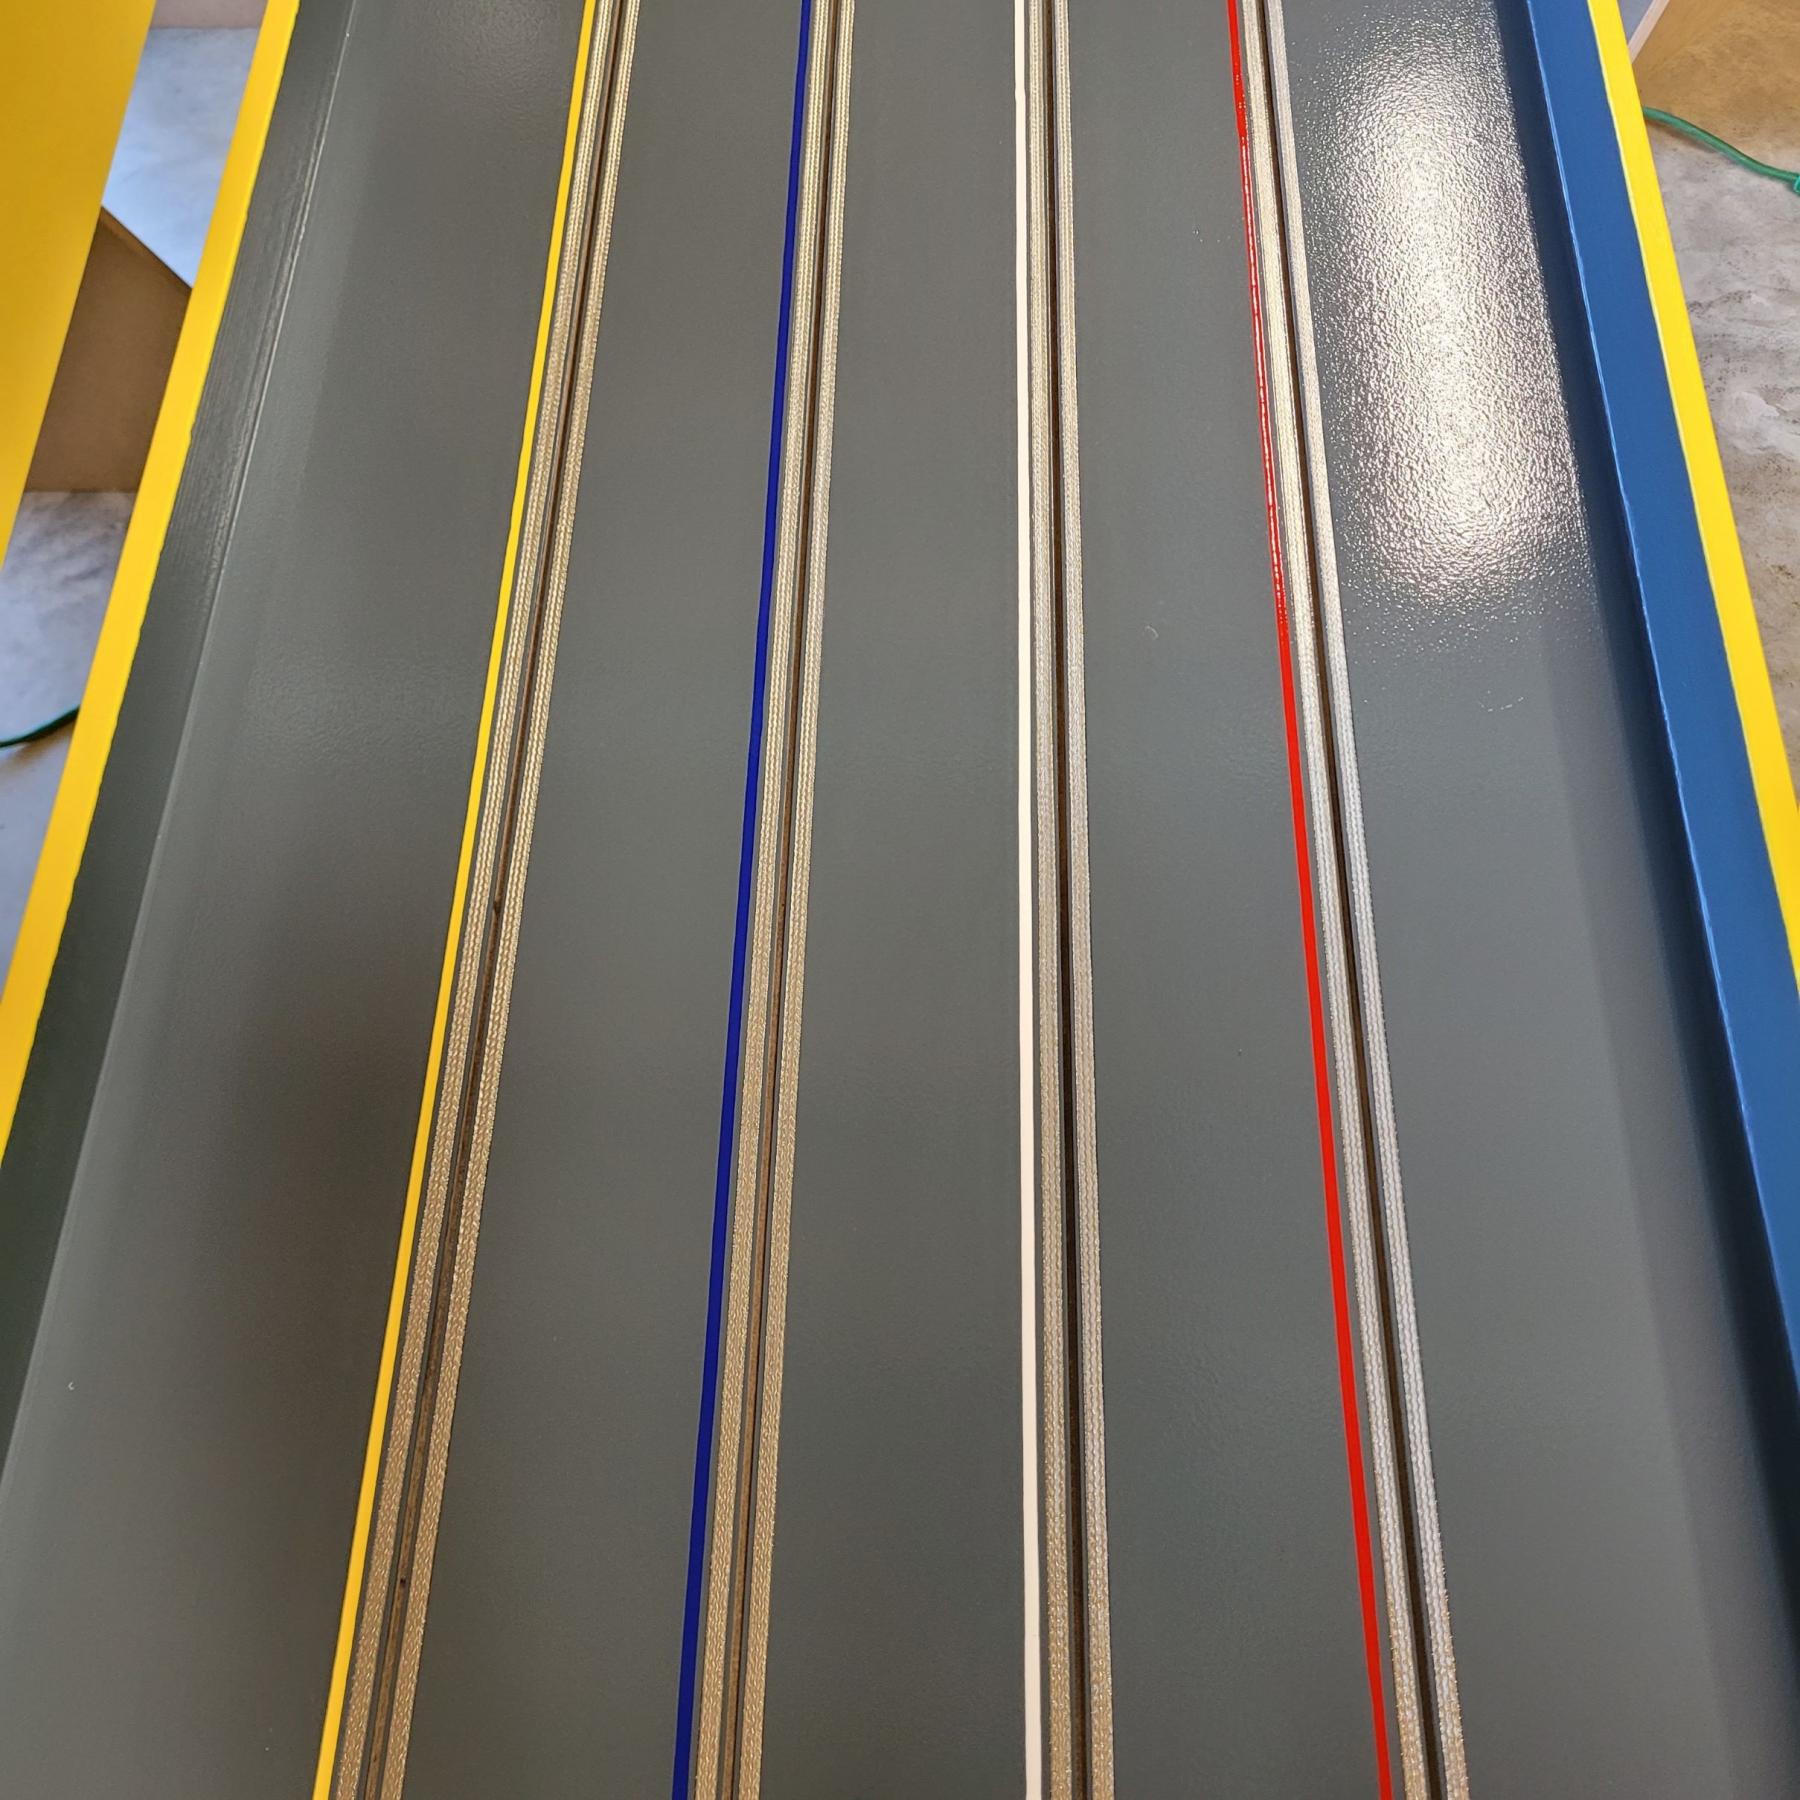
I have pinstriped the four lane colors on the track yesterday with Alphanamel sign paint enamel. I used the Marshalltown pinstripe tool with a 1/8" wide wheel. I striped only one side of the slot because I didn't want your eye drawn to all the colors on the track. Lane identification is still very easy and it's easier on the eyes as well. I didn't stripe under the bridge for obvious reasons of access so I went underneath a few inches on either side. The enamel paint is from Alphanamel from Detroit Michigan. I bought the five color 2.5oz bottle kit for around $35 and it was more than enough for my track. I mixed up about a 3/4+ pinstriper bottle with a added 4 to 5 drops of Low Oder Mineral Spirits to thin it out and flow better thru the striper tool. After each lane was finished I thoroughly cleaned the tool and proceeded to the next color doing every other lane. The paint will need 2 days to completely dry to run on the track.
Attached Images
- NSwanberg and Alchemist like this
Rob Armbruster
#249
Bigdogbro1
-
- Full Member
-
- 144 posts Joined: 23-April 24
Mid-Pack Racer
- Gender:Male
- Location:near Hell, MI
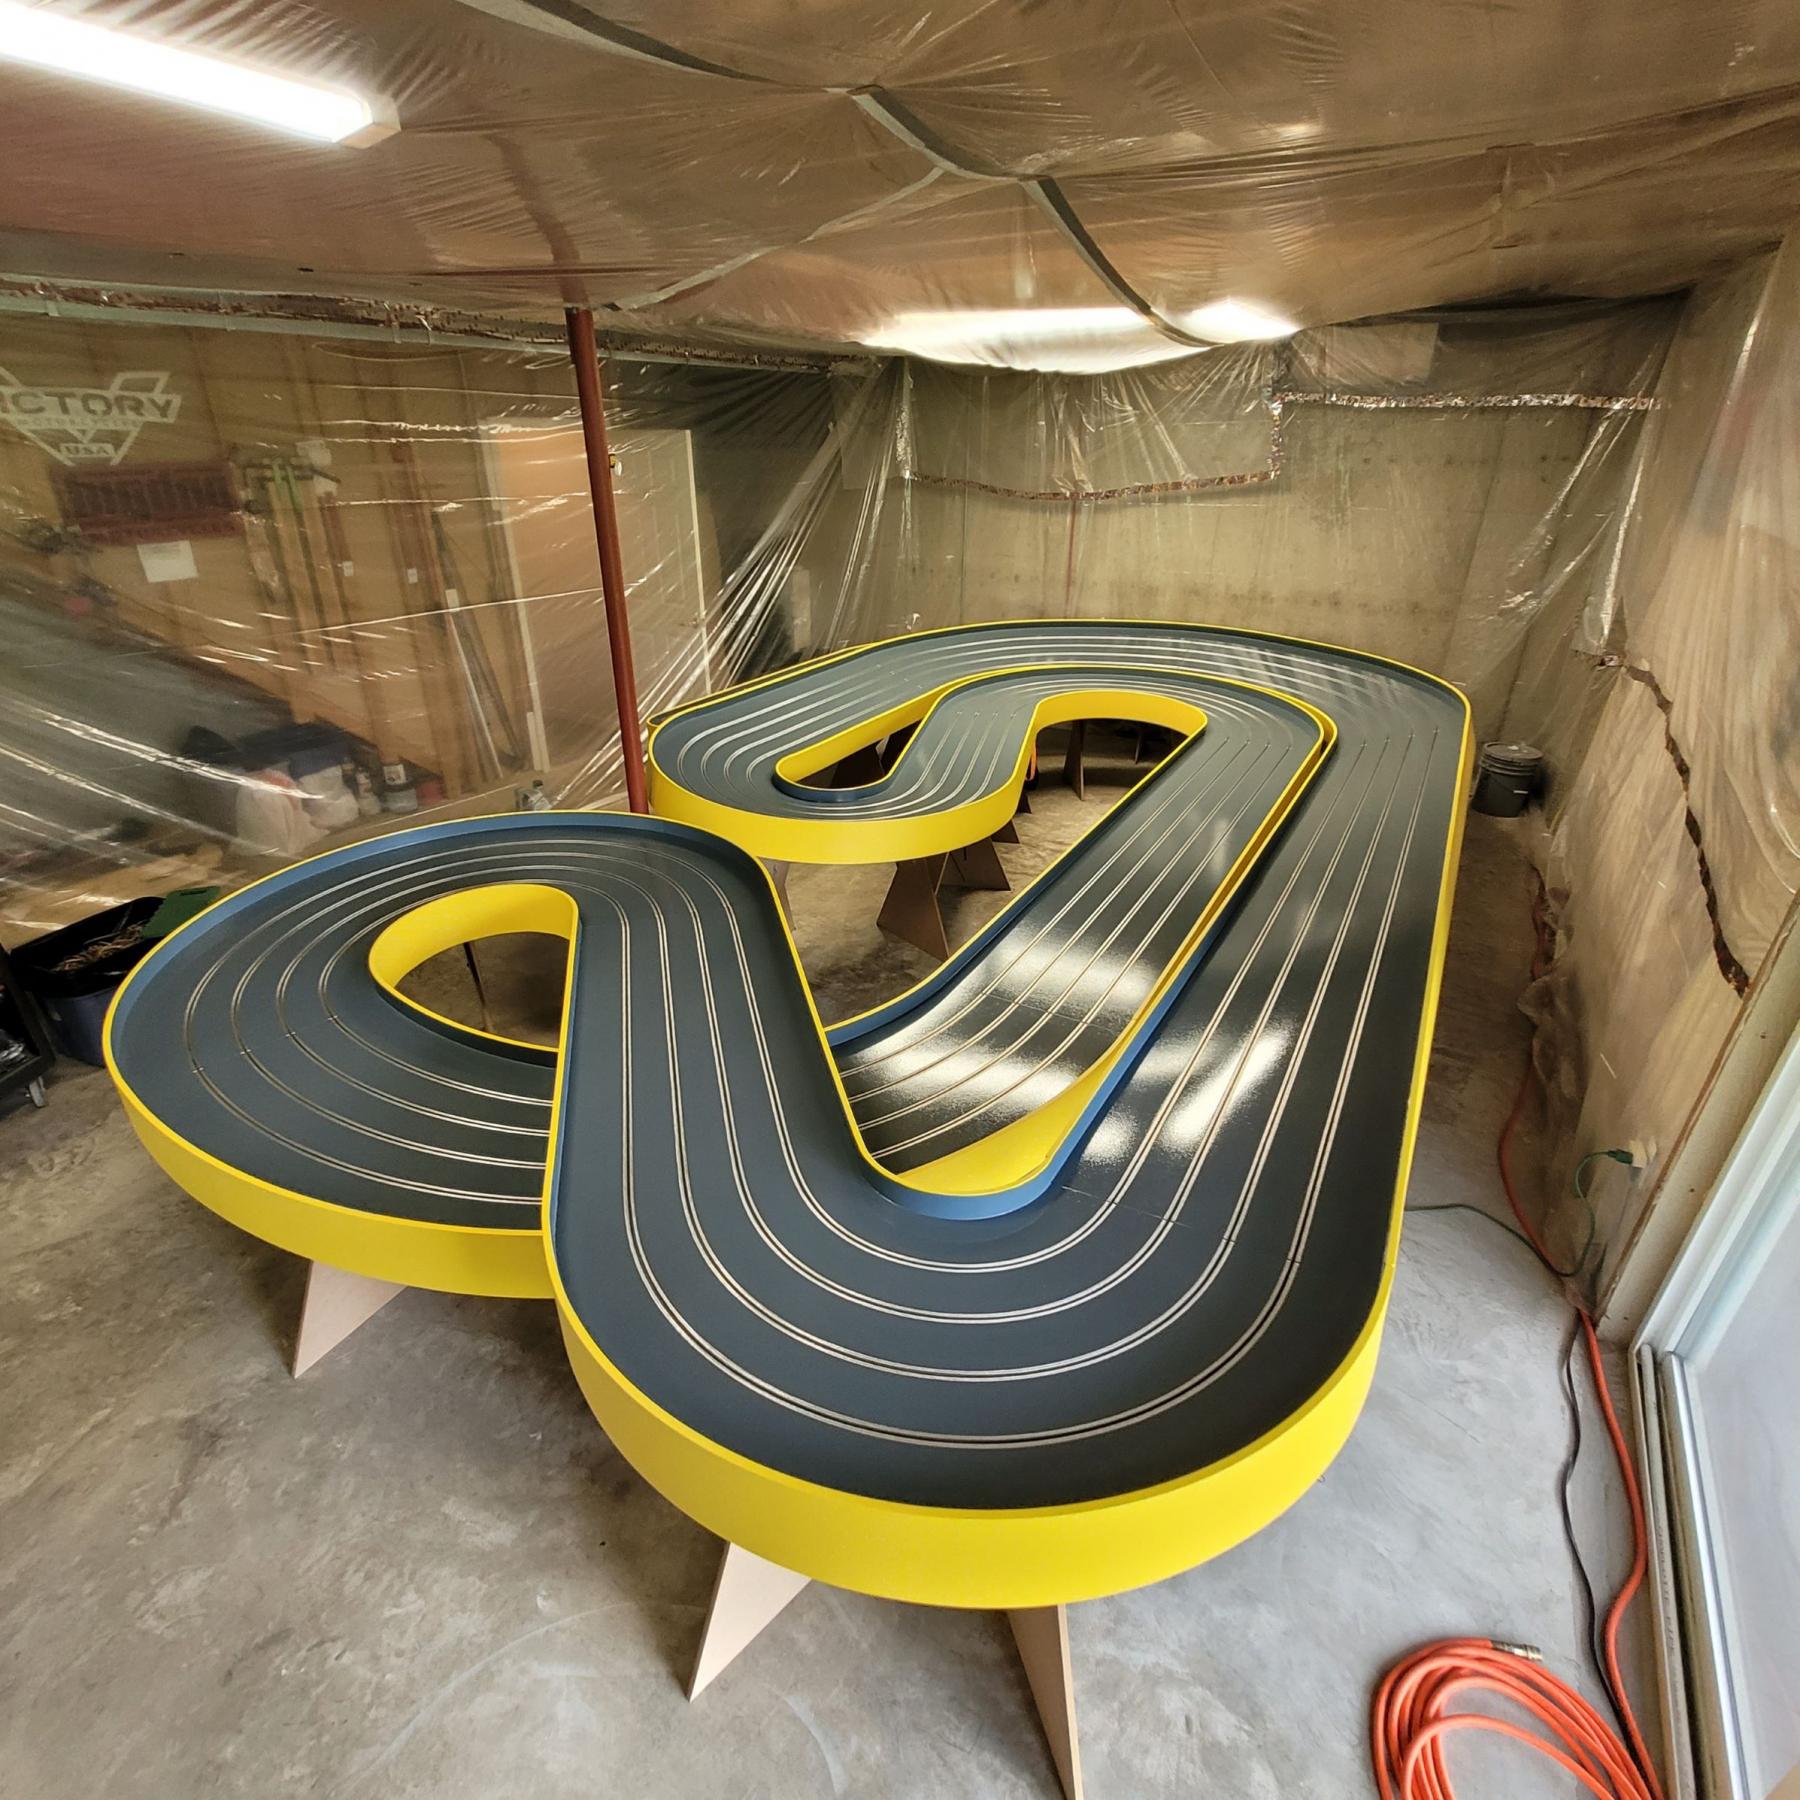
Posted 11 July 2025 - 11:42 AM
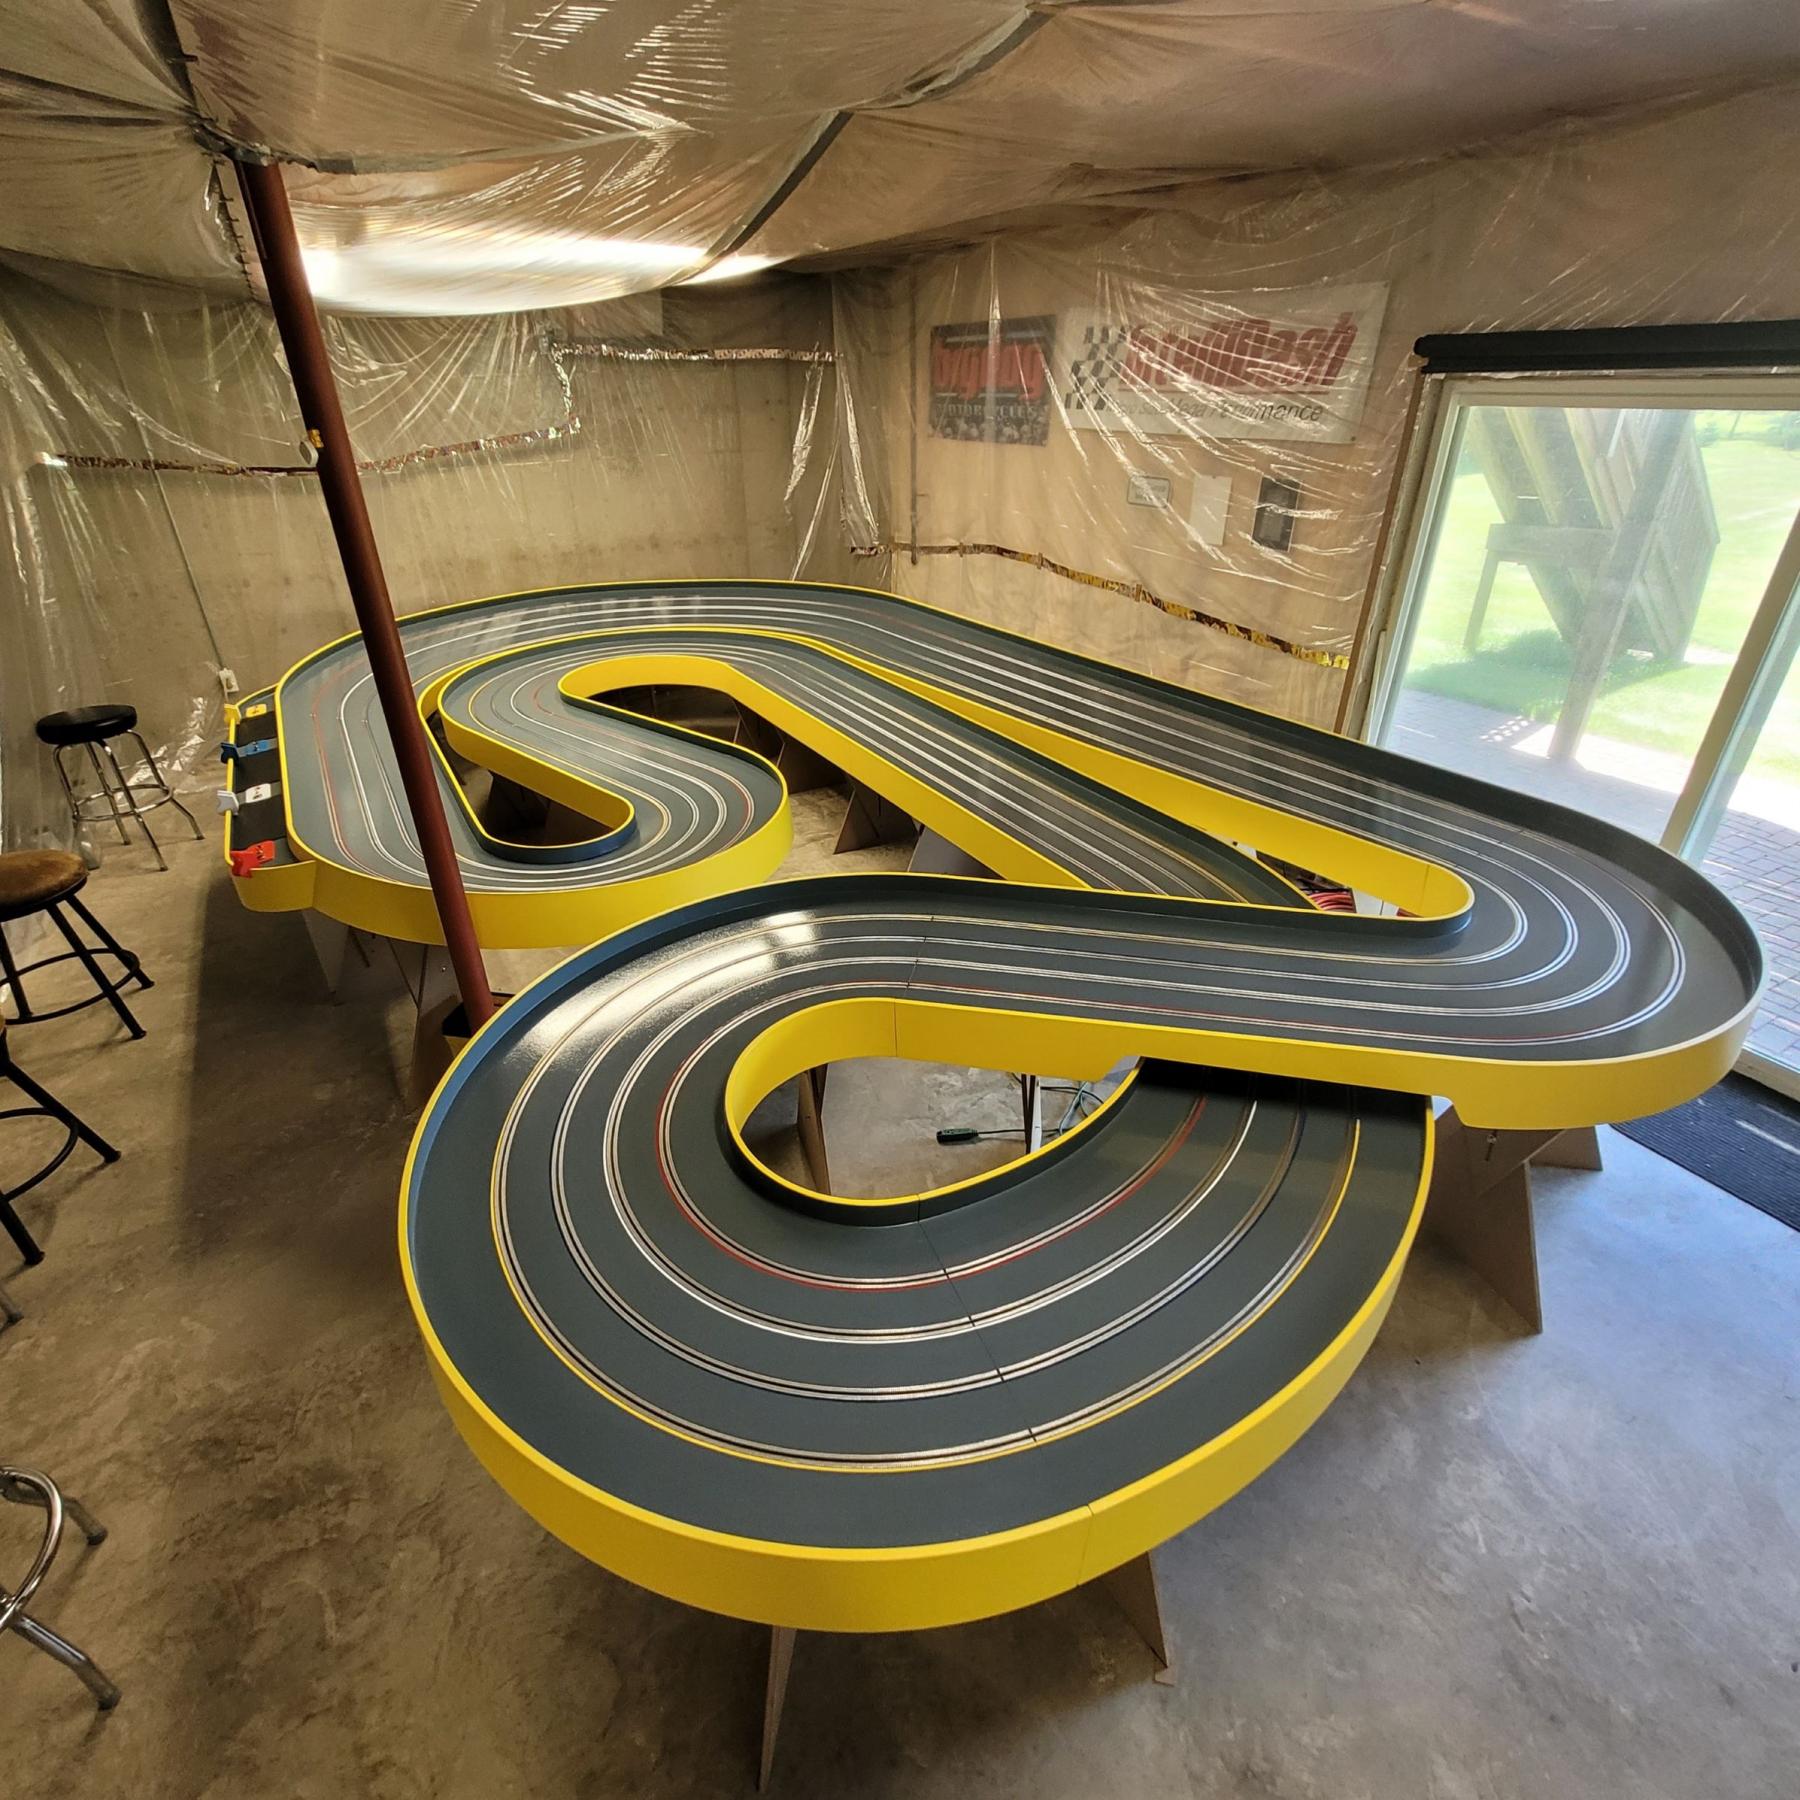
Here are a few pictures of the striped track. I will be cutting off the plastic side curtains in the basement work area and leave the ceiling sheet on for a few more days. We will be running on the track in a few days so I'm cleaning the area and setting it up for the pit benches. We have already run on the track prior to pinstriping and the two guys had high praise for the layout. I expect a 5 to 6 second lap times once we get the cars tuned for the track. I will be installing the lap computer, software and the 65" TV monitor tomorrow as well. Once the four Difalco DD300 hand controllers arrive and I install the XLR plugs everyone will have a chance to run. Let the good times roll!
Attached Images


- dc-65x and Alchemist like this
Rob Armbruster
#250
Bigdogbro1
-
- Full Member
-
- 144 posts Joined: 23-April 24
Mid-Pack Racer
- Gender:Male
- Location:near Hell, MI
Posted 11 July 2025 - 11:49 AM
Super clean job on the electrical, but the everything else has been that way too. What a great job. A very humbling thread to follow.
Thanks Mickey! I've been told that most all my projects look store bought. I like to make something that I can look back and be proud of what I've done.
- MSwiss and Bill from NH like this
Rob Armbruster


