You always have a choice of cutting off one side or the other. If you only have one really tight inside corner it is easy to just cut from the other side to avoid it. If you have 2 tight inside corners you might be able to avoid them by picking the best side as well. But generally if you build a 8' diameter turn with a 40 " track width and 5" skids and 4 1/4" lane spacings and 8 lanes you end up with a 16" circle on the inside to route off of. I considered a 16"inside corner to be at the minimum size of what you need but it usually worked ok for me. Below that you get into trouble and maybe create something that wont look right until about the 3rd lane in from inside of the turn.

First-time build questions for a wood four-lane track
#51

Posted 04 May 2024 - 11:59 PM
- Rob Voska likes this
#52

Posted 05 May 2024 - 10:30 AM
Hi Steve,
Thanks for your thoughts on my topic and contributed posts. Have been a fan of your tracks for years and now retired I want to build a track of my own.
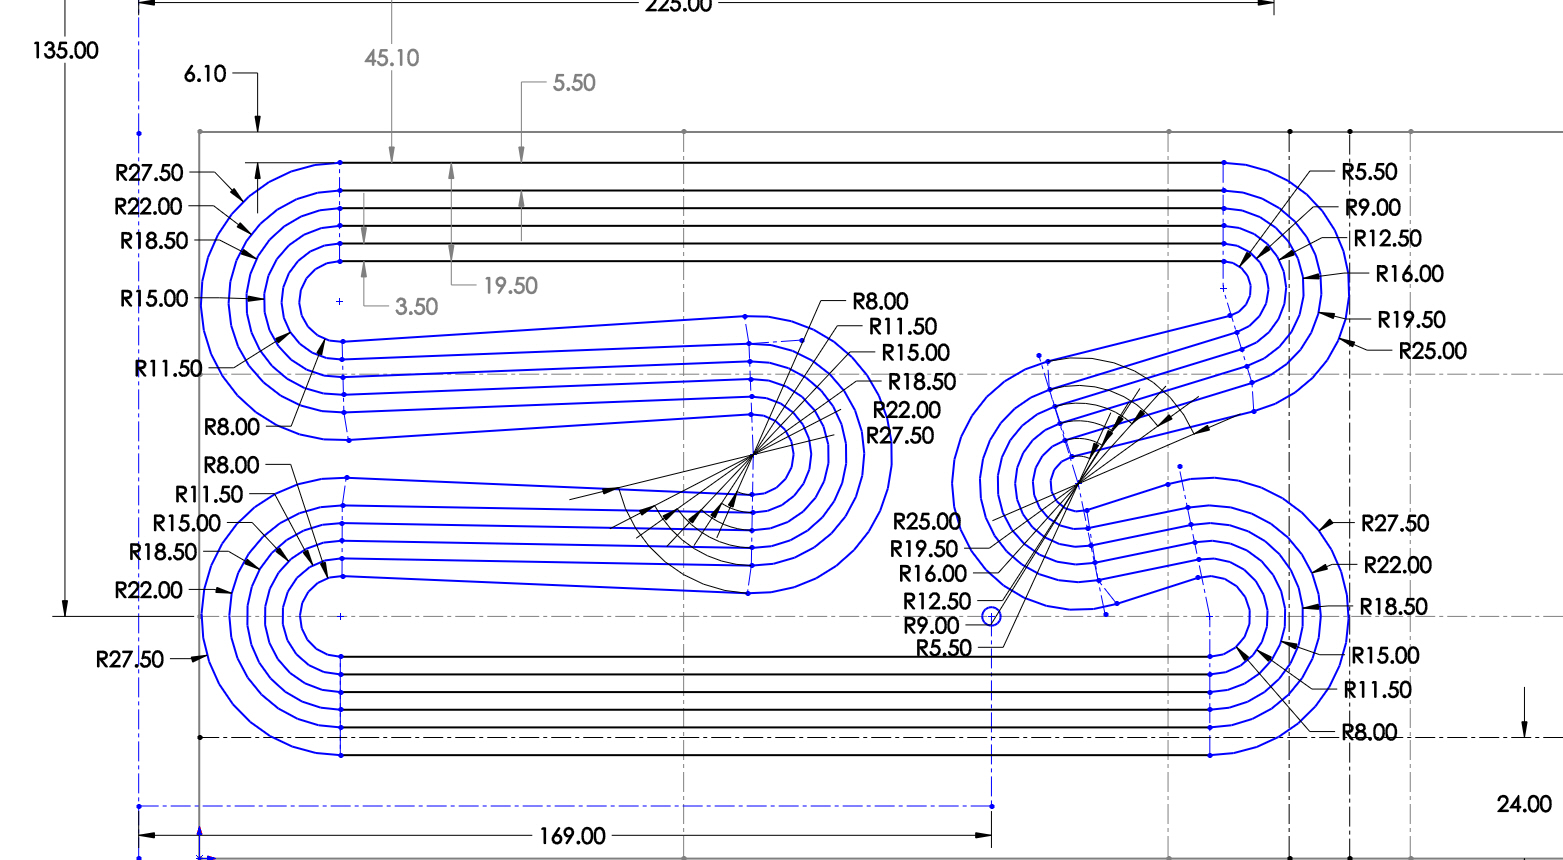
My track design is for 1/32 scale cars as my earlier posts mention. I have a design I like where the track slots are 3.5" spaced with a 3.5" inner turn apron and a 5.5" outer gutter apron for running the longer cars (6" bodies). Having this setup this way has given me some head scratching on the track fabrication. I don't really want to have both inner and outer aprons a 5.5" making a much wider track to fit into my limited area. I like your method of cutting the slots from the track outside wall inward but in this case it doesn't seem to me using the router template method with pins will work due to the outer to inner lane width change between the turns.
I have watched your posted videos and comments and have adopted many of your track building ideas into my layout fabrication. The joints are somewhat modified as well as the leg supports to work with my layout.
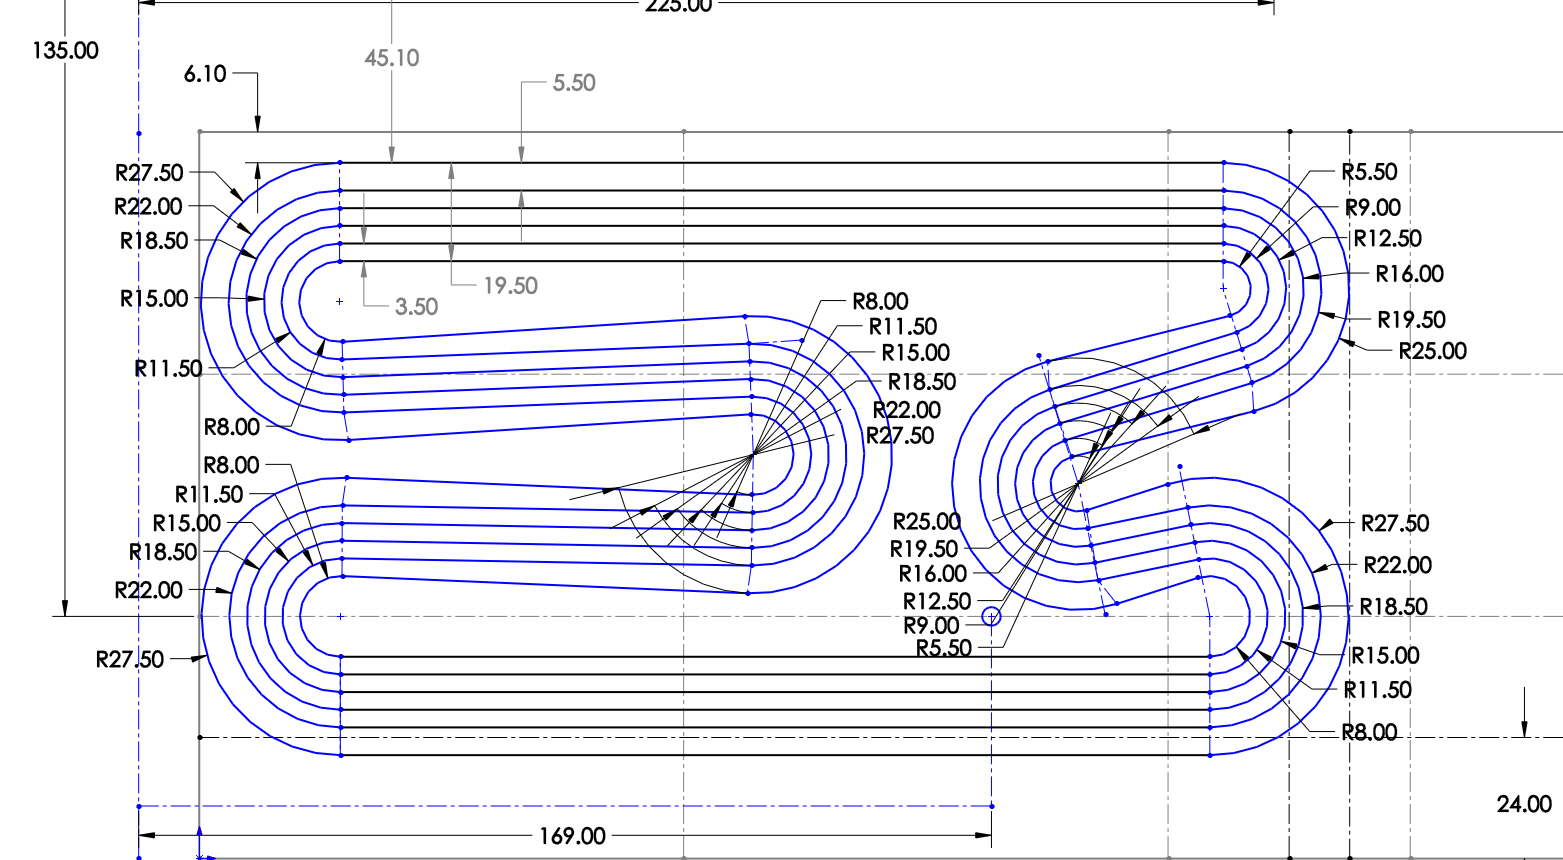
My track design diagram shows six lines, four lane slots and two outer walls and is currently 19.5" wide all the way around. The turn to straights tangent points are not perfectly aligned in a straight line from the turn center points. Having this design may require a mix of routing techiques for different portions of the track.
If you could offer any insight from your building experiences on what I have been posting, it would be greatly appreciated.
I also appreciate the other members here who have posted and given helpful support and information.
Regards,
#53

Posted 05 May 2024 - 10:41 AM
"Plan your routing to avoid those tight inside corners."
I don't quite understand what you mean by "avoid".
Hi Mike,
Is a 9" radius slot considered too tight for a 1/32 car track turn? That is the tightest radius I have in two turns. The other inner slot turns are all 11.5" radius.
Cheers
#54

Posted 05 May 2024 - 11:20 AM
Your tight turns certainly aren't too tight, especially for 1/32 cars.
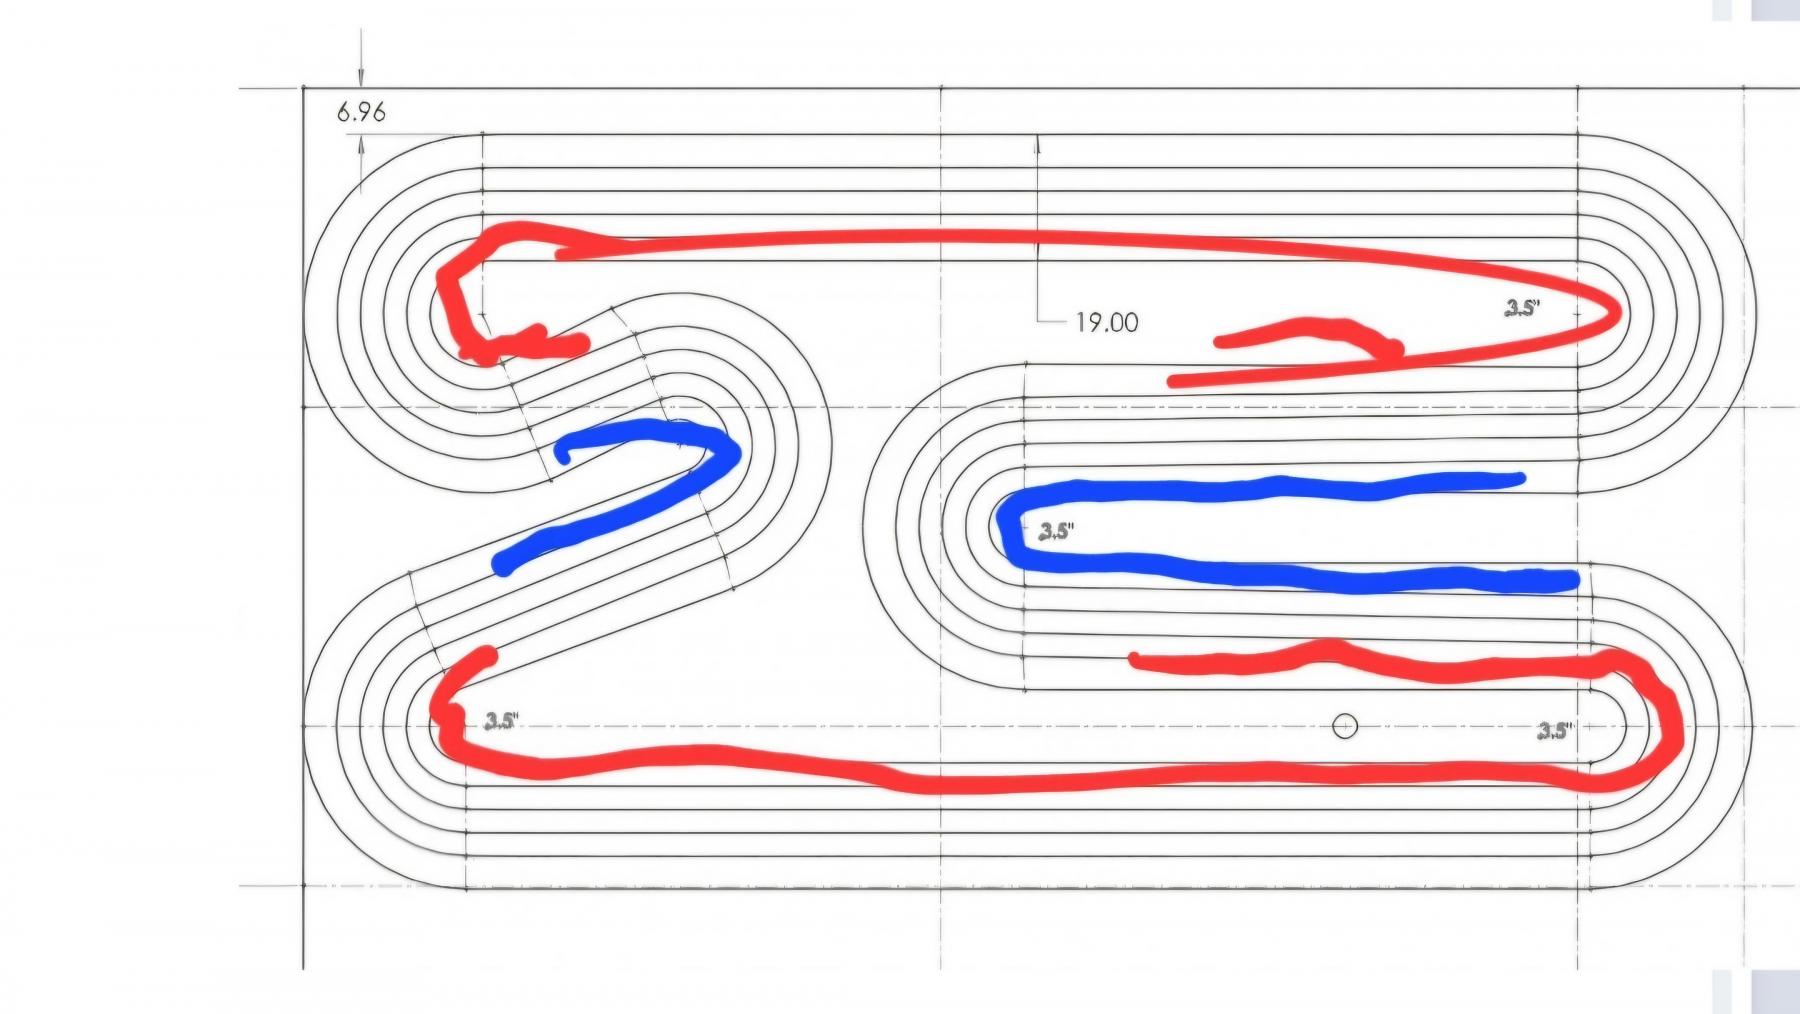
I still don't see why you need narrower aprons in the area's marked with Red, like I pointed out in post 29.
Mike Swiss
Inventor of the Low CG guide flag 4/20/18
IRRA® Components Committee Chairman
Five-time USRA National Champion (two G7, one G27, two G7 Senior)
Two-time G7 World Champion (1988, 1990), eight G7 main appearances
Eight-time G7 King track single lap world record holder
17B West Ogden Ave., Westmont, IL 60559, (708) 203-8003, mikeswiss86@hotmail.com (also my PayPal address)
Note: Send all USPS packages and mail to: 692 Citadel Drive, Westmont, Illinois 60559
#55

Posted 05 May 2024 - 11:56 AM
Your tight turns certainly aren't too tight, especially for 1/32 cars.
I still don't see why you need narrower aprons in the area's marked with Red, like I pointed out in post 29.
Hi Mike,
Leaving the slot spacing at 3.5" and making both inner and outer aprons 5.5" wide just to accommodate the outside slide apron to upcoming inside apron I would need to increase the track width by 2" to 21.5". That would increase the overall track layout width by 8". Leaving the inner turn areas not open enough access to marshall and would then make the layout too large to fit in my area.
#56

Posted 05 May 2024 - 06:40 PM
Leaving those "red" aprons full width wouldn't change the overall footprint at all.
They are on the inner cavity.
- Eddie Fleming likes this
Mike Swiss
Inventor of the Low CG guide flag 4/20/18
IRRA® Components Committee Chairman
Five-time USRA National Champion (two G7, one G27, two G7 Senior)
Two-time G7 World Champion (1988, 1990), eight G7 main appearances
Eight-time G7 King track single lap world record holder
17B West Ogden Ave., Westmont, IL 60559, (708) 203-8003, mikeswiss86@hotmail.com (also my PayPal address)
Note: Send all USPS packages and mail to: 692 Citadel Drive, Westmont, Illinois 60559
#57

Posted 05 May 2024 - 09:10 PM
Most of my tracks did not have the same inner and outer skid aprons. We built a lot of tracks that had 4 3/8" lane spacing and about 5" of apron but were only 40" wide. If you add it up that comes out to 40 and 5/8" wide not 40. The thing is when you go around the inside of a corner with pins set at 5" apart and 5" from the router bit the slot gets pulled in about a half inch or more (the elliptical affect) from the inner edge of the corner and then every successive slot gets pulled in about a 16th and you end up with about 5" of apron on the outside of the turn. That worked out quite well and kept the tracks to what I consdered a reasonable width that kids or small adults could still easily reach across to get cars. You also get a wider skid on the outside routed corners and slightly wider lane spacing.
We built some 1/32 scale tracks that had 3.5" lane spacing and they worked very well. Over the years I found a wider inside apron to really only help on high banked turns where cars that came off tended to slide down and sit on the inside lane. But really you can only do so much. Cars come out, hit each other bounce around and you never know where they are going to end up.
I did make one track with a 6" skid apron on the outside turns and the straights of the track had only 4". I did this by cutting the corner two inches bigger than it was drawn at and then putting a 1/8" bit in to my circle cutter and routing a slot two inches in from the outside of the corner. I assembled the straights so that they lined up with the slot so that i could just push the slot cutter in to the slot on the curve and basically cut the first slot the same way I always did. It made extra work filling in the slot with bondo and attaching some transition pieces on the straight but it worked out.
#58

Posted 06 May 2024 - 06:21 AM
Leaving those "red" aprons full width wouldn't change the overall footprint at all.
They are on the inner cavity.
Hi Mike,
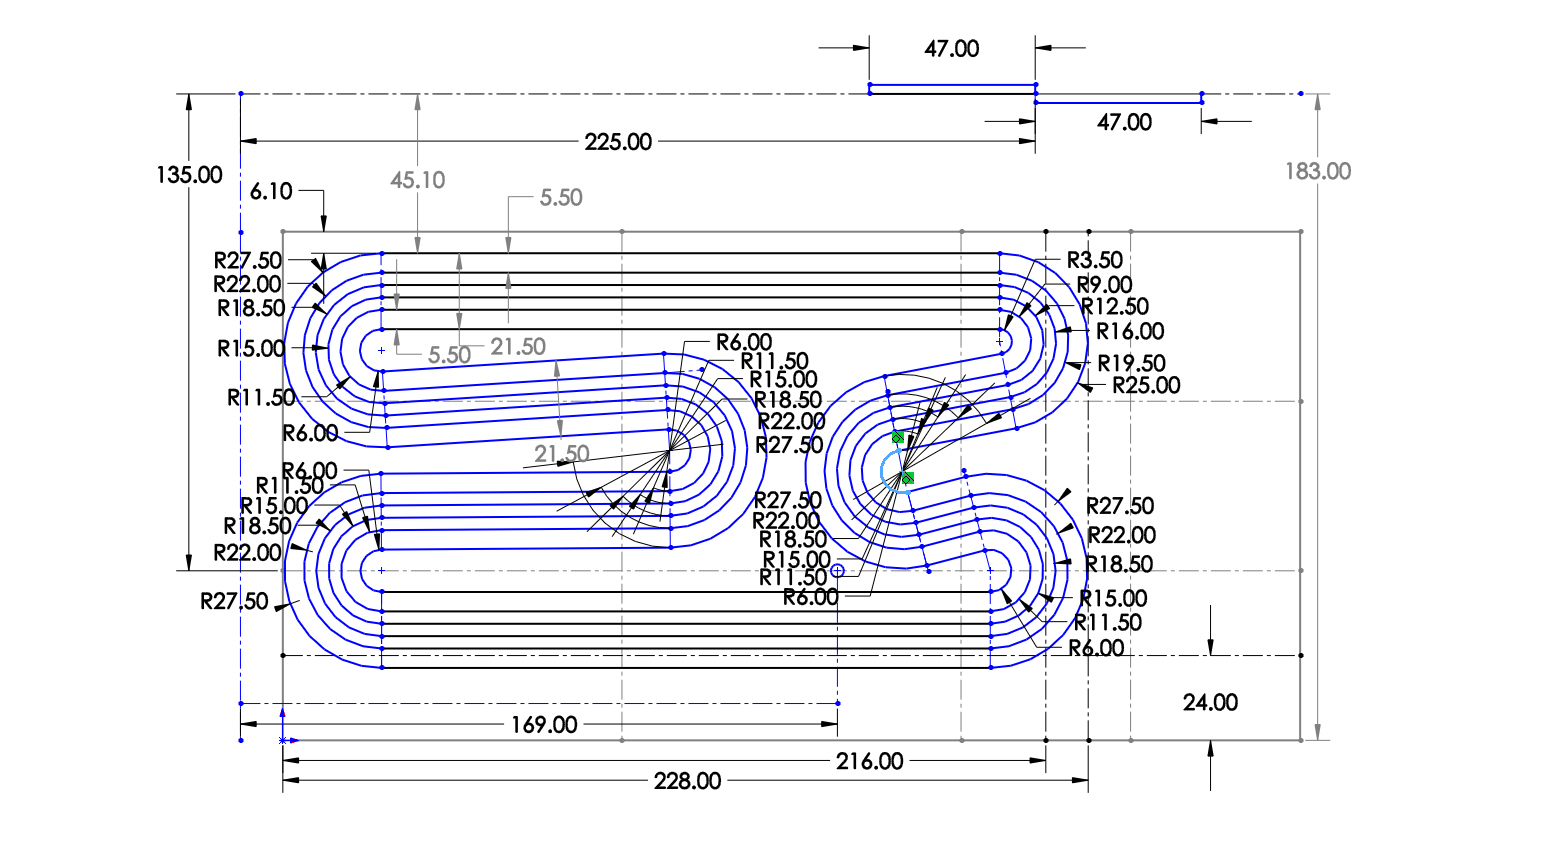
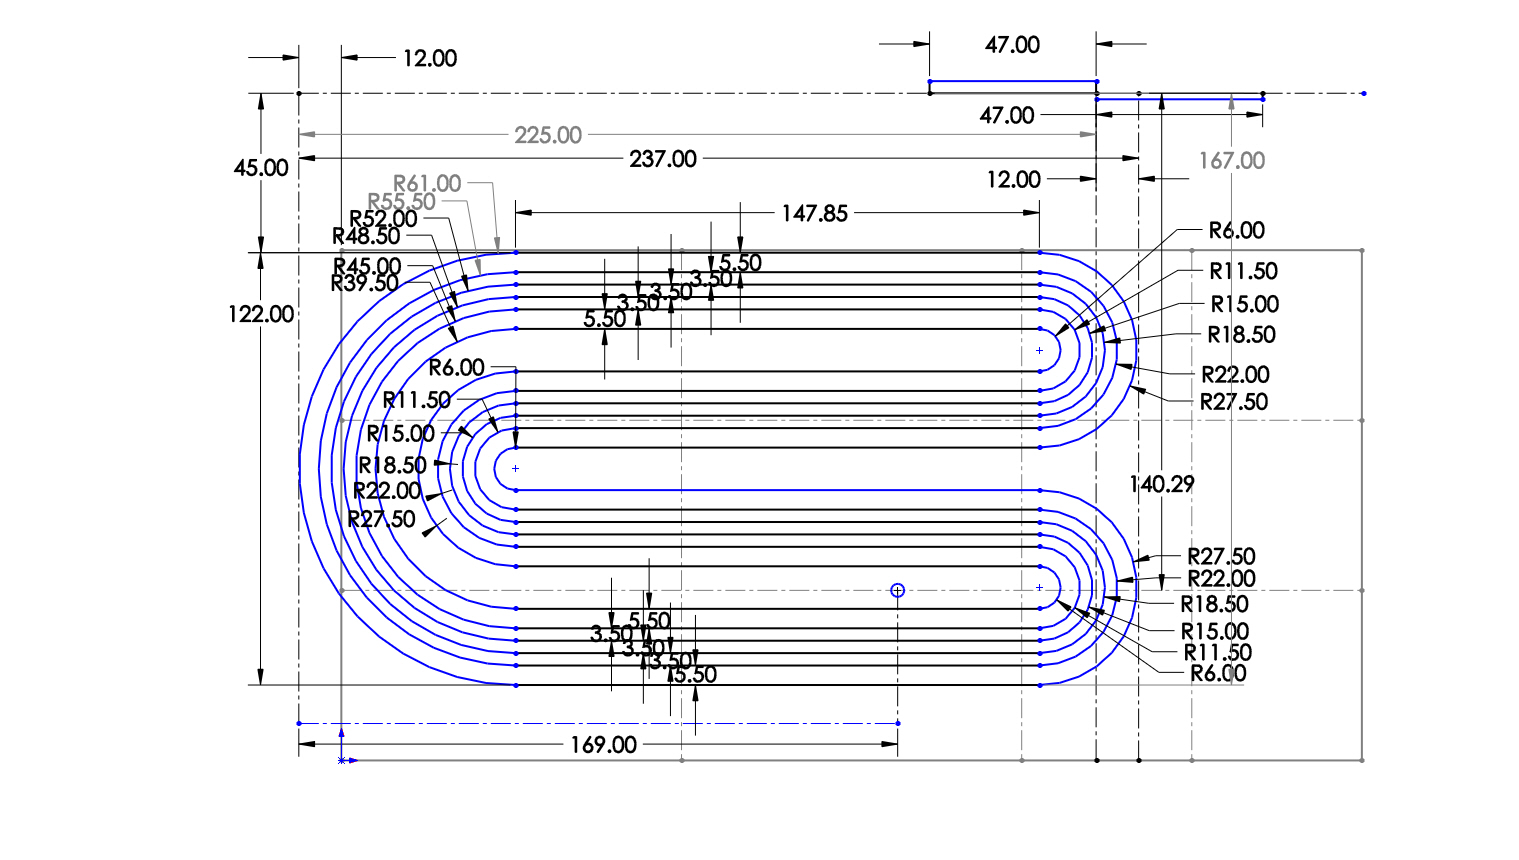
The top drawing is my original with 3.5" inside turn apron and a track width of 19.5" shown by dimensions.
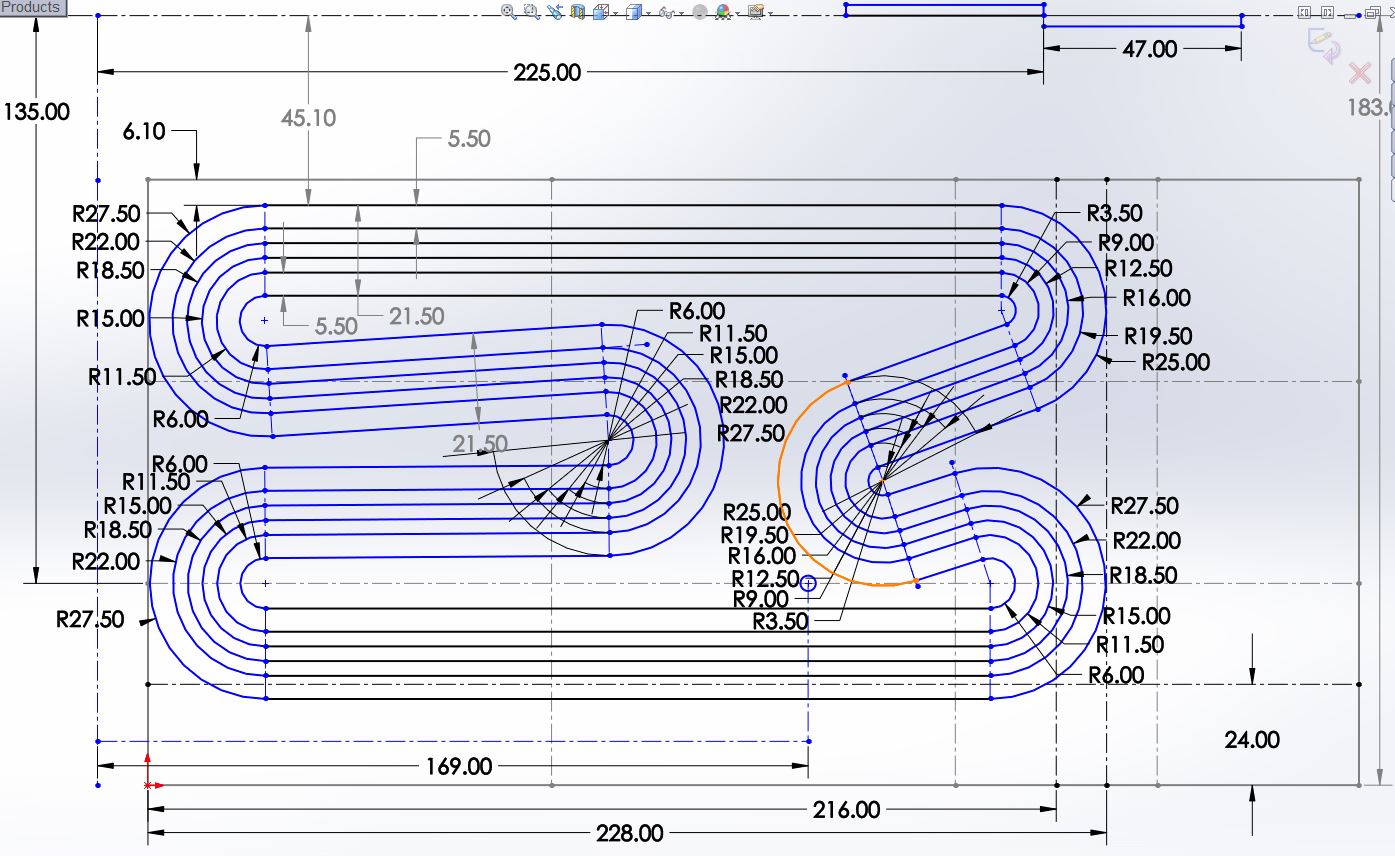
The bottom drawing is a modified layout with turns changed to have both a 5.5" inner and outer turn width aprons which then makes the track width to 21.5" shown by the dimensions. I decreased the inside apron radius by 2.0" to show the effect. An increased track width of 2.0".
The change affects the inner apron radius only and increases the track width which crimps down the marshall access.
I will need to figure out how to jig route the outer lane first when it gets around to that tight 3.5" radius inside turn wall.
#59

Posted 06 May 2024 - 07:41 AM
looks like a very nice "drivers track" design, should be fun to race on. best of luck
#60

Posted 06 May 2024 - 01:55 PM
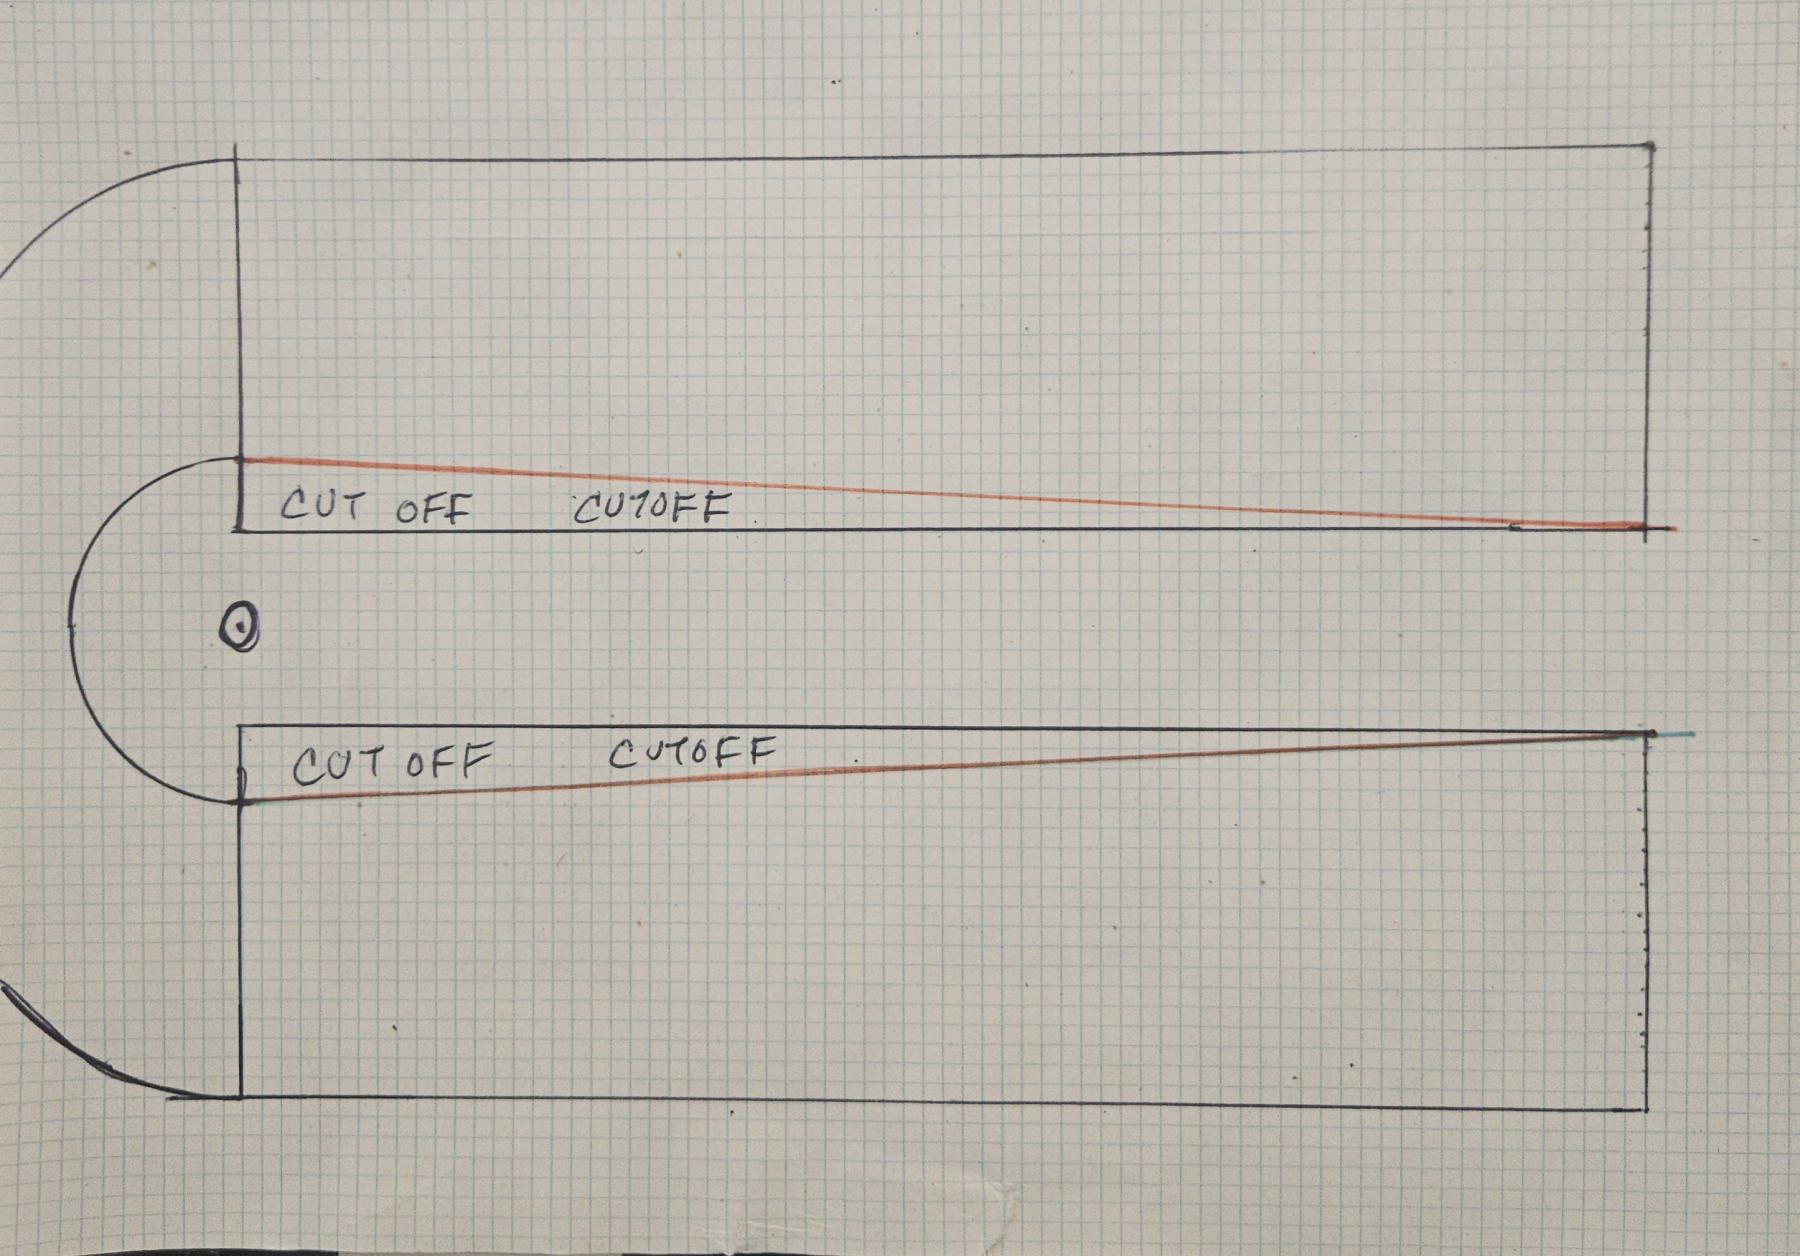
If I was you, as a first timer, I would compass route the whole track leaving the non-access aprons full width.
On the access aprons, I would compass route the inner shape of the track with the narrower spacing.
I would still cut all the boards for the straightaways full width .
IOW, the straightaways will not match up to the access turns because the mating widths will be different.
At the appropriate time , use a straight edge and trim of a wedge, like the pic below, to gain your additional access space, and have the track look normal.
To use a router jig, IMO, when you switch sides on the tight inside turns and route off of the opposite wall, I think you'll have a hard time getting the slots to flow into each other smoothly.(just my opinion, don't take it as gospel)
Mike Swiss
Inventor of the Low CG guide flag 4/20/18
IRRA® Components Committee Chairman
Five-time USRA National Champion (two G7, one G27, two G7 Senior)
Two-time G7 World Champion (1988, 1990), eight G7 main appearances
Eight-time G7 King track single lap world record holder
17B West Ogden Ave., Westmont, IL 60559, (708) 203-8003, mikeswiss86@hotmail.com (also my PayPal address)
Note: Send all USPS packages and mail to: 692 Citadel Drive, Westmont, Illinois 60559
#61

Posted 06 May 2024 - 07:36 PM
Hi Mike,
I think I should be able to jig route all including that one inside sharp turn with the ORANGE line for the outer wall. I would route that turn outside to inside lanes for the curve but then blend in the shorter straight-away slots with a straight edge. It can all be drawn on the wood in pencil prior to blending it all in. Will do some testing prior.
Thanks
#62

Posted 10 May 2024 - 01:52 PM
Refinements to the layout.
Increased the turn radius from 3.5" to 6" inside apron on the RH middle turn to help with using a router jig from the outside to the inside slots. Back straight length is 175" at 14.6ft and the front straight is 172" at 14.3ft. The outer lane length is 905" at 75.4ft. Should be a minimum good length to stretch some legs on a smaller track for 1/32 scale.
- Steve Ogilvie likes this
#63

Posted 10 May 2024 - 02:13 PM
Don't forget where marshals will stand, then if they are in the sight lines of the drivers.
- Ramcatlarry and Paul Menkens like this
#64

Posted 10 May 2024 - 06:34 PM
Don't forget where marshals will stand, then if they are in the sight lines of the drivers.
Also make sure to leave room around the edges to be able to walk around.
#65

Posted 11 May 2024 - 12:35 PM
What is a good final track surface finish for either foam and/or silicone tires on 1/32 cars for competition grip without track glues.
#66

Posted 11 May 2024 - 02:04 PM
I doubt you'll ever get "competition grip" with sponge without at least a tiny bit of glue.
Maybe if you run a million laps and get some sort of rubber build up.
On my flat track I had great luck with a Sherwin Williams 2 part marine epoxy.
I spray glue it and it works with both sponge and silicone.
Best part is the Graphite color doesn't show tire rubber build up.
I recently had an influencer do a short video of my raceway.
It's got 256K views in 2(?) weeks but the shots of the King with it's light gray surface are pretty awful.
When I do a 1/32 event, I don't clean/prep the track and the non-sponge cars run great.
Best place for 1/32 advice is either Slot Car Illustrated or Home Racing World.
https://www.slotcarillustrated.com/
https://homeracingworld.us/TeamHRW/
- NSwanberg and SpeedyNH like this
Mike Swiss
Inventor of the Low CG guide flag 4/20/18
IRRA® Components Committee Chairman
Five-time USRA National Champion (two G7, one G27, two G7 Senior)
Two-time G7 World Champion (1988, 1990), eight G7 main appearances
Eight-time G7 King track single lap world record holder
17B West Ogden Ave., Westmont, IL 60559, (708) 203-8003, mikeswiss86@hotmail.com (also my PayPal address)
Note: Send all USPS packages and mail to: 692 Citadel Drive, Westmont, Illinois 60559
#67

Posted 11 May 2024 - 04:05 PM
If it was me I would get an extra piece to practice on and work out spacing, feel of routing, radius, offset, direction I want to put pressure on pins or arm when routing etc.... Seems a way to save a lot of aggravation. Then I could practice using that to route braid bed to get the feel of that.
Laying something out on a computer is one thing. Noise, vibration, electric cord, dust, safety glasses, dust mask, bent over reaching across a piece of wood, light, shadows and keeping everything right your first time would be hard without at least some practice.
Lay down some lines down to see if you vary or can swing what you want vs what you expect as lane spacing changes with your pins or arm.
The other thing is you could have it CNC routed. Might be cheaper in the long run.
I believe MDF is available in larger sheets also..... if I remember right 5 x 12.
- Ramcatlarry and Paul Menkens like this
#68

Posted 12 May 2024 - 07:55 AM
I doubt you'll ever get "competition grip" with sponge without at least a tiny bit of glue.
Maybe if you run a million laps and get some sort of rubber build up.
On my flat track I had great luck with a Sherwin Williams 2 part marine epoxy.
I spray glue it and it works with both sponge and silicone.
Best part is the Graphite color doesn't show tire rubber build up.
I recently had an influencer do a short video of my raceway.
It's got 256K views in 2(?) weeks but the shots of the King with it's light gray surface are pretty awful.
When I do a 1/32 event, I don't clean/prep the track and the non-sponge cars run great.
Best place for 1/32 advice is either Slot Car Illustrated or Home Racing World.
https://www.slotcarillustrated.com/
https://homeracingworld.us/TeamHRW/
Thanks Mike, I'll look it up. Rubber tires are a choice also.
#69

Posted 12 May 2024 - 08:02 AM
If it was me I would get an extra piece to practice on and work out spacing, feel of routing, radius, offset, direction I want to put pressure on pins or arm when routing etc.... Seems a way to save a lot of aggravation. Then I could practice using that to route braid bed to get the feel of that.
Laying something out on a computer is one thing. Noise, vibration, electric cord, dust, safety glasses, dust mask, bent over reaching across a piece of wood, light, shadows and keeping everything right your first time would be hard without at least some practice.
Lay down some lines down to see if you vary or can swing what you want vs what you expect as lane spacing changes with your pins or arm.
The other thing is you could have it CNC routed. Might be cheaper in the long run.
I believe MDF is available in larger sheets also..... if I remember right 5 x 12.
Hi Rob,
I planned on doing some pre-testing to get a feel for the fixtures, tools and geometry before jumping in. Good advice! I'm absorbing the info as I progress so I don't have many suprises.
#70

Posted 22 May 2024 - 05:43 PM
A question for Steve Ogilvie or other sectional track builders,
When you get ready to mate the track sections after one side of the joint is attached, how do you determine where to place the router trim edge cut to get the sections to all properly aligned in the end. process?
#71

Posted 22 May 2024 - 10:20 PM
My joints are designed to be glued to the track as a unit. I call them joint blocks. You glue the side that exposes the slot on to one section of track and after the glue is partialy set you scrape off the excess glue with a putty knife. Then temporarily tape off the area that will be glued and oil the the exposed face and what will become the tongue. Then take off the tape , apply the glue with a small paint roller and join the next section by raising the joint block into it and clamp . I use 2" # 8 Robrtson screws with 1 1/4"by 1 1/4" 1/4" thick MDF square washers to pull the track pieces tight to the block until the glue sets. Match the side up that you are going to route on and dont worry about the other side you can clean that up with a belt sander before you put sidewalls on. I will try to get a link to the youtube I made about mounting the joint blocks.
When clamping the track sections together, use a piece of 2x4 on top of the joint to prevent the sliding bar clamps from marking the surface. Leave the clamps out far enough from the sides of the track so you can use a small pipe clamp to pull the joints tight by clamping against the "L" brackets already glued on for sidewall attachment. Keep the pipe clamp up high to avoid breaking the L's.
#72

Posted 22 May 2024 - 10:28 PM
Steve Ogilvie builds a track 8 - YouTube
I will see if their is another one but this should give you the idea. Sorry about the camera work.
This one is better watch you can usually get the joints tight enough without the pipe clamps. You will notice in some places I do not have boards under the bar clamps. If the clamps still have rubber feet on that works too.
With the clamps on before putting the washer screws in you can adjust the the edge with a mallet and a block of wood. Not hard to get one side perfectly alligned.
#73

Posted 27 May 2024 - 03:44 PM
Thanks Steve,
I think I have that joint block part figured out from watching your latest build videos but was not sure about aligning and mating the track section end joints. For instance getting the joint angle and setting the position for the routered seam end so the track sections come together as planned before gluing on the joint blocks. Do you just get as close as possible then make sections corrections in the final few joints?
I value the information on all the videos.
#74

Posted 28 May 2024 - 03:28 PM
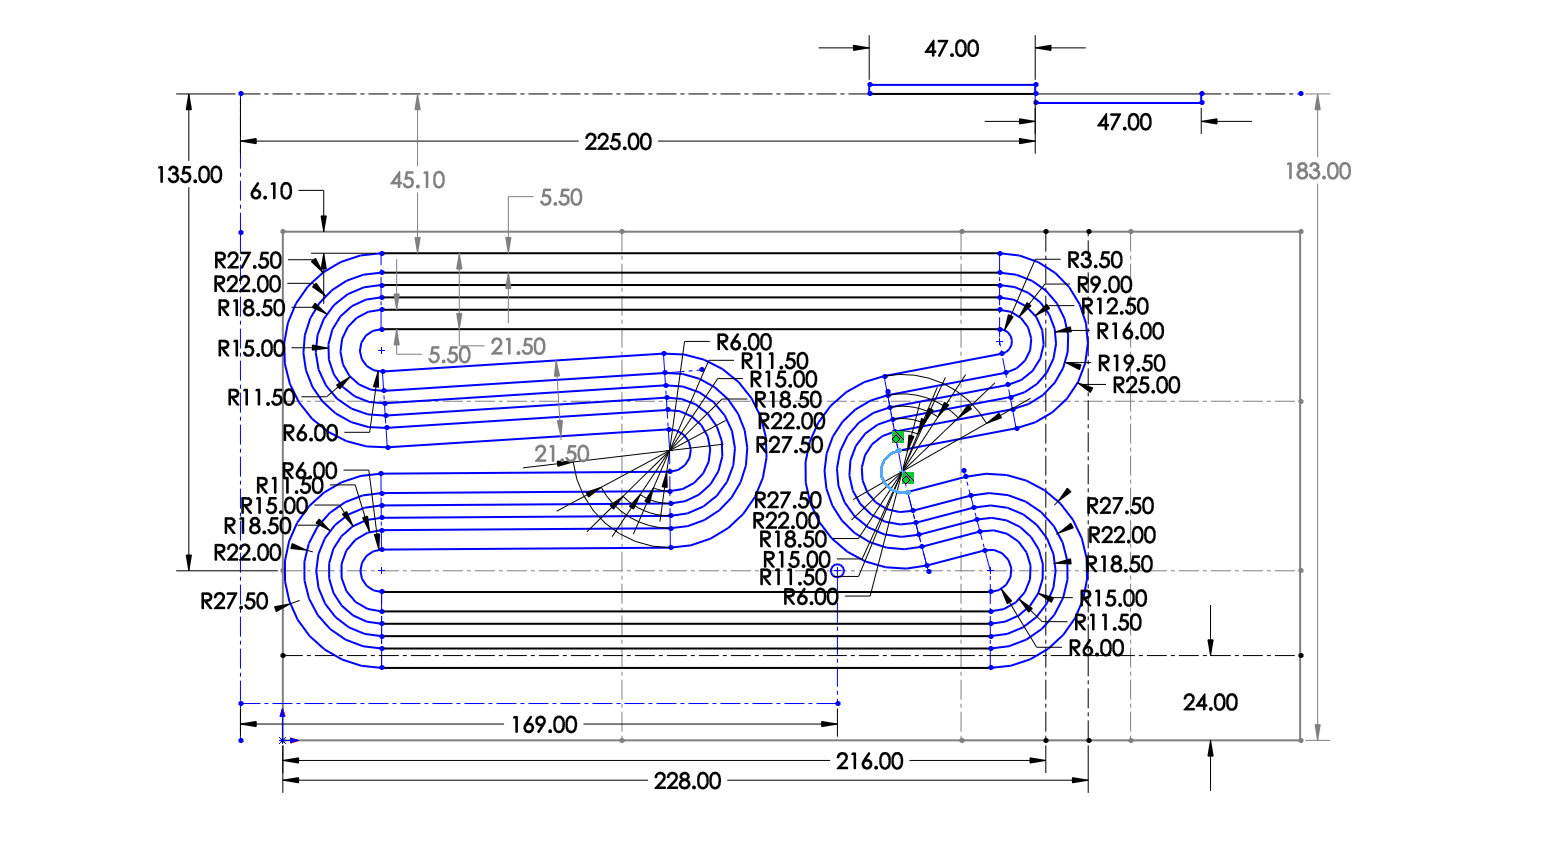
I had this layout pop onto the screen as an alternative. More straight speed but still three tighter turns and one large turn. Although I would like a bank on the large turn I don't think I can pull it off to match up with the others.
3.5" lane space with 5.5" gutters. 21.5" track width. The original design is on the bottom of the post.
What are your thoughts on a 1/32 scale layout like this?
#75

Posted 28 May 2024 - 05:32 PM
Hey Rob:
I''m not a track builder but I have raced on a track similar to the first picture in post #74 above, and I thought it was really a great design. It had everything, plenty of high speed given the straights connected by the banking, then some nice tight turns for driving, all connected by some short straights perfect for passing. I'm not sure why you said you may not be able "pull it off to match the others" but I'm sure Steve or Mike could help you there. The only downside to a track with no true cross-overs is that the lane length is very asymmetric but everyone has to run every lane so it all evens out in the end.
I don't know if you have the room but I would make the lanes on 4" centers so you could run 1/24 scale cars too. Obviously you will need to have enough room to get a turn marshal in the "slot" but if you can put a little bit of banking on the turn under the bank you might get away with only 1 or 2 turn marshals (for the flat turns) which is always a bonus. Hope this helps a bit!
Jay Guard
IRRA Board of Directors (2022-Present),
Gator Region Retro Racing Director (2021-Present)
SERRA Co-Director (2009-2013)
IRRA BoD advisor (2007-2010)
Team Slick 7 member (1998-2001)
Way too serious Retro racer


