

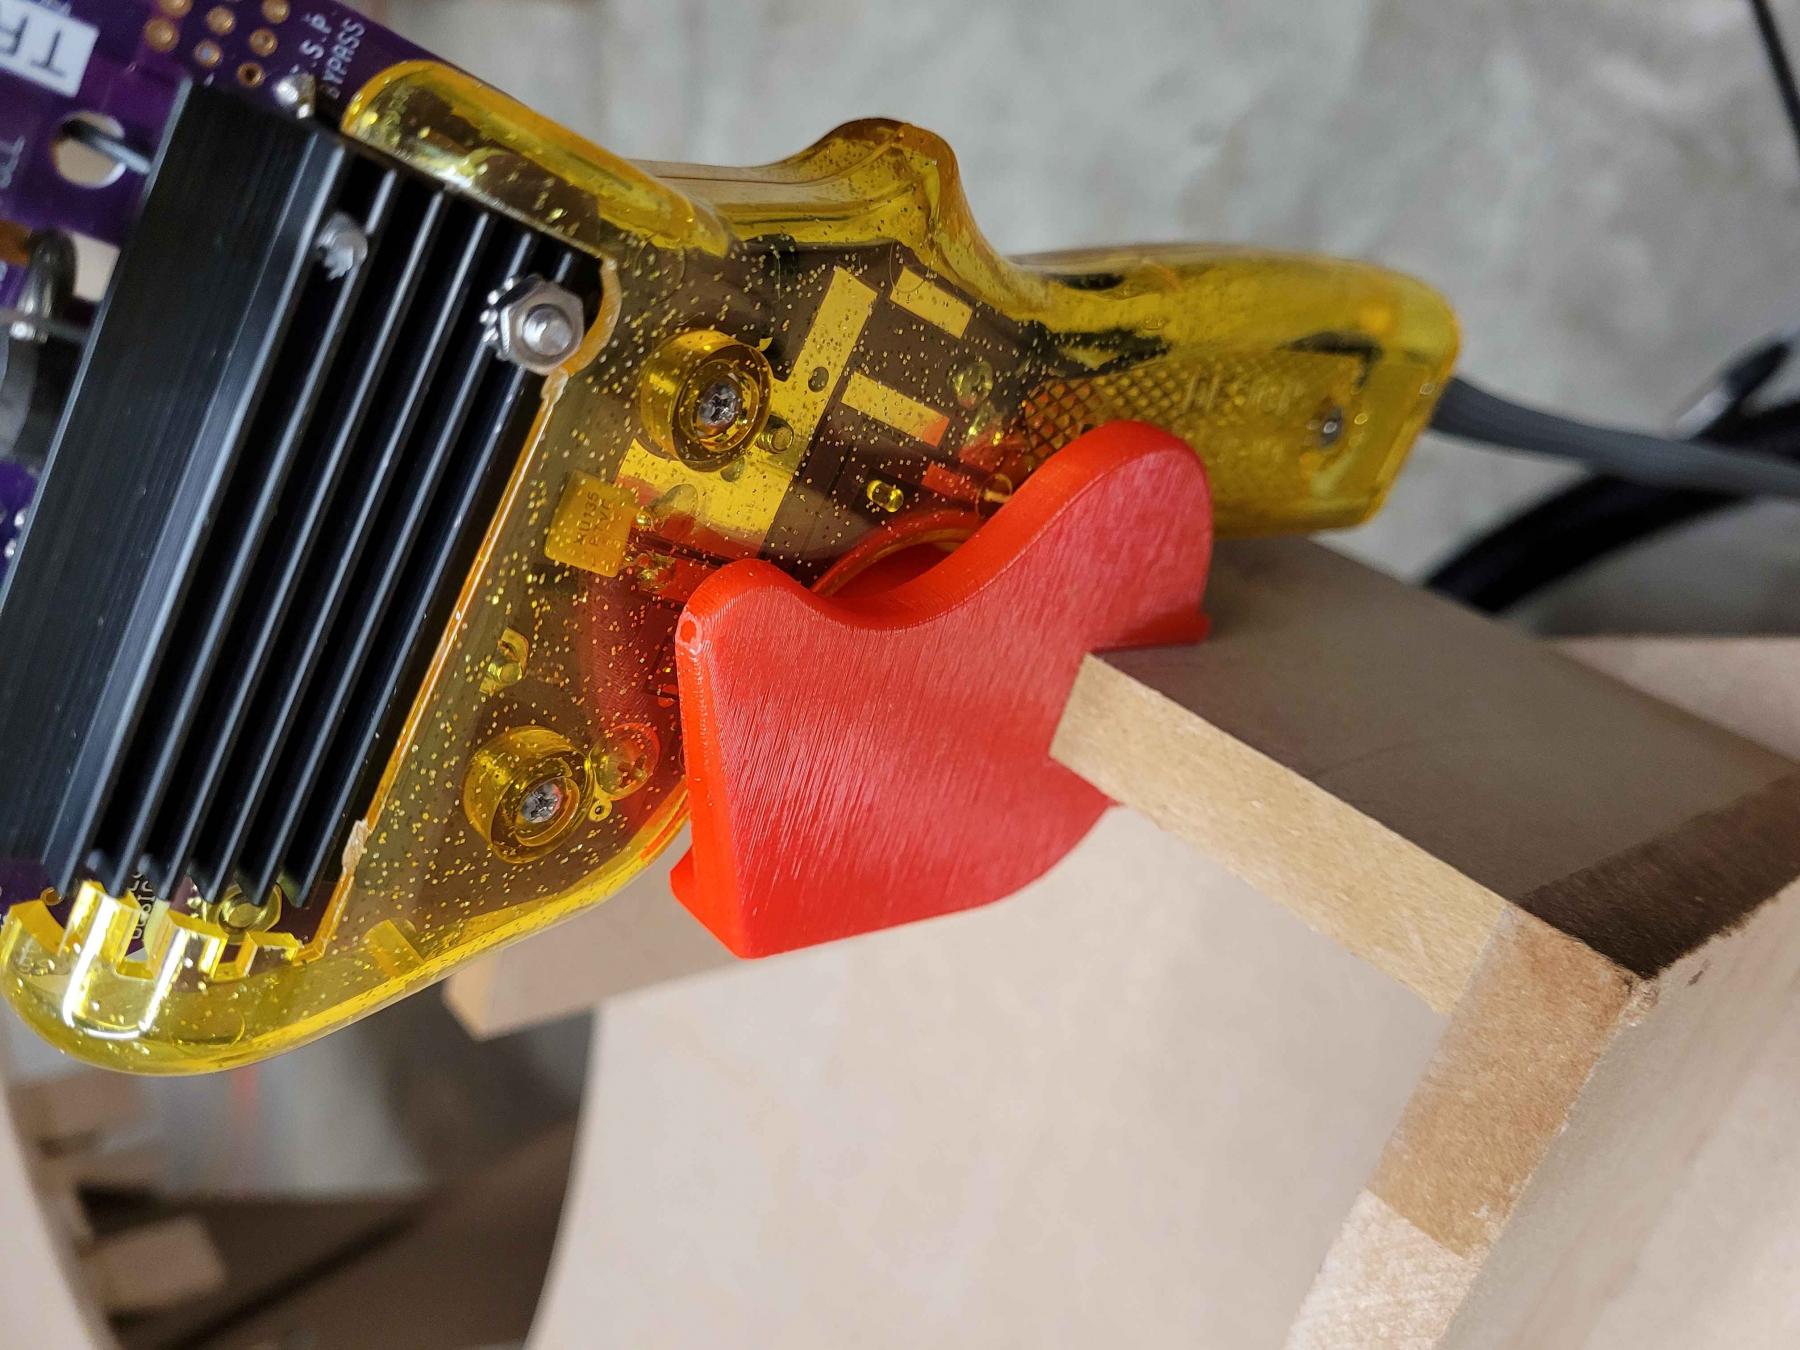
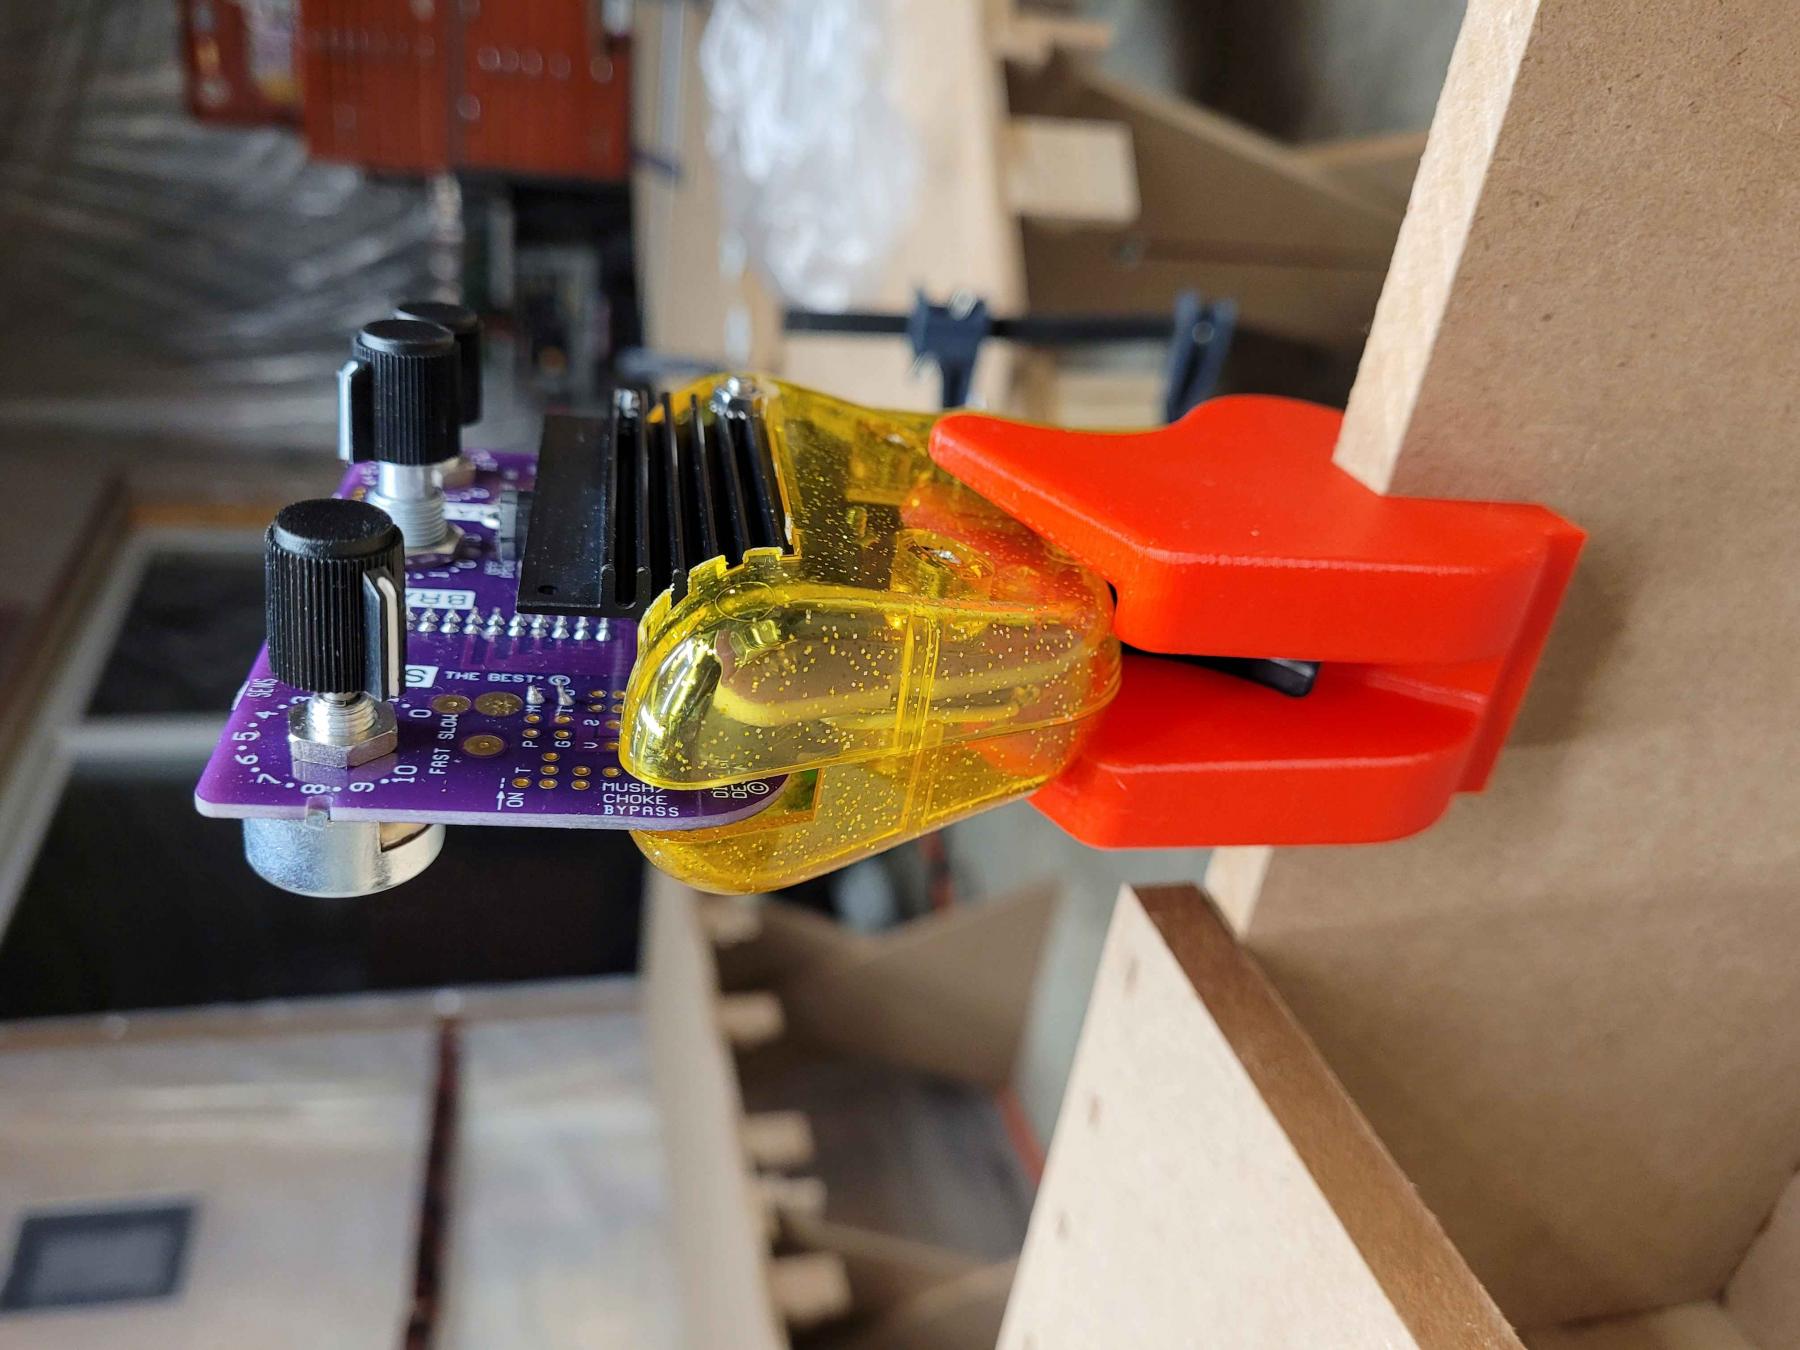
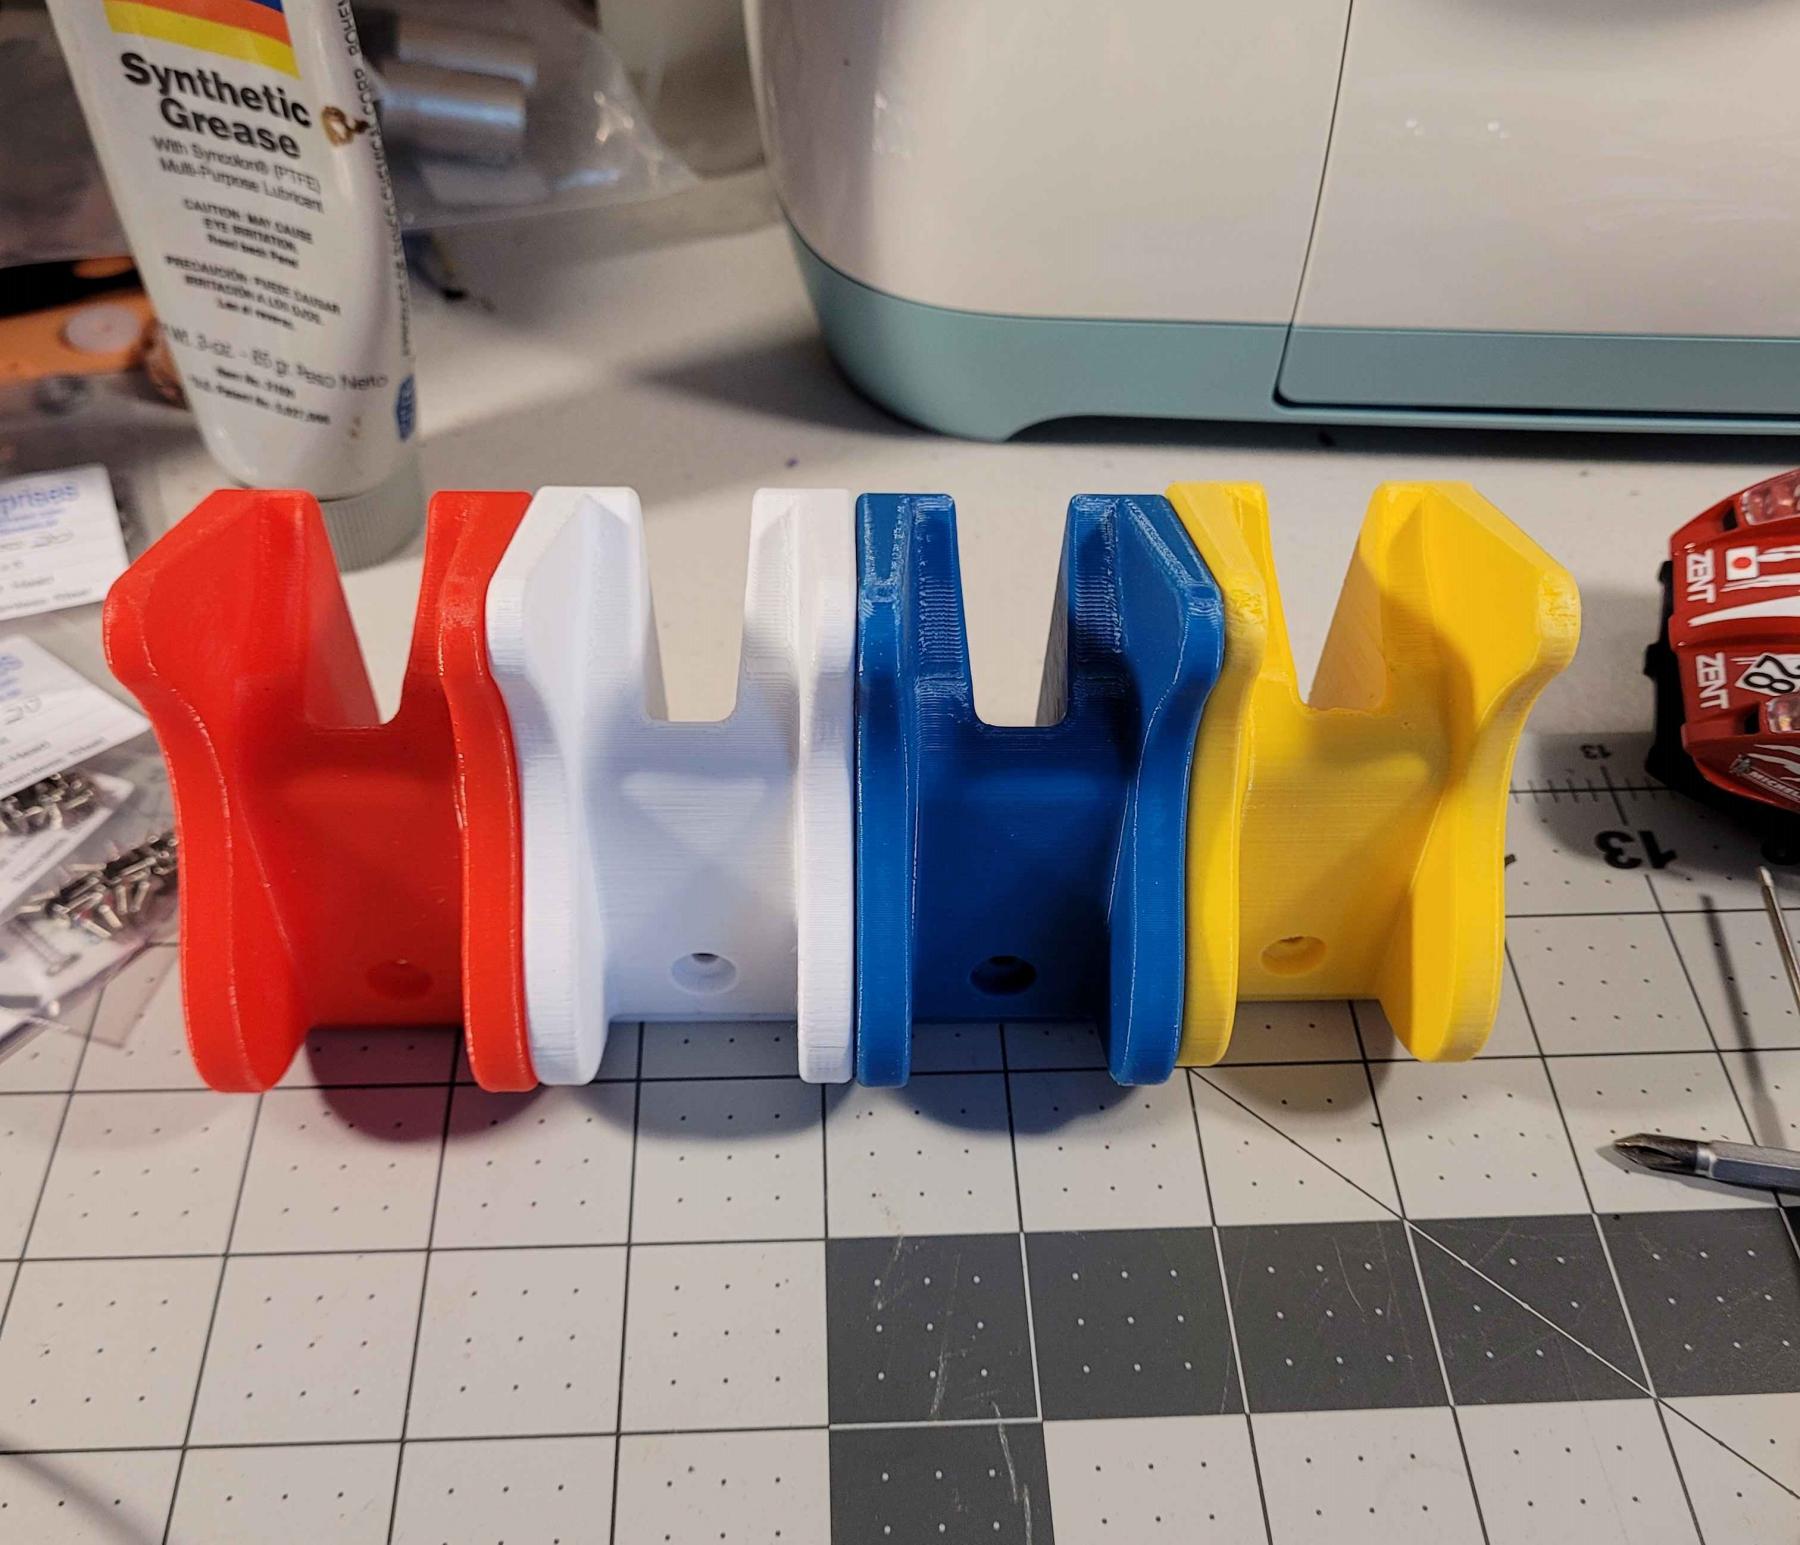
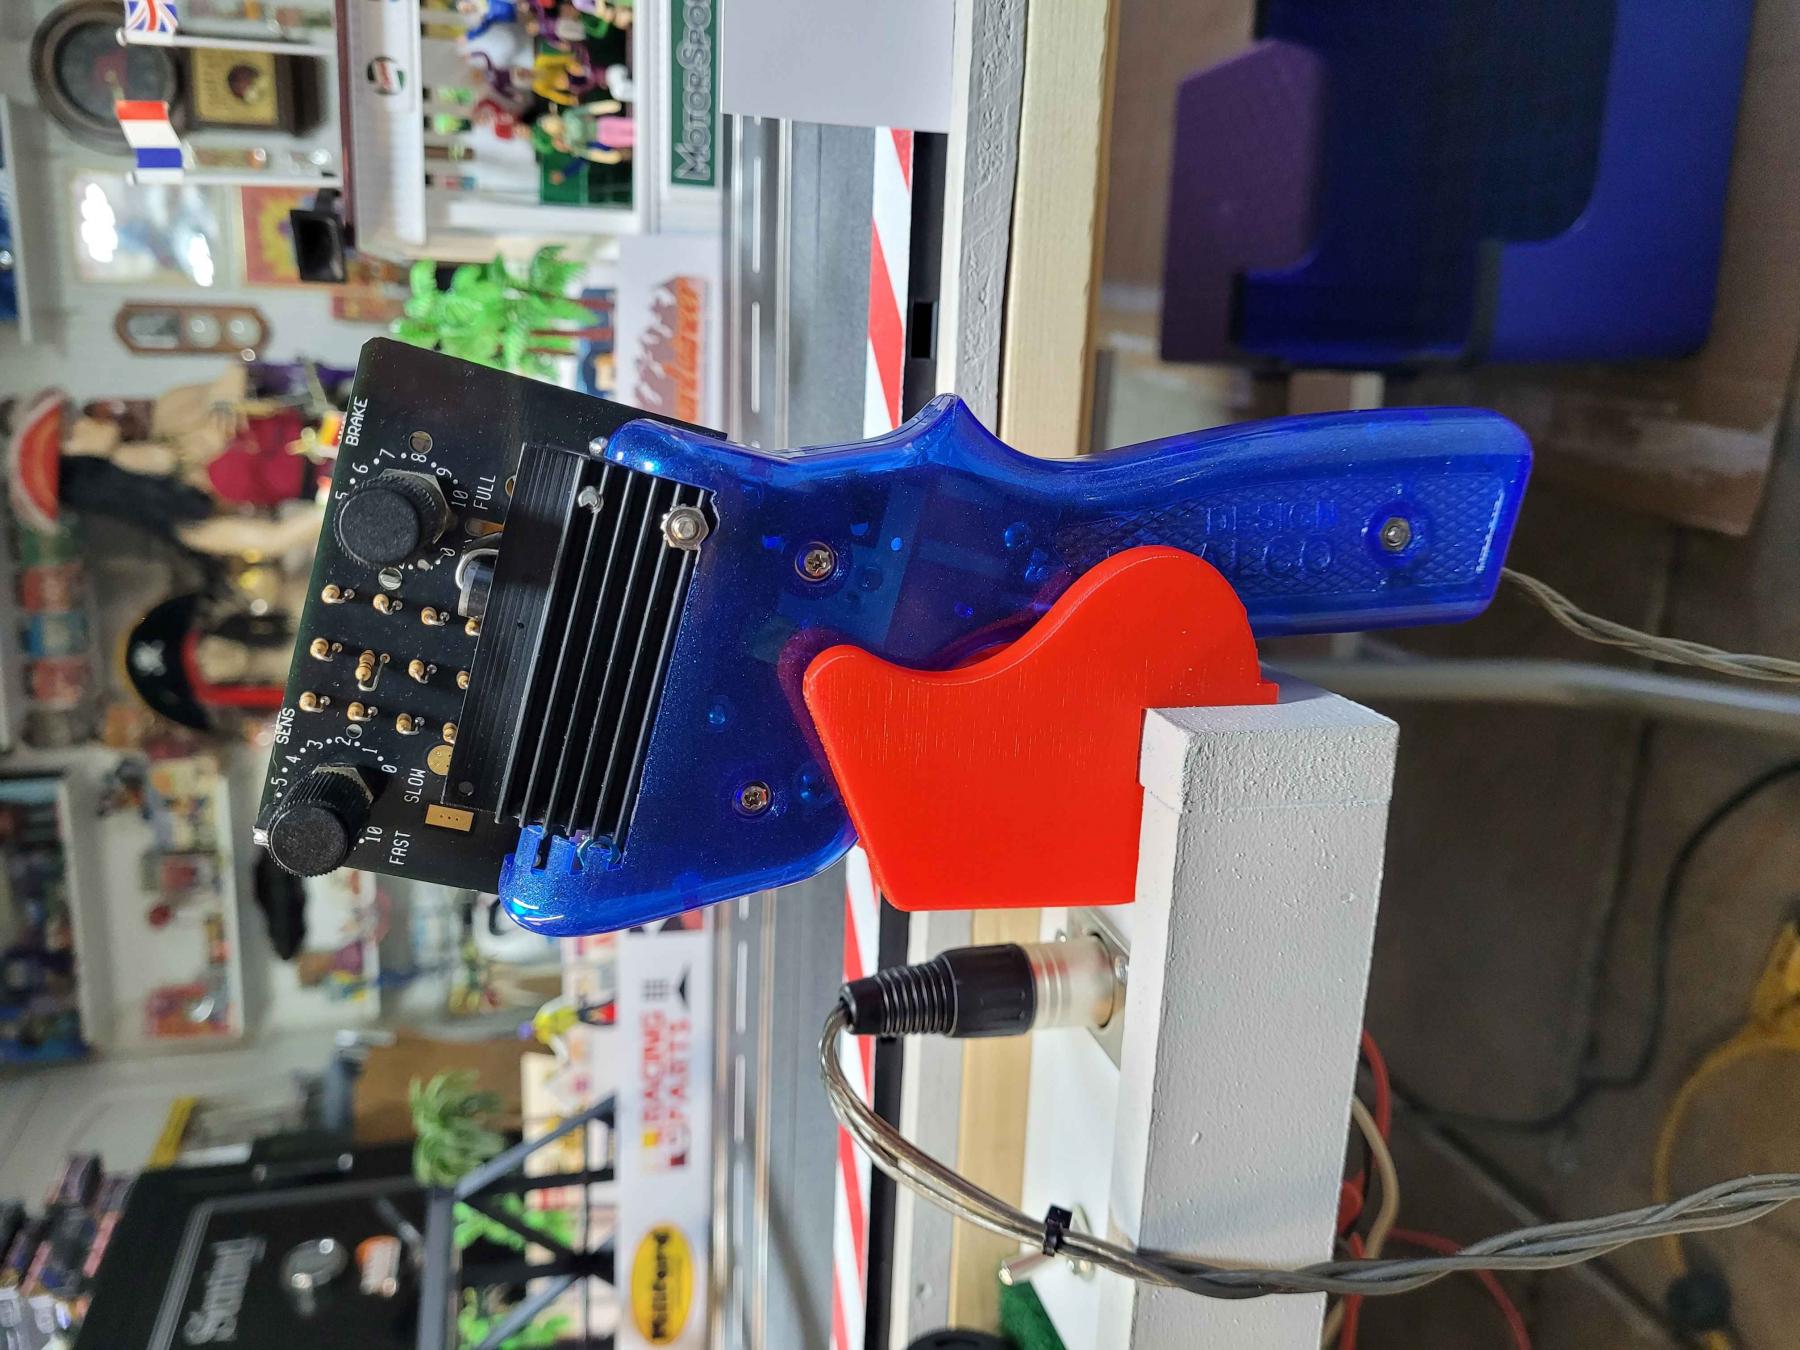
On a side project I finished the designs and 3D printed my control station panels and controller holders. The holders slip over the edge of 1/2" MDF and held on with a #6 screw and saved me money. Easy on and off controller access with the DiFalco controllers.

First-time build questions for a wood four-lane track
Started by
Bigdogbro1
, Apr 23 2024 03:59 PM
178 replies to this topic
#151

Bigdogbro1
-
- Full Member
-

- 94 posts Joined: 23-April 24
Backmarker
- Gender:Male
- Location:near Hell, MI
Posted 29 October 2024 - 08:11 AM

- Eddie Fleming and Steve Ogilvie like this
Rob Armbruster
#152
Bigdogbro1
-
- Full Member
-
- 94 posts Joined: 23-April 24
Backmarker
- Gender:Male
- Location:near Hell, MI
Posted 02 November 2024 - 02:41 PM
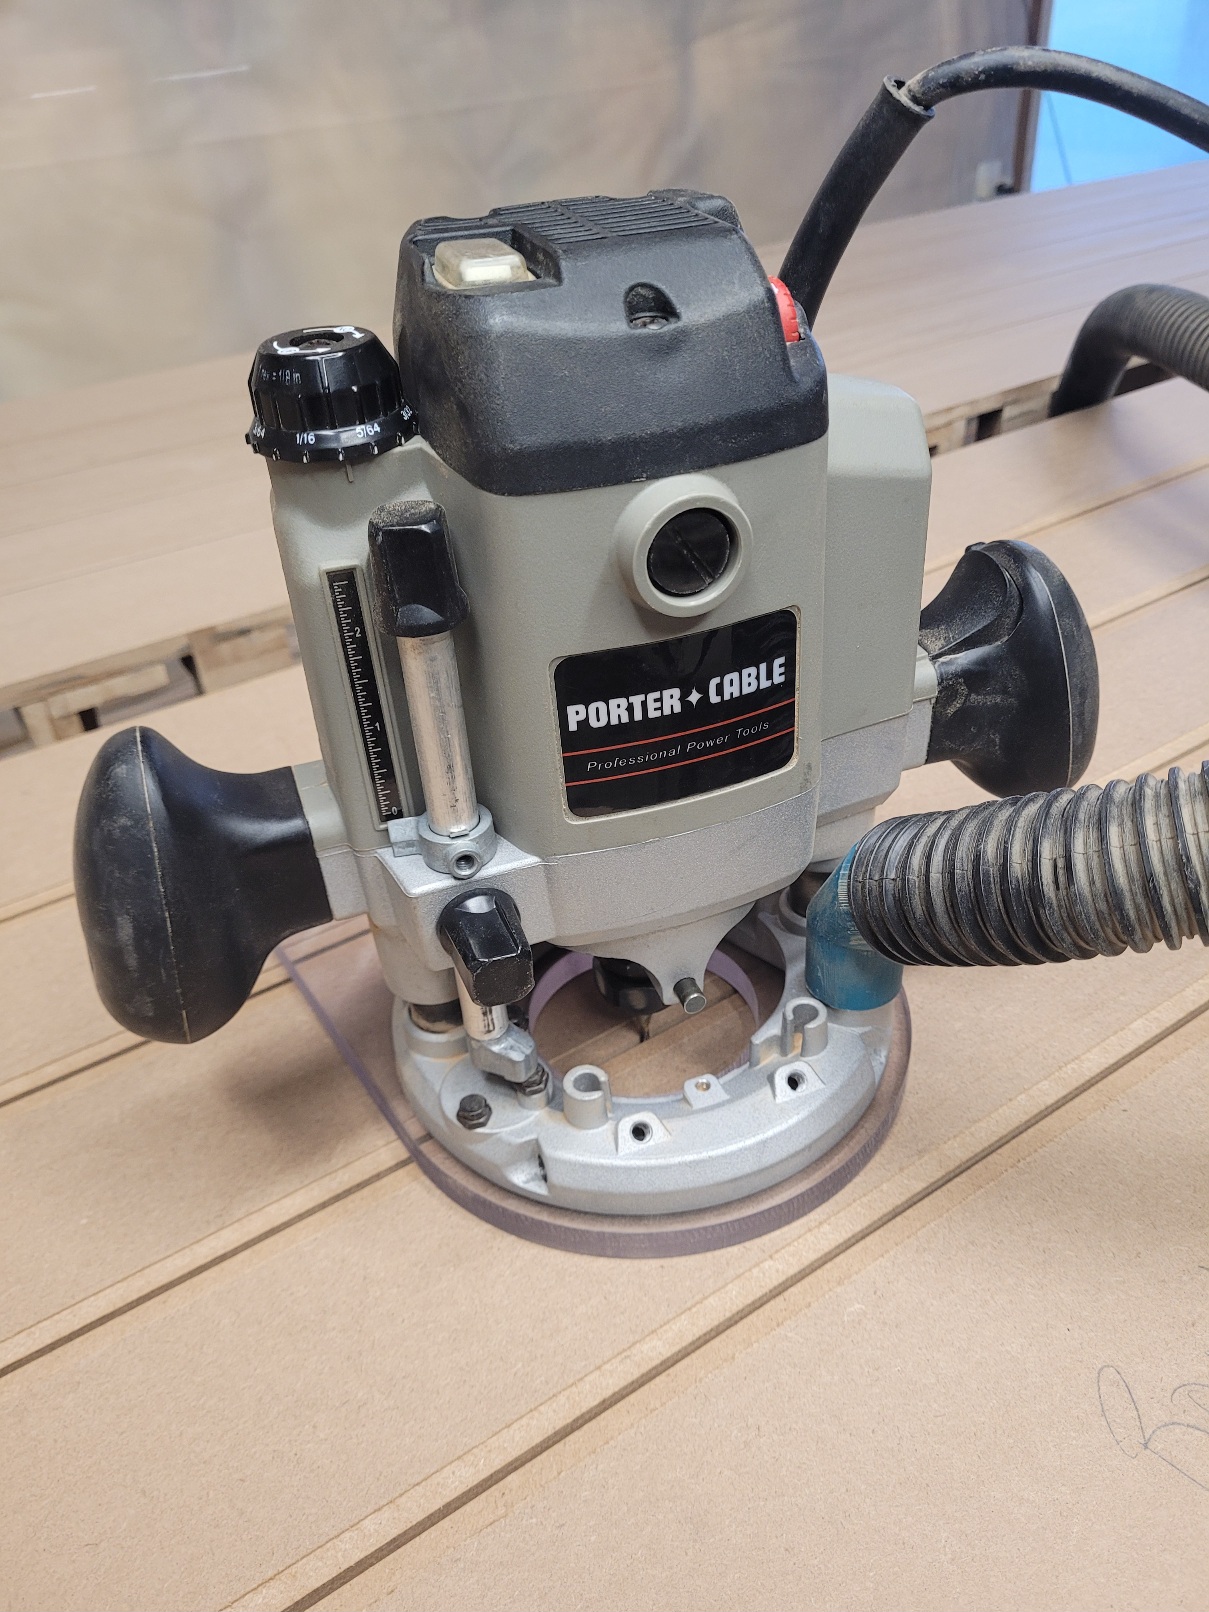
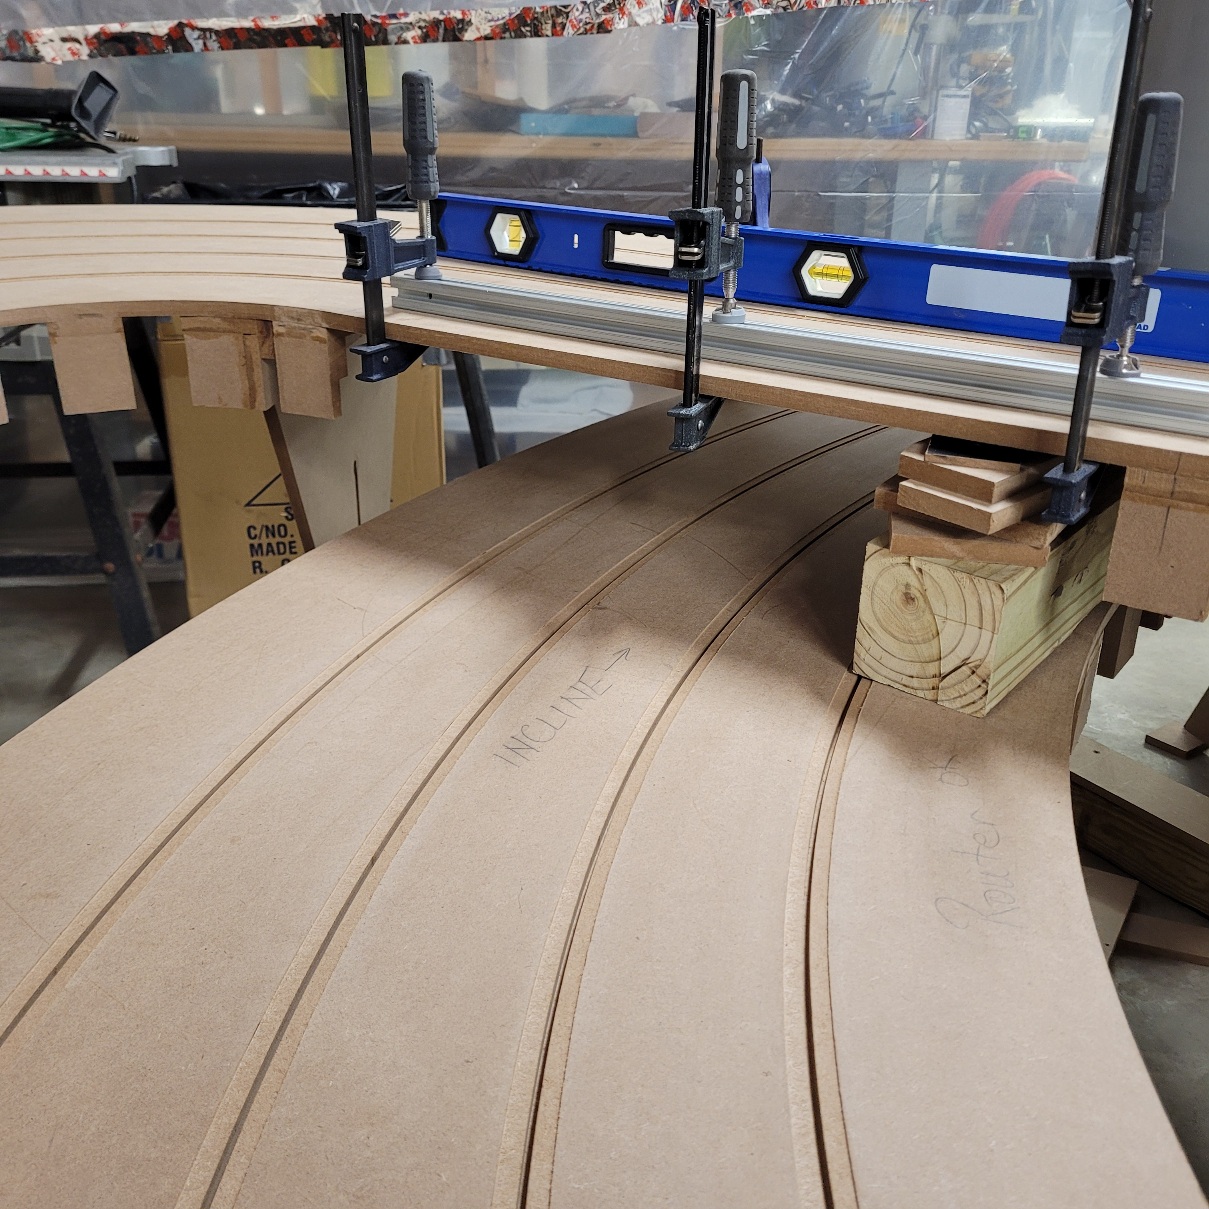
Started my slot routing. Trying to get better dust collection from the router but making progress.
The slot depth is set at .315" to .322" that's 5/16" to 8mm. Making a single pass only so full attention is key here running the router template pins along the track edge for the first slot and pins in the slot for the next three slots. A bit nerve racking the first time building a track.
- Steve Ogilvie likes this
Rob Armbruster
#153
Dave Crevie
-

- Full Member
-
- 4,534 posts Joined: 16-February 09
Posting Leader
Posted 02 November 2024 - 02:58 PM
#154
Bill from NH
-

- Full Member
-
- 14,758 posts Joined: 02-August 07
Age scrubs away speed!
- Gender:Male
- Location:New Boston, NH
Posted 02 November 2024 - 05:54 PM
This is going to be a nice track Rob!
- Paul Menkens likes this
Bill Fernald
I intend to live forever! So far, so good.
I intend to live forever! So far, so good.
#155
Bigdogbro1
-
- Full Member
-
- 94 posts Joined: 23-April 24
Backmarker
- Gender:Male
- Location:near Hell, MI
Posted 03 November 2024 - 08:22 AM

Hi Dave,
Thanks for rotating the picture. Did you do that using the posting tools or download it and repost it?
Rob Armbruster
#156
MSwiss
-

- IRRA National Director
-
- 25,909 posts Joined: 16-April 06
Grand Champion Poster
- Gender:Male
Posted 03 November 2024 - 09:13 AM
What I've seen is if you do the tiniest of crops, that will lock the pic in the orientation you want it.
As a moderator, that's how I fixed your post.
Mike Swiss
Inventor of the Low CG guide flag 4/20/18
IRRA® Components Committee Chairman
Five-time USRA National Champion (two G7, one G27, two G7 Senior)
Two-time G7 World Champion (1988, 1990), eight G7 main appearances
Eight-time G7 King track single lap world record holder
17B West Ogden Ave., Westmont, IL 60559, (708) 203-8003, mikeswiss86@hotmail.com (also my PayPal address)
Note: Send all USPS packages and mail to: 692 Citadel Drive, Westmont, Illinois 60559
#157
Dave Crevie
-
- Full Member
-
- 4,534 posts Joined: 16-February 09
Posting Leader
Posted 03 November 2024 - 09:43 AM
I used the snipping tool. Snipped it, and rotated it.
Sometimes it is better to download from your camera or cellphone to some kind of photo software, where you can access it from the "more reply options" feature at the bottom of this window. In the photo program, you should get an icon or button that will rotate the photo to the orientation you want.
I use Microsoft Photo Gallery because that is what came with the computer, and it is fast and easy to use. I don't have to "fire it up", there is an icon on the lower tool bar that takes me there instantly. The photo screen looks like this;

Down in the lower right corner, (circled in red) are the buttons which allow you to manipulate the photo. Rotate right, rotate left, delete, zoom and crop. Most photo reader programs have these options.
My smartphone (Samsung) lets me rotate photos in the archive. But I know not all phones can do this. If the photo appears in the cellphone screen right side up when you hold the phone in it's natural upright position, it should download right side up.
In the future, if a photo comes out cattywhompus and you want it straightened out, just say so in the post, and I'll take care of it. Only takes seconds.
#158
MSwiss
-
- IRRA National Director
-
- 25,909 posts Joined: 16-April 06
Grand Champion Poster
- Gender:Male
Posted 03 November 2024 - 12:44 PM
Dave,
You're turning this into a project.
Rob is building his own commercial style slot car track.
I'm sure he has a cell phone that doesn't have a rotary dial and can edit/post his own pic.
You take the pic, you click on it immediately.
The cropping option will come up.
You nip the tiniest bit off the top or bottom and it will post correctly oriented.
PS-the issue is all based on taking a pic of a somewhat tall/long vertical object in the portrait mode.
Mike Swiss
Inventor of the Low CG guide flag 4/20/18
IRRA® Components Committee Chairman
Five-time USRA National Champion (two G7, one G27, two G7 Senior)
Two-time G7 World Champion (1988, 1990), eight G7 main appearances
Eight-time G7 King track single lap world record holder
17B West Ogden Ave., Westmont, IL 60559, (708) 203-8003, mikeswiss86@hotmail.com (also my PayPal address)
Note: Send all USPS packages and mail to: 692 Citadel Drive, Westmont, Illinois 60559
#159
Dave Crevie
-
- Full Member
-
- 4,534 posts Joined: 16-February 09
Posting Leader
Posted 03 November 2024 - 02:39 PM
Tried that long ago when we discussed this before. Doesn't work with my phone. I can crop/trim but the photo will stay oriented the way it is.
#160
MSwiss
-
- IRRA National Director
-
- 25,909 posts Joined: 16-April 06
Grand Champion Poster
- Gender:Male
Posted 03 November 2024 - 02:56 PM
I have a Samsung/Android phone.
It's always worked for me and cured the issue for others.
- team burrito likes this
Mike Swiss
Inventor of the Low CG guide flag 4/20/18
IRRA® Components Committee Chairman
Five-time USRA National Champion (two G7, one G27, two G7 Senior)
Two-time G7 World Champion (1988, 1990), eight G7 main appearances
Eight-time G7 King track single lap world record holder
17B West Ogden Ave., Westmont, IL 60559, (708) 203-8003, mikeswiss86@hotmail.com (also my PayPal address)
Note: Send all USPS packages and mail to: 692 Citadel Drive, Westmont, Illinois 60559
#161
Brian Czeiner
-

- Full Member
-
- 517 posts Joined: 04-March 08
Race Leader
- Gender:Male
- Location:Tyler, TX
Posted 04 November 2024 - 12:06 PM
Started my slot routing. Trying to get better dust collection from the router but making progress.
The slot depth is set at .315" to .322" that's 5/16" to 8mm. Making a single pass only so full attention is key here running the router template pins along the track edge for the first slot and pins in the slot for the next three slots. A bit nerve racking the first time building a track.
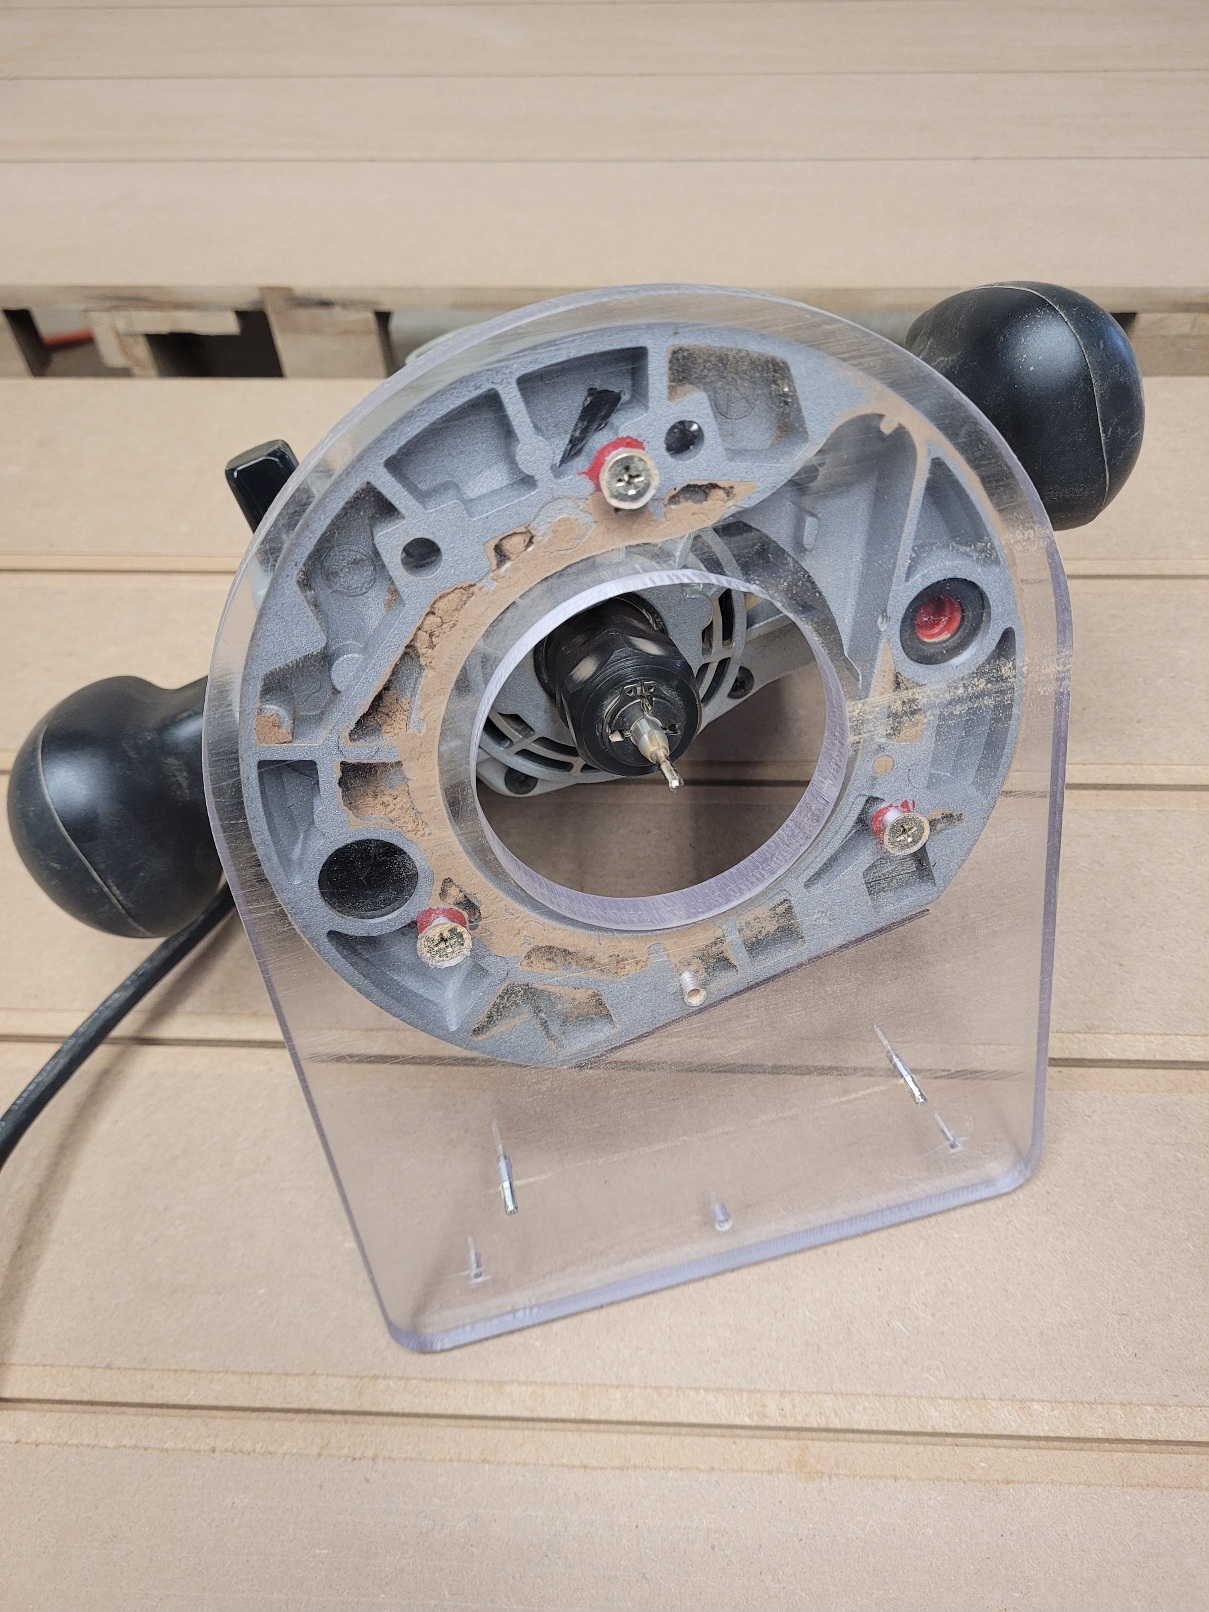
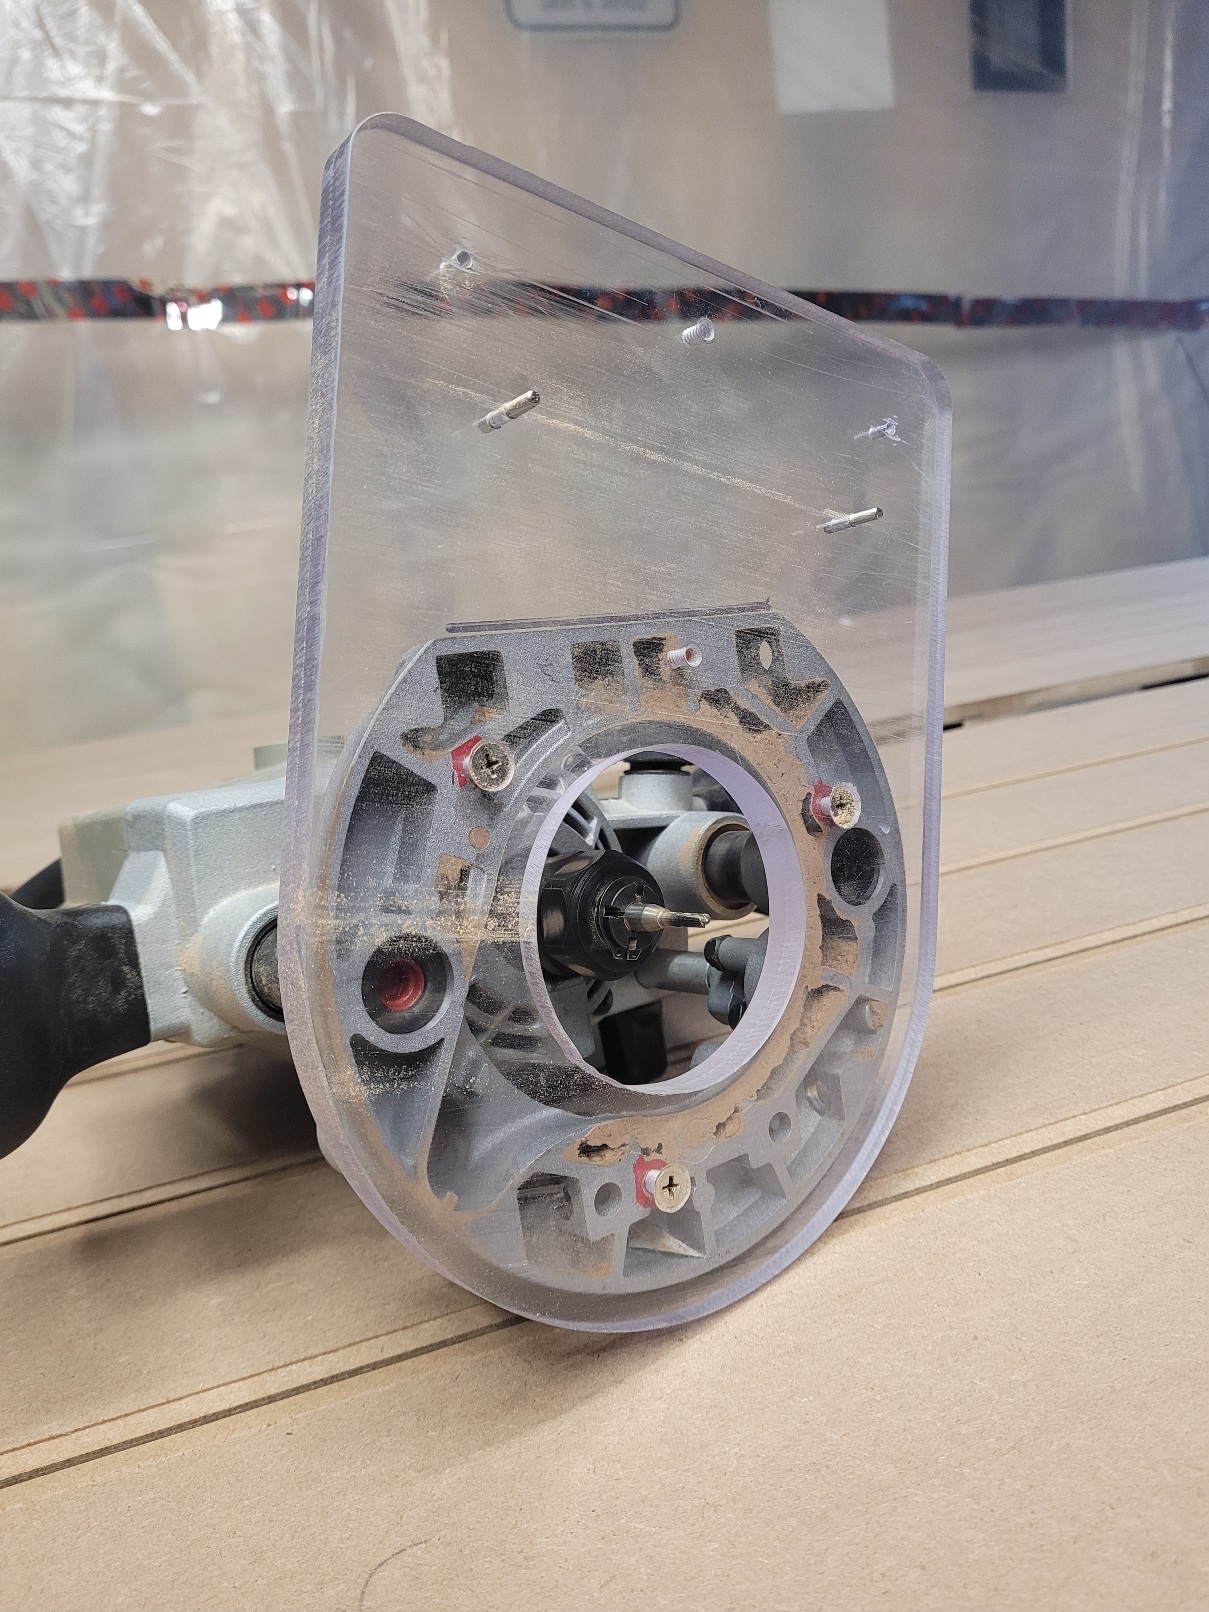
I've gone back and looked but couldn't find a picture of the router jig you are using to go off of the track edge. Could you post a picture of it please? Thank you.
- Sloter likes this
If it's not a Caveman, It's HISTORY! Support Your local raceways!
#162
Bigdogbro1
-
- Full Member
-
- 94 posts Joined: 23-April 24
Backmarker
- Gender:Male
- Location:near Hell, MI
Posted 08 November 2024 - 08:17 AM
Hi Brian,
Here are picture of my router template used to cut the slots.
I used 1/2" thick Lexan but you can use most anything that is flat and strong. I had it CNC cut out and I drilled in the holes the were centered from the CNC. The pins are 1/8" diameter steel that I had and I ground down a small flat on each to get them just under the router bit diameter and slide easily in the cut groove. The pins are pushed into the holes and hold very well. Because this is for short term use I felt there was no need to get fancy and I didn't have any axles or spur gears to use like Steve Ogilvie uses. The inner pins are 4" on center and 4" from the bit for lane spacing. The outer pins are 5" spaced and 5" from the bit. Make sure that the pin holes are sized for a push fit to the dowel pin used.
When using this method you need to make sure that your track edge is smooth and flawless, no bumps or divets in the 1/2" MDF edge. The pins also do not go past the bottom 1/2" edge as they could catch on a bracket or joint block. All those get flush sanded down berfore attaching the side walls. The pins also are raised up from the bottom of the slot groove by a 1/16" when routing in your 2nd and other slots.
Keep a firm hold on the router unit and apply force down low to keep the pins on the MDF edge on your outside first cut. My 1/8" router bit was set to .325" depth and that seemed to work well for me. Clean and sand prep each finished slot before moving to the next one. Go easy on the feed and let the bit do the work. Straights are easier to slide thru than the turns are. Some downward pressure is recommmended as well. I traversed about 3/4" to 1" per second at router full speed RPM's. The 1/8" double flute carbide bits were purchased from Slotcar Corner. I purchased two in case I broke one but I am almost finished and still on the first bit.
Attached Images


Attached Files
-
 PC Plunge Router Slotcar Track Jig.PDF 82.1KB
4 downloads
PC Plunge Router Slotcar Track Jig.PDF 82.1KB
4 downloads
- Steve Ogilvie likes this
Rob Armbruster
#163
Bigdogbro1
-
- Full Member
-
- 94 posts Joined: 23-April 24
Backmarker
- Gender:Male
- Location:near Hell, MI
Posted 08 November 2024 - 08:36 AM
I have a Samsung/Android phone.
It's always worked for me and cured the issue for others.
Thank you both for your comments on editing the photos.
Rob Armbruster
#164
Bigdogbro1
-
- Full Member
-
- 94 posts Joined: 23-April 24
Backmarker
- Gender:Male
- Location:near Hell, MI
Posted 08 November 2024 - 08:54 AM
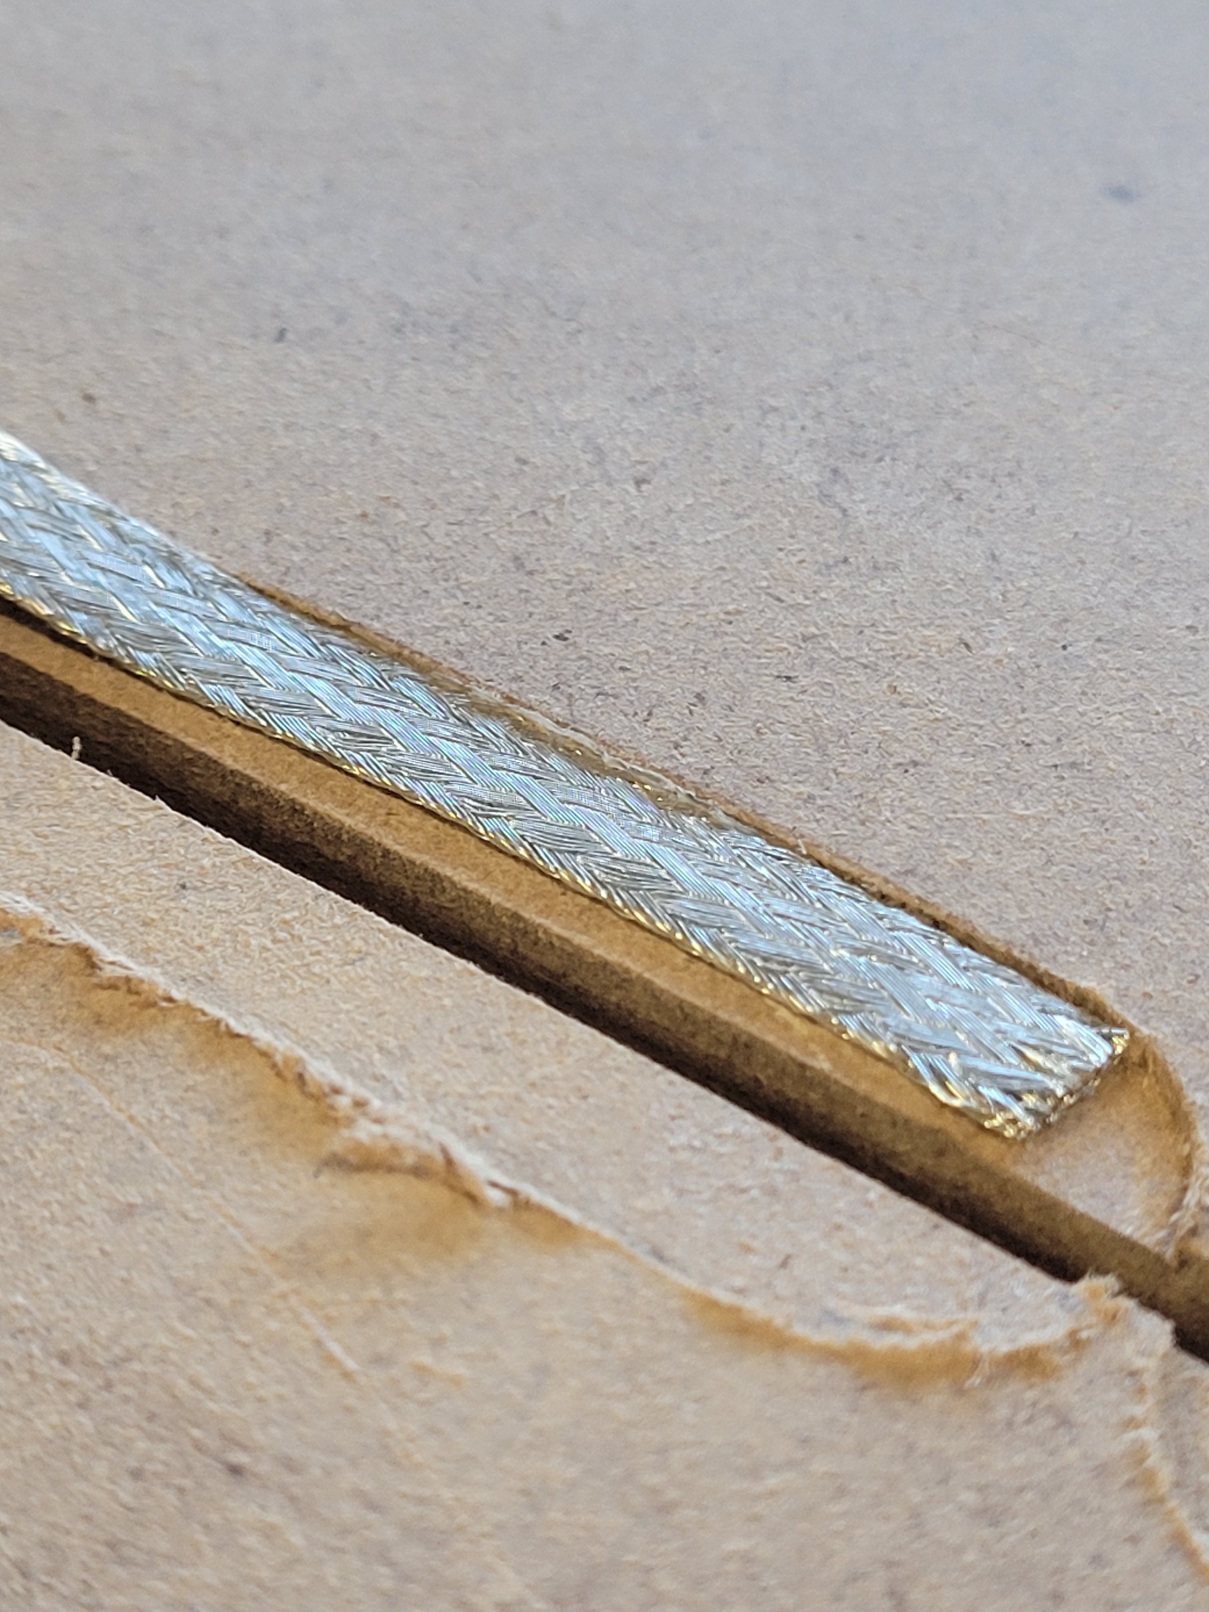
I did the gains grooves next after all the slots were cut after a thorough sanding and vacuumed clean. I used the 3/4" diameter centered 1/8" pin double tip carbide bit from Slotcar Corner and it works very well. I cleaned out the slot grooves with the end of a near 1/8" thick hand file and vacuumed more. I set my cut depth to about .040". The Slotcar Corner braid without the 3M paper carrier backing measured .025" thick so that gives me around .015" braid depth below the surface of the track in a perfect world.
Attached Images

Rob Armbruster
#165
Dave Crevie
-
- Full Member
-
- 4,534 posts Joined: 16-February 09
Posting Leader
Posted 08 November 2024 - 09:16 AM
Like the jig. Like even more that you did a blueline for it.
#166
Brian Czeiner
-
- Full Member
-
- 517 posts Joined: 04-March 08
Race Leader
- Gender:Male
- Location:Tyler, TX
Posted 08 November 2024 - 11:38 AM
Thank you. I was wondering how you got the inside corners so far from the edge without much elliptical geometry happening. The 5 x 5 measurements explain that. The jig we used back in the day use roller bearings guiding the edge. Spacing was also 11 or 12 inches apart between the rollers giving a dive down into the corner effect of the lanes. A second jig similar to what you pictured did the lane spacing. Nice!
If it's not a Caveman, It's HISTORY! Support Your local raceways!
#167
Bigdogbro1
-
- Full Member
-
- 94 posts Joined: 23-April 24
Backmarker
- Gender:Male
- Location:near Hell, MI
Posted 12 November 2024 - 09:41 AM
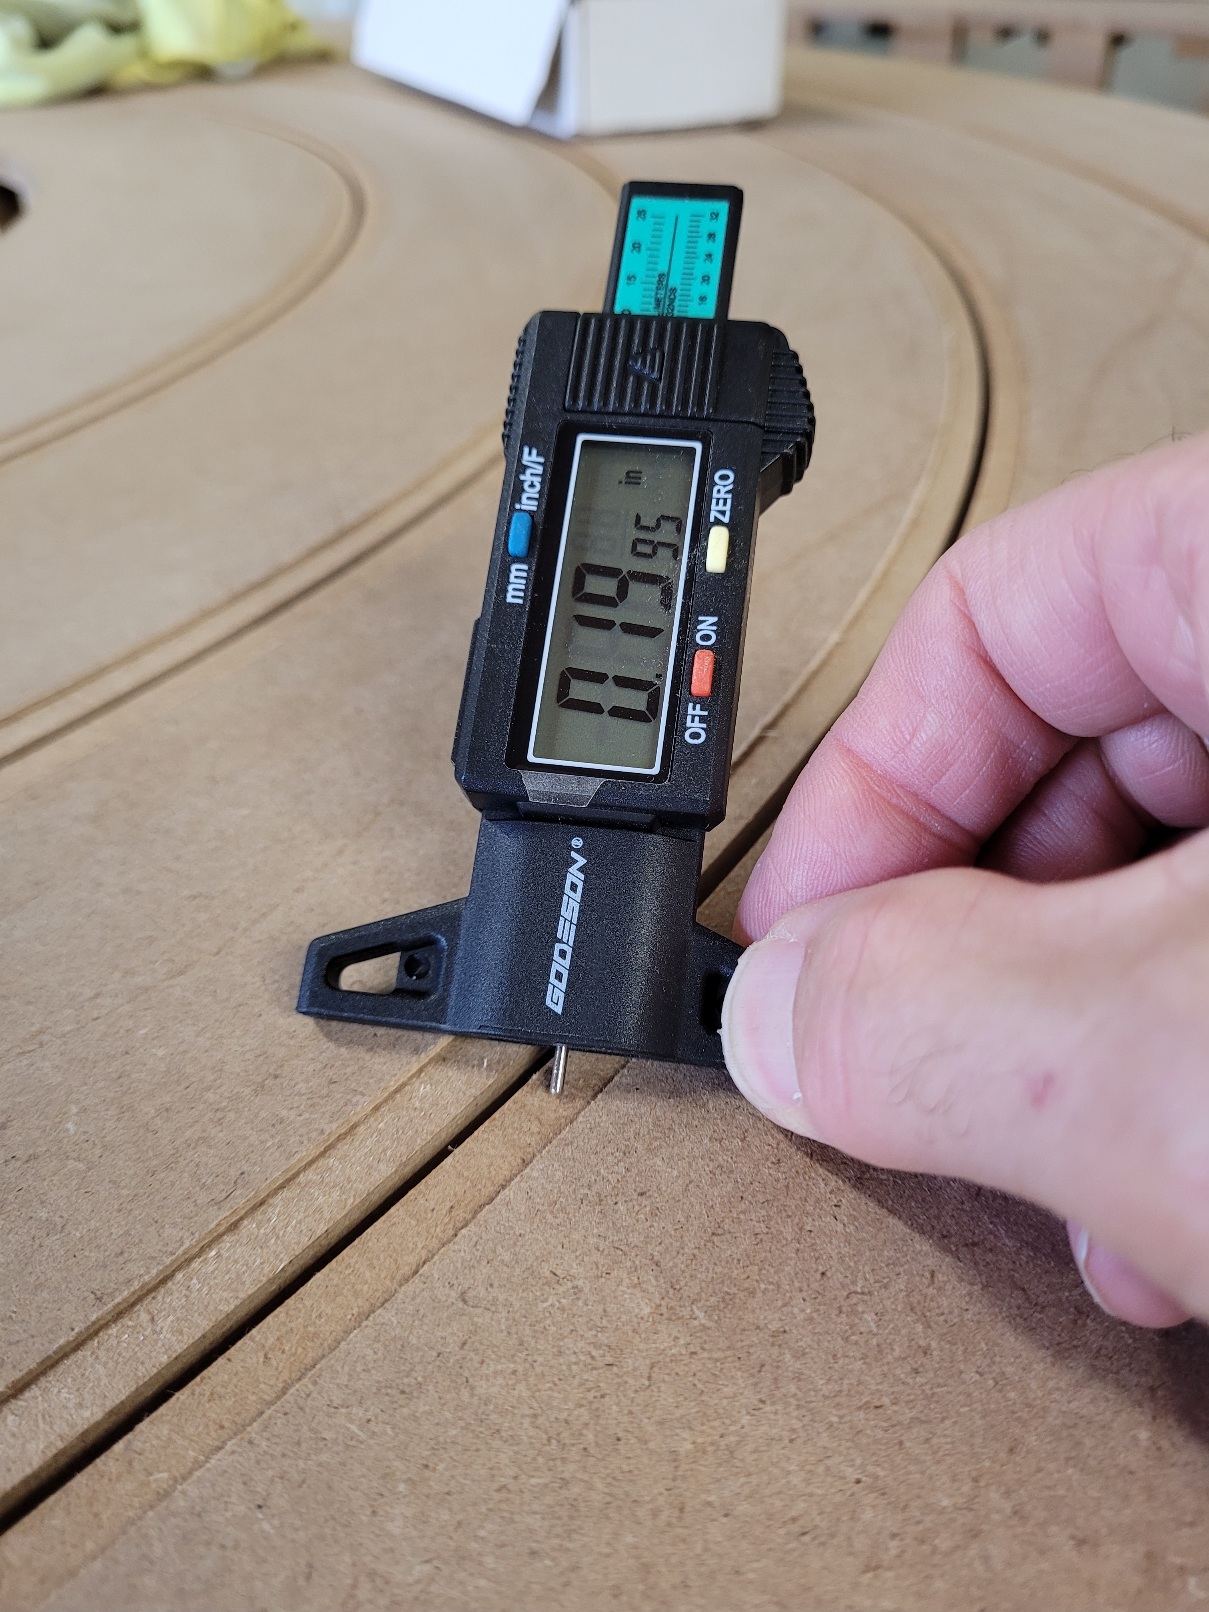
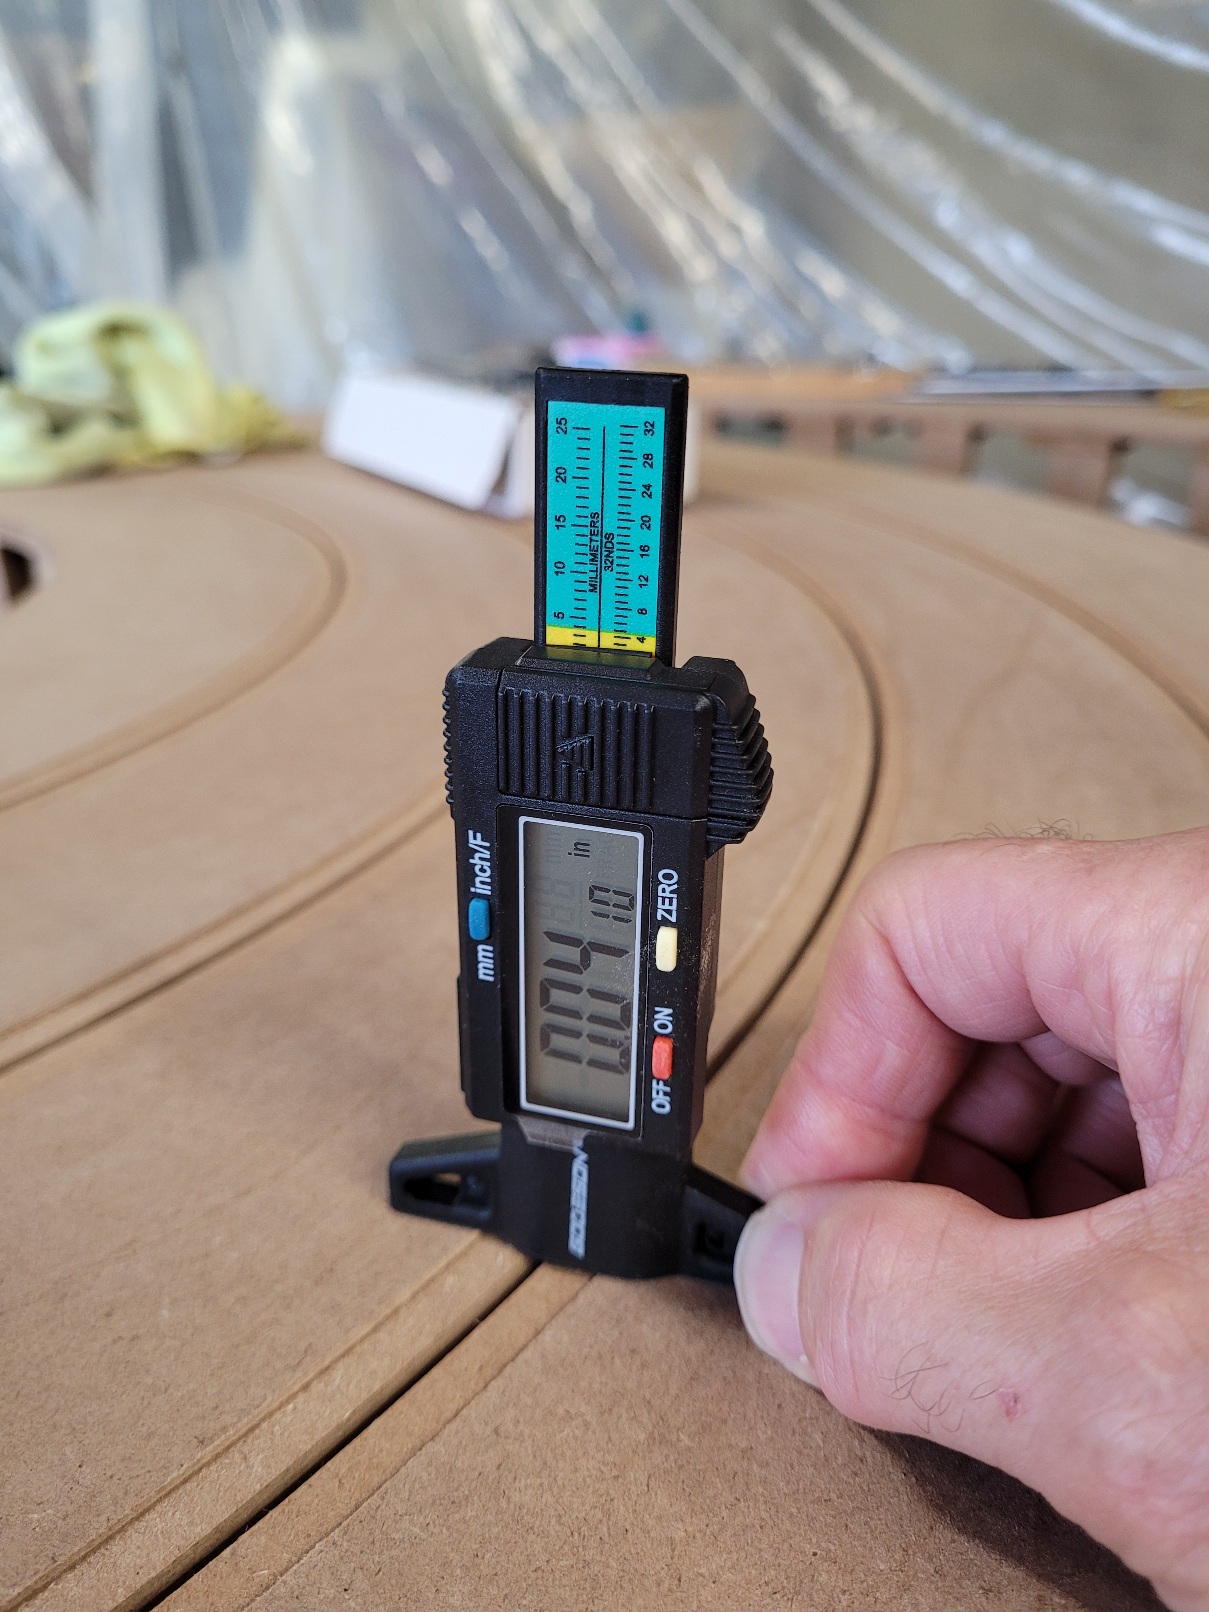
Here is a handy tool for checking the grooves and gaines cut depth. It's a depth gauge for tire tread but it reads in MM, fraction of inch and decimal which is what I wanted. Purchased from Amazon for $19 instead of a machinist depth gauge for $125. It is very repeatable and accurate plus you can span the slot gooves and gains groove to measure each side for uniformity. I had discovered that the gains grooves were not uniform due to deviations in the track surface not being perfectly flat before routing. This tool helped me get things correct and consistant and it's much easier to use than digital calipers.
I did decide to cut the gains depth a bit deeper to .045" to get a bit more fudge factor. Steve Ogilvie makes multiple passes and rotates the router 180 degrees during those passes to correct for any router tool tram misalignment.
I am finishing up the remaning grooves and gains then I will drill the braid drop holes and the joint blocks.
Attached Images
Rob Armbruster
#168
Bill from NH
-
- Full Member
-
- 14,758 posts Joined: 02-August 07
Age scrubs away speed!
- Gender:Male
- Location:New Boston, NH
Posted 12 November 2024 - 10:56 AM
Rob, I like your depth gauge. It may not be quite as accurate as a machinist tool, but slot car tracks aren't built to a machinist's standard, Plus, they move around with humidity & temperature changes.
- Paul Menkens likes this
Bill Fernald
I intend to live forever! So far, so good.
I intend to live forever! So far, so good.
#169
Bigdogbro1
-
- Full Member
-
- 94 posts Joined: 23-April 24
Backmarker
- Gender:Male
- Location:near Hell, MI
Posted 01 December 2024 - 06:07 PM
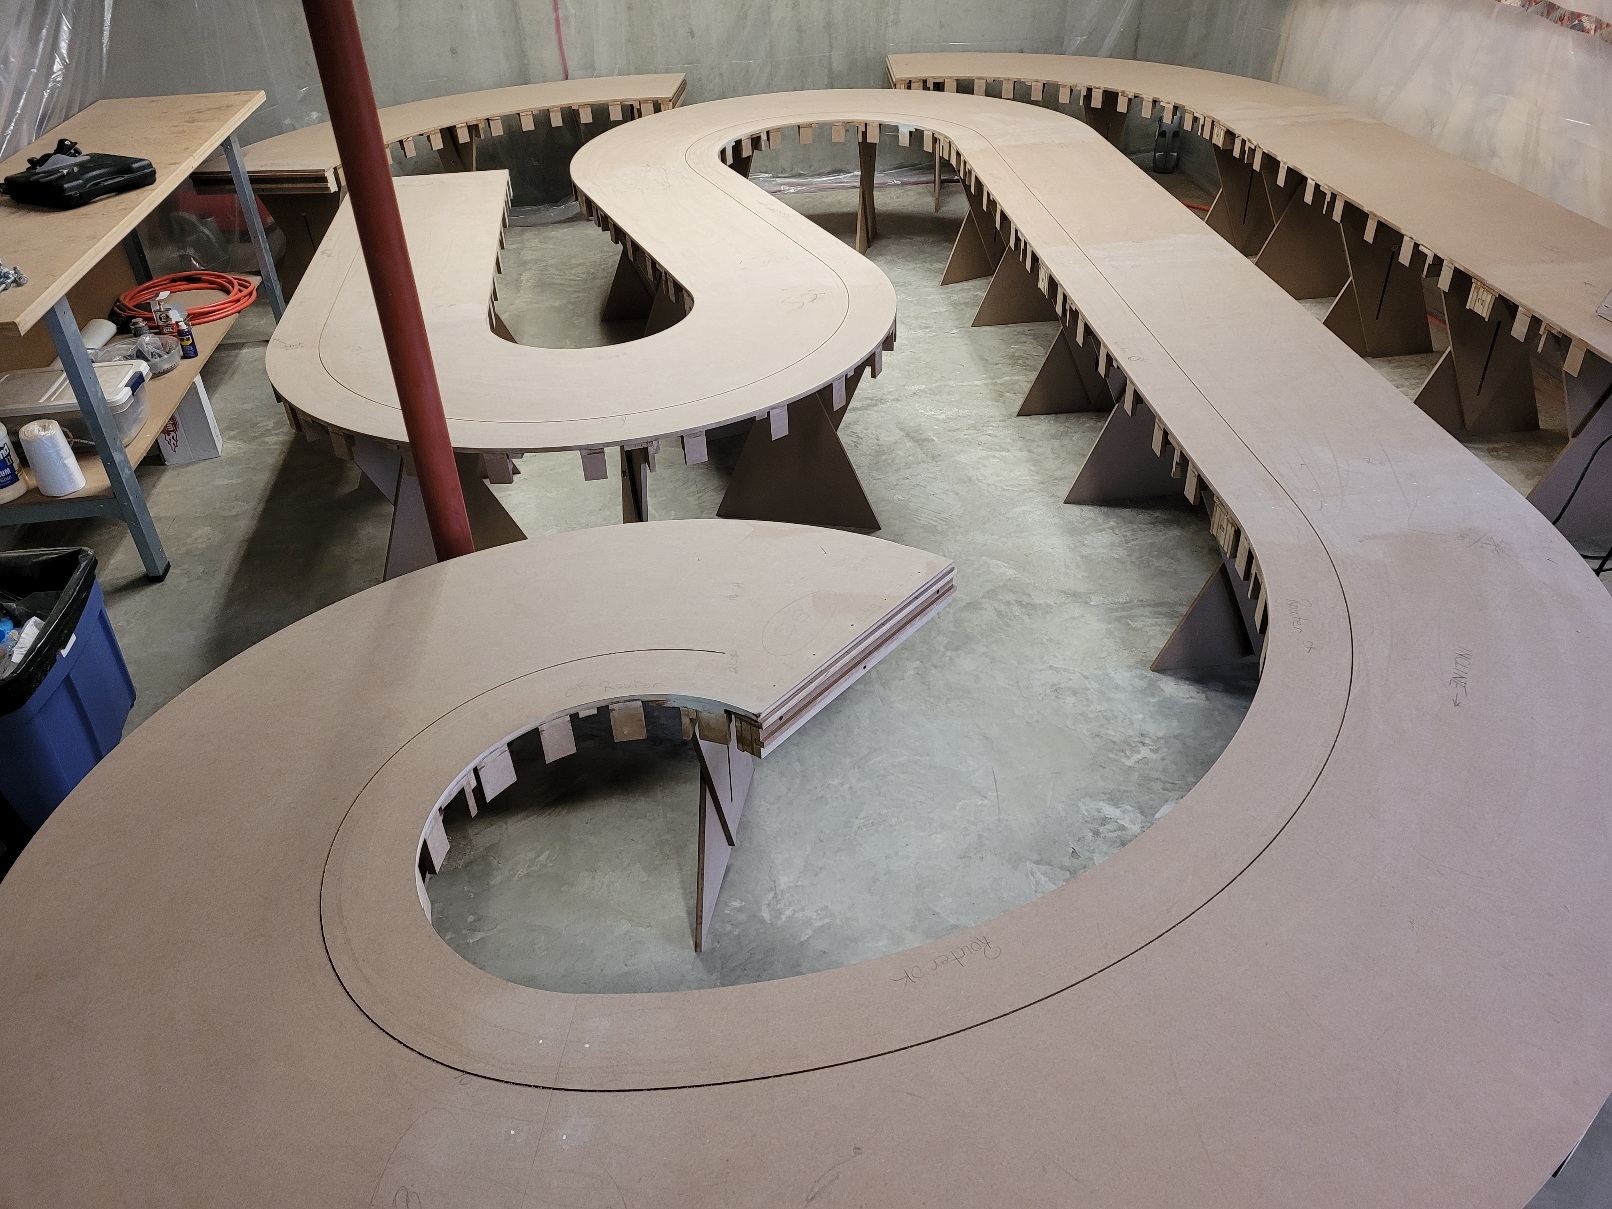
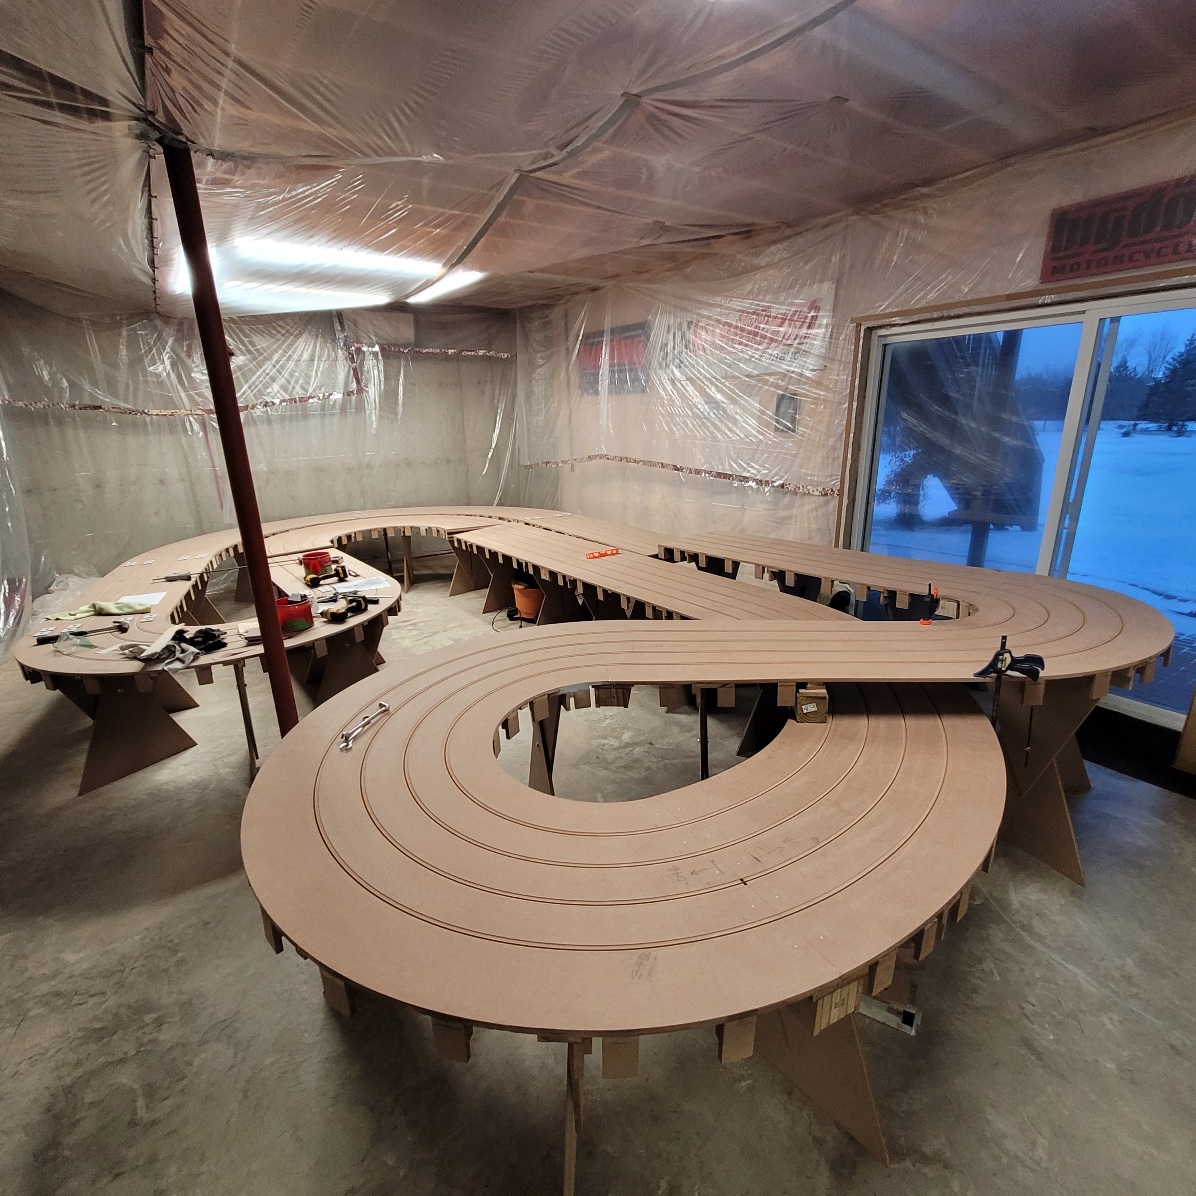
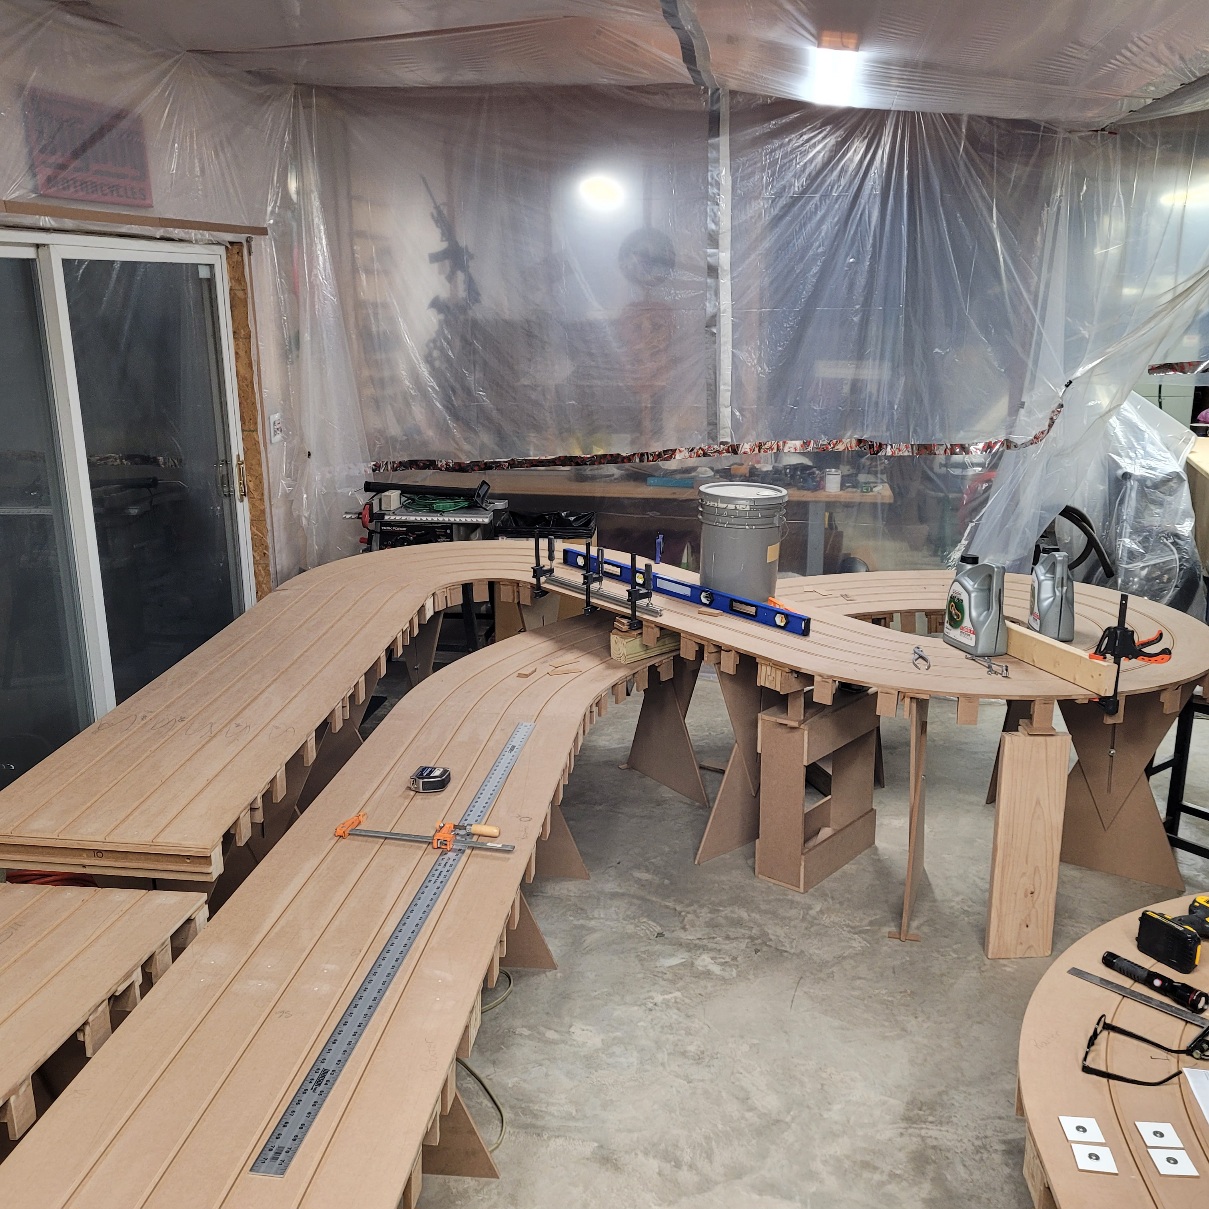
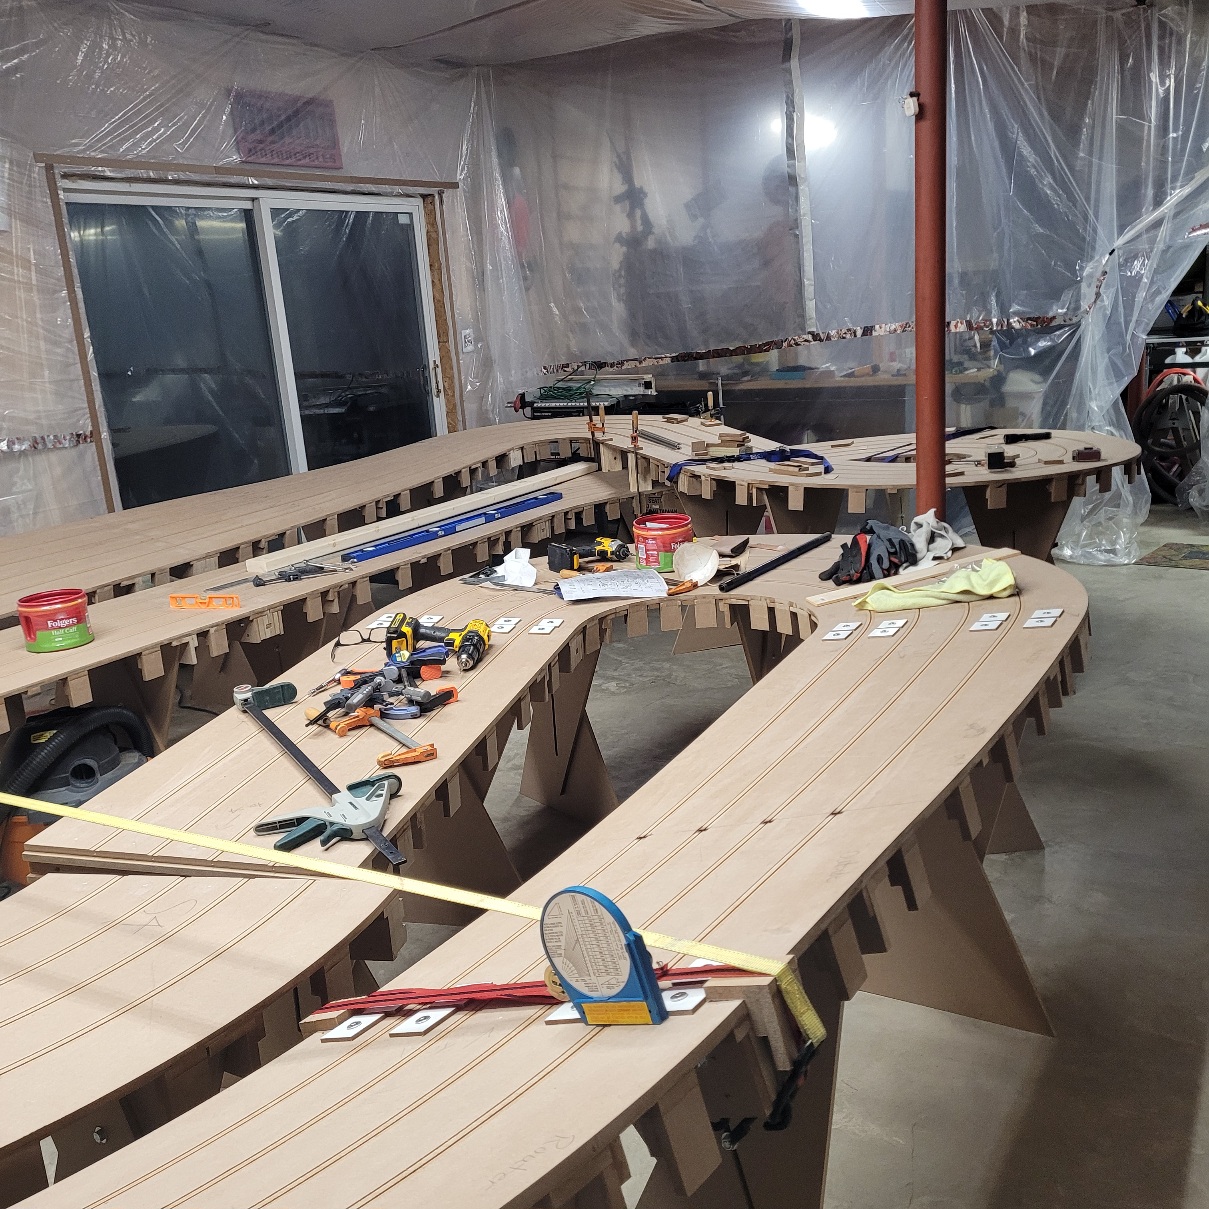
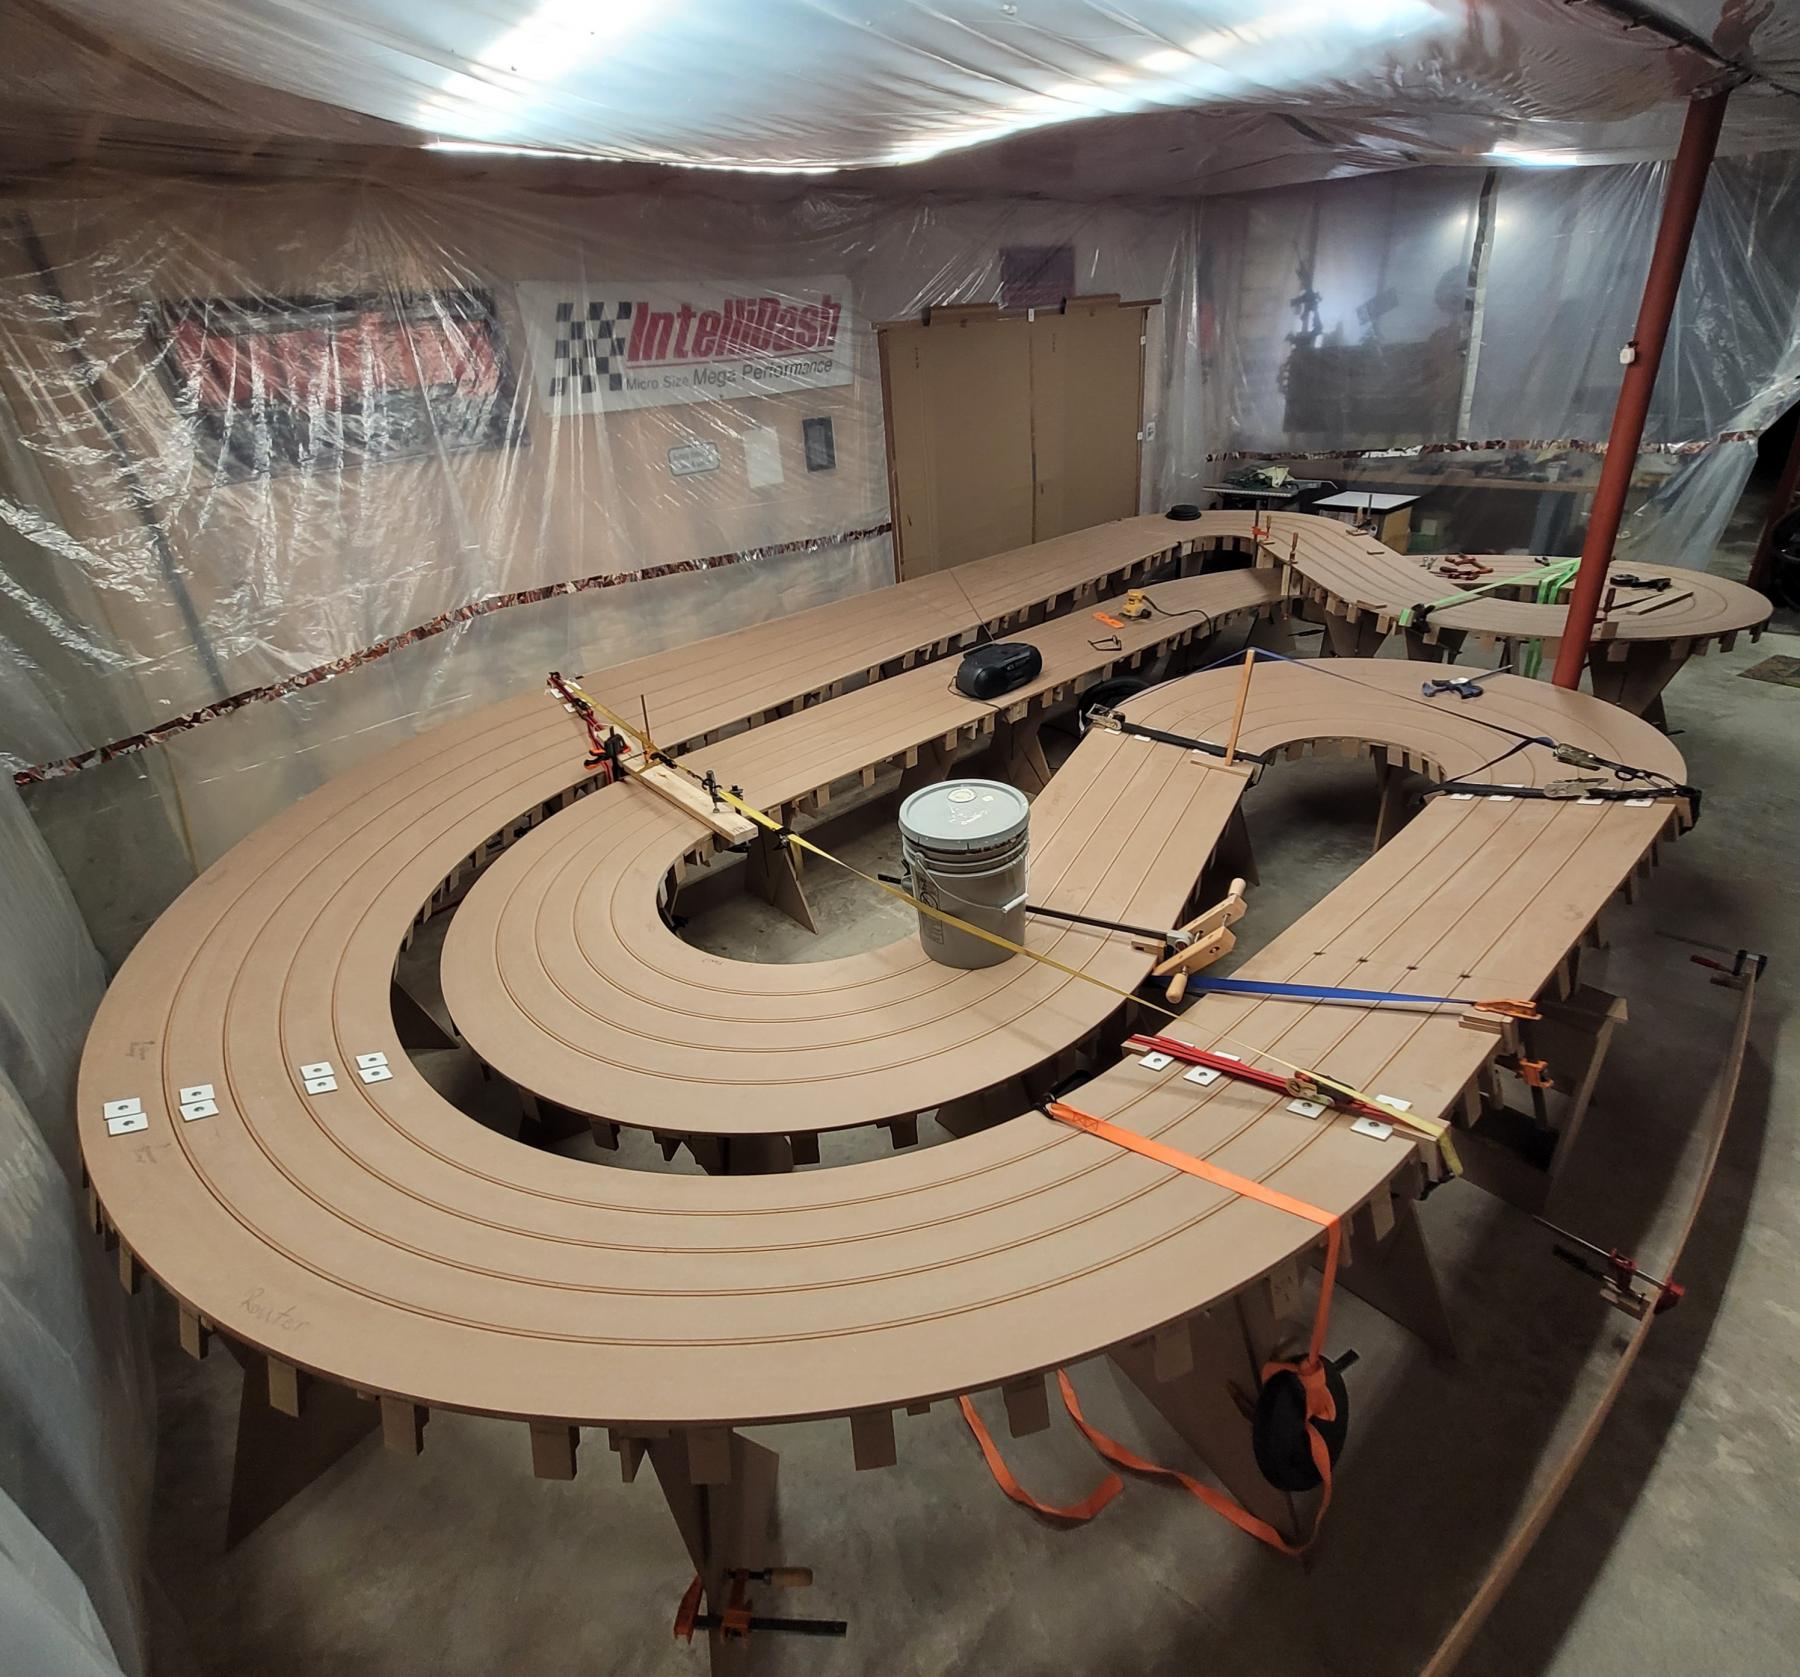
I was told by Steve Ogilvie to drill the braid drop holes last after painting the track. I had about two weeks without much track work done due to the slotcar NSR Eastern Nationals nearby and Thanksgiving so now I'm back at it again and beginning to assemble the track sections after some emails back and forth with Steve O. Assembling the inner straights, sweeper under the bridge, the donut and the lead-on over the bridge back into the back straights. Setting up the track and bending in the small banking/camber, incline and twist transitions then attempt to apply sidewalls where I can get access to, to start. Once I get the setup completed I will lock in the bridge overpass/underpass sections somehow before the sidwalls go on.
I had my sidewall materials ripped and ready to use before the cold weather and snow arrived here. Saturday after Thanksgiving a friend helped out setting up the track for assembly and banking. Twisting, banking and elevating the donut and bridge area is taking time to ease the twisting camber angles and get it right before the sidewalls get attached.
The last bridge height picture is the exit side (see sticker on the 4x4 end).
Attached Images


Rob Armbruster
#170
Bigdogbro1
-
- Full Member
-
- 94 posts Joined: 23-April 24
Backmarker
- Gender:Male
- Location:near Hell, MI
Posted 01 December 2024 - 07:15 PM
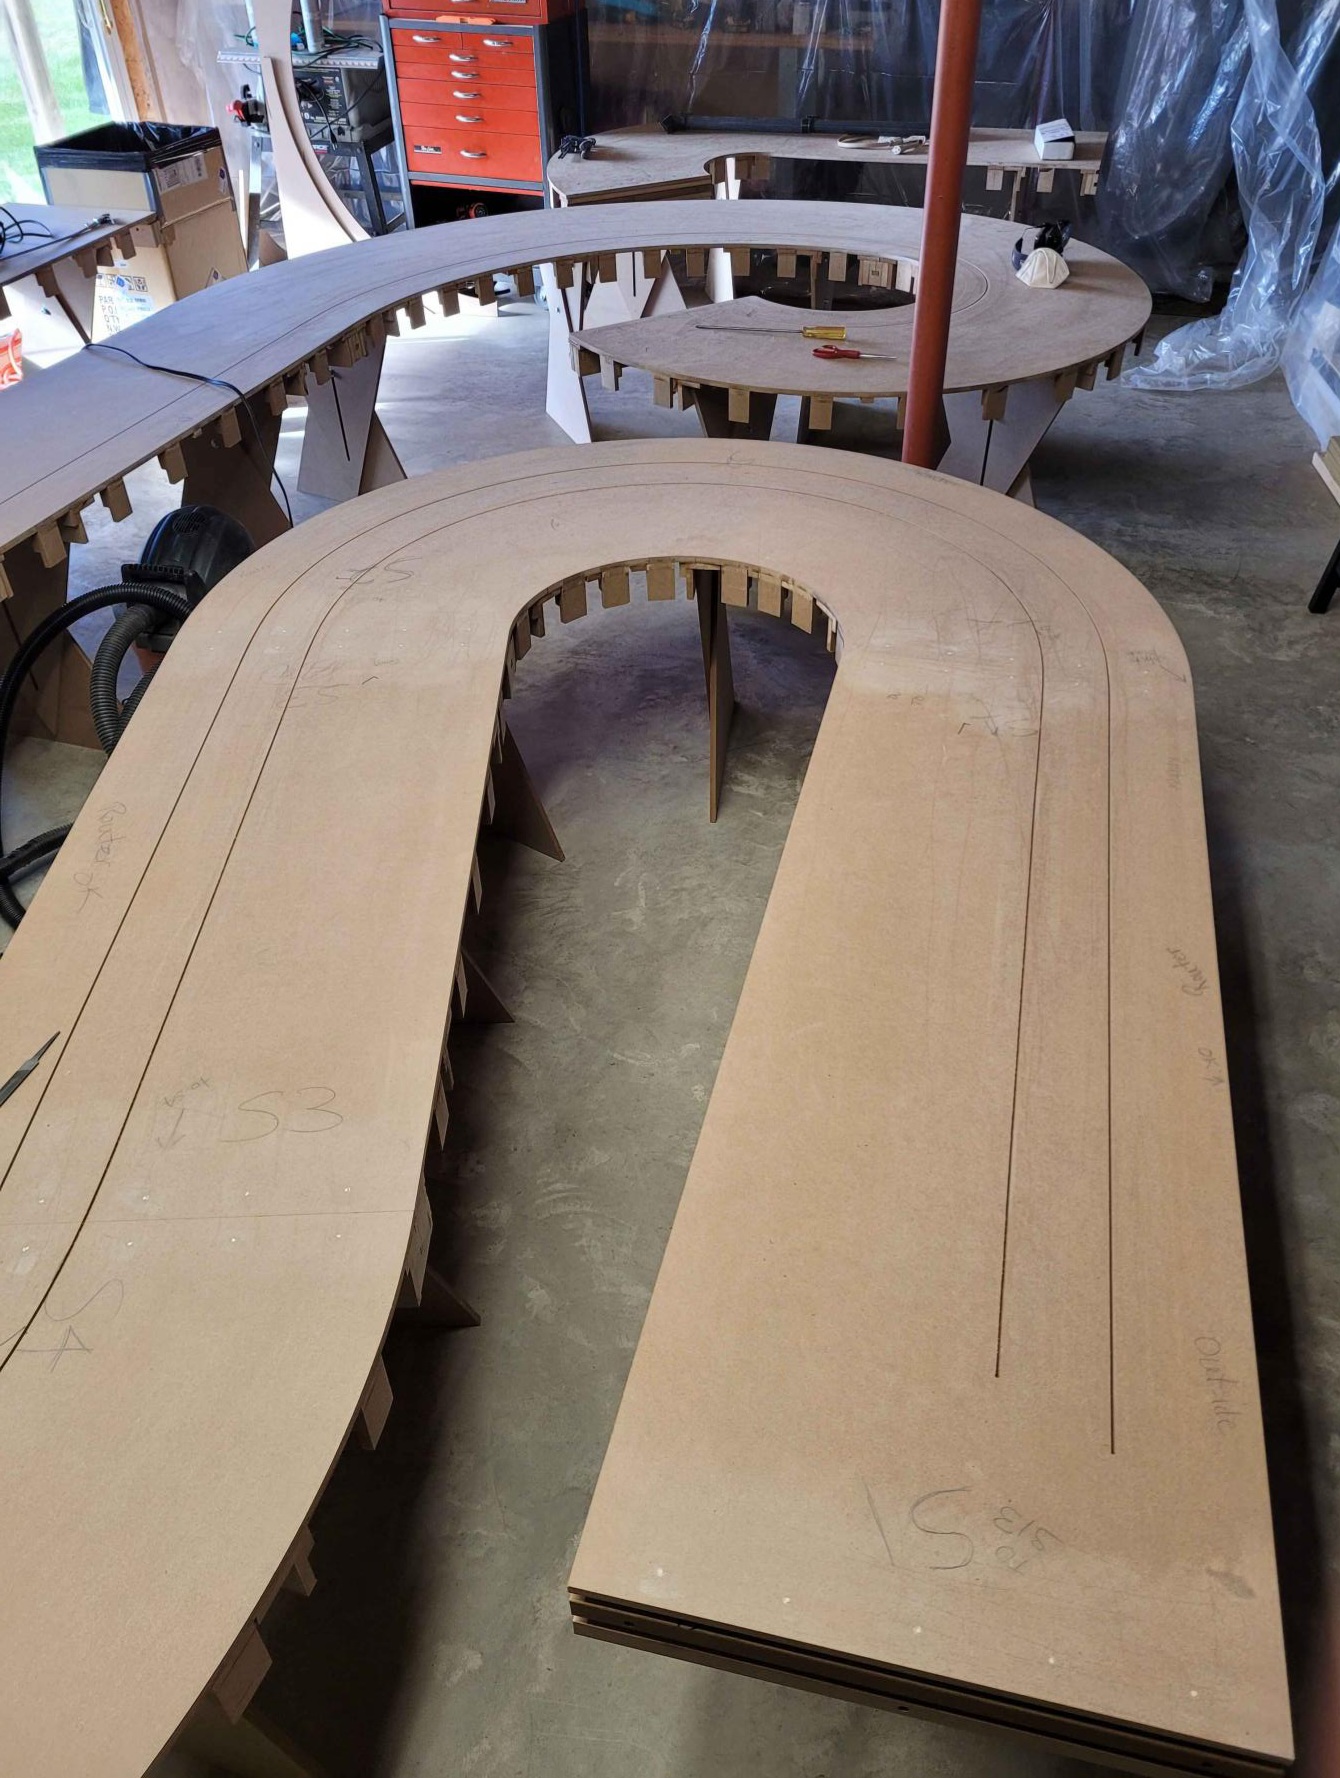
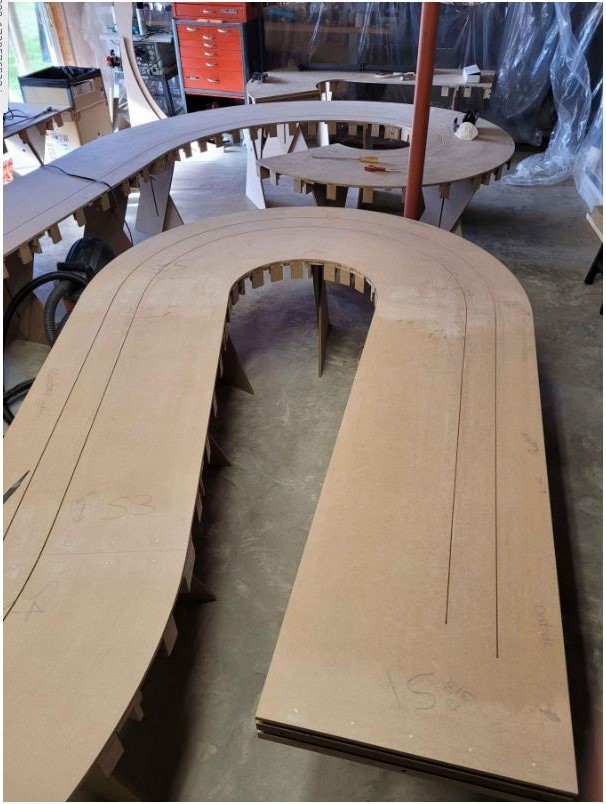
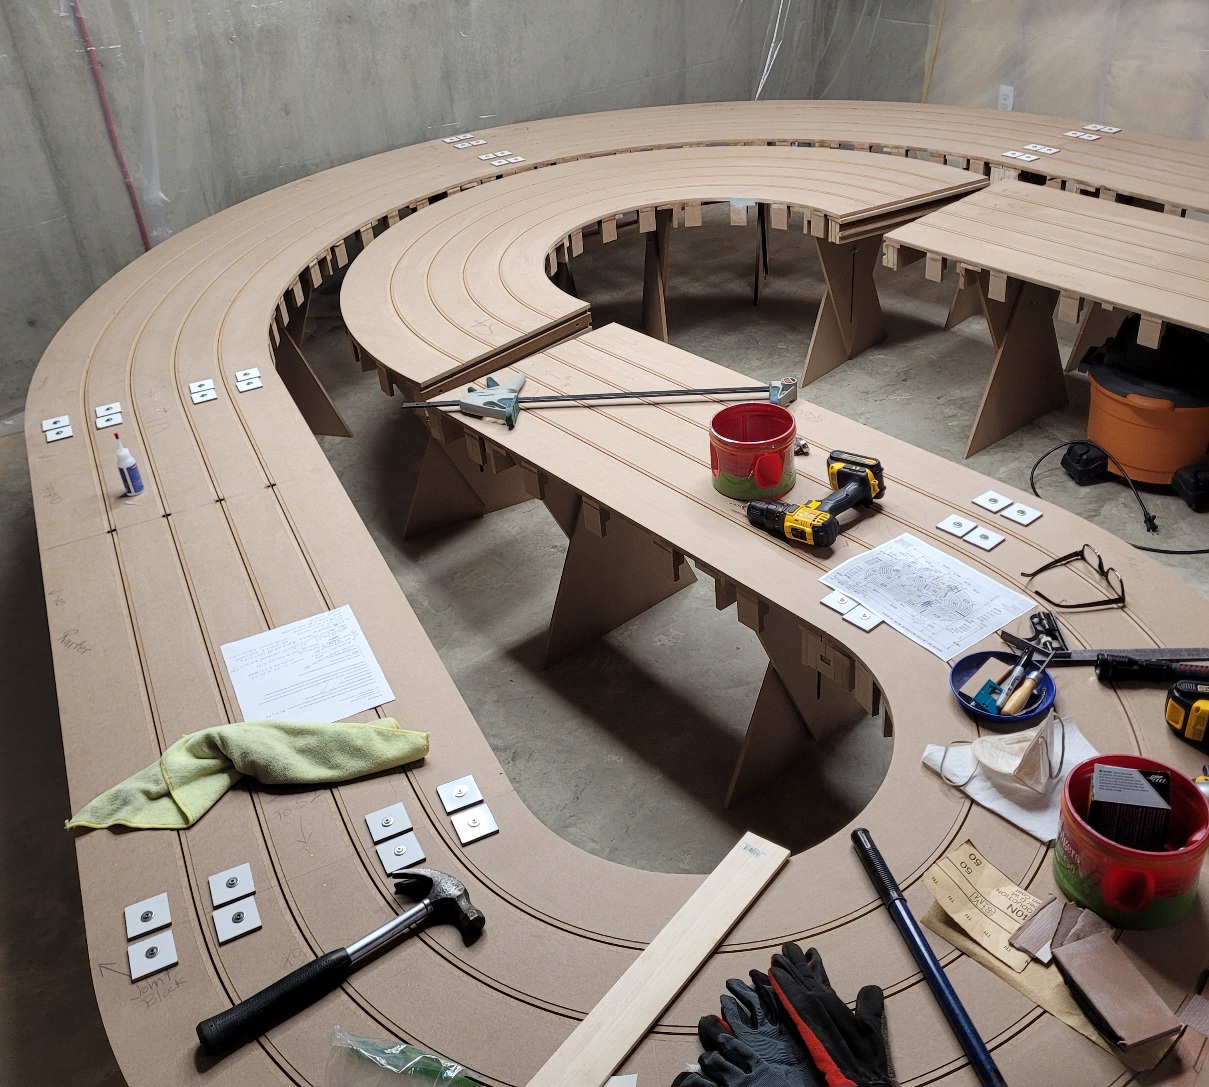
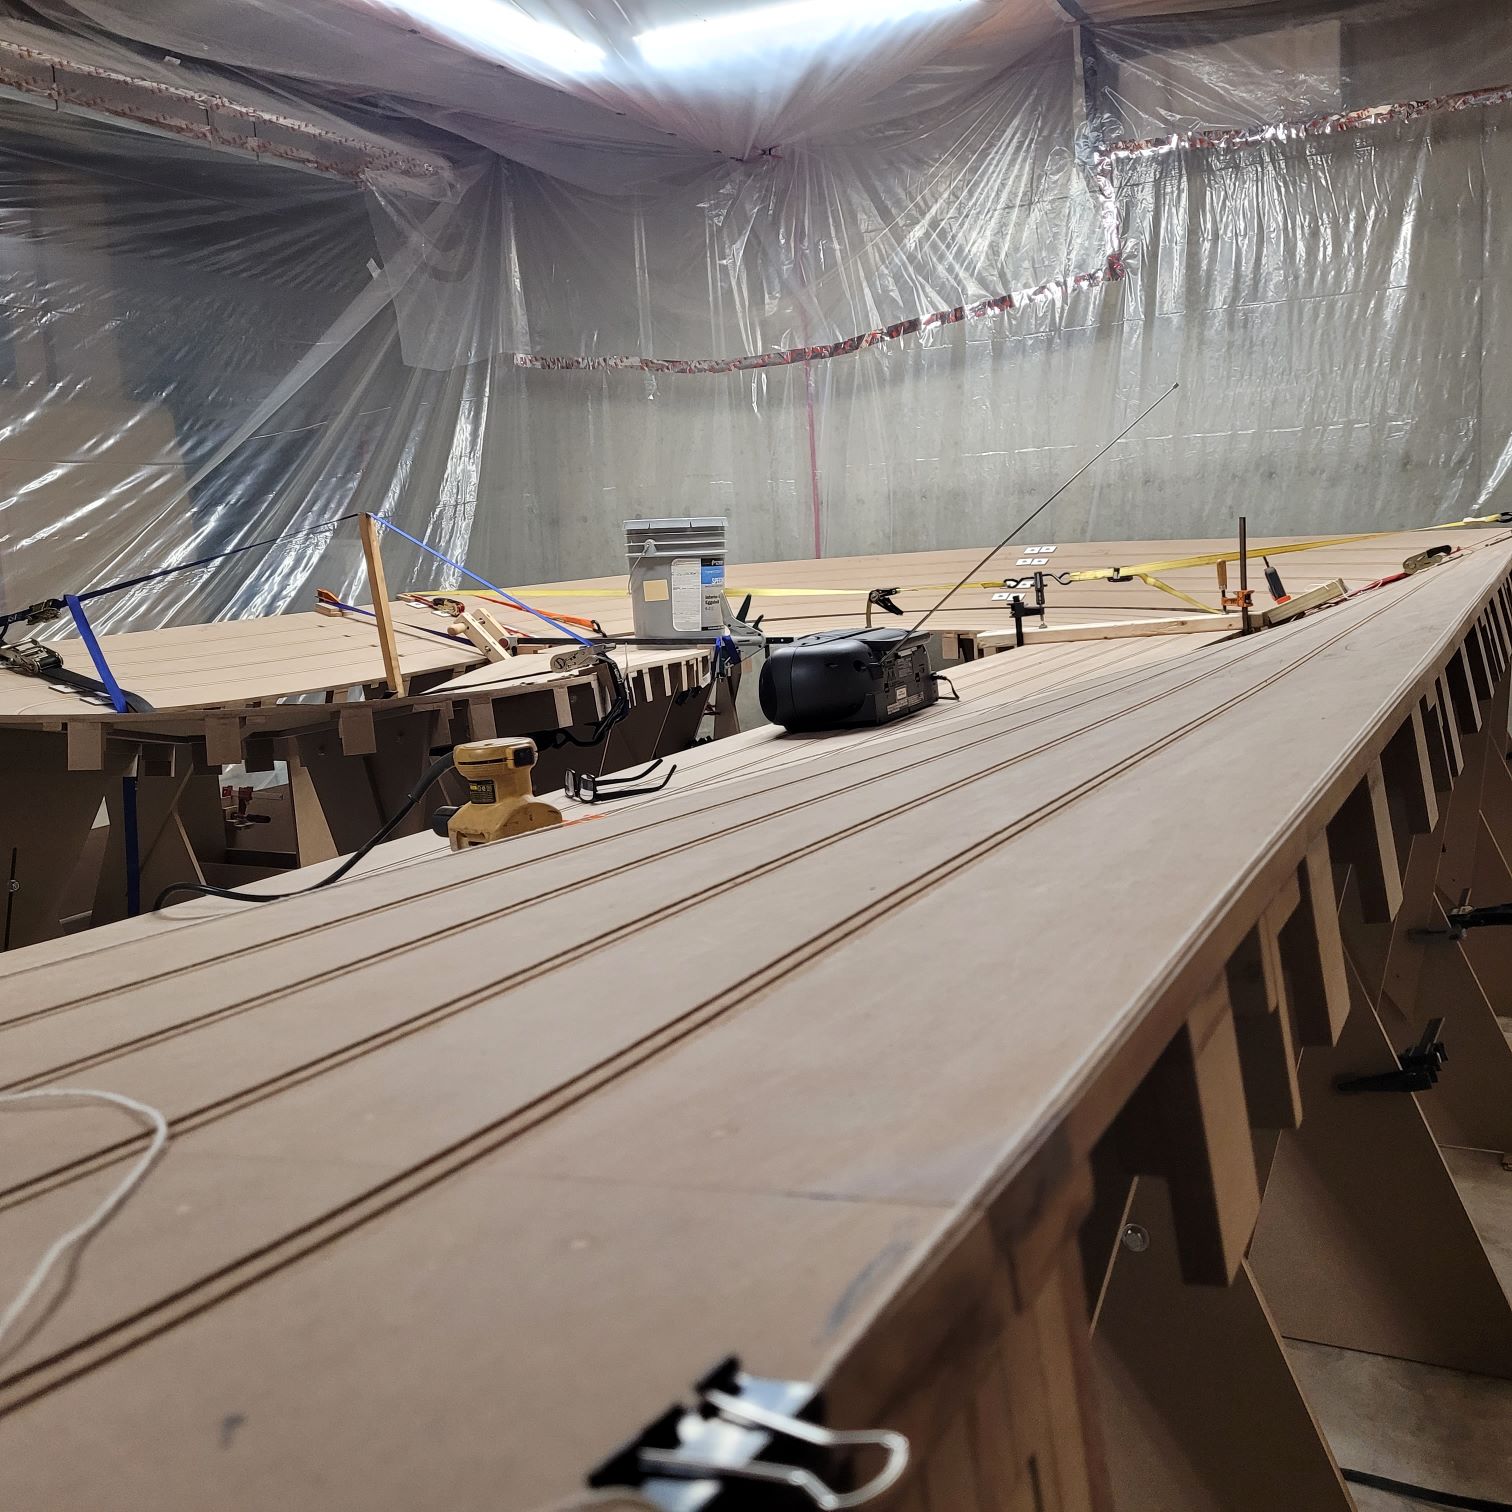
One last picture of the prep for the sidewalls. This side is the counterclockwise track travel entering under the bridge.
Attached Images
- breese likes this
Rob Armbruster
#171
Bigdogbro1
-
- Full Member
-
- 94 posts Joined: 23-April 24
Backmarker
- Gender:Male
- Location:near Hell, MI
Posted 11 December 2024 - 08:16 PM
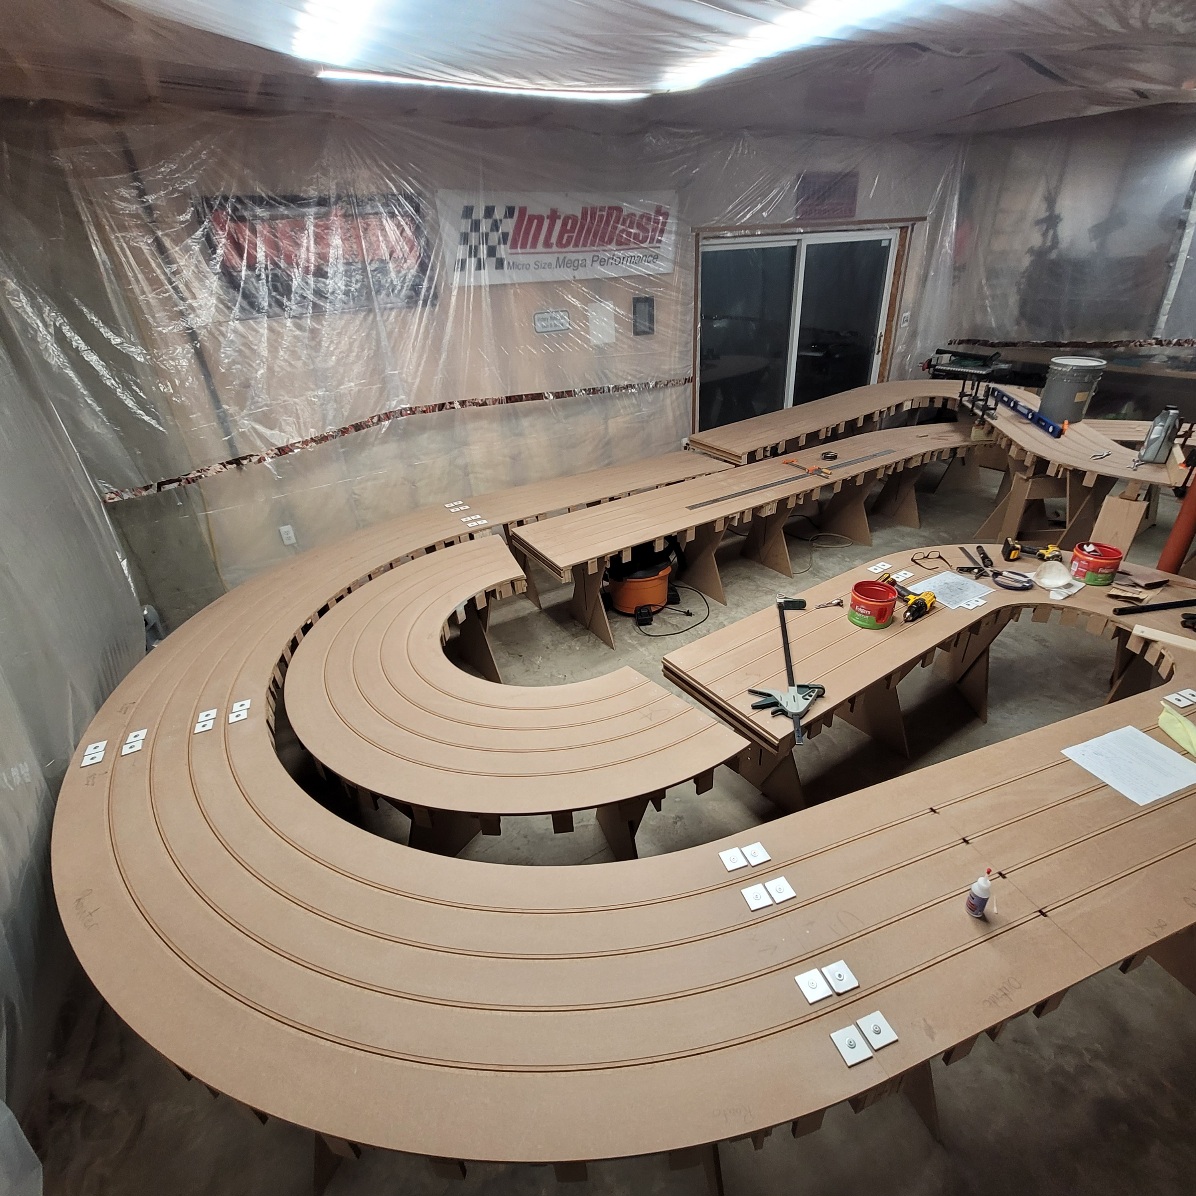
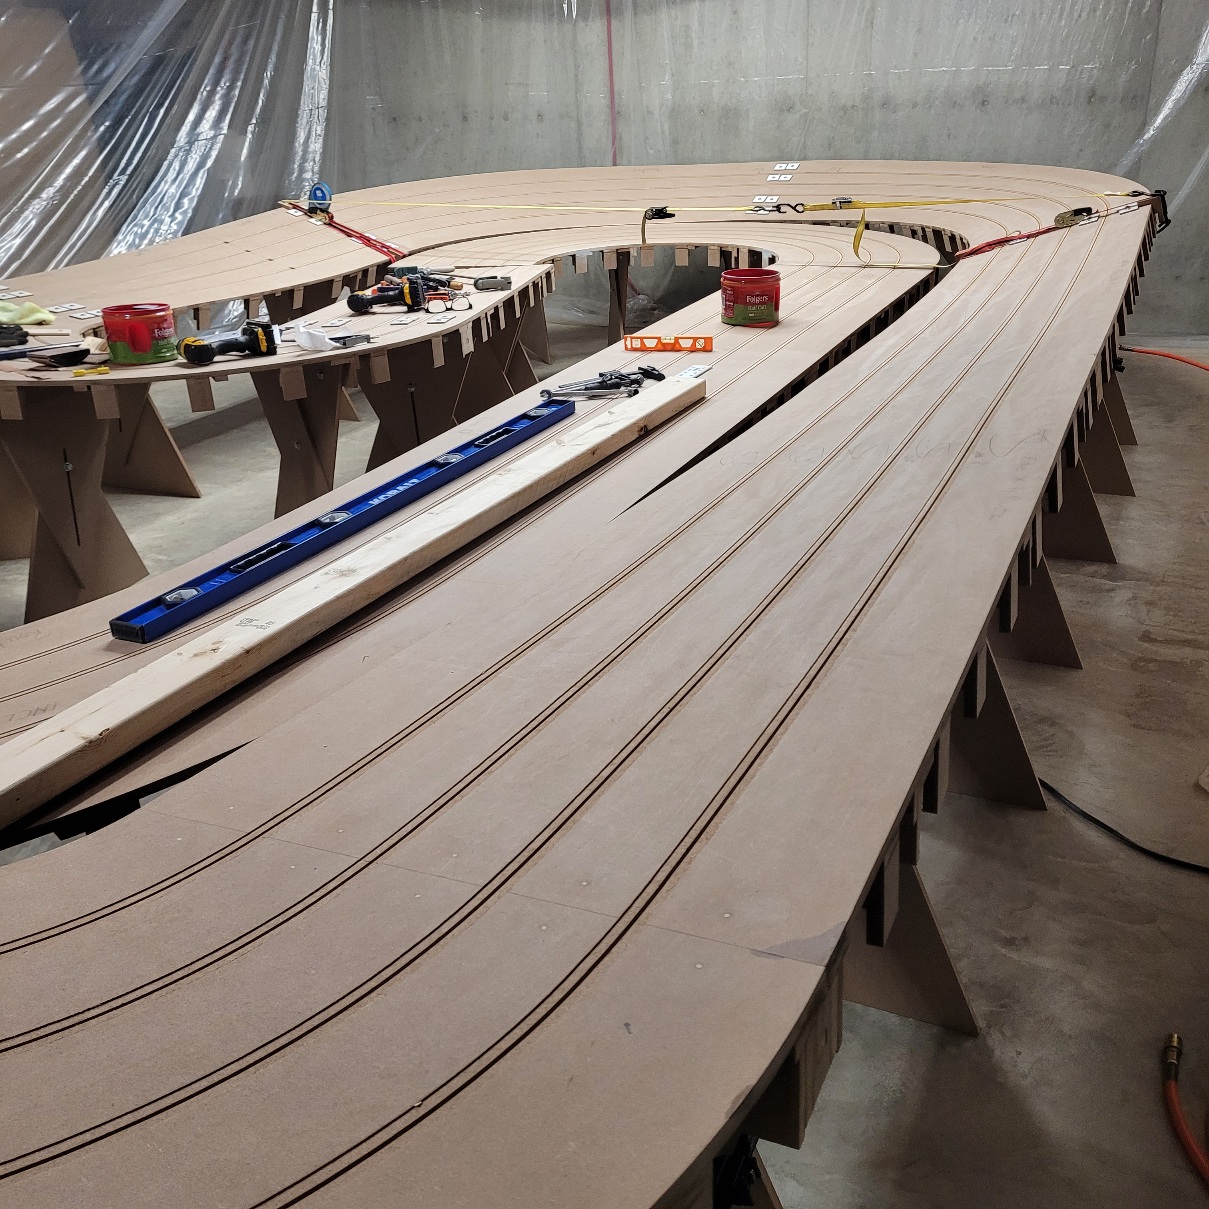
Track banking is progressing and got the last S3 to S4 flat turn bolted tgether today. I need to tweek and shove it a bit to get everything settled in. The last joint pulled in last 1/8" with bolts easily. I will need to put a bit more banking in the S7 and loop to massage the fit down to S4 turn. I will need to shuffle the entire track closer to the end cement wall an inch or two to get clearance at support pole on S2. Happy with results thus far.
Attached Images
- glueside, Eddie Fleming and Steve Ogilvie like this
Rob Armbruster
#172
Sloter
-

- Full Member
-
- 156 posts Joined: 27-May 21
Mid-Pack Racer
- Gender:Male
- Location:Venice, FL
Posted 12 December 2024 - 11:11 AM
Awesome build!
Bob
Bob Roberts
#173
Bigdogbro1
-
- Full Member
-
- 94 posts Joined: 23-April 24
Backmarker
- Gender:Male
- Location:near Hell, MI
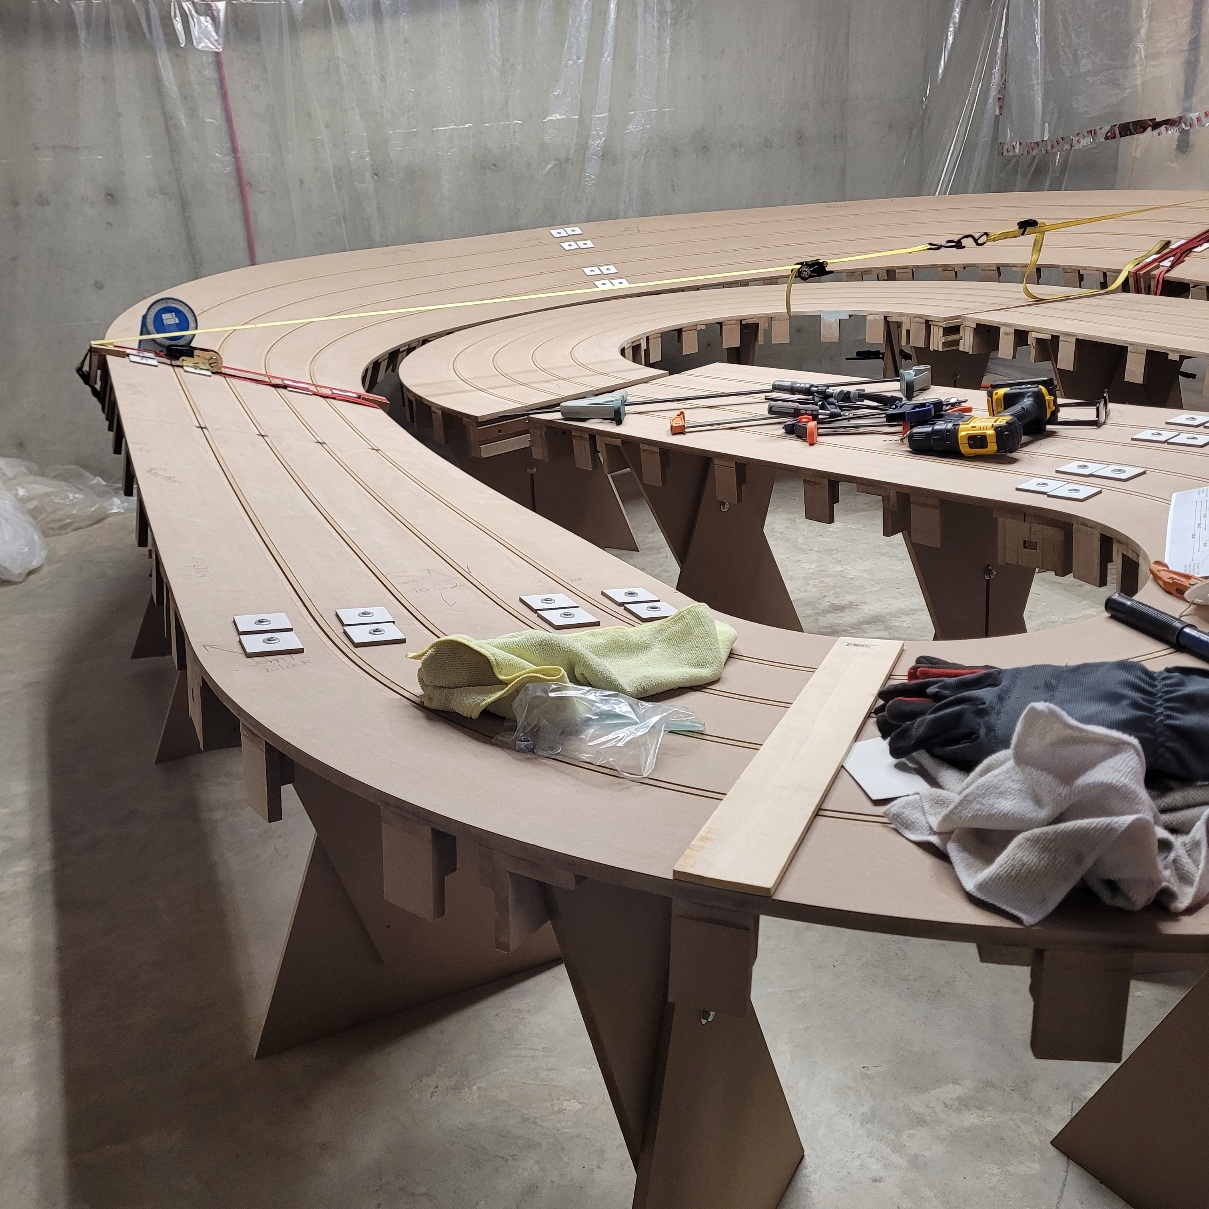
Posted 20 December 2024 - 02:41 PM
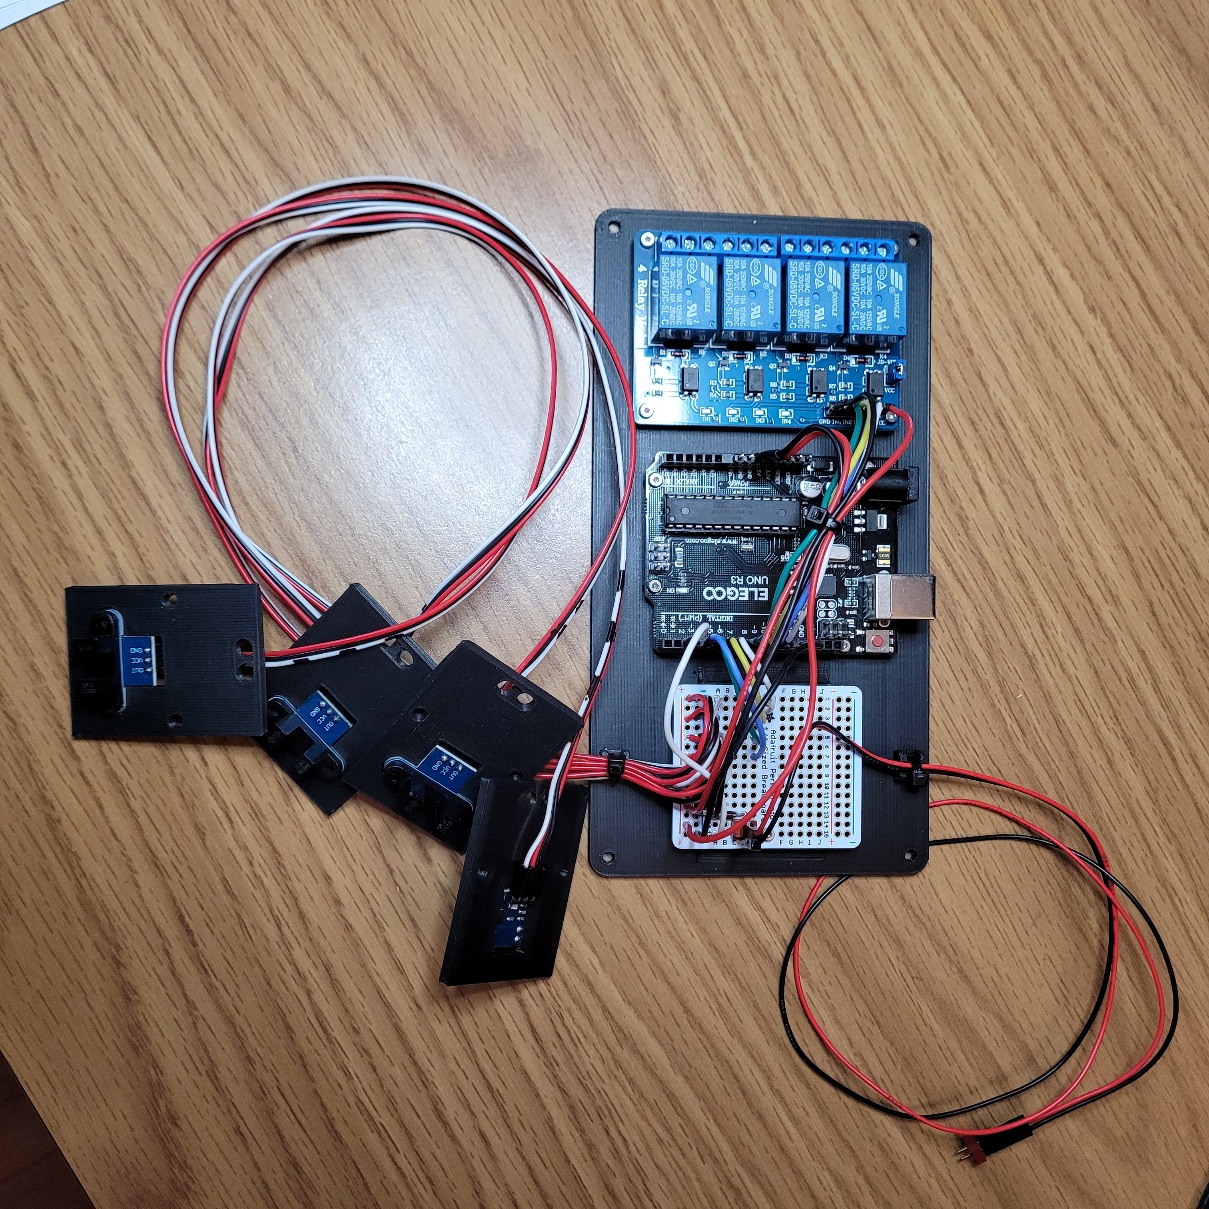
I have been leveling straight-aways and adjusting the track turn banking, prepping for the sidewall installation. I have been busy but not on the track itself untill I get my 4.5" trimsaw fixture finished to cut the sidewall top section to a 2" height. If I need additional sidewall height in any areas I plan on using clear Lexan polycarbonate 1/16" thick sheet to extend the sidewall height in those areas. Don't want to hide the cars on a track this large with high sidewalls. What I have been working on is the electronics for the Race Corrodinator software track timing system. Race Corrodinator is a free program that times laps, runs heats and races. It enables you to use an Arduino Uno controller and four relay board to run the track. Here is my setup for my four lane track. I have also been designing the wiring diagram for the track and the connections from the power supplies to the control panels to the relays then to the track distribution wiring.
The sensors are 3v to 5v optical interrupter style that feed into the Elegoo Uno board digital inputs. The Elegoo Uno drives the Elegoo four relay bd. to control the lane power. The sensor plates are custom designed 3D printed to do the job. The sensors are glued to the mount and placed underneath and screwed in place. The sensor fits into a routed out hole in the underside of the track and kisses the bottom of the braid. See the previous pictures for the track section sensor holes. The small Red/Black harness is for the track call button feeds from the four controller stations and one race official call button.
Youtube video link to Marty Fords channel:
Race Coordinator Arduino, Sensors and Relay board setup.
https://youtu.be/bW2...VUvHCGPpAOmRzI_
Once I get my trim saw jig finished I will return to the track build after Christmas.
Happy Holidays to you all!
Attached Images
- Bill from NH likes this
Rob Armbruster
#174
Bigdogbro1
-
- Full Member
-
- 94 posts Joined: 23-April 24
Backmarker
- Gender:Male
- Location:near Hell, MI
Posted 02 January 2025 - 01:50 PM
Happy New Year fellow slotters!
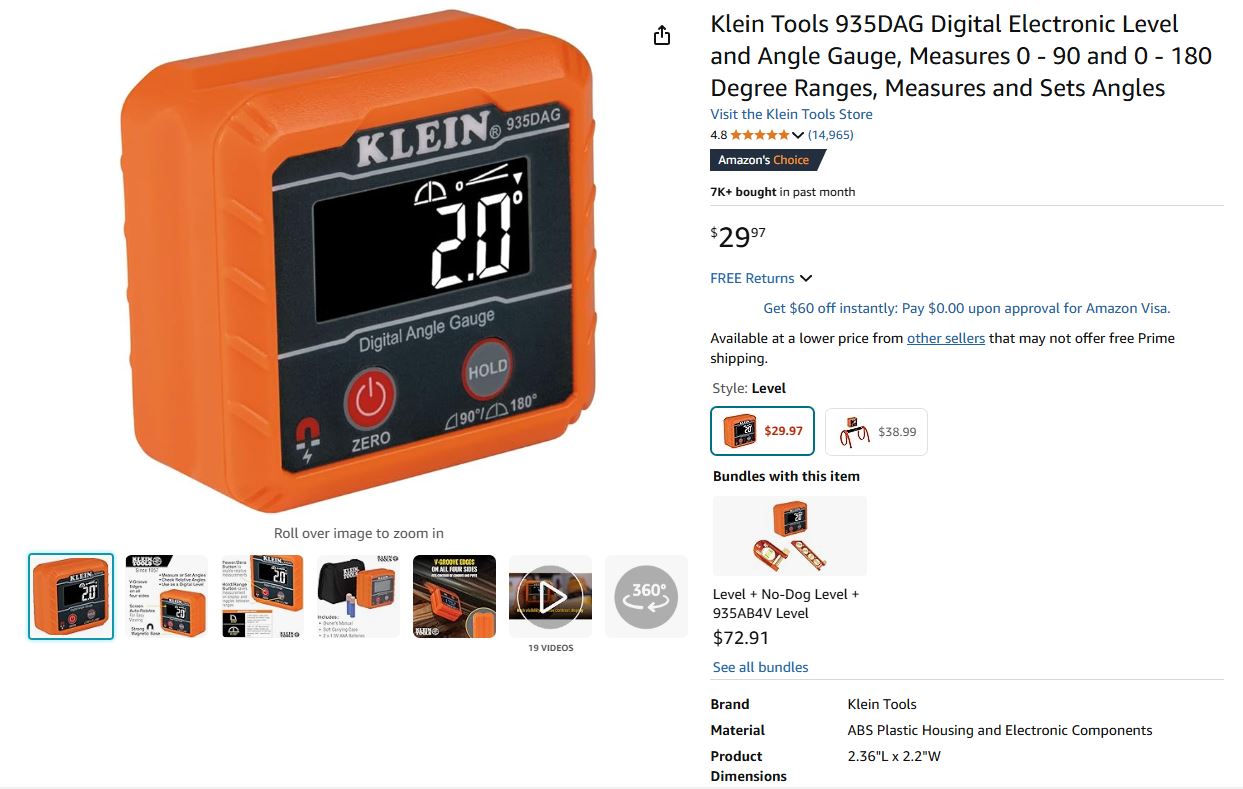
I have again started back on the track build after taking about a month off thru the holidays. Thanksgiving, Christmas and New Years was taking my time off the build. I have however been thinking about the areas that need my attention to continue. Leveling, banking and incline angles and a host of other thoughts to get ready for the application of the sidewalls. I have decided to us the two layers of the 1/4" thick Masonite hardboard to the larger inner and outer radii turns, 1/2" MDF for the straights and two layers of the Flexi plywood for the tighter inside and outer turns. To get things prepped I have been using my cell phone with and angle app to adjust the banking and inclines but it's been a problem to use so I ordered a digital angle meter to use instead...much better! More to follow......
Attached Images
Rob Armbruster
#175
Bigdogbro1
-
- Full Member
-
- 94 posts Joined: 23-April 24
Backmarker
- Gender:Male
- Location:near Hell, MI
Posted 02 January 2025 - 02:11 PM
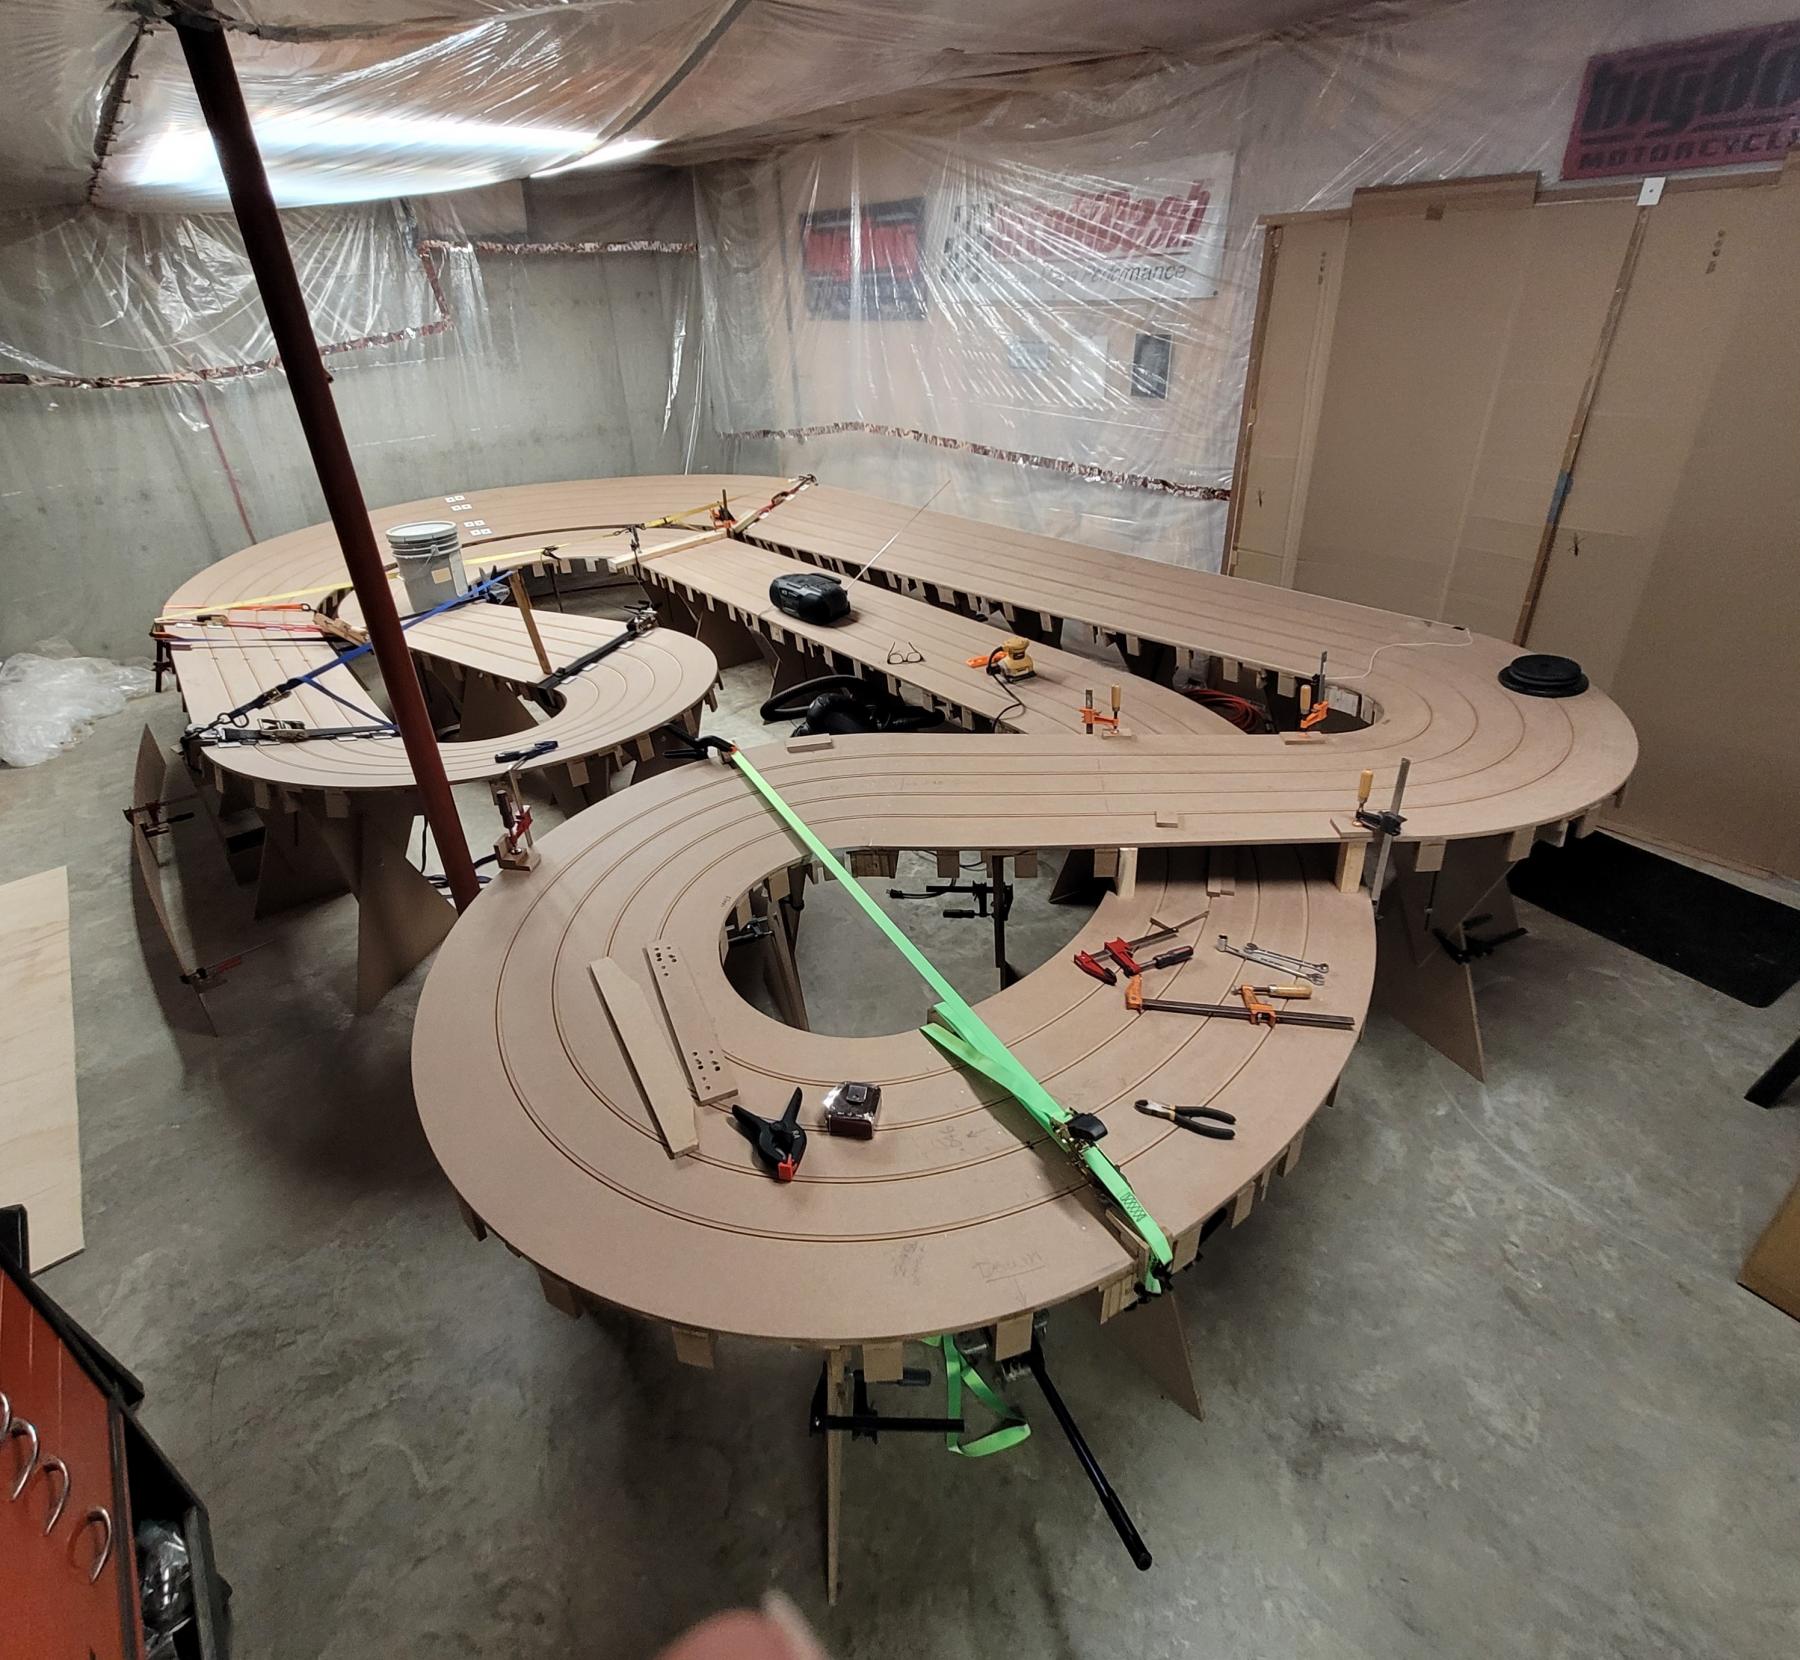
Here are a few recent pictures of the track.
Attached Images
- Brian Czeiner, Steve Ogilvie and Sloter like this
Rob Armbruster


