
Thanks Don H, thanks Bob.
Neils, or anybody else, let me know if you need the correct size rubber bands, I will soon have enough to supply everybody  Tan was the only color I could find them in

|

Builder

Posted 23 May 2015 - 12:09 PM
Thanks Don H, thanks Bob.
Neils, or anybody else, let me know if you need the correct size rubber bands, I will soon have enough to supply everybody Tan was the only color I could find them in
Paul Wolcott
Builder
Posted 23 May 2015 - 01:02 PM
You can't true tapered Cuc wheels perfectly without a Hudy attachment.
My great friend, Dennis Samson, custom made one for me. 

Paul Wolcott
Builder
Posted 25 May 2015 - 11:03 AM
Disassembly: everything looks, indeed, never ran. The Iso hinge pin had some oxidation but it cleaned up real nice.
Why the rear axle had mismatched spacers that allowed one of the bearings to stick out, I don't know.
That, and the flat spot on one side for a sidewinder, sure didn't help. Obviously the wrong axle.

Paul Wolcott
Builder
Posted 25 May 2015 - 11:44 AM
I found a way to magically change the older style chassis without body mounting tabs to a newer one that has them.
So I'd appreciate any tips and pics on how all you Cuc fanatics mounted clear bodies on them.
Enlarge the holes a tad and install shaker pin tubing ?
Paul Wolcott
Builder
Posted 30 May 2015 - 09:08 PM
Anybody ever colored rubber bands ?
Magic Marker ?
Rit dye ?
Paint ?
Paul Wolcott
Grand Champion Poster

Posted 31 May 2015 - 12:21 AM
No but ... What color do you want?

Builder
Posted 31 May 2015 - 05:22 AM
Orange or blue, but they have to be # 14's and tan was the only color I found after a lengthy internet search.
Let me experiment with them and see, Bob.
Paul Wolcott
Builder
Posted 03 June 2015 - 03:32 AM
Thanks Steve. Let me try my mad scientist art experiments first, if I fail, I'll check those out.
Looks like they only sell in bulk - maybe I could con them into sending me a few samples
Can hardly wait to start making this Cuc into a runner. The chassis magically grew body mount tabs during my work week 
I plan to lower the entire car and give it some power. The TrueScale body is probably going to need some air control.
Now, where did I put those doggone Lexan sheets ? 

Paul Wolcott
Posting Leader

Posted 03 June 2015 - 08:51 AM
A Cuk sold for $820 last weekend on ebay. So do it right!
Actually the Cox box was likely about $600 of the auction.
Posting Leader

Posted 03 June 2015 - 12:36 PM
Matt Bishop
Grand Champion Poster
Posted 03 June 2015 - 05:00 PM
I have asked myself in the past - "come on .. what is the 'korrect' color for that rubberband, man?"
IIRC they were Red #7 .. or was that the dye color in Funny-Face Chinese Cherry?
$820 is more than most would pay for a cuc.
Dan Gurney Fan

Posted 03 June 2015 - 06:17 PM
I remember seeing red to reddish/brown rubber bands on the orange Cuc, and blue on the Super Cuc.

Steve King
Builder
Posted 03 June 2015 - 08:14 PM
No matter what color my rubber band ends up being (I might Tie-Dye it, Bob  )
)
my Cuc will probably be worth about half what I paid for it once I get done tweaking on it 
Just don't plan on beating me at the track 
Paul Wolcott
Grand Champion Poster
Posted 03 June 2015 - 08:31 PM
Thirsty? 
The Florida Orange
"Cuc & Manta Ray" Proxy
All original parts - except any motor and tires. 
Builder
Posted 05 July 2015 - 05:20 PM
More practice with my new Iwata Neo. Works fine. Here is "mine" TrueScale Cuc racing/running body.
Funny how John's original Cuc body is blue and his race body is orange, whereas my original is orange and my racing/running body is blue. I didn't plan all this, it just happened Jay Guard, better look out, the cockroaches from Gulf Coast are coming soon.........
Yes, Bunky, all decals are on the inside

Paul Wolcott
Dan Gurney Fan
Posted 05 July 2015 - 06:32 PM
Nice looking Cuc.
Steve King
Builder
Posted 05 July 2015 - 06:44 PM
Thanks, Steve
Paul Wolcott
Posting Leader

Posted 05 July 2015 - 10:08 PM
Superb job on the Cuc painting Sir 
Builder
Posted 07 July 2015 - 09:21 PM
Thanks, guys
Everything pertinent regarding paint issues that you posted here, have been migrated to my new thread here:
http://slotblog.net/...ng-of-the-past/
We got to talking about paint problems so much I thought it wise if a new thread was started....my choice
Paul Wolcott
Builder
Posted 17 July 2015 - 07:50 AM
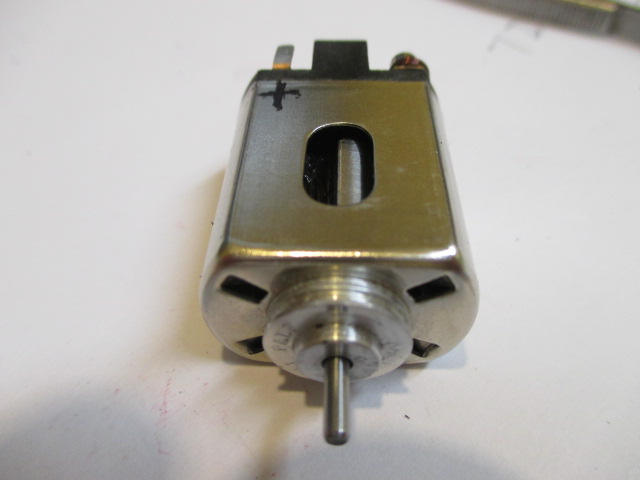
Powerplant: my plan is to make this a race Cuc not a shelf queen  .
.
I opened up the Cox motor. Mint condition, never been run. Checked the shaft for straightness and verified a good assembly.
Buttoned it back up and left it bone stock.
Since I had to remove the factory "bug-a-boos" on the shaft to get the arm out, the pinion was soldered back on.
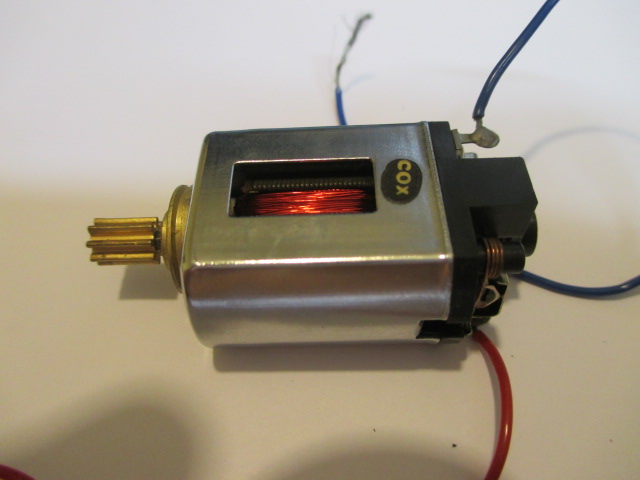
Now the fun begins Opened up my Vintage Motor Box(es) of Horrors and found an ugly reverse timed arm refurbed by Hershman.
I had it marked "Good" - hopefully, it's not "Too Good" or it might bend the chassis

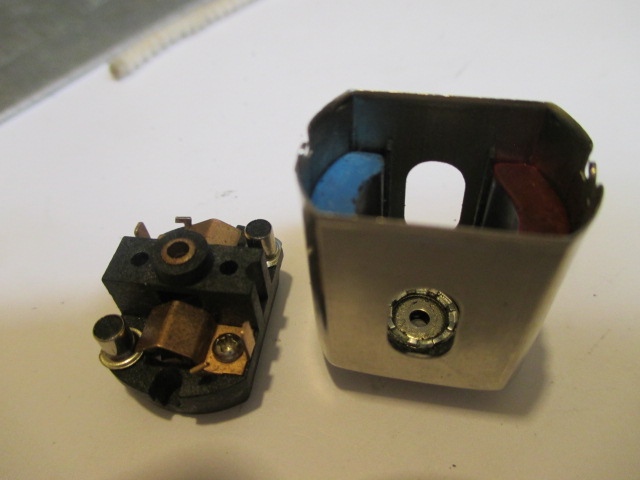
Found a new Tradeship endbell and an old Champion Mabuchi can with BB and good magnets with a hole of about .560. Should work well with the .513 arm.
I adjusted the nubs, set the mags, and Krazy Glued 'em.
Paul Wolcott
Builder
Posted 17 July 2015 - 10:30 AM
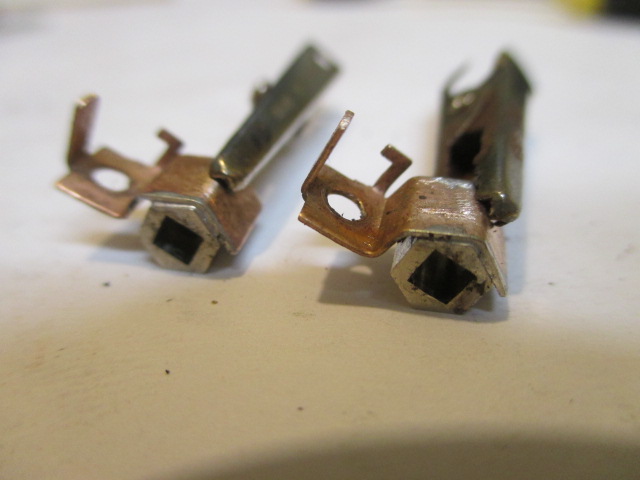
Plugged in the Hakko N454, and tried a better method of soldering hoods to holders.
I probably should have done it this way all along. Craig Landry (R.I.P.) said:
"Hindsight is 20/20; that's why they don't make glasses to fit your butt" 
Align with poor man's brush holder alignment tool: .093" square tubing:

Tack:
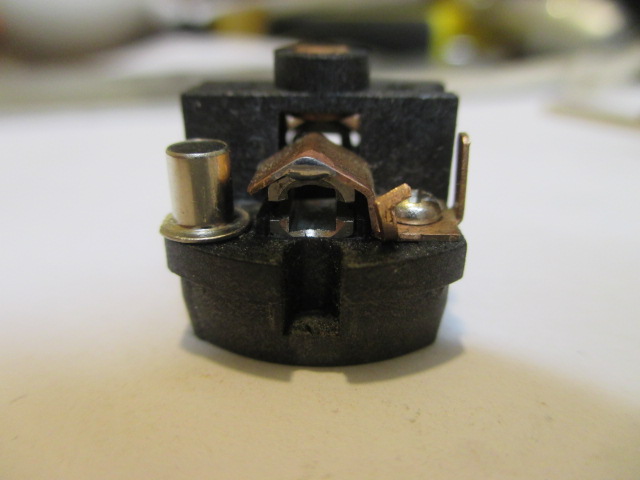
Remove holder/hood assemblies, secure with small alligator clips so they won't move, and solder opposite ends.
Then switch clips to opposite ends, finalize the initial tack, etc.
Guys like Capt. Rick do this in their sleep, but guys like me have to work at it, to get it right first time

Paul Wolcott
Builder
Posted 17 July 2015 - 09:14 PM
I'm well aware of the danger in putting a 45 year old hot arm of questionable origin into a vintage setup.
But only a madman like me with nothing to lose would gamble on this combination:
-ugly arm with big wire and bubbles in the epoxy
-old magnets in a 45 year old can
-huge airgap (works well on modern 16D setups)
-teeny vintage 16D brushes (gifted by Brian McPherson years ago - Thanks Brian )
-no pre-radius of brushes, and only back yard methods of magnet and EB hardware alignment
The good news is, can and mags were recently zapped and arm refurbished by Hershman.
It was a tap dance making the steel pinion extend far enough to reach the teeth of a Parma 29T crown 
The arm spacing (magnet placement) was more critical than usual.
Buttoned it up, fed it 2 V and it didn't start - I had to hand-spin it. She immediately sucked 2, then 3, then 3.5 A. Temp was hot. Stop. Not good 
I thought, brushes too small for the big .200 comm. Bad arm. Airgap too big. Mags too weak for this arm. Short circuit. Bad arm. Bad brushes. Spring tension too light.
First thing to suspect in a new motor that runs bad is: brushes.
Removed brushes to check break in progress and wear patterns.
Negative brush: wear looks good, needs a little more break in.
Positive brush: trailing edge not mating with the comm.

Tweaked the positive spring, then 3 V again. Started up nice, but still draws high Amps. 3, 2.8, 2.5, indicative of a new break in, since I had changed an alignment. Amps steadily decreased to about 1.8. She wasn't as hot as the first run. Hmmm, maybe this is a simple brush break in issue, and there is hope after all ?
Cool off, re-oil, 3 V again. Started right up, draws 1.8 A. After a couple minutes, down to 1.4 A.
Sounds and feels great, nice cool temp. It's a missile
Powerplant complete.

Probably going to be way more power than I need for a 45 year old slot car
Paul Wolcott
Age scrubs away speed!

Posted 17 July 2015 - 09:39 PM
Photo looks like a Mura wound 25S arm. Is it? Amperage draw sounds okay. If you get cold down there, I had a new Koford B12 arm that's a real heater. On a PS it will draw more amps than volts.
Posting Leader
Posted 17 July 2015 - 09:44 PM
 Got a good supply of old parts just like these and I'm not afraid to use them


