Jump to content


Photo

Mike Morrissey GP replica


  • Please log in to reply
101 replies to this topic

#76 SlotStox#53

SlotStox#53

    Posting Leader

  • Full Member
  • PipPipPipPipPipPipPip
  • 4,084 posts
  • Joined: 13-March 13
  • Gender:Male
  • Location:TX

Posted 25 October 2015 - 11:16 AM

Thank you. :) :good: Sweet car.


#77 Pablo

Pablo

    Builder

  • Administrator
  • PipPipPipPipPipPipPipPip
  • 18,461 posts
  • Joined: 20-February 06
  • Gender:Male
  • Location:Cleveland, Tennessee

Posted 25 October 2015 - 01:44 PM

Endbelldrive may get a kick out of this:
 
IMG_7489.JPG
 
IMG_7505.JPG
 
:laugh2:
  • endbelldrive likes this

Paul Wolcott


#78 Pablo

Pablo

    Builder

  • Administrator
  • PipPipPipPipPipPipPipPip
  • 18,461 posts
  • Joined: 20-February 06
  • Gender:Male
  • Location:Cleveland, Tennessee

Posted 25 October 2015 - 06:00 PM

Top: drop arm upstop tubing.
Middle: drop arm hinge assembly with offset solder notch; tolerances +/- 2 thou, rotating surfaces polished with 2000 grit.
Bottom: body mount; pin holes are countersunk a la Mike Steube.
 
p1.jpg
 
p2.jpg
 
I don't know if any of this makes the car go faster, but it makes me happy :D
  • Cheater and Jencar17 like this

Paul Wolcott


#79 Asp

Asp

    Backmarker

  • Full Member
  • PipPip
  • 72 posts
  • Joined: 25-July 11
  • Gender:Male
  • Location:Italy

Posted 25 October 2015 - 06:49 PM

Me, too!
Luciano Luppi

#80 Pablo

Pablo

    Builder

  • Administrator
  • PipPipPipPipPipPipPipPip
  • 18,461 posts
  • Joined: 20-February 06
  • Gender:Male
  • Location:Cleveland, Tennessee

Posted 25 October 2015 - 07:57 PM

No major problems so far, but there is still more work to do.
 
p3.jpg
 
She's looking pretty rough, so might as well give her a (preliminary) tumble overnight. Just to see her in the light of day as a preview. :)
  • Jencar17 likes this

Paul Wolcott


#81 Pablo

Pablo

    Builder

  • Administrator
  • PipPipPipPipPipPipPipPip
  • 18,461 posts
  • Joined: 20-February 06
  • Gender:Male
  • Location:Cleveland, Tennessee

Posted 26 October 2015 - 08:41 AM

Out of the preliminary tumble.

p4.jpg
  • Jencar17 likes this

Paul Wolcott


#82 dc-65x

dc-65x

    Grand Champion Poster

  • Subscriber
  • PipPipPipPipPipPipPipPip
  • 6,995 posts
  • Joined: 14-February 06
  • Gender:Male
  • Location:Captain Rick: The only vintage slot car nut in SW Oregon?

Posted 26 October 2015 - 11:13 AM

She's a beauty, Pablo. That Mississippi water sure shines a chassis up nice. :good:

Rick Thigpen
Check out Steve Okeefe's great web site at its new home here at Slotblog:
The Independent Scratchbuilder
There's much more to come...


#83 Bill from NH

Bill from NH

    Age scrubs away speed!

  • Full Member
  • PipPipPipPipPipPipPipPip
  • 14,807 posts
  • Joined: 02-August 07
  • Gender:Male
  • Location:New Boston, NH

Posted 26 October 2015 - 01:47 PM

Looks just like a "Team Russkit" chassis, Pablo. Nice job!

What's your theory about the offset solder notch in the drop arm hinge assembly, now that you pointed it out? :)
Bill Fernald
 
I intend to live forever!  So far, so good.  :laugh2:  :laugh2: 

#84 Pablo

Pablo

    Builder

  • Administrator
  • PipPipPipPipPipPipPipPip
  • 18,461 posts
  • Joined: 20-February 06
  • Gender:Male
  • Location:Cleveland, Tennessee

Posted 26 October 2015 - 01:50 PM

Thanks, guys. 

Bill, the hinge opening is obviously offset to starboard in the magazine photos. I'm guessing Mike probably didn't want to apply heat directly over where the center rails converge amidships. By offsetting it a little, it's between the rail connections.
 
Flag tube and first set of drop arm rails tacked on, then off the Rick's Jig, for several reasons:

- inner rail set needs to lay right where the jig's center channel is.
- mock up to check flag tube height as relates to flag and braid thickness, front wheels, clearance, etc.
- determine exact placement of flag stops.
- Classic weight is going to need some serious heat and I want the drop arm away from the rails when I go wild with the torch. :D
 
p5.jpg
  • Jencar17 likes this

Paul Wolcott


#85 tonyp

tonyp

    Grand Champion Poster

  • Member at Peace
  • PipPipPipPipPipPipPipPip
  • 15,325 posts
  • Joined: 12-February 07
  • Gender:Male
  • Location:Sanford, FL, land of lizards and big roaches

Posted 26 October 2015 - 04:50 PM

Looking good. I'm watching you! LOL.

Anthony 'Tonyp' Przybylowicz

5/28/50-12/20/21
Requiescat in Pace


#86 Pablo

Pablo

    Builder

  • Administrator
  • PipPipPipPipPipPipPipPip
  • 18,461 posts
  • Joined: 20-February 06
  • Gender:Male
  • Location:Cleveland, Tennessee

Posted 26 October 2015 - 07:23 PM

Set screw on the drop arm weight discarded and a piece of .078" rod soldered in place. Just for fun.
 
Before:
 
IMG_7568.JPG
 
After:
 
IMG_7611.JPG
 
:laugh2:

Paul Wolcott


#87 Pablo

Pablo

    Builder

  • Administrator
  • PipPipPipPipPipPipPipPip
  • 18,461 posts
  • Joined: 20-February 06
  • Gender:Male
  • Location:Cleveland, Tennessee

Posted 27 October 2015 - 11:04 AM

Just for the record, 80 thou of spacers under the flag tube.
 
p6.jpg
 
Now I know why Morrissey didn't solder the drop arm hinge until last. :)
The flag sanding block is a sweet tool for small pieces like this - it's true and flat.
 
p7.jpg
 
Final tumbling
 
p8.jpg
 
p9.jpg
 
p10.jpg
 
p11.jpg
 
p12.jpg
 
p13.jpg
 
p14.jpg
 
p15.jpg
  • endbelldrive, Jencar17, miko and 1 other like this

Paul Wolcott


#88 Half Fast

Half Fast

    Keeper Of Odd Knowledge

  • Subscriber
  • PipPipPipPipPipPipPip
  • 2,628 posts
  • Joined: 02-May 07
  • Gender:Male
  • Location:NYC, Long Island

Posted 27 October 2015 - 11:08 AM

Georgeous, Pablo!
 
My compliments, it's 1967 all over again. :)
 
Cheers,

Bill Botjer

Faster then, wiser now.

The most dangerous form of ignorance is not knowing that you don't know anything!

Never attribute to malice that which is adequately explained by stupidity


#89 tonyp

tonyp

    Grand Champion Poster

  • Member at Peace
  • PipPipPipPipPipPipPipPip
  • 15,325 posts
  • Joined: 12-February 07
  • Gender:Male
  • Location:Sanford, FL, land of lizards and big roaches

Posted 27 October 2015 - 11:17 AM

Remember back then cars were teched on regular test block with no cut-out for guide. You had to clear .063" with braid in guide and front wheels touching. I wonder how much better the cars would have run with the guide spaced correctly for the track.

Anthony 'Tonyp' Przybylowicz

5/28/50-12/20/21
Requiescat in Pace


#90 Pablo

Pablo

    Builder

  • Administrator
  • PipPipPipPipPipPipPipPip
  • 18,461 posts
  • Joined: 20-February 06
  • Gender:Male
  • Location:Cleveland, Tennessee

Posted 27 October 2015 - 11:41 AM

Got it covered, Tony. I wanted at least one 10 thou spacer under the flag, and the braid mikes about .017".

Already mocked it up to check in post 84. :)

Paul Wolcott


#91 SlotStox#53

SlotStox#53

    Posting Leader

  • Full Member
  • PipPipPipPipPipPipPip
  • 4,084 posts
  • Joined: 13-March 13
  • Gender:Male
  • Location:TX

Posted 27 October 2015 - 12:13 PM

You're getting better at this chassis building game, Pablo. :laugh2: It came out looking sweet. :D :good:

Like the contrast between the brass rails and the steel bracket strengthening.

#92 dc-65x

dc-65x

    Grand Champion Poster

  • Subscriber
  • PipPipPipPipPipPipPipPip
  • 6,995 posts
  • Joined: 14-February 06
  • Gender:Male
  • Location:Captain Rick: The only vintage slot car nut in SW Oregon?

Posted 27 October 2015 - 05:33 PM

Well, Pablo, I don't think a chassis can get much better than that! :sun_bespectacled:

Rick Thigpen
Check out Steve Okeefe's great web site at its new home here at Slotblog:
The Independent Scratchbuilder
There's much more to come...


#93 Pablo

Pablo

    Builder

  • Administrator
  • PipPipPipPipPipPipPipPip
  • 18,461 posts
  • Joined: 20-February 06
  • Gender:Male
  • Location:Cleveland, Tennessee

Posted 27 October 2015 - 05:47 PM

Thanks, guys.  :dance3: Like anything handmade, it has a teeny cosmetic flaw, or two. But engineering-wise, it's right on the money.


The Rick's Jig got scrubbed with Dial liquid and baking soda.


Now, where did I put those doggone wheel inserts? :crazy:


Paul Wolcott


#94 Pablo

Pablo

    Builder

  • Administrator
  • PipPipPipPipPipPipPipPip
  • 18,461 posts
  • Joined: 20-February 06
  • Gender:Male
  • Location:Cleveland, Tennessee

Posted 27 October 2015 - 08:42 PM

Wheel insert party...
 
p16.jpg

Paul Wolcott


#95 Pablo

Pablo

    Builder

  • Administrator
  • PipPipPipPipPipPipPipPip
  • 18,461 posts
  • Joined: 20-February 06
  • Gender:Male
  • Location:Cleveland, Tennessee

Posted 28 October 2015 - 09:21 AM

Final check, flag tube perfect height as planned. On the block, the flag and braid with one 10 thou spacer elevate the .880" fronts about 10 thou. For a track with deeper braid recess, the second spacer can be added.
 
IMG_7720.JPG
 
Perfect clearance in back with .880" rears, and the bottom of the 32t Weldun clears well over 1/32".
 
IMG_7727.JPG
 
IMG_7718.JPG
  • Jencar17 and James Fetherolf like this

Paul Wolcott


#96 Pablo

Pablo

    Builder

  • Administrator
  • PipPipPipPipPipPipPipPip
  • 18,461 posts
  • Joined: 20-February 06
  • Gender:Male
  • Location:Cleveland, Tennessee

Posted 28 October 2015 - 07:46 PM

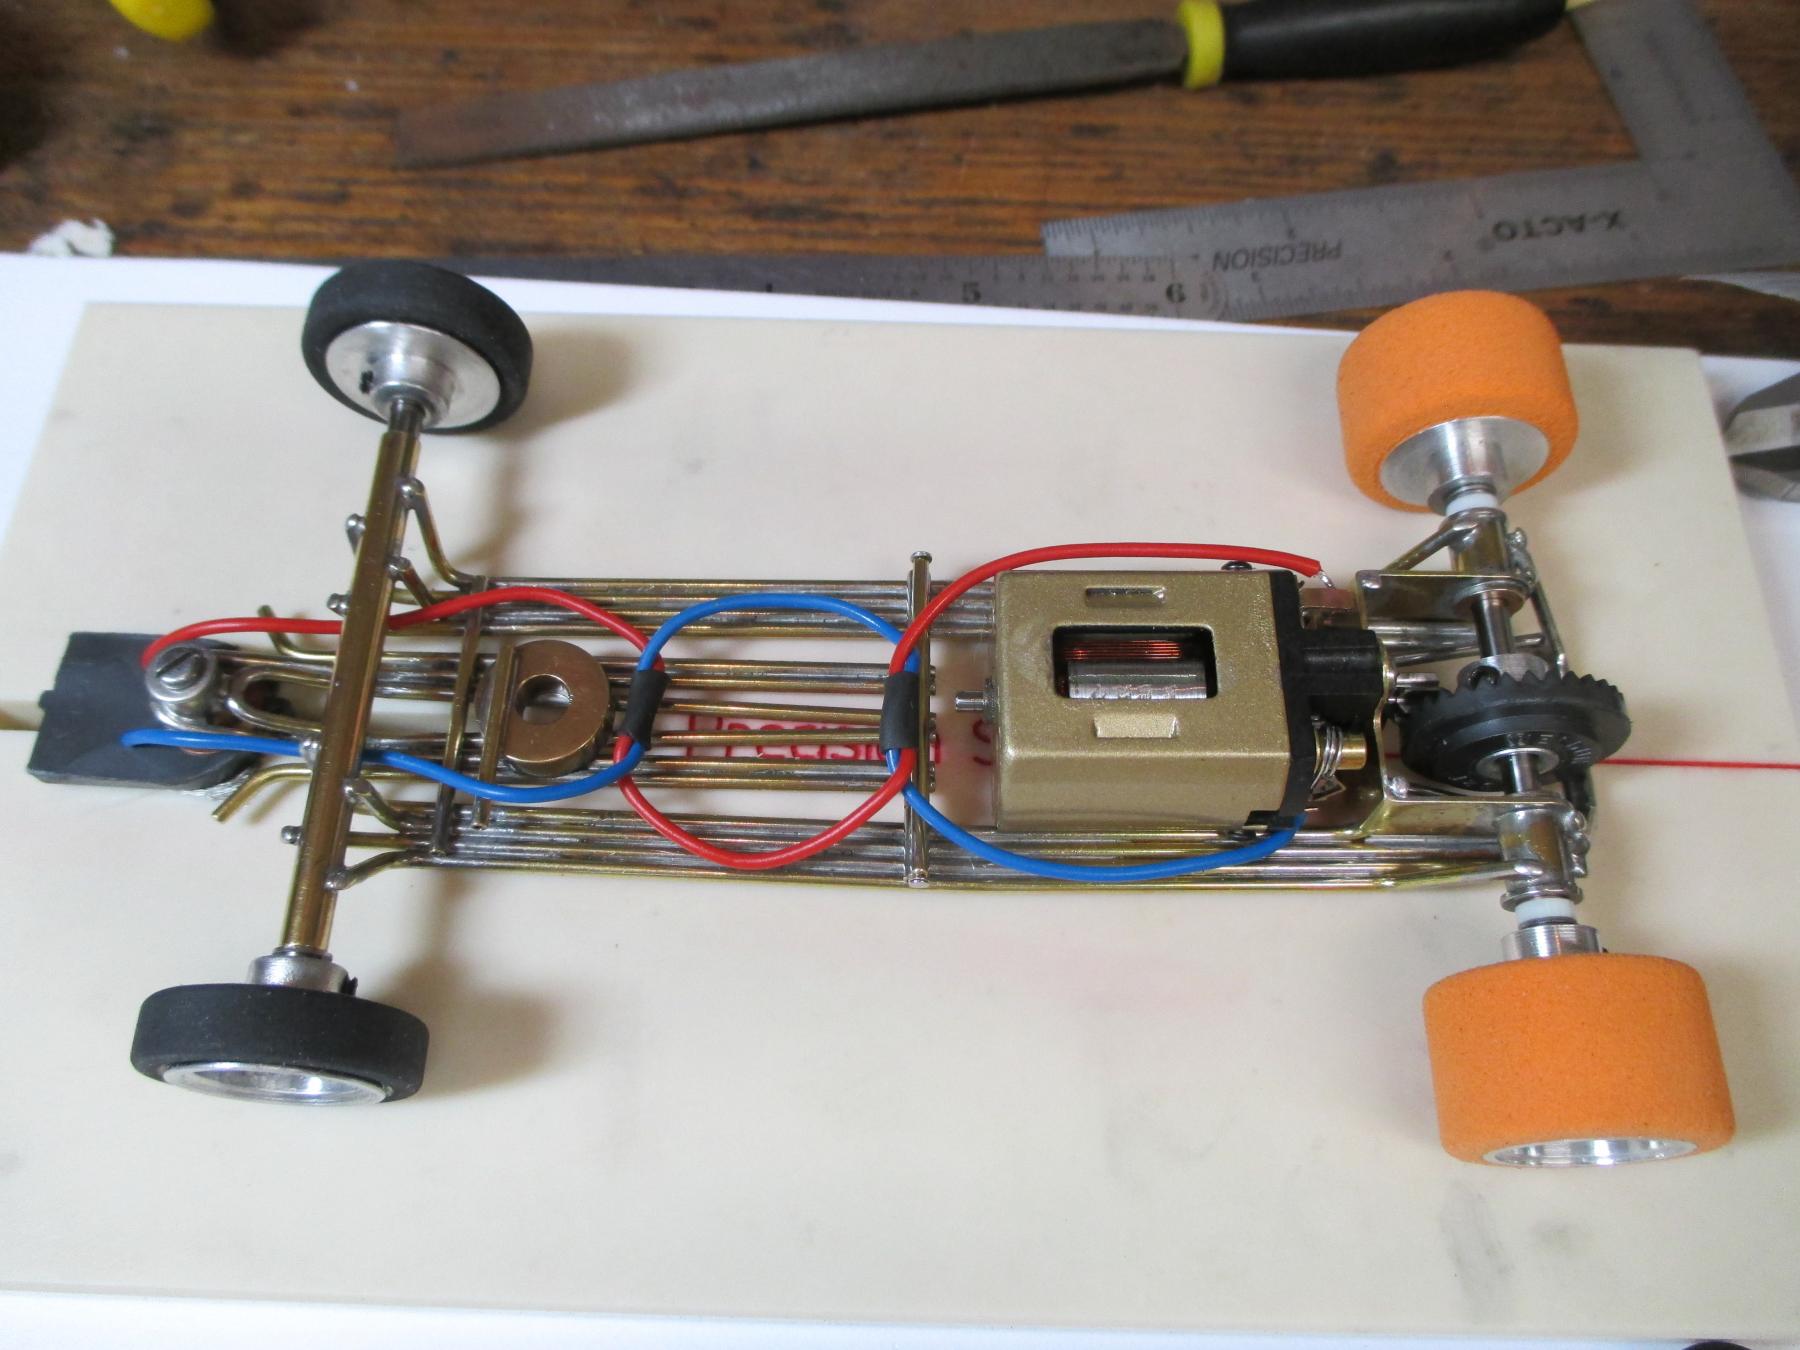
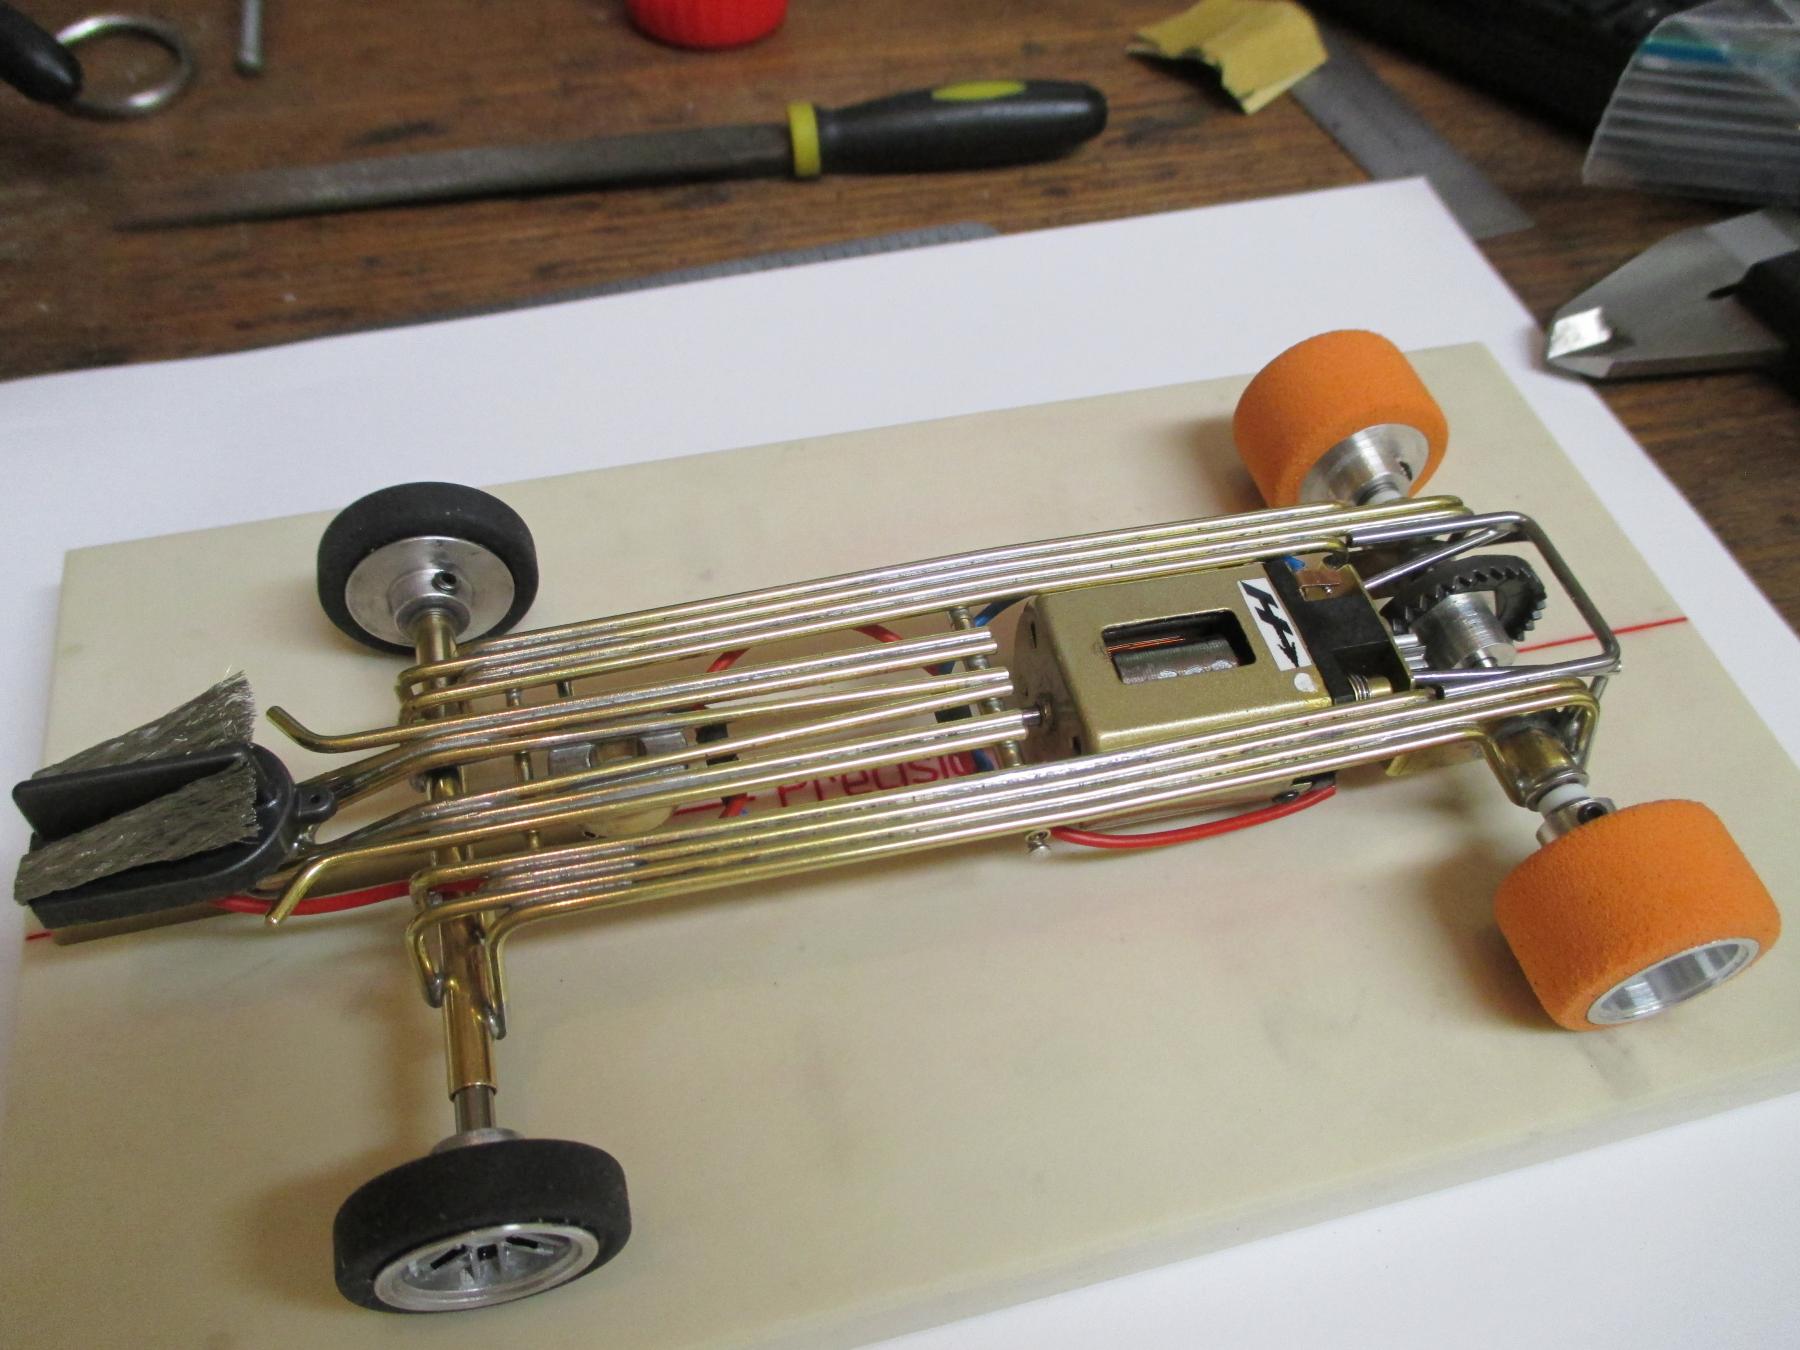
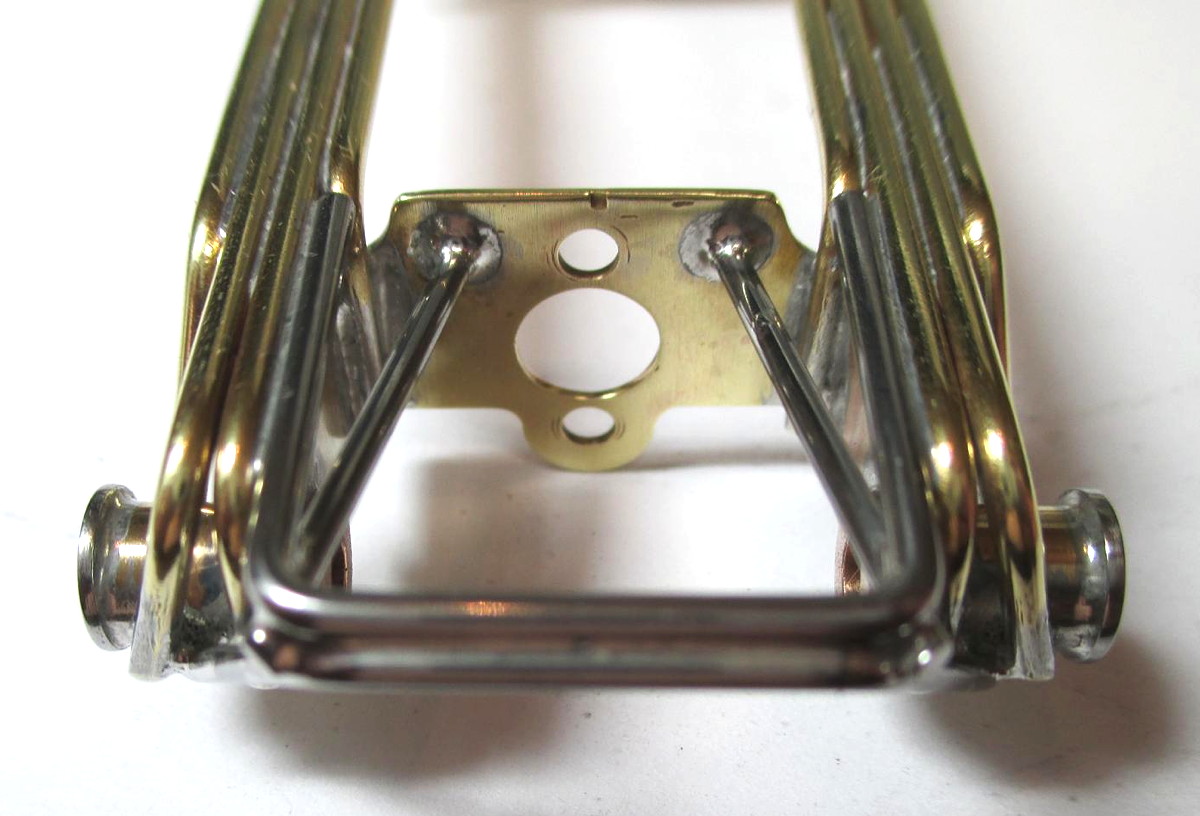
Bushing widths were designed for 3.00" as per the rules, using Professor Motor X-Wide Russkit replica wheels and some spacers to allow an oiler to enter. 

The (custom cut and polished) axle is 2.23" and uses Koford 10 thou spacers against the bushings, then two Slick 7 20 thou steel spacers against the wheels. 

Two pair of wheels were made to allow for track conditions. The black pair are SBR rubber, and the oranges are... well, orange. :D
 
Luciano's local rules allow for about 3-1/8" widths, so I made another axle to accommodate that. The 2.35" axle with Koford 10 thou spacers against the bushings, a pair of Lucky Bob's .063" spacers, and double Slick 7s against the hubs using the same wheels makes it perfect.
 
Note: All axles on all six wheels stop at the outer edges of the hub bosses to prelude conflicting with the inserts.
 
p17.jpg


  • Peter Horvath and James Fetherolf like this

Paul Wolcott


#97 SlotStox#53

SlotStox#53

    Posting Leader

  • Full Member
  • PipPipPipPipPipPipPip
  • 4,084 posts
  • Joined: 13-March 13
  • Gender:Male
  • Location:TX

Posted 28 October 2015 - 07:59 PM

I love it that this car is gonna be used/raced.   :D

With the attention to detail and finish of the whole package this is gonna fly!

Having being bitten by the vintage bug and enjoying the Rod & Custom cars along with the '67 Car Model ones I'm collecting parts and following your plan "body first" to start building more.   :D


#98 Pablo

Pablo

    Builder

  • Administrator
  • PipPipPipPipPipPipPipPip
  • 18,461 posts
  • Joined: 20-February 06
  • Gender:Male
  • Location:Cleveland, Tennessee

Posted 29 October 2015 - 10:12 AM

Passed the drivetrain test with flying colors. Done.


IMG_7745.JPG


IMG_7750.JPG


IMG_7753.JPG


IMG_7757.JPG


IMG_7760.JPG


  • endbelldrive, hiline2, Jencar17 and 5 others like this

Paul Wolcott


#99 Noose

Noose

    Grand Champion Poster

  • IRRA National Director
  • PipPipPipPipPipPipPipPip
  • 23,320 posts
  • Joined: 08-November 06
  • Gender:Male
  • Location:Denville, NJ

Posted 30 December 2015 - 07:44 AM

And now it's all done as requested.

12-16-15-HondaGP-1.JPG


12-16-15-HondaGP-2.JPG


  • Jencar17, Coal Train, Peter Horvath and 1 other like this

Joe "Noose" Neumeister
Sometimes known as a serial despoiler of the clear purity of virgin Lexan bodies. Lexan is my canvas!
Noose Custom Painting - Since 1967
Chairman - IRRA® Body Committee - Roving IRRA® Tech Dude - "EVIL BUCKS Painter"
"Team Evil Bucks" Racer - 2016 Caribbean Retro Overall Champion
The only thing bad about Retro is admitting that you remember doing it originally.


#100 Asp

Asp

    Backmarker

  • Full Member
  • PipPip
  • 72 posts
  • Joined: 25-July 11
  • Gender:Male
  • Location:Italy

Posted 30 December 2015 - 08:32 AM

Joe,


Congratulations, really breathtaking.


Luciano


Luciano Luppi


Electric Dreams Online Shop