Jump to content


Photo

How to build slot car tracks


  • Please log in to reply
405 replies to this topic

#26 Steve Ogilvie

Steve Ogilvie

    Race Leader

  • Subscriber
  • PipPipPipPipPip
  • 630 posts
  • Joined: 17-November 14
  • Gender:Male
  • Location:Kincardine, Ontario, Canada

Posted 13 April 2016 - 05:02 PM

To build these joints , you need a table saw , dado blade for 1/2" slots , a motorised thickness plainer and some clamps .

Start with a straight 2X4 and cut it to the width of your track plus 1/4" .

Cut the height down to 3" .Use a table saw with a long fence and cut a little off the top and bottom to make it as straight as possible .

Put your dado blade in the saw , set at 1/2 " thickness . You can't use the guard when you are dadoing .This is dangerous especially for someone not used to table saws .As a safer alternative , a router table with a 1/2" two flute carbide bit can be used .

Practice cutting a slot on some scrap until you are happy with the fit of the tongue .Cut a 1/2" deep slot down the middle  of the 3" side of each 2X3 .Cut with  the straightest side against the fence of the saw or router table .

Check your cuts with a piece of 1/2 " MDF from the sheets you are going to use for your track .Usually you use track off cuts for this .

The tongue is going to be 1/2 " by 7/8" .With the 1/2" slot lightly beveled the tongue should fit very snug but not to the point that is spreading the wood .

If you need to , run the 2 x 3 's through the cutter again .

Run some glue in the bottom of one of the slots and push the tongue in .Tap it with a block and hammer to get it all the way in .

Wipe off all excess glue . Let the glue dry overnight .

Cut lengths of 3 1/2" MDF to the same length as your joints .

Push your 2X3's together and put the smoothest top down on a flat surface .

Glue the MDF sides on flush with the flat surface .

Clamp them all together .A Workmate style clamping bench works well for this .

Drill  three 3/8" holes for the 5 1/2" long blots that are going to hold this together  One at each end and one in the middle .Use your slot marker to avoid putting a bolt directly under a slot .Tighten the bolt to around 30 ft lbs .Not critical , you just don't want to crush the MDF .

Let dry for an hour . Run it through the thicknes plainer with the overhanging MDF on the bottom rollers of the plainer to have a perfect surface to glue your track pieces to .


#27 Steve Ogilvie

Steve Ogilvie

    Race Leader

  • Subscriber
  • PipPipPipPipPip
  • 630 posts
  • Joined: 17-November 14
  • Gender:Male
  • Location:Kincardine, Ontario, Canada

Posted 13 April 2016 - 07:25 PM

Scan 5.jpeg

Slowly finding some pics of tracks we built .The space saver hillclimb is shown sitting in our old Kincardine shop ready to be knocked down for braiding and wiring .We built a lot of variations of this track , one of my original designs and widely copied by other builders .This one has wider spaces in the openings because it had to accomodate some square block posts in between some of the sections . The other track is sort of an Engleman / hillclimb and is shown at Millstream Raceway in Ringwood England . The posts got painted later .


#28 Steve Ogilvie

Steve Ogilvie

    Race Leader

  • Subscriber
  • PipPipPipPipPip
  • 630 posts
  • Joined: 17-November 14
  • Gender:Male
  • Location:Kincardine, Ontario, Canada

Posted 13 April 2016 - 11:26 PM

Scan 6.jpeg

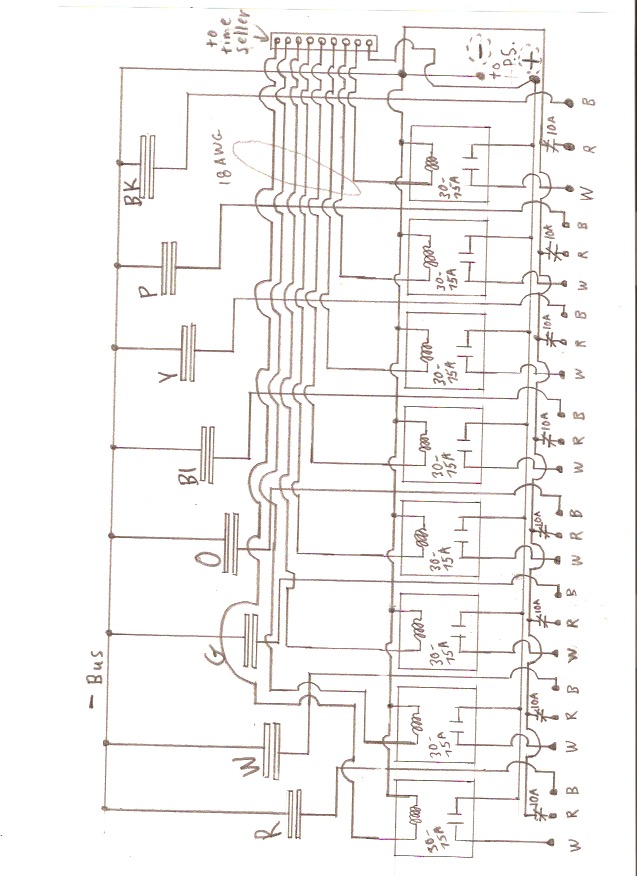
I will add some notes to this diagram tomorrow hopefully . 


#29 MattD

MattD

    Posting Leader

  • Full Member
  • PipPipPipPipPipPipPip
  • 3,561 posts
  • Joined: 13-August 11
  • Gender:Male
  • Location:IN

Posted 14 April 2016 - 08:27 AM

track building.jpg track building 2.jpg
  • Robert BG likes this

Matt Bishop


#30 Steve Ogilvie

Steve Ogilvie

    Race Leader

  • Subscriber
  • PipPipPipPipPip
  • 630 posts
  • Joined: 17-November 14
  • Gender:Male
  • Location:Kincardine, Ontario, Canada

Posted 14 April 2016 - 08:59 AM

That looks much better . Thanks Matt .


#31 Steve Ogilvie

Steve Ogilvie

    Race Leader

  • Subscriber
  • PipPipPipPipPip
  • 630 posts
  • Joined: 17-November 14
  • Gender:Male
  • Location:Kincardine, Ontario, Canada

Posted 14 April 2016 - 10:01 AM

Notes on wiring :

  30 Amp relays are available from auto parts stores and truck stops .They are less than 10.00 each usually .Very reliable , 100% duty .Used for headlight relays .

  75 amp relays are made in a similar configuration by Bosche .I don't have a part # but Delta Supply of Livonia MI used to supply us with them . I don't have a contact # at this time .Other high amp continuous duty relays are available from Grainger .Be careful to get :12 v dc coil continuous duty .The contacts will be generally rated for AC  voltage and current .This does not matter , just the current rating .

  The diagram is just meant to show connections .Except for the common coil side of the relays , all relays should have separate individual wires for feeds from the + post .Do not daisy chain , this will result in low power at the end relays .

  The 10 amp breakers are pop up style that fit in a 1/2" ? hole . They are designed to save controllers when hooked up wrong .To protect cheaper controllers and high resistance controllers , use 5 amp breakers .

   12 awg wire is used for basic setups .Higher power , bigger wire yadayada .But you can't break Ohm's law so there is a practical limit here . 

   The best way to wire a small track is to put the negative tap half way around and the positive connections in front of the drivers .This is called a split tap .The voltage will then be the same all the way around the track .Add more taps if you want , but to keep the power consistent , keep negative and positive taps spaced out from each other .

   The coil connections and contact connections are shown on either side of the relays just for drawing convenience .Mot relays have stab type connections out of one side .Automotive style relays usually have a wiring diagram on them .

    Most time selling systems use a 9 wire sustem as shown .If the system sends out its own 12 v signals the you MUST follow their wiring instructions .

    Also , if you are running an adjustable power supply to slow down cars , isolate the relay coils from the track power and feed it with a separate 12 vdc supply .A cheap 2 amp 12vdc wall plug style is all you need .Once you drop the voltage to the track to 9 volts or less , relays will shut off if you do not do this .

   You can use wind up timers to sell time with this setup .One side of each timer goes to the common wire .One side of each timer goes to its lane wire .This gets connected to the terminal block .


  • Ramcatlarry likes this

#32 Steve Ogilvie

Steve Ogilvie

    Race Leader

  • Subscriber
  • PipPipPipPipPip
  • 630 posts
  • Joined: 17-November 14
  • Gender:Male
  • Location:Kincardine, Ontario, Canada

Posted 23 April 2016 - 12:06 PM

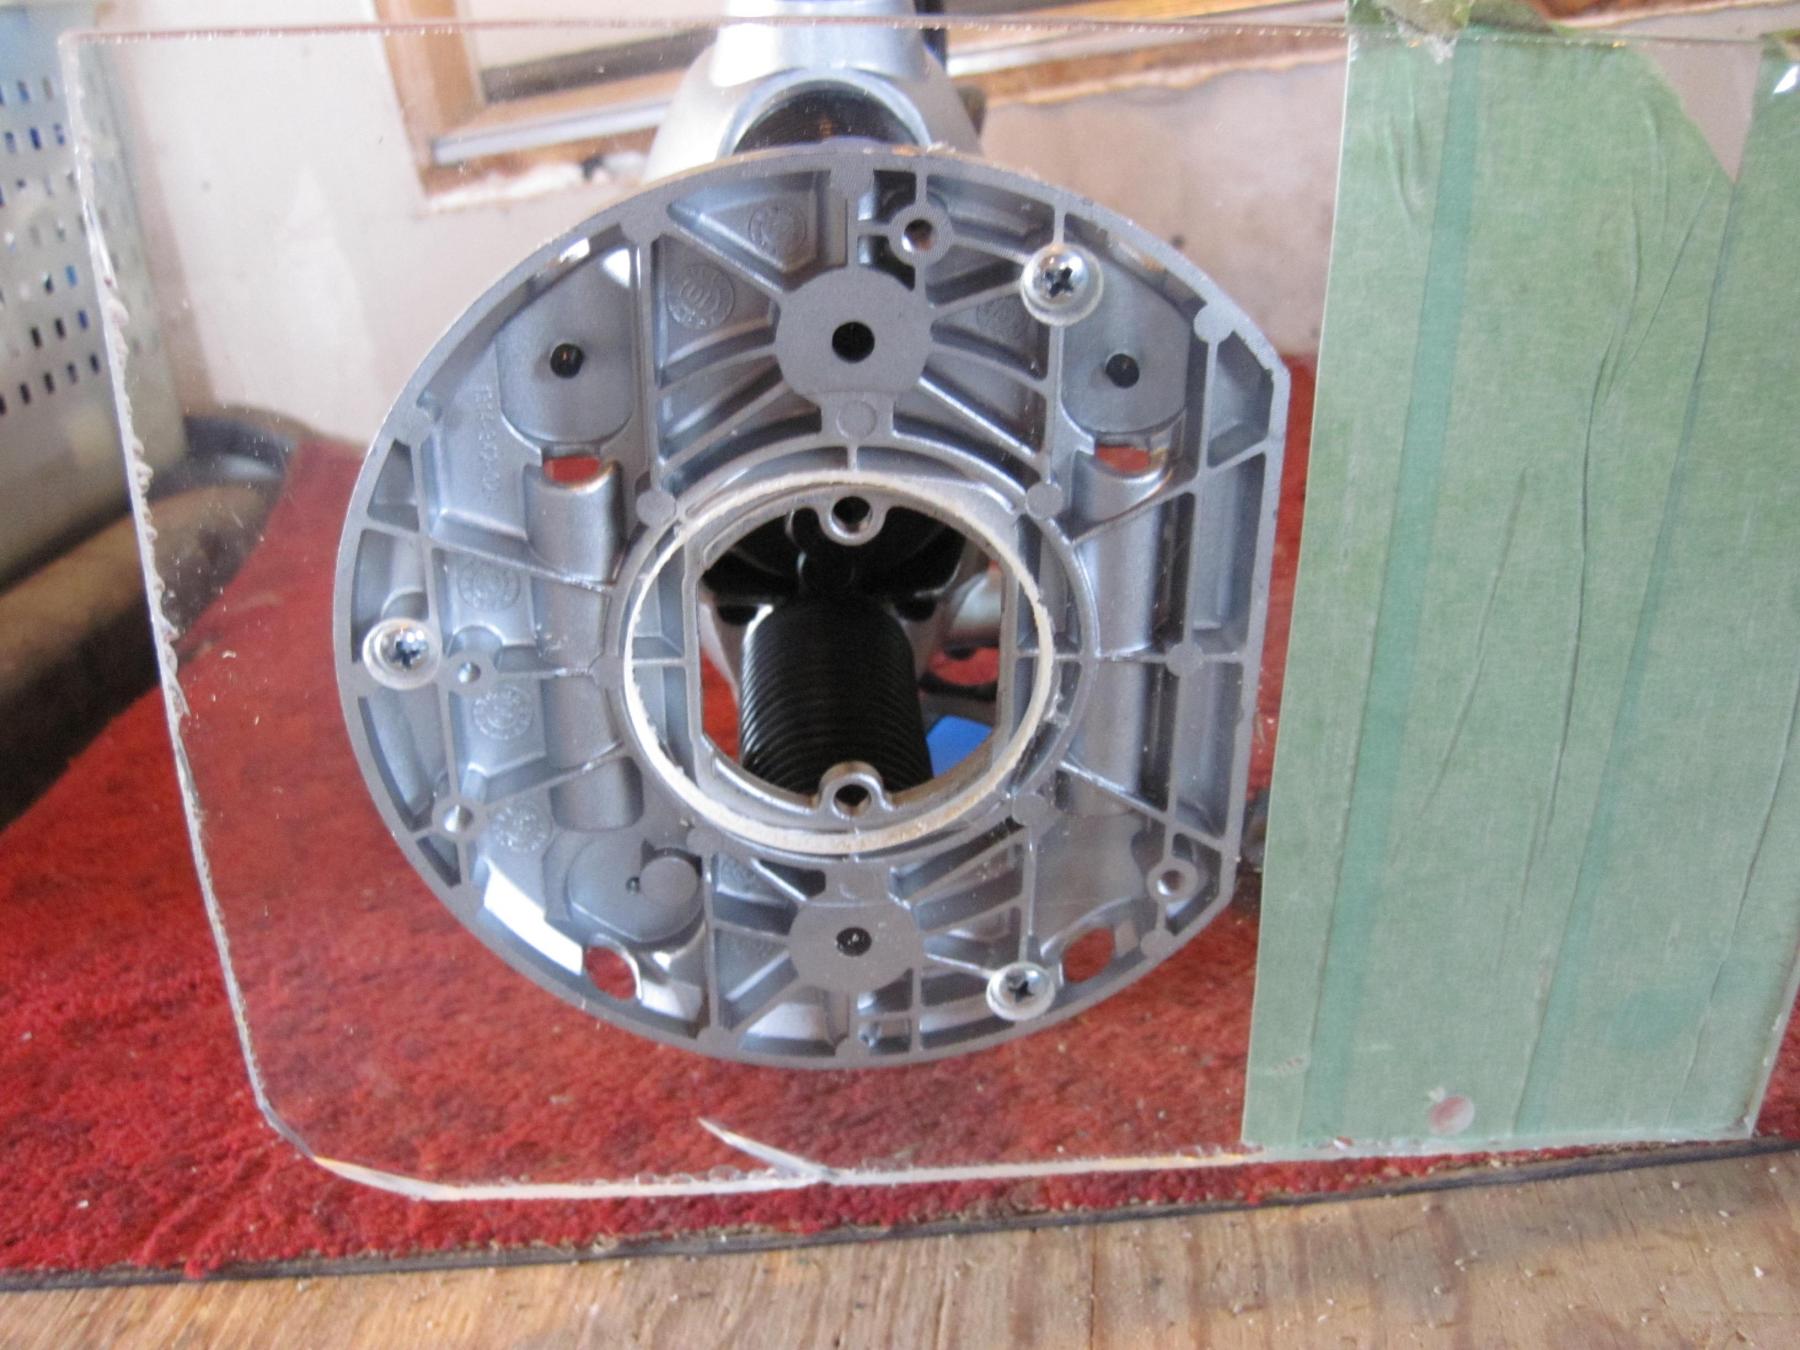
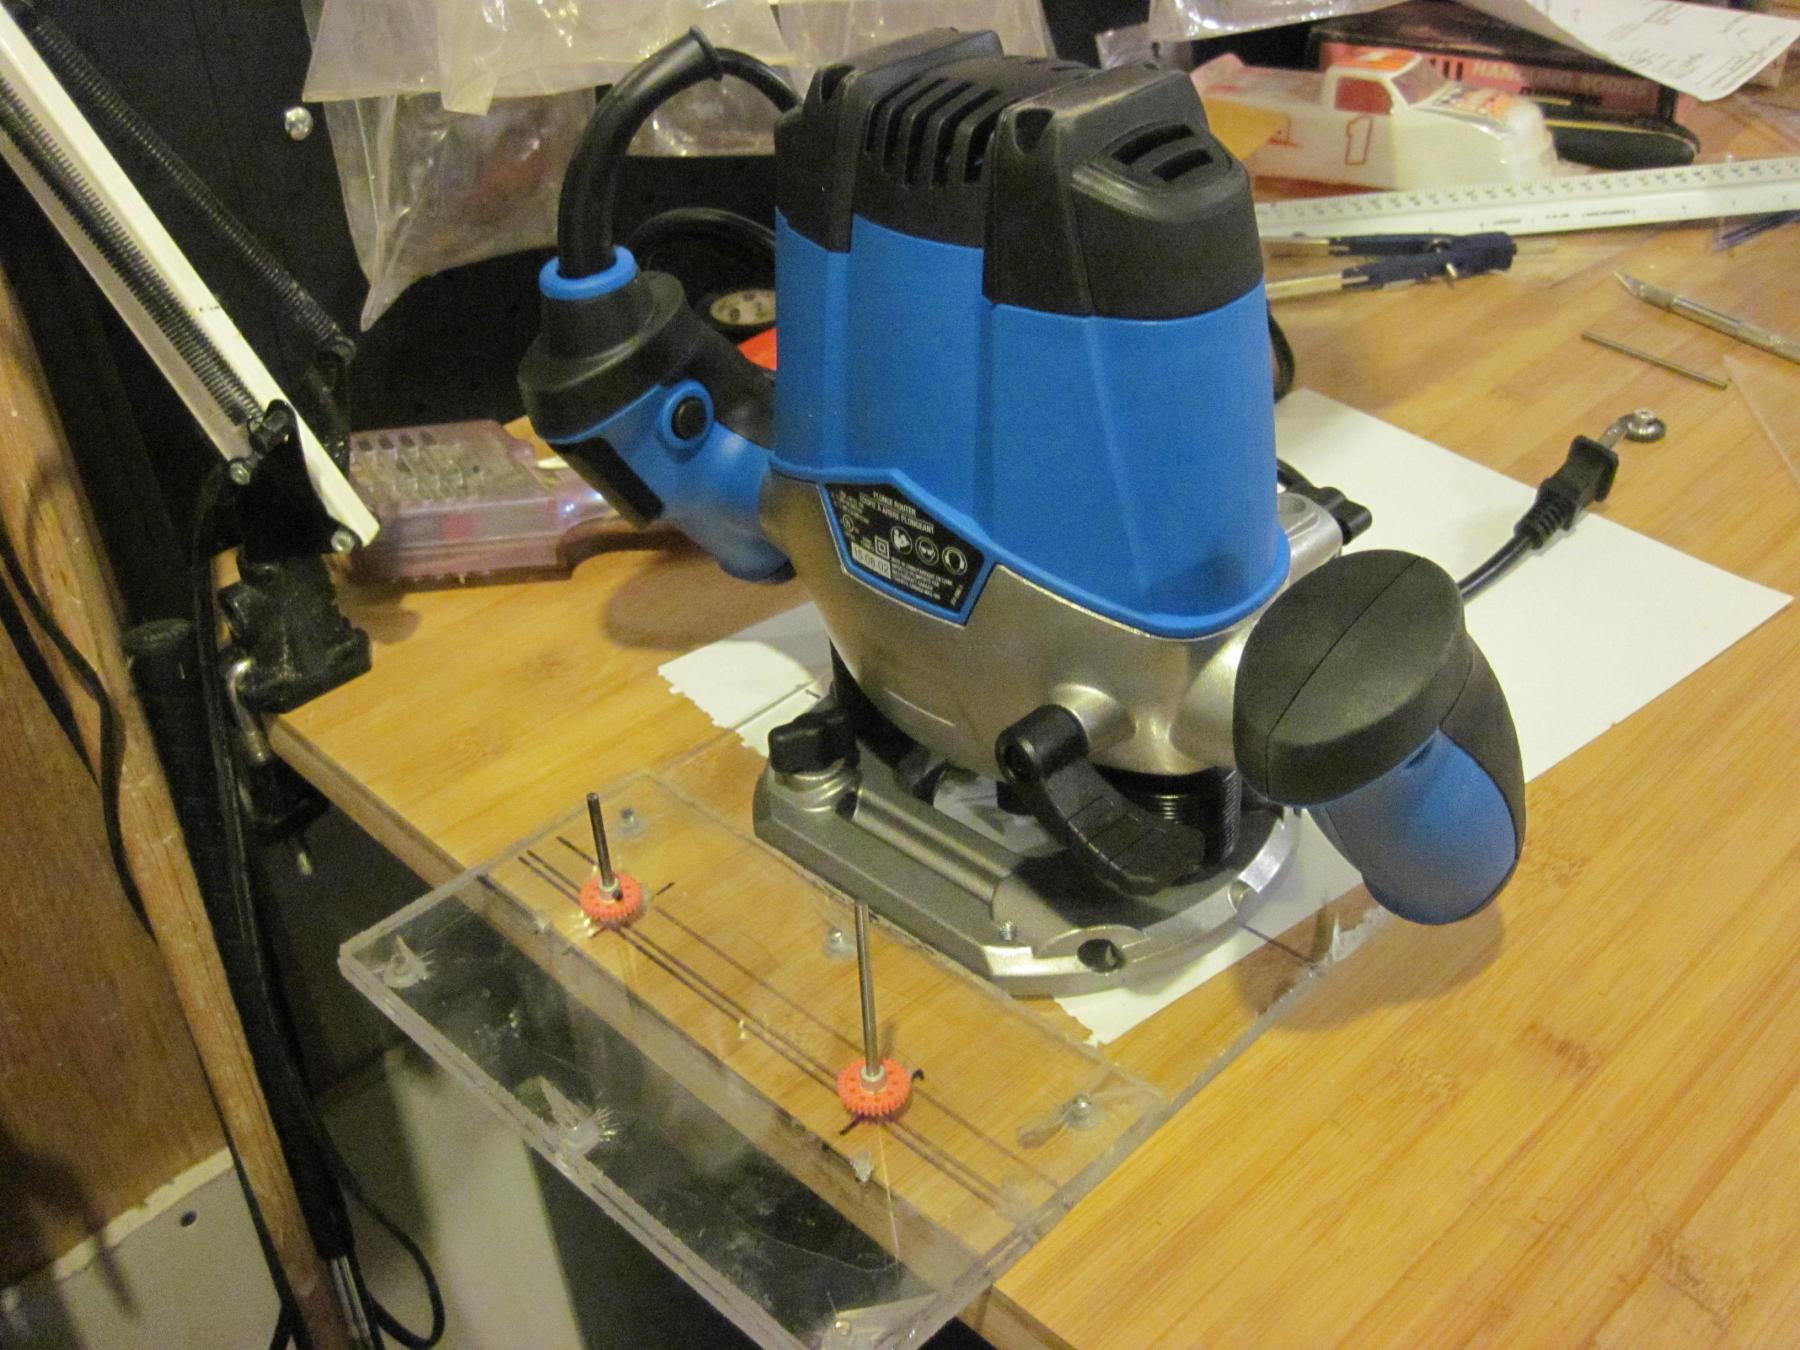
IMG_5016.JPG IMG_5017.JPG IMG_5018.JPG IMG_5020.JPG IMG_5021.JPG     I decided to build one of my slot cutters . The importance of this tool really cannot be overstated . With this tool , two people (one cutting the slots , one digging out the sawdust and routing the relief cuts) can route the slots on a king track in under 1 hour . This jig literally made building tracks for a living viable .Routing a track any other way  takes days instead of an hour .

    Only a handful of people ever saw my jig , and unauthorised copies were made by some .I invented this jig myself , I have never seen the jigs other builders used nor did I ever work for or with any other builders .

    This jig cuts slots that make cars go around corners better because of the eliptical affect .And it makes possible the use of a narrower track surface because it automaticaly offsets the outside slot . The jig in the pics uses a 5" skid apron with 4" or 4 3/8" slot centres . Of course any dimensions are possible by drilling your pin holes in different places .


  • Robert BG likes this

#33 Steve Ogilvie

Steve Ogilvie

    Race Leader

  • Subscriber
  • PipPipPipPipPip
  • 630 posts
  • Joined: 17-November 14
  • Gender:Male
  • Location:Kincardine, Ontario, Canada

Posted 23 April 2016 - 12:09 PM

Some pics of the finished product :

IMG_5026.JPG

IMG_5025.JPG


#34 Steve Ogilvie

Steve Ogilvie

    Race Leader

  • Subscriber
  • PipPipPipPipPip
  • 630 posts
  • Joined: 17-November 14
  • Gender:Male
  • Location:Kincardine, Ontario, Canada

Posted 23 April 2016 - 12:13 PM

I built the base out of 1/4 plexiglass , doubling up on the thickness where the pins sit .It is screwed together with a bit of clear silicone in between .


#35 CoastalAngler1

CoastalAngler1

    Outlaw Racer

  • Full Member
  • PipPipPipPipPipPip
  • 1,299 posts
  • Joined: 03-May 14
  • Gender:Not Telling
  • Location:Quit Wishin Go Fishin

Posted 23 April 2016 - 12:14 PM

If I make the router sound in my head when I read this, it is perfectly clear.  What a great guy sharing track building secrets!! 


Charlie McCullough

Charlie's Speed Shop

Kelly Racing Wanna Be


#36 Steve Ogilvie

Steve Ogilvie

    Race Leader

  • Subscriber
  • PipPipPipPipPip
  • 630 posts
  • Joined: 17-November 14
  • Gender:Male
  • Location:Kincardine, Ontario, Canada

Posted 23 April 2016 - 03:37 PM

  Thank you . A way to get used to the cutter before you attempt to use it on a track is with your off cuts from the corners .Clamp them solid to a workbench or saw horses and make slots .You will learn the direction you prefer and how to keep it tight to the outside of the track . Rules for using this jig :

1- always cut off of one side of the track .

2-never change directions

3-when you assemble the track , pick the side you are going to route from and make sure the edges line up as close to perfect as possible .Touch up with a sand block if needed to get a perfect guide edge .

4-when cutting the first slot , set your pins so they hang down at least 3/8" but no more than 1/2" .

5-since track pieces get built upside down , make sure you knock off any little glue nubs that may have dribbled onto the edge of the track .

6-Never cut the same slot twice .

7- minimum depth of slot is 5/16" .Be careful to check this on a piece of scrap before you start cutting the track and after replacing a broken or dull bit .

8-Do not use solid carbide router bits .They break in no time at all . 2 flute carbide tip bits is what you want .


#37 Mach9

Mach9

    Mid-Pack Racer

  • Full Member
  • PipPipPip
  • 164 posts
  • Joined: 27-June 12
  • Gender:Male
  • Location:NC

Posted 26 April 2016 - 08:57 PM

Steve, I have a few questions regarding your routing jig.

Do you make it out of Lexan for visibility reasons, or is it just a convenient material?

Do you use the standard 1/8" pins when starting off routing the first lane when you're using the edge of the track for a guide? I've seen some jigs that use larger wheels which I would think would be less affected by small imperfections in the track edge.

When you say to pick one side of the track to start from and go all the way around on that side, I assume that means you'll be routing off of the outside of some corners, and the inside of others. Is this correct? Could you share any criteria you might use to decide which side of a given track to start from?

I have tentative plans to one day build a pretty close replica of an Orange, complete with esses. Any suggestions on the best approach to routing those?

Are those spur gears glued to the jig and used to adjust pin depth?

Thanks so much for sharing your wealth of knowledge. I guess it's time to throw out my old adjustable "radius rod" setup! MJ

Mack Johnson
'86 Mustang footbraker
6.435 @ 104 MPH
NC Slot Car Tracks - Past and Present


#38 Steve Ogilvie

Steve Ogilvie

    Race Leader

  • Subscriber
  • PipPipPipPipPip
  • 630 posts
  • Joined: 17-November 14
  • Gender:Male
  • Location:Kincardine, Ontario, Canada

Posted 27 April 2016 - 08:26 AM

    I use lexan or plexi glass (maybe it is the same stuff?) because it is available at most hardware stores and it is much easier to get the pins in to the slot when you cut the second slot etc if you can see through the jig . 

    I use the 1/8 pins to cut the outer slot .That is why I say to run your circle cutter twice (always in the same direction) to make a smooth inner and outer cut .Use the factory edge of the straight pieces for the side you are going to cut off of .You could use larger pins or small hard rubber wheels for the first slot but 1/8" pins slide along fairly well .

    It is correct that sometimes you are on the inside of a turn and sometimes you will cut from the outside of a turn .Generally you pick the side of the track that has the outside of the biggest turn on it , but if you have a turn on the track that has a really small inside diameter you want to make sure you don't cut off of the inside of that turn .The slot will look more like a potato than a circle if you route off the inside of a really tight turn .Not certain , but below 10" inside diameter gets a little risky .

    You use the same jig the same way to route esses .I always cut esses out of one sheet of MDF if its possible , but the easiest way is just to cut a big turn and cut the pieces you need out of that and glue and screw them together with 5" wide MDF planks on the bottom .

   The spur gears are just held on by the set screws .I always set them for the first cut and leave them.It does not matter if they sit above the jig when cutting inner slots .You have to press down on them as you go so they don't ride up .

    Thanks for the questions , it helps me to remember stuff that I should put in here . 


  • Robert BG likes this

#39 Steve Ogilvie

Steve Ogilvie

    Race Leader

  • Subscriber
  • PipPipPipPipPip
  • 630 posts
  • Joined: 17-November 14
  • Gender:Male
  • Location:Kincardine, Ontario, Canada

Posted 02 May 2016 - 09:10 PM

So the next logical part of this thread I think should be to build a track of some kind .Since the title of the thread is simple ways to build a home track , I shall try to make something easy(er) and build it mostly out of stuff that people can get locally or may even have laying around the garage or basement .I have a stack of old warped 2 by 4 's that I hope to carve in to joints , only good for firewood right now anyway .I only have 500 feet of braid on hand so the length will be limited by that .I have 4 grandkids so 5 lanes would be good so Gramps can kick their...nevermind lets stick with 4 lanes .Anyway , to bridge or not to bridge that is the question , oval or figure 8 .Have to do some planning ...


  • Mach9 likes this

#40 Steve Ogilvie

Steve Ogilvie

    Race Leader

  • Subscriber
  • PipPipPipPipPip
  • 630 posts
  • Joined: 17-November 14
  • Gender:Male
  • Location:Kincardine, Ontario, Canada

Posted 04 May 2016 - 12:49 AM

An awesome little track by Brian Crosby

Newly Completed Ogilvie Routed Track - SlotForum


#41 Steve Ogilvie

Steve Ogilvie

    Race Leader

  • Subscriber
  • PipPipPipPipPip
  • 630 posts
  • Joined: 17-November 14
  • Gender:Male
  • Location:Kincardine, Ontario, Canada

Posted 16 May 2016 - 01:01 PM

I guess I will have to find a better link to the track I posted above .I dropped in and visited my old shop today .The people that bought my property off me are friends of mine .Unfortunately they were not home and I could not get the lights on under the second storey .On the wood work supporting the room above , when we finished a track we would put its # and either the owner or sometimes where it went to on the wood above the steel support beam . That and the customs broker paperwork is all the record we had of what went where .Next time I go over I will take a flashlight and get some pictures of the list .The last # I saw was 488 and that was not the end of the list .Brian built about 10 tracks a year for 9 years after I left the business. A  conservative estimate of Donn Bryans production would be over 100 tracks  .So our company has produced about 700 tracks so far .  


#42 Robert BG

Robert BG

    On The Lead Lap

  • Full Member
  • PipPipPipPip
  • 427 posts
  • Joined: 12-May 16
  • Gender:Male
  • Location:Southern NJ and Bulgaria

Posted 20 May 2016 - 12:30 PM

Steve,

Thanks for sharing,my first track I ever raced on was a new Ogilvie and man was it nice.I used to complain about having to run on spray glue and no metal gears but after running some other tracks I never once complained again ;)  Some of the other tracks I ran on you absolutely needed glue,granted the old Americans had been through hell by then but still.


I dont know if you were still building them or not but do by chance remember doing a hill climb and oval in a video store in Southern NJ? It would have been the early 90's. They called it Rio Raceway and it was just a few miles from Cape May and the beach at the southern most tip of NJ.


Anyway you and I both got caught with the return to slot car bug about the same time and while we have never met I'm glad you're back and want to say thanks for all the tracks you built and what you've done for the hobby in general.


I personally cant wait to get controllers into my daughters hands but I've got a little time(almost 4 and 4 months) Chances are I'll be building a track in Bulgaria in a few years.I'd love for it to be commercial but  that is too far away to say for sure.Either way I know it's a long shot but if in a few years you want a free vacation to Bulgaria to help advise me on my build let me know.


No matter what and I'm sure I speak for most here we're glad to have you around and appreciate all you've done and are sharing with us now.


Robert


  • Samiam and Steve Ogilvie like this
Robert Fothergill

#43 Steve Ogilvie

Steve Ogilvie

    Race Leader

  • Subscriber
  • PipPipPipPipPip
  • 630 posts
  • Joined: 17-November 14
  • Gender:Male
  • Location:Kincardine, Ontario, Canada

Posted 20 May 2016 - 07:18 PM

Thanks very much .I would definitely be up for a trip to Bulgaria .When I retire (hopefully early next year) I hope to travel a lot and I will be more than willing  to help anyone with a rebuild or a new track build . I know I put quite a few tracks in NJ , some were even right on the beach off of a boardwalk , but I really can't remember the places names .The year after I moved my shop up from Oakville to Kincardine and I had 5 employees , we built and installed 60 tracks from coast to coast .I barely got 5 hrs of sleep a day back then and all I remember is a big blurr .It is very nice to be appreciated and remembered because it was a huge amount of work and time away from my family .


  • Mach9 likes this

#44 Steve Ogilvie

Steve Ogilvie

    Race Leader

  • Subscriber
  • PipPipPipPipPip
  • 630 posts
  • Joined: 17-November 14
  • Gender:Male
  • Location:Kincardine, Ontario, Canada

Posted 11 July 2016 - 11:04 PM

Sorry to everyone for not posting in a while .My hobbies take a back seat to golf and boating and camping  (and that other 4 letter word , work ) in the summer time .I will be back at building a small track in September .In the meantime , I always check out slotblog every day so if you have any questions , post them up .


  • Mach9 and Robert BG like this

#45 Mach9

Mach9

    Mid-Pack Racer

  • Full Member
  • PipPipPip
  • 164 posts
  • Joined: 27-June 12
  • Gender:Male
  • Location:NC

Posted 02 December 2016 - 05:16 PM

Steve, I figured I would post on this thread instead of "pulling the bank". I was hoping you would check my math for the banked turn on the track I want to build. My turn will have a 63" radius. It will be a 194 deg. turn. My target bank angle is 20 deg. I found an online cosine calculator that seems to work and came up with a cosine for 20 deg. of .93969262.  63" / .93969262 = 67.04". 

   My circumference will be 126" x 3.14 = 395.64 / 360 = 1.099 inches per degree x 194 deg. = 213.206 inches of circumference. This works out to a "back cut" (my term) of roughly 11 degrees. I now know this figure is not all that important. Just helps when drawing it in AutoCad. Does this look right? Is 20 deg. a reasonable amount of banking to shoot for on a 10-1/2' diameter turn with 8 lanes? My inside radius is 28".

   Another question. I may have found a company that can CNC laser cut MDF. With this thing (pretty close Orange replica) drawn out in AutoCad, if I have the pieces cut based on the sizes/angles that AutoCad computes, what are the chances it would go together properly? I don't know yet what the cost is. But if it's not too bad, it would sure save a ton of work, not to mention probably be higher quality cuts than I can make. Thanks again. 


Mack Johnson
'86 Mustang footbraker
6.435 @ 104 MPH
NC Slot Car Tracks - Past and Present


#46 Ramcatlarry

Ramcatlarry

    Posting Leader

  • Subscriber
  • PipPipPipPipPipPipPip
  • 2,942 posts
  • Joined: 08-March 06
  • Gender:Male
  • Location:St Charles, IL 60174

Posted 02 December 2016 - 10:16 PM

FYI - The LTD did spend many years in Jerry Kulich and my care in McHenry, IL and nearby.  I recall it was the 2001 USRA Scale Nats track.  It spent some time in Rockford, IL and went to visit LA before it got set up in Oklahoma - last I heard it was sold in the past two years and I have not heard of it being set up. Anyone know where it is?


The Super Eight was the track I had for the 2006 ISRA/USA Nats in Mchenry, IL before going to New York and getting destroyed in the flood......


Thanks Steve for the narrative and your workmanship over the years.


  • Steve Ogilvie and Tomark like this

Larry D. Kelley, MA
retired raceway owner... Raceworld/Ramcat Raceways
racing  around Chicago-land


Diode/Omni repair specialist
USRA 2023 member # 2322
IRRA,/Sano/R4 veteran, Flat track racer/MFTS

Host 2006 Formula 2000 & ISRA/USA Nats
Great Lakes Slot Car Club (1/32) member
65+ year pin Racing rail/slot cars in America


#47 Steve Ogilvie

Steve Ogilvie

    Race Leader

  • Subscriber
  • PipPipPipPipPip
  • 630 posts
  • Joined: 17-November 14
  • Gender:Male
  • Location:Kincardine, Ontario, Canada

Posted 03 December 2016 - 12:07 AM

Steve, I figured I would post on this thread instead of "pulling the bank". I was hoping you would check my math for the banked turn on the track I want to build. My turn will have a 63" radius. It will be a 194 deg. turn. My target bank angle is 20 deg. I found an online cosine calculator that seems to work and came up with a cosine for 20 deg. of .93969262.  63" / .93969262 = 67.04". 

   My circumference will be 126" x 3.14 = 395.64 / 360 = 1.099 inches per degree x 194 deg. = 213.206 inches of circumference. This works out to a "back cut" (my term) of roughly 11 degrees. I now know this figure is not all that important. Just helps when drawing it in AutoCad. Does this look right? Is 20 deg. a reasonable amount of banking to shoot for on a 10-1/2' diameter turn with 8 lanes? My inside radius is 28".

   Another question. I may have found a company that can CNC laser cut MDF. With this thing (pretty close Orange replica) drawn out in AutoCad, if I have the pieces cut based on the sizes/angles that AutoCad computes, what are the chances it would go together properly? I don't know yet what the cost is. But if it's not too bad, it would sure save a ton of work, not to mention probably be higher quality cuts than I can make. Thanks again. 

I will check all your calcs tomorrow .20 degrees banking on a roughly 10' 6" diameter turn will work easily and is pretty close to an original American Orange .


  • Mach9 likes this

#48 Steve Ogilvie

Steve Ogilvie

    Race Leader

  • Subscriber
  • PipPipPipPipPip
  • 630 posts
  • Joined: 17-November 14
  • Gender:Male
  • Location:Kincardine, Ontario, Canada

Posted 03 December 2016 - 12:34 AM

Thanks for the info and the kind words Larry .I wish I had been better at documenting what we built and for who , but I was really busy back then and family and making sure we actually made a living was a priority back then . So I assume that Brian Crosby built the Super 8 that you had ? Or maybe Donn ? 


#49 Steve Ogilvie

Steve Ogilvie

    Race Leader

  • Subscriber
  • PipPipPipPipPip
  • 630 posts
  • Joined: 17-November 14
  • Gender:Male
  • Location:Kincardine, Ontario, Canada

Posted 03 December 2016 - 10:08 AM

There is a slight error that develops when you round off the value for PI instead of using the number that comes up when you push the PI button . Without rounding , I got a circumference of 213.314 .Since your radius calc is so close to 67" , I would just set my hand cutter at 67 1/32 . Remember that these calcs are only as accurate as your original drawing of the finished track .On a large track , I always found 1/8" = 1' worked well .For a small home track 1/4"= 1' gave a bit more accuracy because a small track takes away your wiggle room .


  • Mach9 likes this

#50 Ramcatlarry

Ramcatlarry

    Posting Leader

  • Subscriber
  • PipPipPipPipPipPipPip
  • 2,942 posts
  • Joined: 08-March 06
  • Gender:Male
  • Location:St Charles, IL 60174

Posted 04 December 2016 - 01:55 PM

I shot photos of the signatures under the Super-8 before it went back East. Of course they are not 'at hand' - but it was the 1999 Worlds track from Mossetti.  Found it!  Track #404 march 1999.  I still have a lot of film to jpeg.


I had thoughts of adding two eight ft lengths to the LTD after driving it.


  • Mach9 likes this

Larry D. Kelley, MA
retired raceway owner... Raceworld/Ramcat Raceways
racing  around Chicago-land


Diode/Omni repair specialist
USRA 2023 member # 2322
IRRA,/Sano/R4 veteran, Flat track racer/MFTS

Host 2006 Formula 2000 & ISRA/USA Nats
Great Lakes Slot Car Club (1/32) member
65+ year pin Racing rail/slot cars in America


Electric Dreams Online Shop