Jump to content


Photo

How to build slot car tracks


  • Please log in to reply
405 replies to this topic

#76 MattD

MattD

    Posting Leader

  • Full Member
  • PipPipPipPipPipPipPip
  • 3,561 posts
  • Joined: 13-August 11
  • Gender:Male
  • Location:IN

Posted 11 July 2019 - 04:01 PM

Steve was a big help to me when I built my track last year.    I think he's built 1 or 2 tracks!   


Modifications  I did, and should have done on the originaI build.


I  cut  the inside wall off as you exit the banked turn on my track and built a gutter.   Too often guys crashed in the bank and always slid down in the way of the bottom lane.    


I replaced the flat  end of my track with 5 inch lane centers instead of 4.   That made it much easier to get thru without somebody   getting nerfed every lap.


I would build the whole track  with 5 inch centers if I did it again.   


On the flat end I would incorporate a drop off/outside gutter, also.   That track would pretty much self cleaning.


I think to have a fun basement or garage track, the length needs to be 30-32 foot and width 8 foot.    You can build a reasonably fun track in that space and run fast and crash too often!!


  • MSwiss likes this

Matt Bishop


#77 MSwiss

MSwiss

    Grand Champion Poster

  • IRRA National Director
  • PipPipPipPipPipPipPipPip
  • 25,872 posts
  • Joined: 16-April 06
  • Gender:Male

Posted 11 July 2019 - 04:28 PM

I  cut  the inside wall off as you exit the banked turn on my track and built a gutter.   Too often guys crashed in the bank and always slid down in the way of the bottom lane.   

I never put one on, on the last part of my main straight, and the whole Bank, for that same reason.


Get the deslotted car out of the way of the racers, who can keep their car in the slot.


Tall and thick, permanently attached, opaque walls, only serve 3 purposes, IMO.


1) Hamper the racers vision.


2) Bending the cars.


3) Make the dissembled track easier for the guy who buys it from you, to move.


Mike Swiss
 
Inventor of the Low CG guide flag 4/20/18
IRRA® Components Committee Chairman
Five-time USRA National Champion (two G7, one G27, two G7 Senior)
Two-time G7 World Champion (1988, 1990), eight G7 main appearances
Eight-time G7 King track single lap world record holder

17B West Ogden Ave., Westmont, IL 60559, (708) 203-8003, mikeswiss86@hotmail.com (also my PayPal address)

Note: Send all USPS packages and mail to: 692 Citadel Drive, Westmont, Illinois 60559


#78 Steve Ogilvie

Steve Ogilvie

    Race Leader

  • Subscriber
  • PipPipPipPipPip
  • 630 posts
  • Joined: 17-November 14
  • Gender:Male
  • Location:Kincardine, Ontario, Canada

Posted 11 July 2019 - 09:50 PM

Not the only way to build a track of course but for us having solid permanantly mounted sidewalls allowed quick dissasembly and set up at the customers. We built 3 tracks for a fellow in Mexico City in the late 80's and I shipped those flat and flew down and put the sidewalls on in the owner's huge bottom floor garage. I only did that because I could not wrap my head around crating up 3 finished tracks.  


#79 MattD

MattD

    Posting Leader

  • Full Member
  • PipPipPipPipPipPipPip
  • 3,561 posts
  • Joined: 13-August 11
  • Gender:Male
  • Location:IN

Posted 12 July 2019 - 08:28 AM

In my opinion, the sidewalls do help the track to keep the surface shape and not let the MDF  change it's shape as it "settles".    I have found you can still change the the surface a bit by jacking and putting pressure on the underside and weight on the top side.     Having sidewalls will help retain the rigidness.    The "H" shape is much harder to bend.    If the wall does not extend above the roadbed, but only from the surface down, it probably serves the same purpose as a full wall in making the track rigid


Matt Bishop


#80 MSwiss

MSwiss

    Grand Champion Poster

  • IRRA National Director
  • PipPipPipPipPipPipPipPip
  • 25,872 posts
  • Joined: 16-April 06
  • Gender:Male

Posted 15 July 2019 - 09:03 AM

Not the only way to build a track of course but for us having solid permanantly mounted sidewalls allowed quick dissasembly and set up at the customers. We built 3 tracks for a fellow in Mexico City in the late 80's and I shipped those flat and flew down and put the sidewalls on in the owner's huge bottom floor garage. I only did that because I could not wrap my head around crating up 3 finished tracks.

Yes, it's amazing how fast guys like you and Hasse would get tracks up.

With having the luxury of only moving 20 and 10 minutes away, in my 2 relocations, I'm glad I never permanently attached the walls.

Not having them on, made adjusting the track much easier.

I worked on the Koford King, extensively, when Scott Wright bought it.

All I could really do, with it, is adjust the elevation.

With mine, after the first move, I was able to get at a less than ideal transition between the Deadman and Finger, on Purple.

It was never an issue with wing cars, but became a bit of one when we started racing lowdown force, Retro F1 cars.

I cut one leg an inch or so shorter, as I was out of adjustment slotting, and the inside dropped/twisted right to where he should be.

It's been perfect since.

On my 2nd move, I changed the footprint of the track by opening up the Bank, reducing the banking slightly, (where it had more than was needed) which in turn tightened up the Deadman and Finger, which increased the banking in those 2 turns.

Back to ease of moving, after moving a fair amount of tracks, I always wondered why the track builders didn't route a few slots, in the walls, below the track surface, for hand grips.

It seems like it would make grabbing the track much easier.


In my opinion, the sidewalls do help the track to keep the surface shape and not let the MDF  change it's shape as it "settles".    I have found you can still change the the surface a bit by jacking and putting pressure on the underside and weight on the top side.     Having sidewalls will help retain the rigidness.    The "H" shape is much harder to bend.    If the wall does not extend above the roadbed, but only from the surface down, it probably serves the same purpose as a full wall in making the track rigid

No doubt adding solidly attached walls makes the track stronger.

If it is to be used as a part time shelf, it definitely would be a help.

Especially, like in the case of Mark Mattei, where he had dozens of unassembled bikes, in boxes, stacked on his Imperial Red, during the warm weather months.

But other than that, I think it's a negative.

Along with the ease of adjustment, I already alluded to in this post, I think not having the walls permanently attached, allows the track to "breathe".

Since Retro got started, in about 2005 or 2006, it seems like just about every King has launched F1 cars, at one time or another.

Mine, in the 12 years, we have run Retro, has never had any launching issues, with low downforce F1 cars, and even with the less aerodynamic, Hardbodies, we've been racing for the last 6 years, or so.

Of course, maybe I just got lucky, and have sort of magical MDF.

Mike Swiss
 
Inventor of the Low CG guide flag 4/20/18
IRRA® Components Committee Chairman
Five-time USRA National Champion (two G7, one G27, two G7 Senior)
Two-time G7 World Champion (1988, 1990), eight G7 main appearances
Eight-time G7 King track single lap world record holder

17B West Ogden Ave., Westmont, IL 60559, (708) 203-8003, mikeswiss86@hotmail.com (also my PayPal address)

Note: Send all USPS packages and mail to: 692 Citadel Drive, Westmont, Illinois 60559


#81 Steve Ogilvie

Steve Ogilvie

    Race Leader

  • Subscriber
  • PipPipPipPipPip
  • 630 posts
  • Joined: 17-November 14
  • Gender:Male
  • Location:Kincardine, Ontario, Canada

Posted 15 July 2019 - 05:41 PM

One mistake I have seen people make when setting up an old king is they just do not get pieces in the right place, mainly the deadman. Everybody thinks a track with solid walls inside and out does not flex but that is just not true. Most people will bolt together the main straight, bank,  back straight and deadman and carry on and try to put the bridge or the leadon on last. If the deadman is not in the right spot related to the main straight everything will still fit together but it won't fit together the way it was supposed to.

  The last piece of a king track to be put in should always be the finger bank. You push and pull the rest of the track until you can see the deadman will just fall in and then everything will be in the right place.

   For a long time I sold tracks unpainted, painted, RTR, whatever people wanted. But the only track you can make a decent amount of money on is a ready to run track. So from about 1998 or so all we sold were modular RTR tracks. The strategy worked and we could make a good buck and we sold a lot less tracks but were making much better income. 


#82 Steve Ogilvie

Steve Ogilvie

    Race Leader

  • Subscriber
  • PipPipPipPipPip
  • 630 posts
  • Joined: 17-November 14
  • Gender:Male
  • Location:Kincardine, Ontario, Canada

Posted 04 September 2019 - 01:07 PM

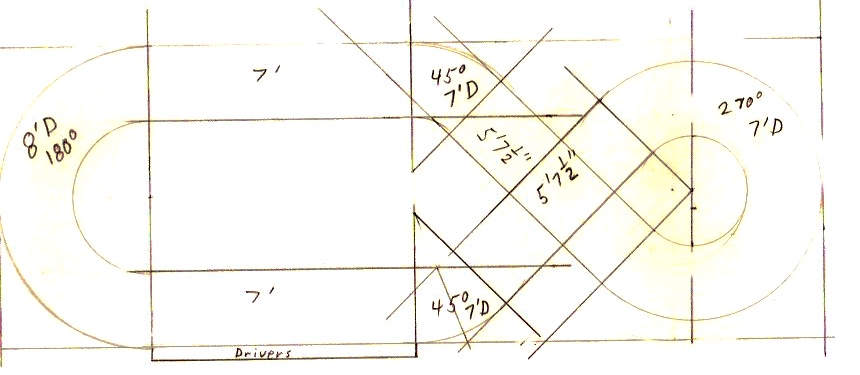
Drew up a small 4 lane track that I am going to build for my oldest son's basement. It is a simple design that I used to call the shoulder 8. I am building it at a 24" track bed, not sure on the lane spacing we will use but this gives wide spacing if we want and fairly large run offs. And a 24" width is easy to draw, although you will notice I was a bit sloppy with the drafting. But since it is symetrical, easy to figure out the dimensions without a real accurate drawing.

Scan 24.jpg


  • Lou E, Dominator and William Bowden like this

#83 Bill from NH

Bill from NH

    Age scrubs away speed!

  • Full Member
  • PipPipPipPipPipPipPipPip
  • 14,719 posts
  • Joined: 02-August 07
  • Gender:Male
  • Location:New Boston, NH

Posted 04 September 2019 - 03:29 PM

Steve I like that "Shoulder 8" layout for a short track.What is it, about 22' long in the drawing? i realize the straights can be shorter or longer for different lengths. Post some pictures here when you begin its construction.


Bill Fernald
 
I intend to live forever!  So far, so good.  :laugh2:  :laugh2: 

#84 Steve Ogilvie

Steve Ogilvie

    Race Leader

  • Subscriber
  • PipPipPipPipPip
  • 630 posts
  • Joined: 17-November 14
  • Gender:Male
  • Location:Kincardine, Ontario, Canada

Posted 04 September 2019 - 04:15 PM

Correct, it is 22' long. I have a space about 24' x 9' to work with. Going to post pics once I get started hopefully in a couple of weeks.


#85 MattD

MattD

    Posting Leader

  • Full Member
  • PipPipPipPipPipPipPip
  • 3,561 posts
  • Joined: 13-August 11
  • Gender:Male
  • Location:IN

Posted 04 September 2019 - 05:15 PM

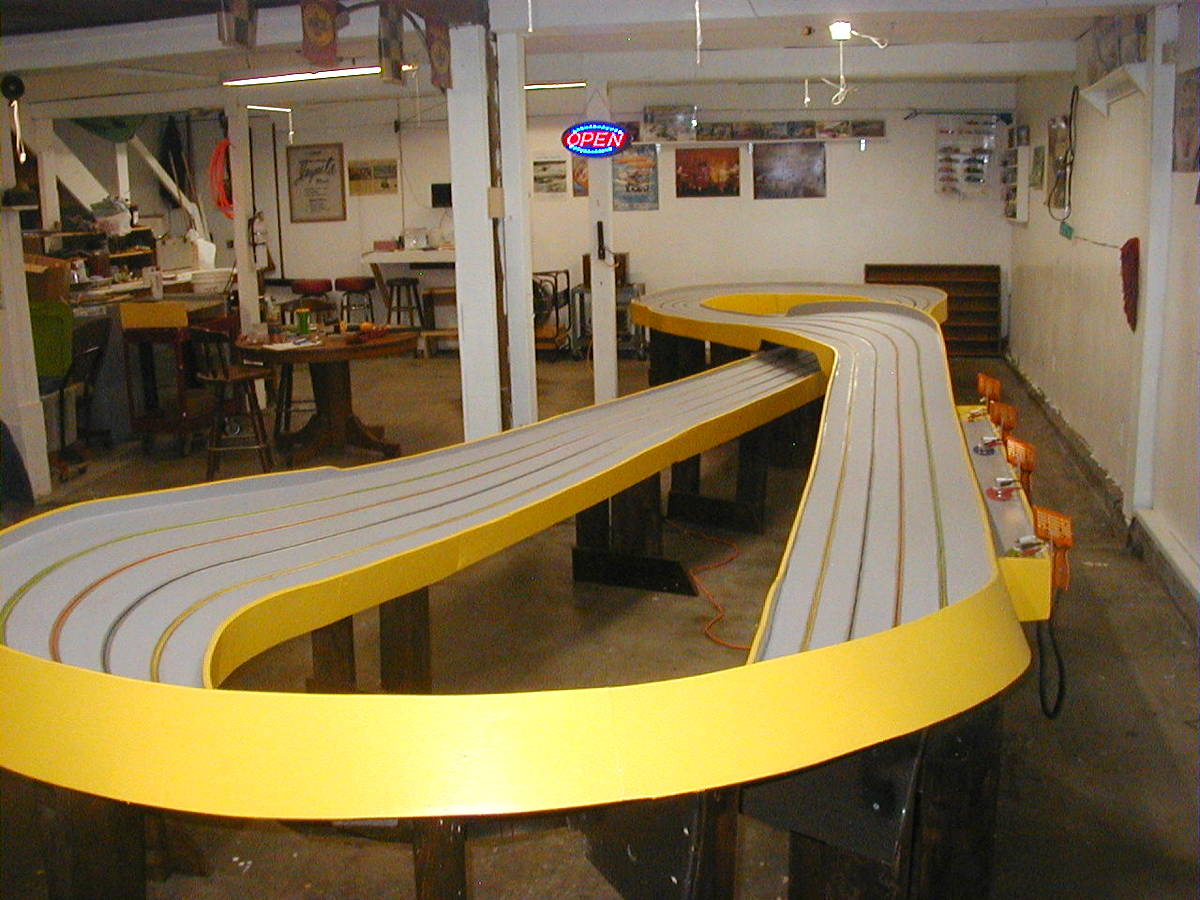
Steve you know I cut off my flat 180 curve and replaced with a 5 inch lane centers and 8 degree bank!    Guys just couldn't get around it without crashing into another car.  Now they can run side by side.  The rest of the track is still 4 inch centers.      I'm not saying the guys drive above their ability, but.....


I would put a filler between the front stretch and back stretch to keep cars from hitting the floor.    I ended up buying fish pond net covering and stapling it underneath so cars no longer  can hit the floor.    I think on the flat end, I would add an outer gutter so deslots  can roll out of the way and not be in the way of the outer lane.   


Since we run crash and burn, we how have one of the extra guys at the flat end to be the "catcher"..   If a car de-slots, the catcher picks it up and gets it out of the way before it causes a wreck!!   


I also added a controller station to the flat end for the yellow lane and a long enough wire to allow the green lane driver to stand  at the end of the banked turn.    Originally we were all lined up next to each other and it was tight.   Being spread around makes it much better.


We now have good racing and not a lot of repairs.   I guess we have been racing on this track  for almost a year now.      A 4 second lap is what we try for and I run all cars on orange to get  them dialed in a 4.0 -4.1 seconds.    There maybe a small edge, but all 4 lanes run nearly the same lap times. 


new track bright.jpg


.   


  • MSwiss, Gene/ZR1, Lou E and 2 others like this

Matt Bishop


#86 Steve Ogilvie

Steve Ogilvie

    Race Leader

  • Subscriber
  • PipPipPipPipPip
  • 630 posts
  • Joined: 17-November 14
  • Gender:Male
  • Location:Kincardine, Ontario, Canada

Posted 04 September 2019 - 09:06 PM

Your track room looks great!


#87 Justin

Justin

    Mid-Pack Racer

  • Full Member
  • PipPipPip
  • 160 posts
  • Joined: 29-February 08
  • Gender:Male
  • Location:Loveland, CO

Posted 13 November 2019 - 11:44 AM

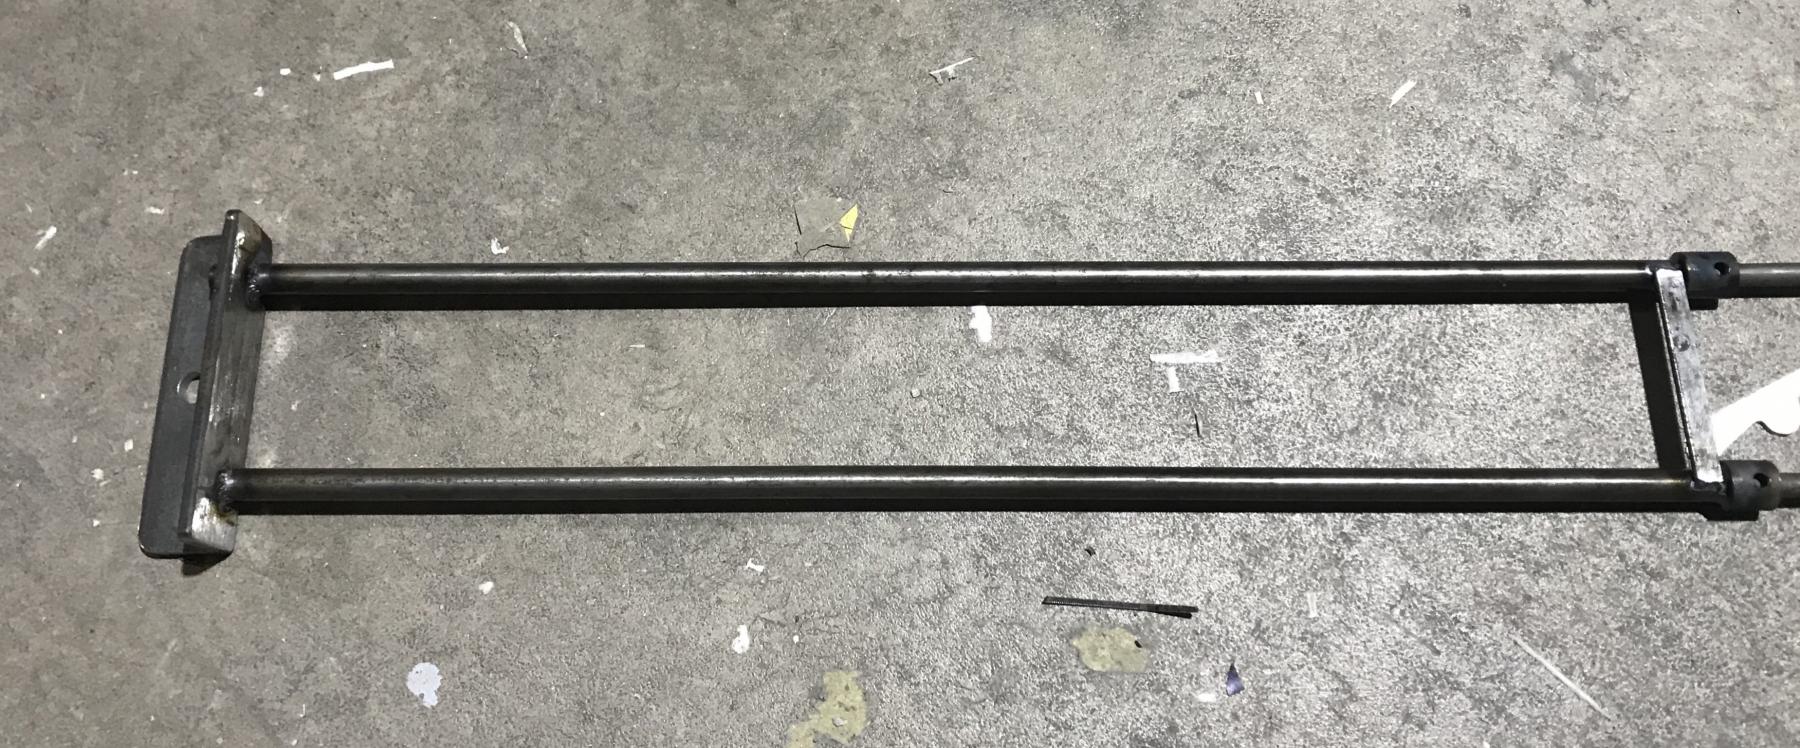
Finished the circle cutting attachment for my router this morning. Will do up to a 69 inch radius and down to about a 6 Inch radius. On to a slot cutting fixture next.

Attached Images

  • EE90AE77-1B95-4AD5-9B34-1B24F30B6782.jpeg
  • 9EC53445-1BF6-45C1-8009-2ADA4DFBFCEC.jpeg

  • Dale Tomczyk likes this
Justin Kill
(970)-581-8134 (cell)
Overkill Racecars

#88 MattD

MattD

    Posting Leader

  • Full Member
  • PipPipPipPipPipPipPip
  • 3,561 posts
  • Joined: 13-August 11
  • Gender:Male
  • Location:IN

Posted 13 November 2019 - 02:06 PM

Justin that looks pretty stout.  One thing I learned about a compass attachment for the router (I have done 3  over the years),  you need square tubing or something stout like the round tubing you have.   If you just use something flat or not real stout the  compass can bend up and down and keep the slot from being as smooth as you want.   


I added the gutter inside the straight off the bank turn on my track and that sure helped.   I took it a little farther a few months ago.   I went to the fish pond story and bought enough of that net pond covering to  cover the infield area on that end of the track.   No more cars on the floor!      It doesn't take much for an open wheel car to climb over another cars wheels and flip several feet.


The track design I used is a copy of a really basic copper taped 3 lane track that was my second track build around 1984.     I've built a lot of  different designs using Carrera for so long, but  this basic figure 8 with one long straight and two shorts is still the most fun.


It takes an 8 X 32 space.


Steve, have you got started on your son's track yet?


  • William Bowden likes this

Matt Bishop


#89 Justin

Justin

    Mid-Pack Racer

  • Full Member
  • PipPipPip
  • 160 posts
  • Joined: 29-February 08
  • Gender:Male
  • Location:Loveland, CO

Posted 13 November 2019 - 02:22 PM

Matt,

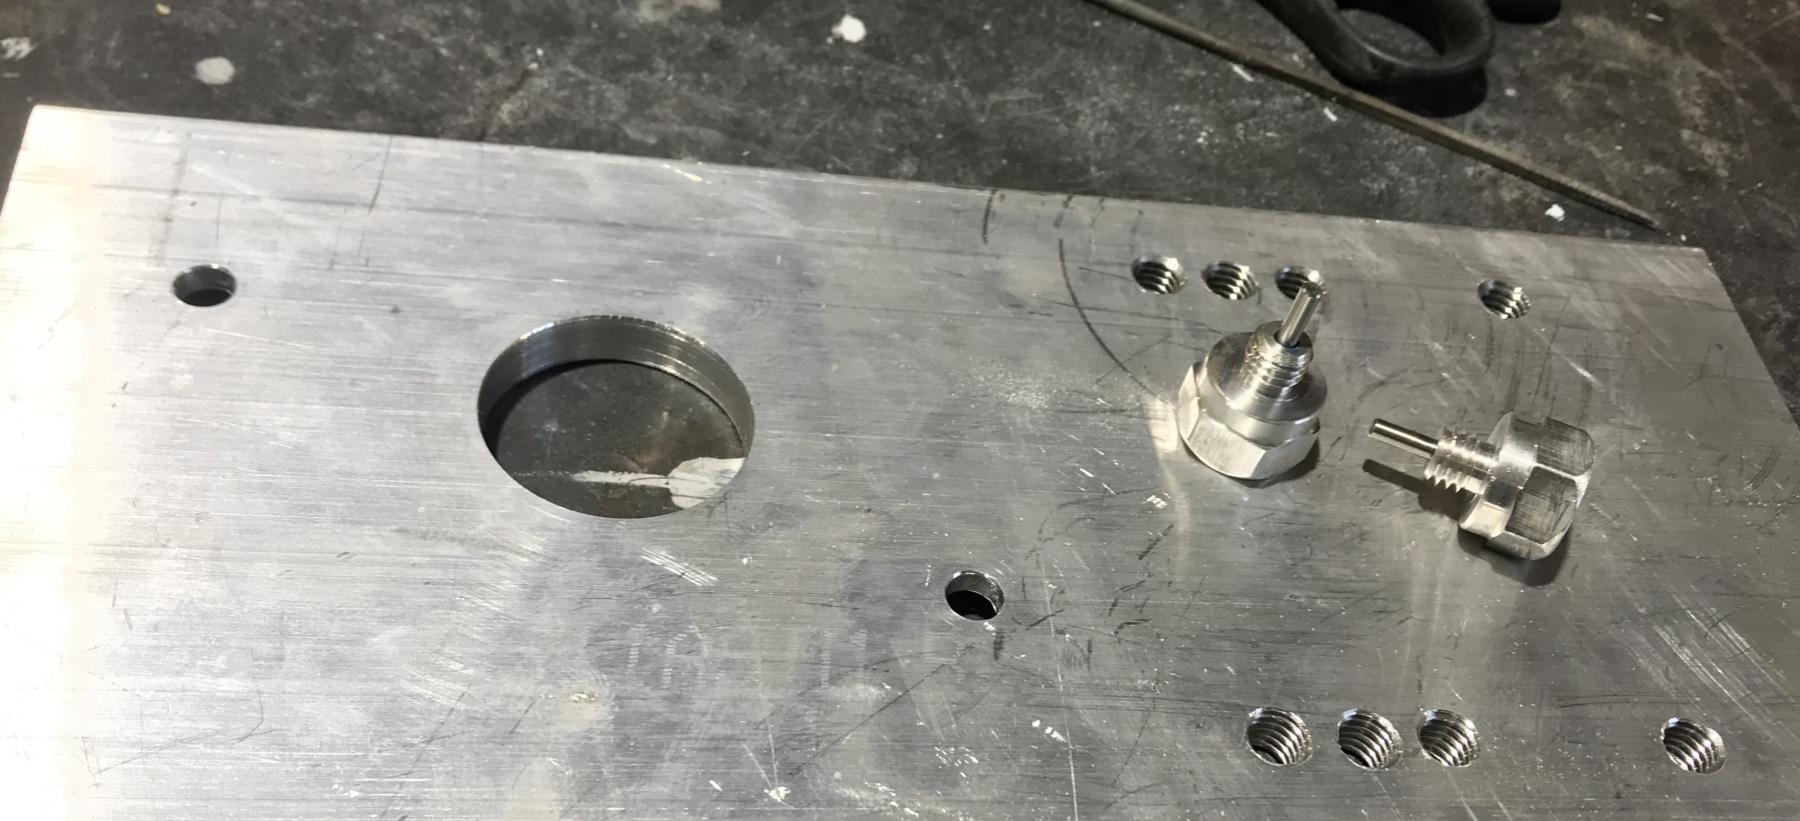
Thanks, the main part is 3/8 solid steel which goes Into the router the slider is 1/2 steel tubing, well give it a shot. Planning to start on a small (12 x 18) 8 lane tri oval for my local raceway.

Here is the slot cutting fixture I made. It got holes for 3.5, 4, and 4.5 lane spacing and a 6 gutter, but left myself some room for more gutter if I want.

Attached Images

  • 0BFC86C9-63BC-4B0B-8BFD-2FC12EDCBDAC.jpeg
  • C28F3B32-5EEE-415A-82E0-08111E3F6301.jpeg

  • MSwiss, Tim Neja, Rob Voska and 4 others like this
Justin Kill
(970)-581-8134 (cell)
Overkill Racecars

#90 MarkH

MarkH

    Race Leader

  • Subscriber
  • PipPipPipPipPip
  • 530 posts
  • Joined: 26-November 12
  • Gender:Male
  • Location:St. Louis

Posted 13 November 2019 - 04:19 PM

Excellent lane spacing tool. Well done sir.


Mark Horne

SERG - www.slotcarenduro.club
"Racing is life... everything else is just waiting." Steve McQueen - LeMans
There are only two things in life that make me feel alive. Racing is one of them.


#91 MSwiss

MSwiss

    Grand Champion Poster

  • IRRA National Director
  • PipPipPipPipPipPipPipPip
  • 25,872 posts
  • Joined: 16-April 06
  • Gender:Male

Posted 14 November 2019 - 08:47 AM

Justin that looks pretty stout.  One thing I learned about a compass attachment for the router (I have done 3  over the years),  you need square tubing or something stout like the round tubing you have.   If you just use something flat or not real stout the  compass can bend up and down and keep the slot from being as smooth as you want.   

Matt, from looking at Justin's router base, it appears he is just using his compass arm to cut the shape of the track, not the slots.

But the compass arm can never be too stiff.

I compass routed the slots on my King, so my arm is 1/2" MDF, but with a couple of vertical 1/2" strips glued on vertically, about 1- 1 1/2" apart, in the middle, to create a 'T', to stiffen it up.

Inside the vertical strips, is a second thickness of 1/2" MDF, with 1/8" holes drilled every 5/8" for easy repeatability of a myriad of radius, to cut the slots and shape, on the King, and the shape, on the Fiedler Flat.

I have 4 3/8" lane spacing, so 7 holes apart gives you your spacing. (7 X .625" = 4.375)
  • Gak likes this

Mike Swiss
 
Inventor of the Low CG guide flag 4/20/18
IRRA® Components Committee Chairman
Five-time USRA National Champion (two G7, one G27, two G7 Senior)
Two-time G7 World Champion (1988, 1990), eight G7 main appearances
Eight-time G7 King track single lap world record holder

17B West Ogden Ave., Westmont, IL 60559, (708) 203-8003, mikeswiss86@hotmail.com (also my PayPal address)

Note: Send all USPS packages and mail to: 692 Citadel Drive, Westmont, Illinois 60559


#92 MSwiss

MSwiss

    Grand Champion Poster

  • IRRA National Director
  • PipPipPipPipPipPipPipPip
  • 25,872 posts
  • Joined: 16-April 06
  • Gender:Male

Posted 14 November 2019 - 08:56 AM

Matt,
Thanks, the main part is 3/8 solid steel which goes Into the router the slider is 1/2 steel tubing, well give it a shot. Planning to start on a small (12 x 18) 8 lane tri oval for my local raceway.
Here is the slot cutting fixture I made. It got holes for 3.5, 4, and 4.5 lane spacing and a 6 gutter, but left myself some room for more gutter if I want.

Justin,
Terrific job on the router base.

Below are some features I found useful with mine.

20191114_071504.jpg
The variable position handle.

20191114_071405.jpg
The cam followers work great for routing your first slot off of the wall.

They are normally mounted in the outer row of holes.

The round insert is for holding a pencil, to preview your cut.

It comes in handy when routing a tight inside turn, on a road course, to see if the cam followers have to be moved closer together.
  • Pappy, Tim Neja and Lou E like this

Mike Swiss
 
Inventor of the Low CG guide flag 4/20/18
IRRA® Components Committee Chairman
Five-time USRA National Champion (two G7, one G27, two G7 Senior)
Two-time G7 World Champion (1988, 1990), eight G7 main appearances
Eight-time G7 King track single lap world record holder

17B West Ogden Ave., Westmont, IL 60559, (708) 203-8003, mikeswiss86@hotmail.com (also my PayPal address)

Note: Send all USPS packages and mail to: 692 Citadel Drive, Westmont, Illinois 60559


#93 MattD

MattD

    Posting Leader

  • Full Member
  • PipPipPipPipPipPipPip
  • 3,561 posts
  • Joined: 13-August 11
  • Gender:Male
  • Location:IN

Posted 14 November 2019 - 09:33 AM

When I did my track, it had been 20 some years since I routed the last one.    The arm I made for that router was long gone.     When I made the arm this time, I used a 1/4 X 1 inch piece of aluminum.     I added triangular braces at the router end that were about 8 inches long.    As I started and stopped the router in the corners, I realized the slot was not  perfectly round and that it wiggled a little.   It was from me  not having equal pressure on the router at all times.   I saw then the  router tilted ever so slightly and the arm would bend very slightly.    It was due to the arm being just a little flexible.   It wasn't enough to  screw up anything, but it is enough to be seen.     


So, make that arm strong enough to not be able to bend.    Both the arms you guys made are better than what I made.   


I made a plexi router base to do the slots,   and I would do the whole track assembled before I routed if I do another one.  I did this one in sections.  Best tip is to cut a perfect outer edge and rout off that edge using the base.    


  • William Bowden likes this

Matt Bishop


#94 MSwiss

MSwiss

    Grand Champion Poster

  • IRRA National Director
  • PipPipPipPipPipPipPipPip
  • 25,872 posts
  • Joined: 16-April 06
  • Gender:Male

Posted 14 November 2019 - 10:05 AM

Matt,
MDF is super-popular with woodworkers for making jigs.

Cheap,dense,stiff,easy to cut and route.

When it was time to cut the 14'(?) diameter Bank , for the King, I just quickly made an extension.

I never experienced any of the wiggle you describe.

I'll take a picture of it when I get a chance.

It's in one of our crawlspaces at home.

Hopefully in my wife's more navigable side. Lol

Mike Swiss
 
Inventor of the Low CG guide flag 4/20/18
IRRA® Components Committee Chairman
Five-time USRA National Champion (two G7, one G27, two G7 Senior)
Two-time G7 World Champion (1988, 1990), eight G7 main appearances
Eight-time G7 King track single lap world record holder

17B West Ogden Ave., Westmont, IL 60559, (708) 203-8003, mikeswiss86@hotmail.com (also my PayPal address)

Note: Send all USPS packages and mail to: 692 Citadel Drive, Westmont, Illinois 60559


#95 MattD

MattD

    Posting Leader

  • Full Member
  • PipPipPipPipPipPipPip
  • 3,561 posts
  • Joined: 13-August 11
  • Gender:Male
  • Location:IN

Posted 14 November 2019 - 11:11 AM

Mike, I think the arm like you made from mdf is quite strong enough.   It was the arm I made a from flat aluminum stock that was too flexible.    MDF is great for lot os of uses.    It is strong and easy to  cut and work with.      I wish I had started with a better arm.    You clamp and glue mdf and to take it apart, you can't break the glue joint.   It is strong stuff and I should have made my arm from MDF!   My routing would have been much better! 


Matt Bishop


#96 Steve Ogilvie

Steve Ogilvie

    Race Leader

  • Subscriber
  • PipPipPipPipPip
  • 630 posts
  • Joined: 17-November 14
  • Gender:Male
  • Location:Kincardine, Ontario, Canada

Posted 14 November 2019 - 11:14 AM

I have not made any progress with my son's track other than cutting up some old 2X4's to start making the joints. I work on 2 old cars, a Fiero and a 91 Civic wagon, and I got carried away with those projects and vacations so no time to build the track. We are taking a trip leaving Sunday so will be another couple of weeks before I get serious about it. Once I get up the ambition, it will not take too long and I will try to document it all and maybe post some videos.


  • cdtanner, Tim Neja, Lou E and 5 others like this

#97 Justin

Justin

    Mid-Pack Racer

  • Full Member
  • PipPipPip
  • 160 posts
  • Joined: 29-February 08
  • Gender:Male
  • Location:Loveland, CO

Posted 23 November 2019 - 05:09 PM

Thanks Mike, I appreciate that. After playing with mine a bit I definitely plan to add rollers and a handle, I can see where that would be helpful.

Justin,
Terrific job on the router base.

Below are some features I found useful with mine.

20191114_071504.jpg
The variable position handle.

20191114_071405.jpg
The cam followers work great for routing your first slot off of the wall.

They are normally mounted in the outer row of holes.

The round insert is for holding a pencil, to preview your cut.

It comes in handy when routing a tight inside turn, on a road course, to see if the cam followers have to be moved closer together.


  • MSwiss likes this
Justin Kill
(970)-581-8134 (cell)
Overkill Racecars

#98 Steve Ogilvie

Steve Ogilvie

    Race Leader

  • Subscriber
  • PipPipPipPipPip
  • 630 posts
  • Joined: 17-November 14
  • Gender:Male
  • Location:Kincardine, Ontario, Canada

Posted 30 January 2020 - 08:32 PM

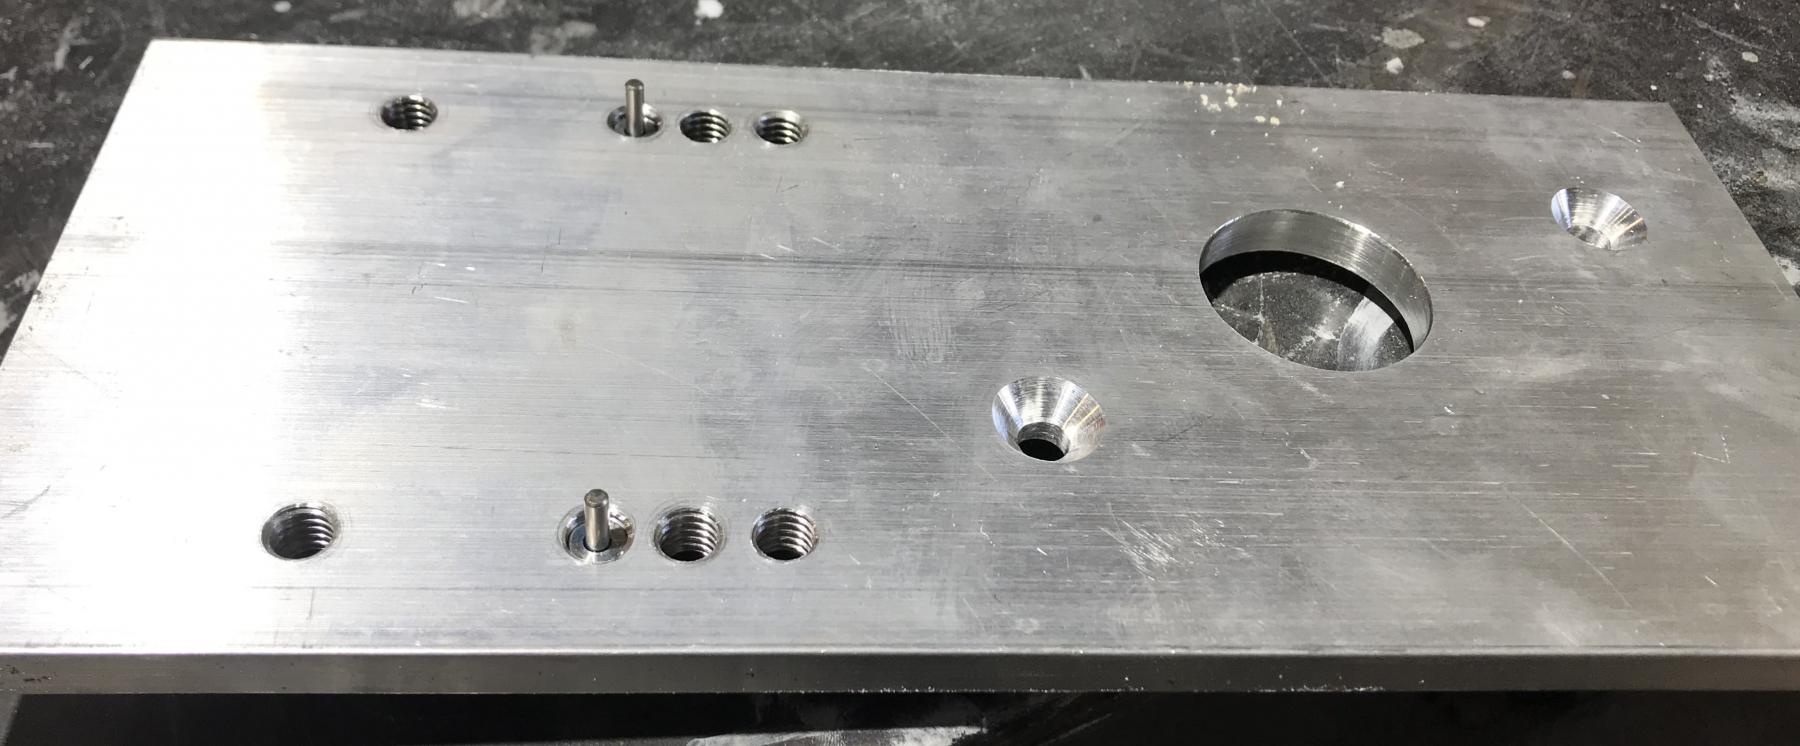
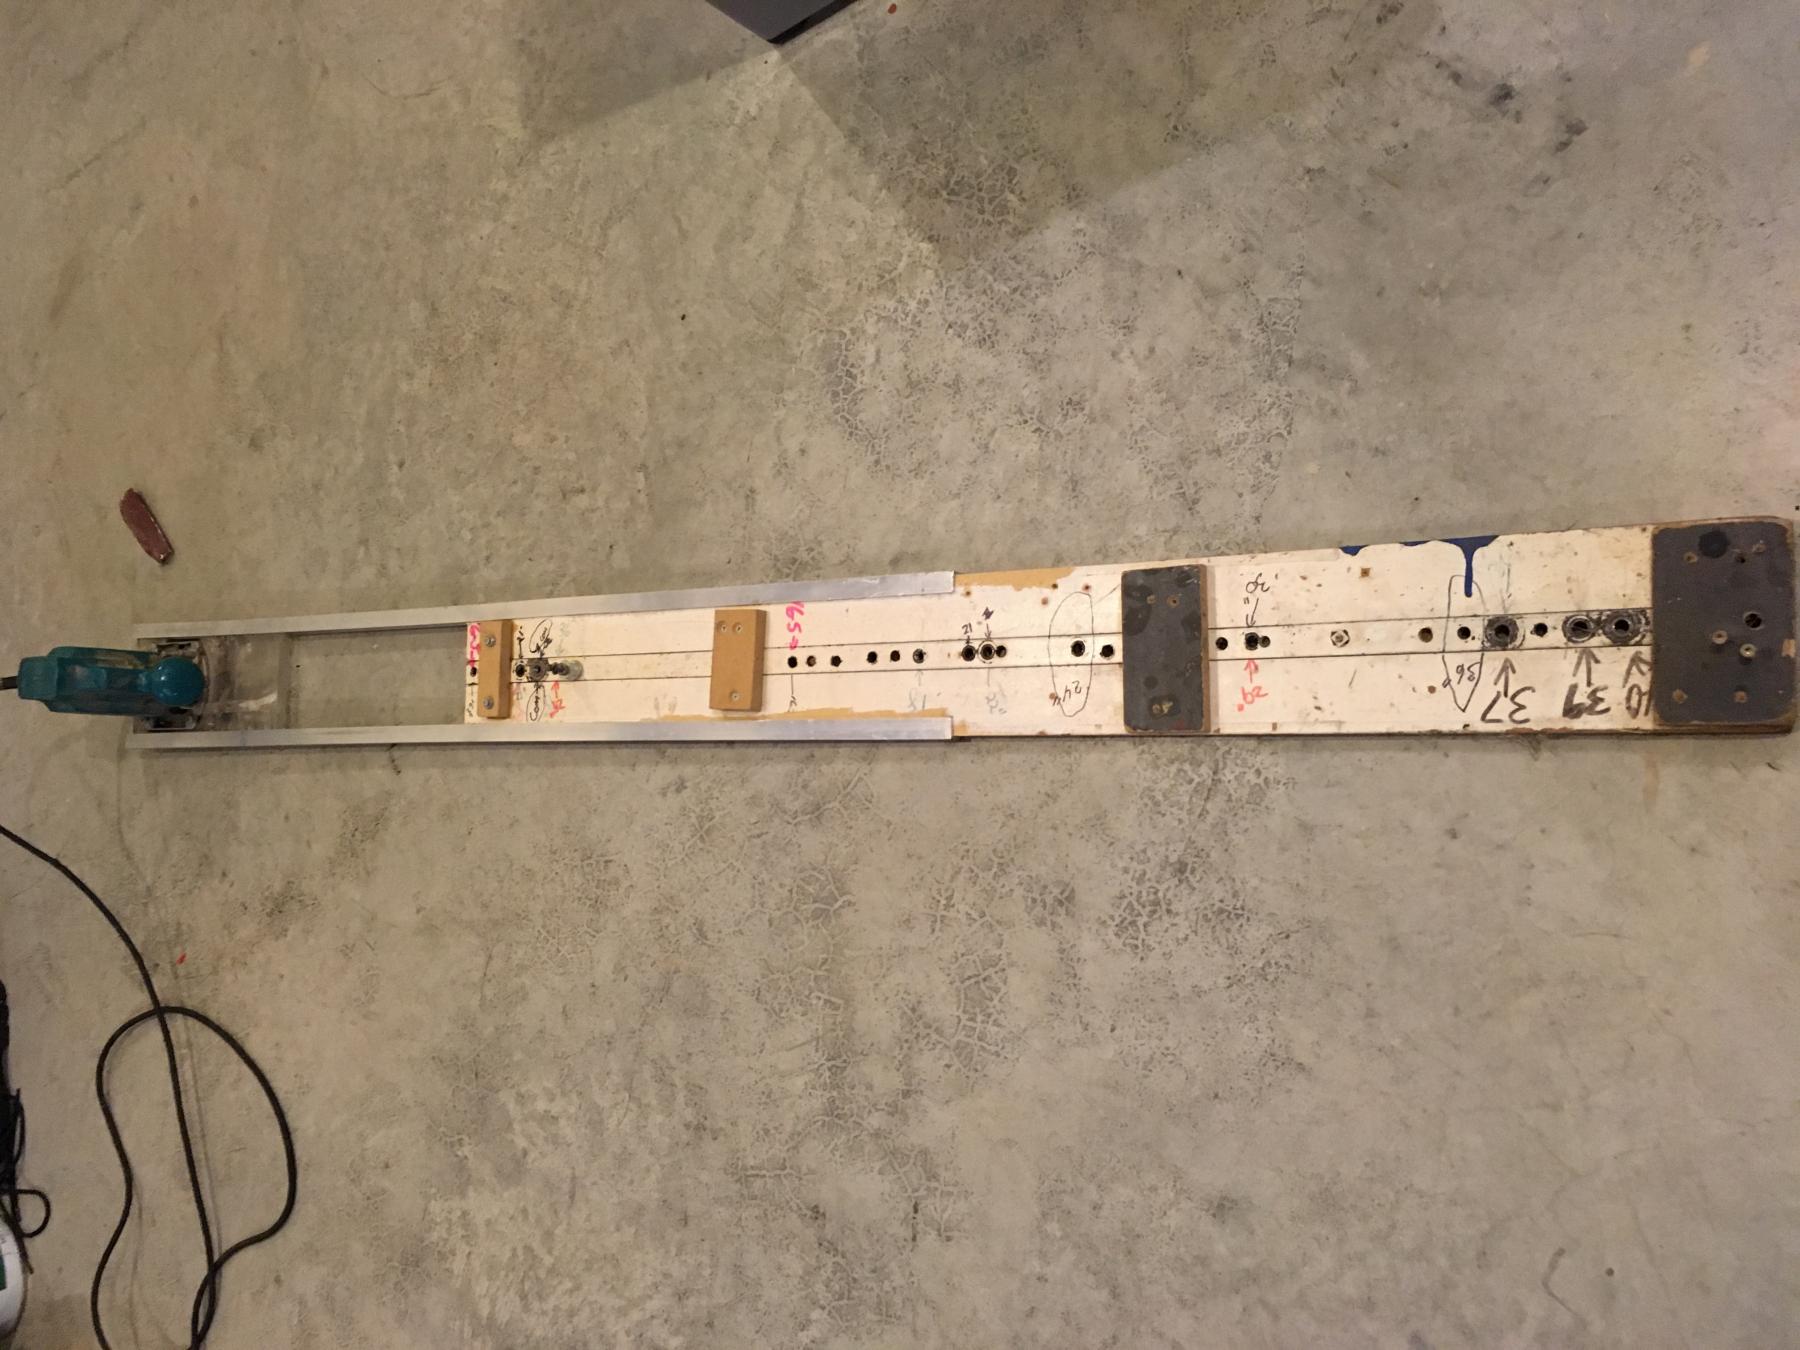
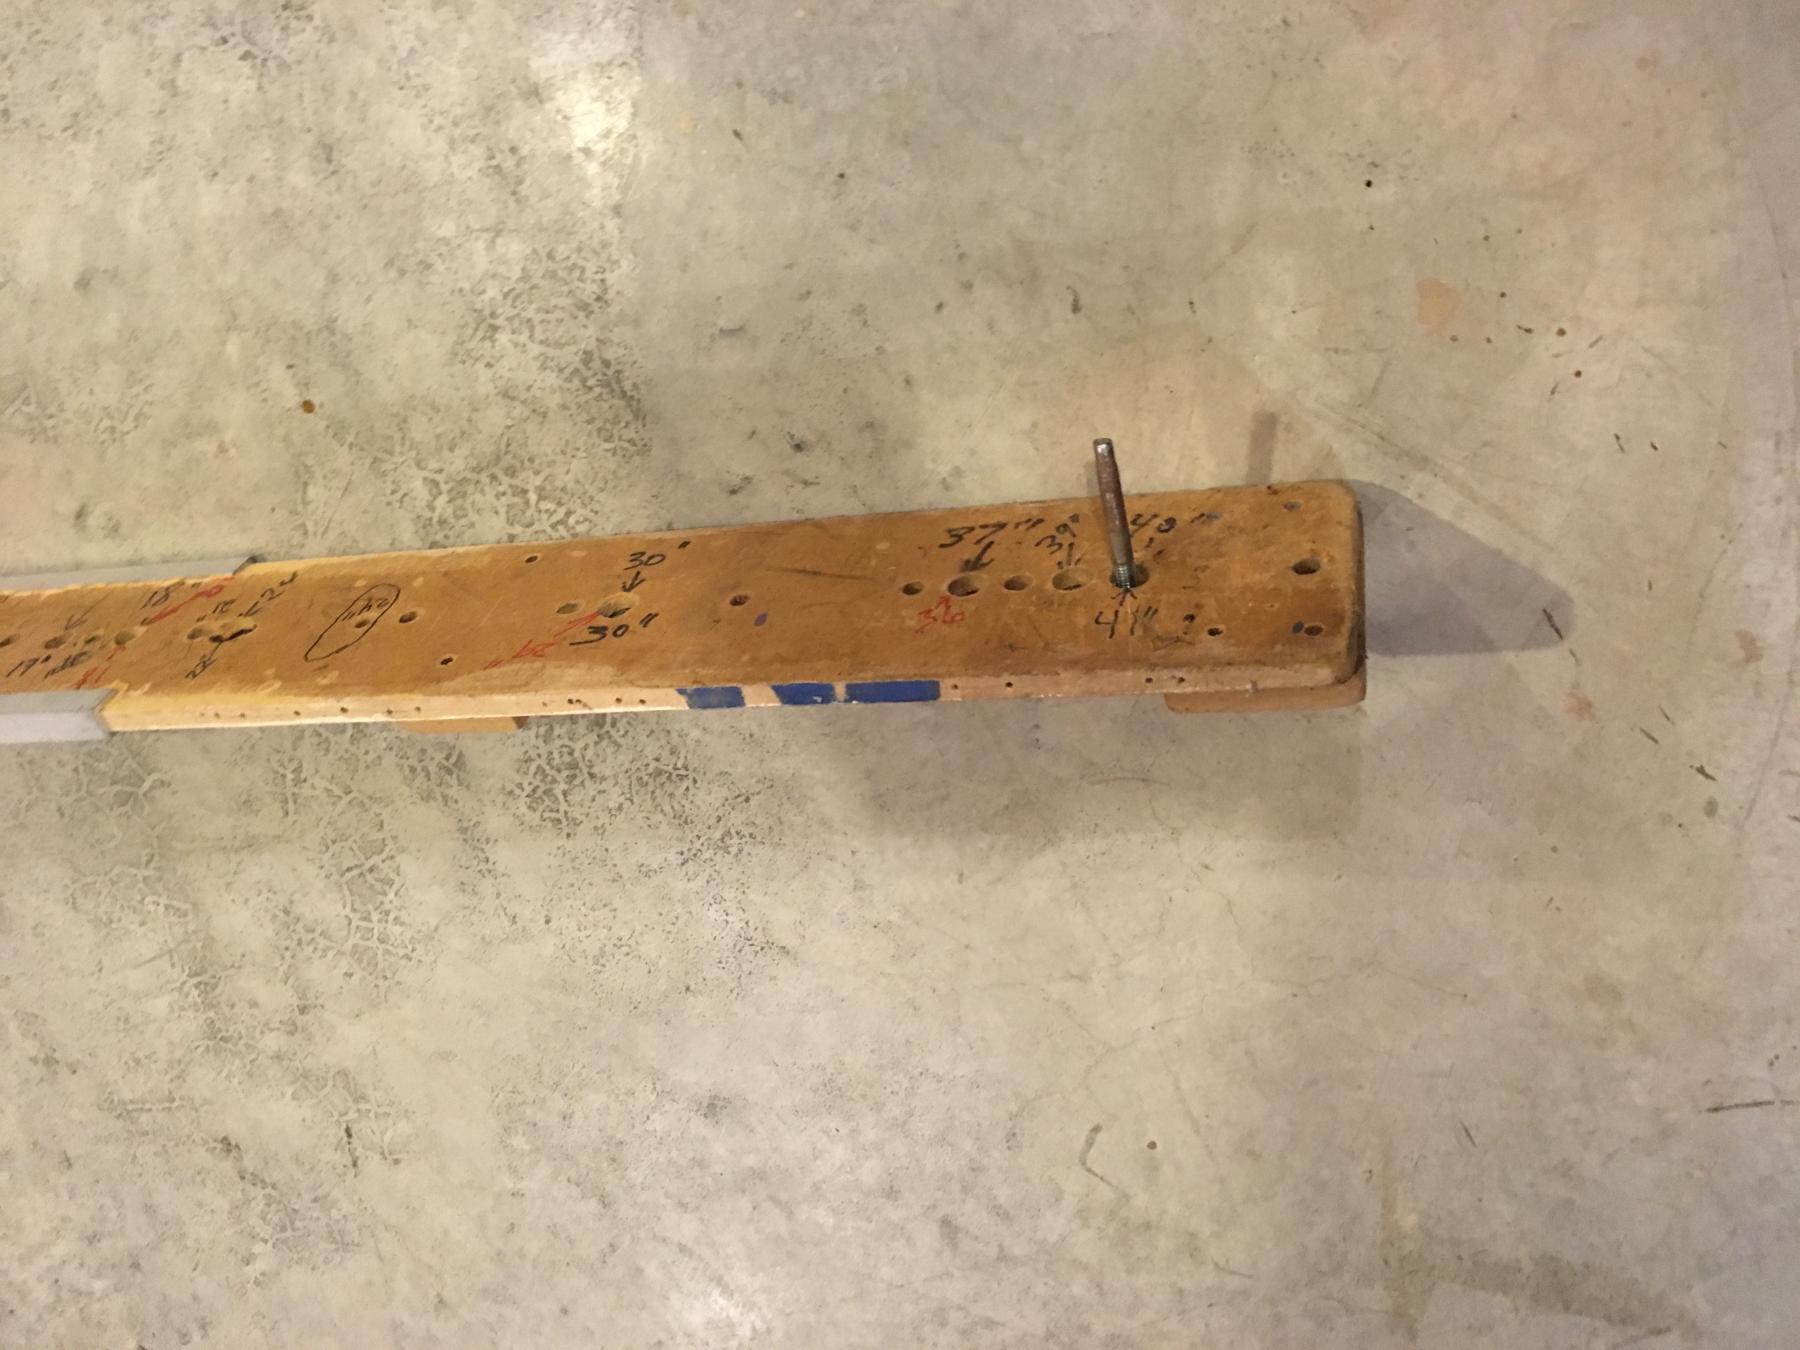
Finally making some progress on building the track for my oldest son's basement. I got the remains of my old circle cutter out of the shed it was in. Yesterday I picked up some AL 1/2" U channel for the sides of the jig. Of course they only had one 8' piece in stock but the big corner for this track is 8' diameter so 2- 4' pieces will work fine. This basic cutter cut out all the shapes for all the tracks we built in our Canadian shops. The router has seen better days and I need to make a new base that allows it to slide in the rails. I could probably make it work for this track but I want to have it back up to snuff for the long run. I was surprised the router itself actually runs, it is beat up a bit too. But it sounds fine so that saves a few bucks.

IMG_2585.JPG IMG_2590.JPG


The multiple holes in the jig are for the inside and outside cuts of each corner. You cut the outside of the corner first, measure and mark the circumference wanted, draw lines from your marks to the centre of the radius pin hole . Then you take the locator bolt and put it in to the corresponding hole to make the inner cut. You only cut the inside of the turn from line to line so the board does not break and get flimsy enough to ruin the cut. The inside circumference is determined by the jig itself and the accuracy of the lines you draw. The measurement of the inside of the corner does not matter using this type of jig.


The radius is set by sliding the router in the rails to the desired position and then drilling holes through the rails in to the plexi base plate. then add a couple of screws and it is ready to cut. I always draw a line down the 4' side in the middle of the sheet of MDF, measure and drill the radius hole, put the jig in place , slide the router to the edge of the sheet at the middle line, drill and screw the router on the rails and then make the cuts.The rails are attatched to the radius board with screws but you only remove those screws if you want to stretch the jig out for wide radius corners.


When making cuts, start from the right hand side and make the cut, then move the router back where you started and make another pass to clean things up and smooth the cut. Allways go in the same direction.


  • William Bowden, Gak and Tomark like this

#99 MattD

MattD

    Posting Leader

  • Full Member
  • PipPipPipPipPipPipPip
  • 3,561 posts
  • Joined: 13-August 11
  • Gender:Male
  • Location:IN

Posted 30 January 2020 - 08:50 PM

Keep it coming Steve.  I don't intend to do another track, but I like learning from what Swiss has done and what you have done.   I know most of the mistakes I made, I could sure do better on another one.     The current track is working fine, and I have got cars kind of bullet proof.   The guys all have fun and sometimes as many as 7-8 show up, but 6 is our  best sized group.   4 drivers, a race master and a catcher to grab the cars that deslot in the big end.    Steve I know you don't follow a lot of this forum, so I'll put  the house rules here for you to see.   We have  several race formats we use and I will post that in a few days.   I'm in the process of getting  it printed up;


P1010012 (2).JPG


  • Steve Ogilvie likes this

Matt Bishop


#100 Steve Ogilvie

Steve Ogilvie

    Race Leader

  • Subscriber
  • PipPipPipPipPip
  • 630 posts
  • Joined: 17-November 14
  • Gender:Male
  • Location:Kincardine, Ontario, Canada

Posted 10 April 2020 - 11:33 AM

I have started cutting out the track. Since we can't go anywhere because of the covid travel restrictions and it is warm enough to work outside in our big fabric shed, this is a great time to build. The local Rona still delivers so I got 10 sheets of 49"X97" 1/2" MDF yesterday.


The floor in the shed is a pressure-treated platform that is 1-1/4" thick so I am using the floor as my cutting table. A little ackward but I do not want to waste time and money making a cutting table that I will only use once. Yesterday was spent mostly prepping things so I only have the 8' banked turn cut out. 


  • Cheater, Jason Holmes and William Bowden like this


Electric Dreams Online Shop