#1826

Posted 08 August 2010 - 08:06 AM
Then I did a 26D earlier this year for a friend. Same routine, but first grind didn't quite do it, nor the second, nor... well, you get the picture - after about 10 "iterations" it was more or less in static balance. For some reason, one of the poles was way too heavy, so had to drill a couple holes on that one.
In other words, trial and error - with an emphasis on the latta...
Don
#1827

Posted 08 August 2010 - 09:23 AM
I intend to live forever! So far, so good.
#1828

Posted 08 August 2010 - 10:48 AM
For some reason, one of the poles was way too heavy, so had to drill a couple holes on that one.
Don...if you have a way of checking runout on either end of the arm, I would bet the shaft is out. The laminations are punched out identically and there should be very little if any variation from pole to pole in their weight. The copper coils weigh less than the steel lams and the variance from the copper and epoxy (which weighs far less than the copper even)...even if you somehow messed-up would be relatively easy to account for by drilling.
-john
#1829

Posted 08 August 2010 - 11:13 AM
I didn't remove a HUGE amount, but just enough so it would spin up faster, right Bill?
Don
#1830

Posted 10 August 2010 - 06:12 PM
The motor parts arrived yesterday. I was able to do a quick test this afternoon on the assembled motor. It sounds as strong as the Kemtron 6 Volt motors. I put the second arm in a Kemtron motor frame and it has decent RPM, but seems to have less torque than my other Kemtrons. This might be due to the advance in the timing. Usually 5 and 7 pole motors have zero timing (or at least very little). I have a custom end bell with retarded timing that I'm going to try. I'll report back when I get that done.
Nesta,
I use the Kemtrons for my hardbody cars on my home track. As heavy as they are, these motors make the hardbody racers handle well. When my buddies come over to race, they prefer the Kemtron powered cars over anything else. You might be interested to know that the very first hard body race at BPR was won with a Kemtron - it never fell off the track. Of course, once Paul and Foamy started racing with us, all bets were off and the Kemtron was replaced with the 36D.
JB
Requiescat in Pace
#1831

Posted 10 August 2010 - 06:20 PM
Thanks for the report! Yes, the com timing is something I have to still figure out. I thought I had pretty much duplicated the stock timing, but must have somehow changed it. Truthfully, I'm gratified that I even got in the ballpark and will keep looking further into the com situation. Speaking of coms, the Pittman can motors have some beefy coms on them...they seem huge compared to the size of the arms themselves. As you had said, the gap between the poles on those things is really small and getting the wire on there is going to be...challenging
-john
#1832

Posted 12 August 2010 - 02:33 PM
Today I mounted the offset endbell on the Kemtron with the second arm you wound. The offset was enough to partially undo the timing on the arm. Just from listening to it, the motor seems stronger now, with more RPM. I'll have to dig around for my camera and get a picture for you. There is till some timing advance as the motor does not run as well in the other direction. Without measuring, I would "guess" that it now has just a few degrees of timing.
JB
Requiescat in Pace
#1833

Posted 15 August 2010 - 07:34 AM

#1834

Posted 15 August 2010 - 08:09 AM
HiYeah, I wondered about that John, but have no way of checking run-out that I know of, and the arm is now back with my friend, hopefully in his car... I eyeballed it, and spun it around in my hands and the motor, but that didn't really tell me anything. I didn't remove a HUGE amount, but just enough so it would spin up faster, right Bill? Don
Maybe I can butt in here, with a work-around lifted from another thread--this does well when you don't have the Science Stuff.
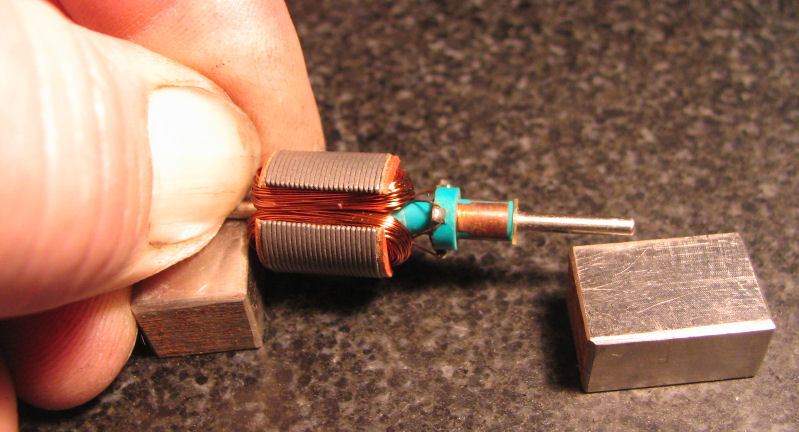
So, let's look at a trick the Old Dudes did when I was just a wee small toolmaker: "Feeler Gage Run-out" checking. You can try this at home, just start with a hard flat surface and place two hard bits of exactly the same height on it.
(Look, you can be as OCD as you like, or you can trust that the axle blocks that came with your building block are a perfect match - some of what variance you may find will be dealt with in the next paragraph.)

Now, with a thumbnail keeping one end of a shaft securely on one flat block, you try pushing the other hopefully-equal block under the shaft's far end. If everything's flat and beautifully true, ANY misalignment of that shaft will either give you a tiny resistance that you can feel, or none at all - in which case, you rotate that arm a bit and do again, and again, and in a few passes you get an idea of what you got.
And here's what happens if your setup is not dead-flat: you may feel nothing at all as you pass&rotate&pass, OR each pass gives you some interference. Hm. Well, one block's higher. SO, trade blocks and try again. Or, if that doesn't satisfy you, rotate one block and see if it's any better... and there will come a point where it doesn't matter if you actually arrive at some condition where all's equal, because as you've been going through all this, you've been getting a feel for what's going on with your shaft! Got run-out? Feel a high spot? Do some gentle bending, and do a few more passes. Better? Try again. Presto, you've taught yourself to feel in bits-of-thousandths. Really.
This sort of stuf can be done easily, in less time than it took to read my drivel, and you can get really precise with it.
1950-2016
Requiescat in Pace
And I am awaiting
perpetually and forever
a renaissance of wonder
#1835

Posted 15 August 2010 - 10:55 AM
I have a couple of ways to check for runout, one of which is the same as yours, except I use glass and/or stone...same thing basically. Problem I have isn't finding runout, it's correcting it because knowing a shaft is out is one thing...but which end of the shaft is another. In other words, if the com end of the shaft is being pressed onto one block and you see or feel runout on the other block...it (the bend) could be on the com end or the tail end. If you tweak the shaft to get it to seem true, the result when flipping it can be the same even though it seemed OK reading it on the first end. Sometimes I can get them fairly straight...sometimes it seems like an excercize in frustration. I also have a v-block setup from Rick (RGEO) with a dial indicator to read runout directly. Since the arm is supported on both ends, that can work well also...sometimes.
-john
#1836

Posted 15 August 2010 - 11:03 AM
Remember, two wrongs don't make a right... but three lefts do! Only you're a block over and a block behind.
#1837

Posted 15 August 2010 - 11:22 AM
Well, just chuck the thing and watch it turn. Most of us even half blind have eyes to see out of round.
Course if you run the motor and you see buffing on one pole, that's a clue as well! Grin.
Fate
3/6/48-1/1/12
Requiescat in Pace
#1838

Posted 15 August 2010 - 12:42 PM
Hi
Well, just chuck the thing and watch it turn. Most of us even half blind have eyes to see out of round.
Course if you run the motor and you see buffing on one pole, that's a clue as well! Grin.
Fate
Hi Rocky...we've already gone over that finding runout is easy, it's correcting it that's not so easy.
-john
#1839

Posted 15 August 2010 - 04:30 PM
Sorry I was out of town, coulda chimed in before this got frustrating.Problem I have isn't finding runout, it's correcting it because knowing a shaft is out is one thing...but which end of the shaft is another. In other words, if the com end of the shaft is being pressed onto one block and you see or feel runout on the other block...it (the bend) could be on the com end or the tail end.
Okay, partly so,but as you've rightly pointed out elsewhere, we really can't work with some of the fine tolerances we snobbishly claim to measure to--and as I rightly respond, the better we measure, the better our informed choices will be about working on the data we have.
What's all that Be Here Now gobblygook mean to a bent shaft? Means, getting a feel for how the shaft's shaped will, indeed, tell you much about where it's bent. Imagine: feel a runout when pressing on the straight end, bend that one--and suddenly you'll have a runout feel in the opposite side. See why? you've made a Z-shaft, and now you're jamming up on the outer bend of the Z.
Now, no matter where that original bend was, your response would be the same--"Oh, I bent too far, bend back"---and now you'll either be back to your original or go too far the other way, leading you to the right conclusion.
That's why I recommend doing many passes between the blocks on both ends--& I will start from the shortest like in the picture, because any runout from that end will be magnified more and because our horse sense says the runout's likely on the long, knocked-about gear end--many passes, to get a feel for where the problem seems to be.
The intent here is to get us thinking in terms of problem-solving, getting an understanding of just what the engineering concerns are and finding usable workarounds, rather than tossing hands up when the Proper Tool isn't available. You're rigt, the solution isn't perfect, but it's cheap and it's there-mostly.
Missed this one too:
Ah. Right again, at first; But, if all you got in your toolbox is a pin vise and a verve, chuck shaft in the pin vise and whack the other end with the verve 'til something happens. Trust this, like learning to hammer a nail; you get the process pretty quickly after a few painful moments at the start, and then it becomes second nature...we've already gone over that finding runout is easy, it's correcting it that's not so easy.
I'm currently re-learning how to drive these little puppies. Anything's hard until you start to do it.
Duffy
1950-2016
Requiescat in Pace
And I am awaiting
perpetually and forever
a renaissance of wonder
#1840

Posted 15 August 2010 - 09:23 PM
Quote
..we've already gone over that finding runout is easy, it's correcting it that's not so easy.
Ah. Right again, at first; But, if all you got in your toolbox is a pin vise and a verve, chuck shaft in the pin vise and whack the other end with the verve 'til something happens.
Well...no not "at first", because Rocky's post was only about how to find out if a shaft isn't true.
-john
#1841

Posted 16 August 2010 - 07:24 AM
because our horse sense says the runout's likely on the long, knocked-about gear end
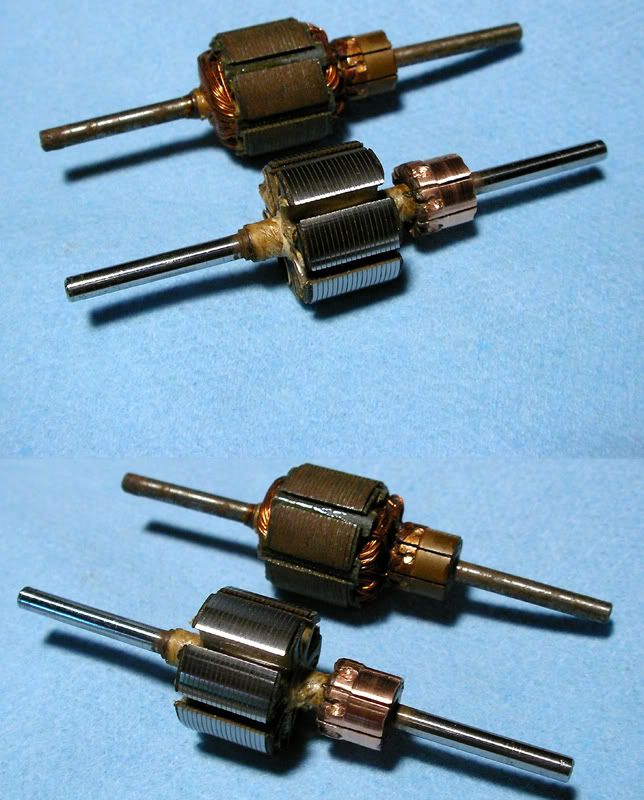
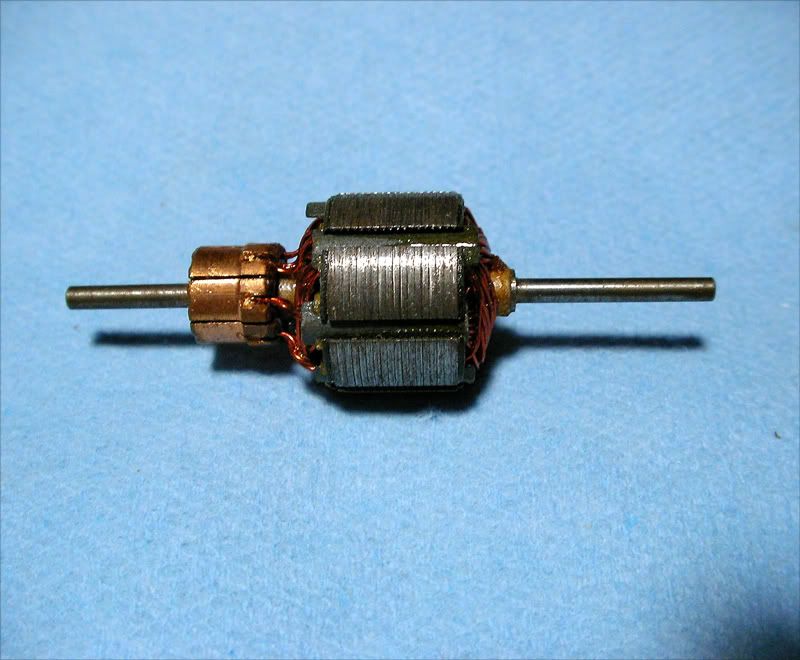
I think you're probably right in most cases when the bending has taken place after the motor was run. In most cases where the arm is either new or even when it's been installed already, the shaft was probably "out" from the get-go. The picture below is an example. Say the shaft were cut short on the com end but with some extra for the com end bearing, you'd still be looking at a pretty long shaft on both the com and the tail ends because the com won't do much if anything to "straighten the shaft" and the shaft may well have been bent from the top of the stack out to the tip of the com end.
Since the laminations that make up the stack are a close fit on the shaft, any original bend of the shaft inside the stack can be discounted. So, shaft problems original to the shaft (not due to having been bent by the person running the car) are most likely on either the com or tail end. I have spent a fair amount of time tweaking shafts and doing the whole "feel" and "guess/assume" thing, but haven't had reliable/repeatable results based on what the dial indicator and/or razor blades are telling me. I can either make things better or worse, so I often will "fall back 10 yards and punt (press in a new shaft).
I do appreciate your telling me what you've done...I was just hoping it was some machinist's "inside secret" that I hadn't tried yet. In previous times I had asked the question, I was hoping one of the "motor guys" here (Tony P, Ron H, Philippe...etc.) might have chimed in. Since they haven't...I figured that "shaft-truing" is actually not done because it's either not economically feasible (too labor/time intensive) or really isn't "do-able" and that instead, armatures are simply installed with shafts that are true from the beginning. I wonder if a motor-reconditioning service that took in an arm for rebalancing and com-cutting would have a method if they found the shaft out, or would they just send the arm back to the customer saying it was not saveable?

-john
#1842

Posted 16 August 2010 - 11:59 AM
Depending on the run out, I use different techniques. SOME can be fixed by using a drill or dremel with a fine chuck and running the bend IN a guide or on a surface. Sometimes, you can just see it and I do little "taps" to get it into line. I don't like a hard tap because it can stress the metal.
For me, these details are the fun part.
Might not matter, though.
Fate
3/6/48-1/1/12
Requiescat in Pace
#1843

Posted 16 August 2010 - 03:08 PM
-john
#1844

Posted 19 August 2010 - 05:44 PM

...I did my best, but??? Brazing the com was a nightmare
-john
#1845

Posted 20 August 2010 - 11:47 AM
Oh........comon, John, you KNOW you really actually had fun!
Fate
3/6/48-1/1/12
Requiescat in Pace
#1846

Posted 21 August 2010 - 03:50 AM
Don
#1847

Posted 21 August 2010 - 07:07 AM
Thanks. I wasn't thrilled with the idea of soldering the com connections so I just "went for it" and filled those little holes on the com with brazing silver by hitting the com directly with the heater element
-john
#1848

Posted 21 August 2010 - 02:04 PM
Ernie
#1849

Posted 22 August 2010 - 10:26 AM
It's a thrill to see your success on these arms John!! They look great to me!! I'm sure they will perform profoundly superior than it's previous condition
Thanks Ernie, but "success" is a relative term and I've had more than my fair share of failures and I have no idea whether this arm will run well...or even at all. I would be happy as a pig in you-know-what if the arm worked as well as the stock arm did originally and have serious doubts about that. I did give it the old college try though and my worries aren't so much about winding the poles anymore now that I've tried it...although that is more difficult and tedious than a 3 pole arm. The real problem with this type arm is the com connection and my experiences with soldering com tabs hasn't been good with anything above a really mild arm. Since Don was completely OK with the possibility of failure here, I figured the only way to go was to try and braze the com. Thanks again Ernie:)
-john
#1850

Posted 22 August 2010 - 11:30 AM
Would a 5-pole arm put out more torque/power than a 3 pole due to having more wire?
Thanks!
Ernie


 This topic is locked


