Jump to content


Photo

Arm winding #1

Closed due to length

  • This topic is locked This topic is locked
3573 replies to this topic

#1876 havlicek

havlicek

    OCD Rewinder

  • Subscriber
  • PipPipPipPipPipPipPipPip
  • 11,198 posts
  • Joined: 20-August 07
  • Gender:Male
  • Location:NY

Posted 03 September 2010 - 10:22 AM

Hi Don,

Thanks, I had thought of that myself as Dennis is one of the few I see doing the SW thing...and he does it so freaking well to boot! I figure the short length would allow for some decent rubber in that configuration, and the bussbars also simplify things for running SW.

-john

PS...your package should be there (along with a little goody) soon. :)
John Havlicek


#1877 don.siegel

don.siegel

    Grand Champion Poster

  • Subscriber
  • PipPipPipPipPipPipPipPip
  • 5,858 posts
  • Joined: 17-February 06
  • Gender:Male
  • Location:Paris, France

Posted 03 September 2010 - 10:35 AM

Amen John! When you cut the can down, how do you keep it square? I've been meaning to do that on a Ram-Boochie (you know, one of those 7 pole arms you love so much...), but I'm a little afraid to start cutting on the can, in case I snip too much on one side...

Don

#1878 havlicek

havlicek

    OCD Rewinder

  • Subscriber
  • PipPipPipPipPipPipPipPip
  • 11,198 posts
  • Joined: 20-August 07
  • Gender:Male
  • Location:NY

Posted 03 September 2010 - 11:35 AM

Hi Don,

When you cut the can down, how do you keep it square?


I wish I could tell you that I have a small cutoff saw so i can just lop the end off and have it come out OK...but I don't. I simply scribe lines on both flat sides of the can and cut the can a little "proud" of the lines and then finish the can off with some sandpaper on my glass work surface. I only get "anal" if there's a problem when I try and spin the arm after mounting the endbell...it should turn really freely even with bushings. If there seems to be any binding, then I start re-measuring and adjusting the end of the can a little at a time until it all works. I'm actually not necessarily looking for absolute "square" so much as for the arm to spin properly. I would think both are the same, but if they're not, then I favor the way the arm spins over what reads as square anyday. :)

-john
John Havlicek

#1879 gascarnut

gascarnut

    Posting Leader

  • Full Member
  • PipPipPipPipPipPipPip
  • 3,938 posts
  • Joined: 16-February 06
  • Gender:Male
  • Location:Irvine, CA

Posted 03 September 2010 - 11:38 AM

That is one SWEET motor!

With a 26 wind in it, it is a candidate for a 1/32 Eurosport type frame, or perhaps a low-angle anglewinder frame from the 1980's:

Posted Image

Posted Image
Dennis Samson
--------------------------
Scratchbuilding is life
Life is scratchbuilt

Samson Classics

#1880 havlicek

havlicek

    OCD Rewinder

  • Subscriber
  • PipPipPipPipPipPipPipPip
  • 11,198 posts
  • Joined: 20-August 07
  • Gender:Male
  • Location:NY

Posted 03 September 2010 - 11:47 AM

Hi Dennis,

It might not be up to the lovely powerplants in your pictures, but considering it's the love-child of a TSR and Mura relationship I think it will definitely run just fine. PM sent :)

-john
John Havlicek

#1881 gascarnut

gascarnut

    Posting Leader

  • Full Member
  • PipPipPipPipPipPipPip
  • 3,938 posts
  • Joined: 16-February 06
  • Gender:Male
  • Location:Irvine, CA

Posted 03 September 2010 - 11:57 AM

Hi Dennis,

It might not be up to the lovely powerplants in your pictures, but considering it's the love-child of a TSR and Mura relationship I think it will definitely run just fine. PM sent :)

-john

John,

The top photo shows another "love-child", a mixture of a modified Johnson 111 can, polymer cobalt magnets from 1-0-1 Products in the UK (no longer available of course), a modified Mura endbell, and a ProSlot 38T27 armature.

The second photo has a modified 1-0-1 (Inphinity) can instead of the Johnson, but the rest of the specs are similar. The armature I think was a 40T28 in this case.

The top photo was one of my cars, that I sold when I stopped racing in 1989 (we do stupid things sometimes.....), the lower one was a restoration I did about a year back for the owner of the car.
Dennis Samson
--------------------------
Scratchbuilding is life
Life is scratchbuilt

Samson Classics

#1882 MantaRay

MantaRay

    a dearly-missed departed member

  • Member at Peace
  • PipPipPipPipPipPipPip
  • 2,859 posts
  • Joined: 05-March 06
  • Gender:Male
  • Location:Chicagoland

Posted 05 September 2010 - 12:00 PM

John,I thought I saw a post about you needing some CH arms. I found these in some obscure corner..........they look new............513 diameter...approx 450 stack lenght.........1.10 Overall length(varies) Can you use them?
Posted Image
Ray Price
11/4/49-1/23/15
Requiescat in Pace

#1883 Phil Irvin

Phil Irvin

    Checkered Flag in Hand

  • Full Member
  • PipPipPipPipPipPip
  • 1,764 posts
  • Joined: 21-July 08
  • Gender:Male
  • Location:Wesley Chapel, FL

Posted 05 September 2010 - 04:33 PM

It's also true that winding is imperfect and can cause imbalance and even epoxy, to a lesser extent can. Having said that, in the end it doesn't matter where the imbalance comes from, it's important to at least try and do something about it...hence my crude static balancing.

So back to your question Bill, if you look at an arm that has a lot of wire on it, the last pole wound can overlap the first pole a bit and even the way you attach the wire to the com tabs can be slightly "heavier" at the first/last tab (I try and avoid that even though the weight is teensy-weensy). That extra wire can mean a bit more weight (as well as more resistance on that pole, but that's another thing altogether), so it can help to offset that by not finishing on the "heavy" pole. So I often mark the heavy pole with a Sharpie beforehand. I also go through arms that I'm stripping after they're cleaned-up as well as new ones to look for bad shafts, or at least shafts that are bad enough to cause significant problems. I also got a small arbor press a while back to use instead of "C" clamps or a vise for installing shafts...cheap and MUCH more precise, making shaft-swapping a predictable job. I also keep a bunch of drill blanks on hand and even some .078" piano wire that's pretty straight and round for some Mabuchi jobs. Fighting an out-of-true shaft or even trying to straighten one out is tedious as heck. Of course, I would think none of this is a big concern for motor manufacturers. They use good quality stock and have nailed down a sequence of steps for building arms that's efficient and also takes some of the human-error out of the equation.
Sorry for the long-winded reply. :blush:

-john


In doing my own 40 years ago when 28 AWG was 'BIG'. Overlapping wire was more 'norm' than not. After doing one arm and doing a static balance before applying epoxy. I had one pole that was rather heavy. I dewound it and found that it had the same number of turns on all poles but the LENGTH of wire was about 1.5 in. longer on the 1st pole dewound. The last wound and it did have some overlap... I started measuring the wire first before winding and then winding by turns and comparing wire length left over. Now with not much winding overlap. That may be moot now days. But..... ;)

OLPHRT
PHIL I.

#1884 havlicek

havlicek

    OCD Rewinder

  • Subscriber
  • PipPipPipPipPipPipPipPip
  • 11,198 posts
  • Joined: 20-August 07
  • Gender:Male
  • Location:NY

Posted 05 September 2010 - 05:25 PM

John,I thought I saw a post about you needing some CH arms. I found these in some obscure corner..........they look new............513 diameter...approx 450 stack lenght.........1.10 Overall length(varies) Can you use them?
Posted Image


Hi Ray, sure thing. It's rerally difficult to undo arms like that, but I put them aside and do a little bit at a time. Those are especially useful since they aren't balanced (Challenger) and if anyone has more like them I could use those too. Please let me know the details Ray! :)

Boy Phil, being off by one and a half inches is a lot and if winding by length works for you then that's all that counts. I guess we all get into our own way of doing things and then learn how to make that work for us because I definitely have some...er...unique methods:unsure: .

-john
John Havlicek

#1885 Prof. Fate

Prof. Fate

    a dearly-missed departed member

  • Member at Peace
  • PipPipPipPipPipPipPipPip
  • 6,580 posts
  • Joined: 20-February 06
  • Gender:Male
  • Location:Salt Lake City, UT

Posted 06 September 2010 - 12:48 PM

Hi

Locally, I am allowed to use them as well....I'll take your balanced ones! A lot of my old survivors from the Pre-flexi days use these arms. Simply, they are "enough" when just playing with an old car with a C can. On the local track, they only drop a couple tenths from the "proper" arm, but when you are just playing it is no big deal.

And this arm is very low stress in an anglewinder. Hotter arms, you do a regular bit of work on can and gear side bushings every couple hours with, say a 26. Drop to a 30s like this and play and the times aren't that different, but the maintainence goes WAY down.

Fate
Rocky Russo
3/6/48-1/1/12
Requiescat in Pace

#1886 havlicek

havlicek

    OCD Rewinder

  • Subscriber
  • PipPipPipPipPipPipPipPip
  • 11,198 posts
  • Joined: 20-August 07
  • Gender:Male
  • Location:NY

Posted 10 September 2010 - 09:50 AM

I have a couple of Mabuchi 36D jobs coming up, and one of them allows for alternate endbell hardware. Keeping that in mind, I did up an arm that would be stoopid in a stock FT36D but should be fine in a can with Arcos and an endbell with say D-motor or C-motor brush hardware. I had a 36D stack that needed a new shaft as the original was cut and nicked like crazy, so I pressed off the old shaft and decided to use a 3/32 axle for the new shaft. With the stock shaft at around .089" and the axle at around .090"-ish, the arm will be a much better fit for either vintage or new 3/32" bearings. The stock bushings would have to be opened up a touch as those couple of ten-thousandths do make a difference. I actually had to assemble the stack by pressing one lam at a time so as not to distort things and/or break the shaft, so that was a little tedious...but with .014" lams, there isn't many of them and I shortened the stack by one lam and removed the fiber stack insulators. For the com I chose what I believe is an old Champion and brazed the connections with no trouble as the tabs (and I assume also the com plates) are nice and stout. With the Arcos shimmed and centered and the better brush hardware, it should make a strong 36D as I did a #29 double wind (I mismarked it as a #30 dbl.). Going to balance the thing, all I could get out of it was one small hole on my R-GEO static balancer...so things look good!

Posted Image

-john
John Havlicek

#1887 Phil Irvin

Phil Irvin

    Checkered Flag in Hand

  • Full Member
  • PipPipPipPipPipPip
  • 1,764 posts
  • Joined: 21-July 08
  • Gender:Male
  • Location:Wesley Chapel, FL

Posted 10 September 2010 - 12:29 PM

Boy Phil, being off by one and a half inches is a lot and if winding by length works for you then that's all that counts. I guess we all get into our own way of doing things and then learn how to make that work for us because I definitely have some...er...unique methods:unsure: .
-john

:laugh2: :laugh2:
You shoulda heard the @#$%^%$#@....The next arm was 4 turns less...I REALLY worked the wires with Popcycle sticks and had no overlap....Very little balancing with epoxy....Was a screemer :) Lasted threw 2 sets of brushes.. :shok: ..Unheard of back then. Thank god for the elephant wings & comm cooler :laugh2:

OLPHRT
PHIL I.

#1888 havlicek

havlicek

    OCD Rewinder

  • Subscriber
  • PipPipPipPipPipPipPipPip
  • 11,198 posts
  • Joined: 20-August 07
  • Gender:Male
  • Location:NY

Posted 14 September 2010 - 08:09 AM

Dennis Sampson sent me some neat stuff for no apparent reason (!) and among the stuff was a Mura C can endbell that had been turned/trimmed to fit a Johnson 13UO-sized can ...very snug/tight. So I did a smidge more trimming of the endbell and then cut the can length down about 1/8" or a bit more. I did the usual "body & fender" work on the can...a little straightening, filling-in the magnet stops with solder and then coated it with textured black to make it look nice and serious. A little trimming of a set of mini motor neo magnets and they were epoxied-in to the can to nicely center the arm I prepped in the field and the can also got a nice sealed bearing to match the bearing I installed in the endbell. To finish off the setup, I installed a set of vintage bussbars (trimmed a little)/hoods and aluminum heatsinks. I was going to install a pair of elephant ears, and still might, but it kinds seemed to defeat the whole purpose of the mini-motor thing. :unsure: So thanks to Dennis' inspiration, I'm on my way to another "Walnut" motor. I have to think a little about the wind, but the magnets seem up to a pretty stout arm.

Posted Image

-john
  • MarcusPHagen likes this
John Havlicek

#1889 havlicek

havlicek

    OCD Rewinder

  • Subscriber
  • PipPipPipPipPipPipPipPip
  • 11,198 posts
  • Joined: 20-August 07
  • Gender:Male
  • Location:NY

Posted 15 September 2010 - 02:58 PM

I did this:

Posted Image

...and put it in this:

Posted Image

It's a cute little sonofagun :)

-john
  • MarcusPHagen likes this
John Havlicek

#1890 gascarnut

gascarnut

    Posting Leader

  • Full Member
  • PipPipPipPipPipPipPip
  • 3,938 posts
  • Joined: 16-February 06
  • Gender:Male
  • Location:Irvine, CA

Posted 15 September 2010 - 03:16 PM

Wow, that is nice!

And you work so quickly - it would take me weeks to do something like that.

What's the wind on the armature?
Dennis Samson
--------------------------
Scratchbuilding is life
Life is scratchbuilt

Samson Classics

#1891 havlicek

havlicek

    OCD Rewinder

  • Subscriber
  • PipPipPipPipPipPipPipPip
  • 11,198 posts
  • Joined: 20-August 07
  • Gender:Male
  • Location:NY

Posted 15 September 2010 - 04:03 PM

Hi Dennis,

Thanks, and thanks for the neat stuff! The arm is a #23 :shok: ...I got the idea after talking to Bill Bugenis. This arm could really use cobalt magnets, but I don't have any so I gave it a try anyway and it actually seems not that bad. I'm going to wind a #25 for it also and think that one will be just about right. B)

-john
John Havlicek

#1892 Kim Lander

Kim Lander

    Race Leader

  • Full Member
  • PipPipPipPipPip
  • 601 posts
  • Joined: 06-June 09
  • Gender:Male
  • Location:Macon, GA

Posted 15 September 2010 - 08:49 PM

BEEEEEEEUUUUUTTTIIIIFFFFUUUULLLLL Wind......John, you never stop amazing me....that is nice work.....I have some shunt wire connectors I`ll send you, see what you think of them, I just place them under the spring pole with the shunt connected to it, let me know how you like them, I have had quite good results ......Kim

#1893 Gus Kelley

Gus Kelley

    Race Leader

  • Member at Peace
  • PipPipPipPipPip
  • 501 posts
  • Joined: 23-August 09
  • Gender:Male
  • Location:Sacramento, CA - always

Posted 15 September 2010 - 11:15 PM

Hey John! Great build. It brings back memories of a local gentleman by the name of Paul Updyke and his motor work. He did a lot of things with this motor in '67-'68 including sanding down mura magnets to fit inside the can and cutting out the backs of the can and epoxying the magnets in others. He also built long stack and short stack arms along with factory length ones. He also tried shortening the can as you did. The arms were standard for his conventional motors. He was quite an "engineer". He didn't limit himself to motors only, but that is another story about "Paul" Gus in Sacto.
Gus Kelley
12/01/54-7/22/14
Requiescat in Pace

#1894 havlicek

havlicek

    OCD Rewinder

  • Subscriber
  • PipPipPipPipPipPipPipPip
  • 11,198 posts
  • Joined: 20-August 07
  • Gender:Male
  • Location:NY

Posted 16 September 2010 - 05:43 AM

Hi Kim,

Thanks for looking-in buddy :) 
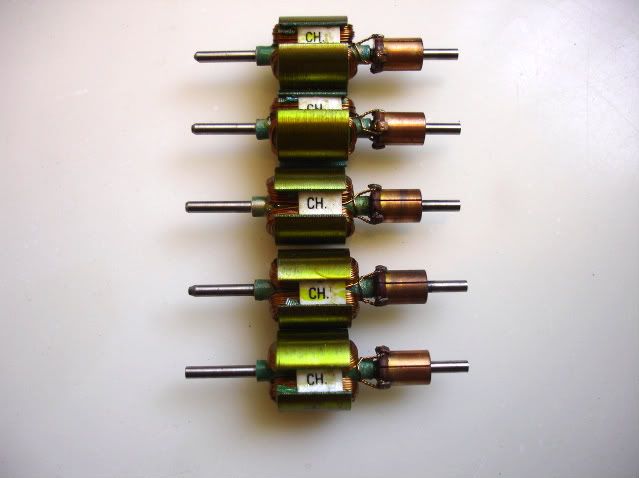
I think that this kind of motor with these magnets will be about maxxed-out with a #25 or a #26 wind. When I've done them based on a Mura C can with ceramic magnets, the #26 seems to work really well. These neos seem about 10% stronger than those magnets so I wanted to try the #23 and I think it's past the useable point...but surprisingly not by a whole lot. Being able to build these things and try stuff out makes it relatively easy to experiment with different winds and not "break the bank" money-wise, so I'm going to do a #25 for this motor now and that should be the final arm that "lives" in this thing. Your #26 Walnut is (to me) a great package, small and high-reving to make up for not having the brute torque of say those gorgeous golden-era Muras you see in some of Rick T's builds. These are much more like the awesome stuff that Dennis has shown in 1/32 where a smoother power-band and driveability are key. They seem similar to what Bill Bugenis has described to me as what the eurosport racers use...but in a Flintstones lo-tech version.

On the shunt connectors, I actually have looked around for some really small solderless "spade" or "ring" terminals to use for shunts as it would seem much better than soldering them on, I never found any the right size (they'd need to be really small to be useful). I'd love to try some; not only would it make for a neater installation...but probably easier as well. Thanks again Kim :)

Hi Gus,

I'm not familiar with Paul's work, but he sounds like a real gonzo-engineer type...my kinda guy! I'm sure that he was probably waaaaaay past what I'm doing though because those days there were actual racing programs for this stuff. Home-wound arms would have a very tough time keeping up with the beautiful factory stuff produced today. I suppose that sending the arms out for dynamic balancing would add a bit more tto the performance thing, but then they wouldn't be "all-mine". Doing all this as a kid in the 60's, I didn't have a clue as to why some arms ran well and others vaporized or worse...detonated. Now I at least have a clue and the further along I go, the less problems I have and the more I want to experiment. Thanks for looking-in Gus!

-john
John Havlicek

#1895 Tex

Tex

    Grand Champion Poster

  • Full Member
  • PipPipPipPipPipPipPipPip
  • 9,245 posts
  • Joined: 07-July 06
  • Gender:Male
  • Location:Denton, TX

Posted 16 September 2010 - 10:16 AM

LOL!

You need to put that #23 walnut motor in a 1/32 car and melt some rubber. AWESOME motors, John.
Richard L. Hofer

Remember, two wrongs don't make a right... but three lefts do! Only you're a block over and a block behind.

#1896 havlicek

havlicek

    OCD Rewinder

  • Subscriber
  • PipPipPipPipPipPipPipPip
  • 11,198 posts
  • Joined: 20-August 07
  • Gender:Male
  • Location:NY

Posted 16 September 2010 - 10:26 AM

:) I hear you Tex! Sometime, I want to get some cobalt mags and do one of these with another #23 arm. Now that will be fun! Thanks for looking Tex.

-john
John Havlicek

#1897 Tex

Tex

    Grand Champion Poster

  • Full Member
  • PipPipPipPipPipPipPipPip
  • 9,245 posts
  • Joined: 07-July 06
  • Gender:Male
  • Location:Denton, TX

Posted 16 September 2010 - 11:17 AM

BTW.......

I still have the 16D motor you sent me, still in it's shipping envelope. I'd made up my mind that it would go in my very first Thingie build. Thingie Kingie Edo sent me an Astro-V body to use, also. I've had a basic idea what I wanted to do for a long time, but there were details that needed to be worked out in my head first. I've worked a couple of those details out. Now, it's a matter of finding/making the time to build the car. It's gonna be a while... maybe in 2011.
Richard L. Hofer

Remember, two wrongs don't make a right... but three lefts do! Only you're a block over and a block behind.

#1898 havlicek

havlicek

    OCD Rewinder

  • Subscriber
  • PipPipPipPipPipPipPipPip
  • 11,198 posts
  • Joined: 20-August 07
  • Gender:Male
  • Location:NY

Posted 17 September 2010 - 06:48 AM

I still have the 16D motor you sent me, still in it's shipping envelope. I'd made up my mind that it would go in my very first Thingie build.


Yikes Tex, I don't remember how long ago that was but it I've come a way since then (and am still learning!). It may be fine or may only last for a short while as I had a habit of putting really hot arms in Mabuchis back then, and it most likely was done with regular hardware store epoxy. I've really only recently really started to limit the Mabuchi stuff, because they can only be run for a very short while when you go too hot. Also, the best coms I used then for Mabuchis were the Tradeships and those are only good up to maybe a #28 single. I do remember using some modern D motor arms and coms for Mabuchis though, and those would be much stronger so...???

-john
John Havlicek

#1899 havlicek

havlicek

    OCD Rewinder

  • Subscriber
  • PipPipPipPipPipPipPipPip
  • 11,198 posts
  • Joined: 20-August 07
  • Gender:Male
  • Location:NY

Posted 17 September 2010 - 09:25 AM

I did the #25 arm for the last "Walnut" motor and it's a screamer for sure. This time I used a modern Mura .007" lam arm blank and a modern Mura com. The shaft was replaced with a hardened drill blank...which of course meant I had to polish it down like 2 or 3 ten-thousandths of an inch to get it to slip ift in the bearings :angry: ...not my idea of fun.

Posted Image

Reassembled the motor with the new arm and it sounds excellent!

Posted Image

...into a bag it goes until it finds a new home :)

-john
  • MarcusPHagen likes this
John Havlicek

#1900 havlicek

havlicek

    OCD Rewinder

  • Subscriber
  • PipPipPipPipPipPipPipPip
  • 11,198 posts
  • Joined: 20-August 07
  • Gender:Male
  • Location:NY

Posted 17 September 2010 - 02:53 PM

I finished a #30 awg double wind for a Blogger's lovely Champion 26D. I have some work to do on the setup, but the arm came out really nice. I think it's going into a Thingie Proxy car, and knowing how hard those get run, I did my best to try and make it stay together :)

Posted Image

-john
John Havlicek


Electric Dreams Online Shop