So much fun to see this coming along. The artist is creating another masterpiece.
Thanks, Rick.

|

Checkered Flag in Hand


Posted 12 August 2015 - 09:52 AM
So much fun to see this coming along. The artist is creating another masterpiece.
Thanks, Rick.
Grand Champion Poster
Posted 12 August 2015 - 11:05 AM
Thanks, Howie. 
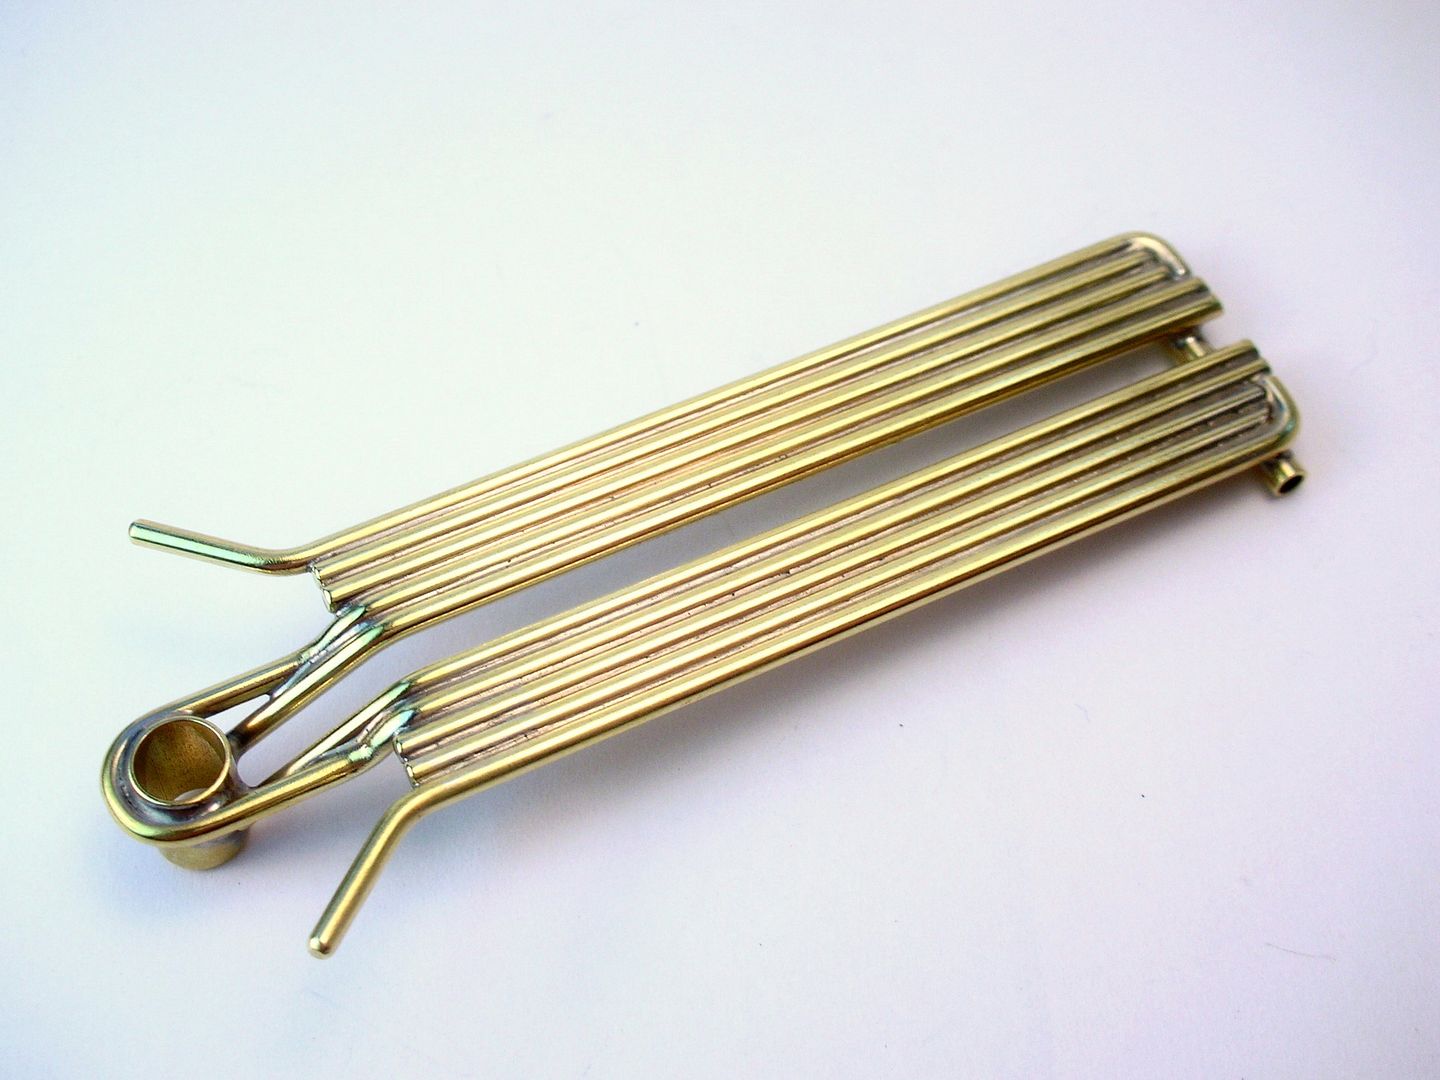
The drop arm is up next (Howie's original is on the left below):

I love lots of brass rod!
But first, I have to prepare for lunch...  My wife it taking me to the Historic Oakland Tavern for one of their "OT Grinder" Sandwiches (olive oil and Italian seasonings with ham, salami, pepperoni, tomato, green pepper, onion, melted provolone, and red wine vinegar)...and, of course, several pints of PBR.

WEEE!!!
Rick Thigpen
Check out Steve Okeefe's great web site at its new home here at Slotblog:
The Independent Scratchbuilder
There's much more to come...
Builder

Posted 13 August 2015 - 01:59 PM
Must have been some sandwich. 

Paul Wolcott
Checkered Flag in Hand

Posted 13 August 2015 - 03:52 PM
PBR???  Didn't know they still made the stuff...
Don Weaver
A slot car racer who never grew up!
The supply of government exceeds demand.
L.H. Lapham
If the brain-eating amoeba invades Washington
it will starve to death...
Grand Champion Poster
Posted 13 August 2015 - 04:06 PM
Must have been some sandwich.
Hi Pablo... you're right!

PBR???

I'm recovered now and working on the drop arm.
Rick Thigpen
Check out Steve Okeefe's great web site at its new home here at Slotblog:
The Independent Scratchbuilder
There's much more to come...
Grand Champion Poster
Posted 14 August 2015 - 05:17 PM
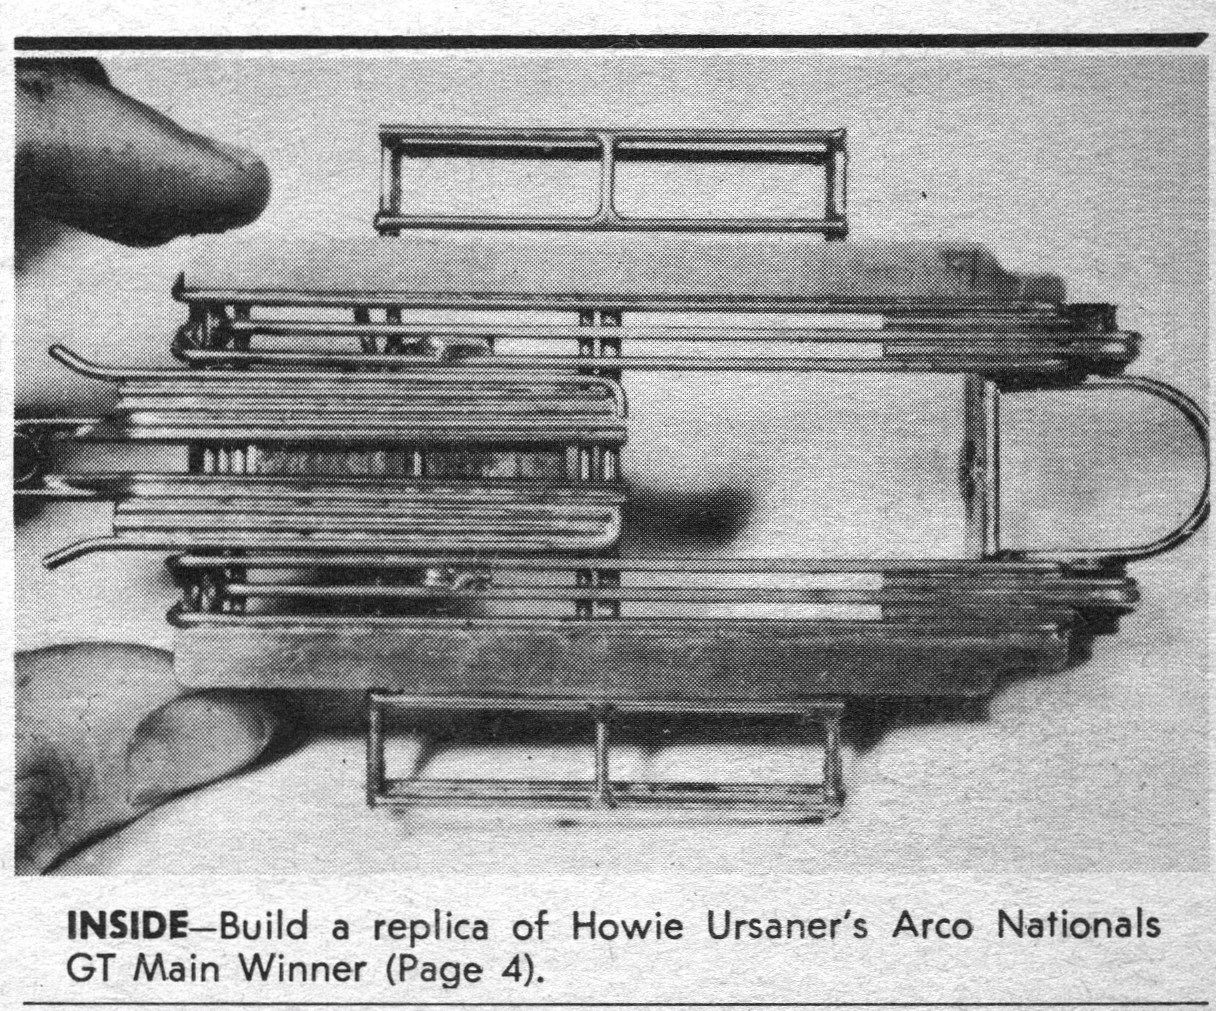
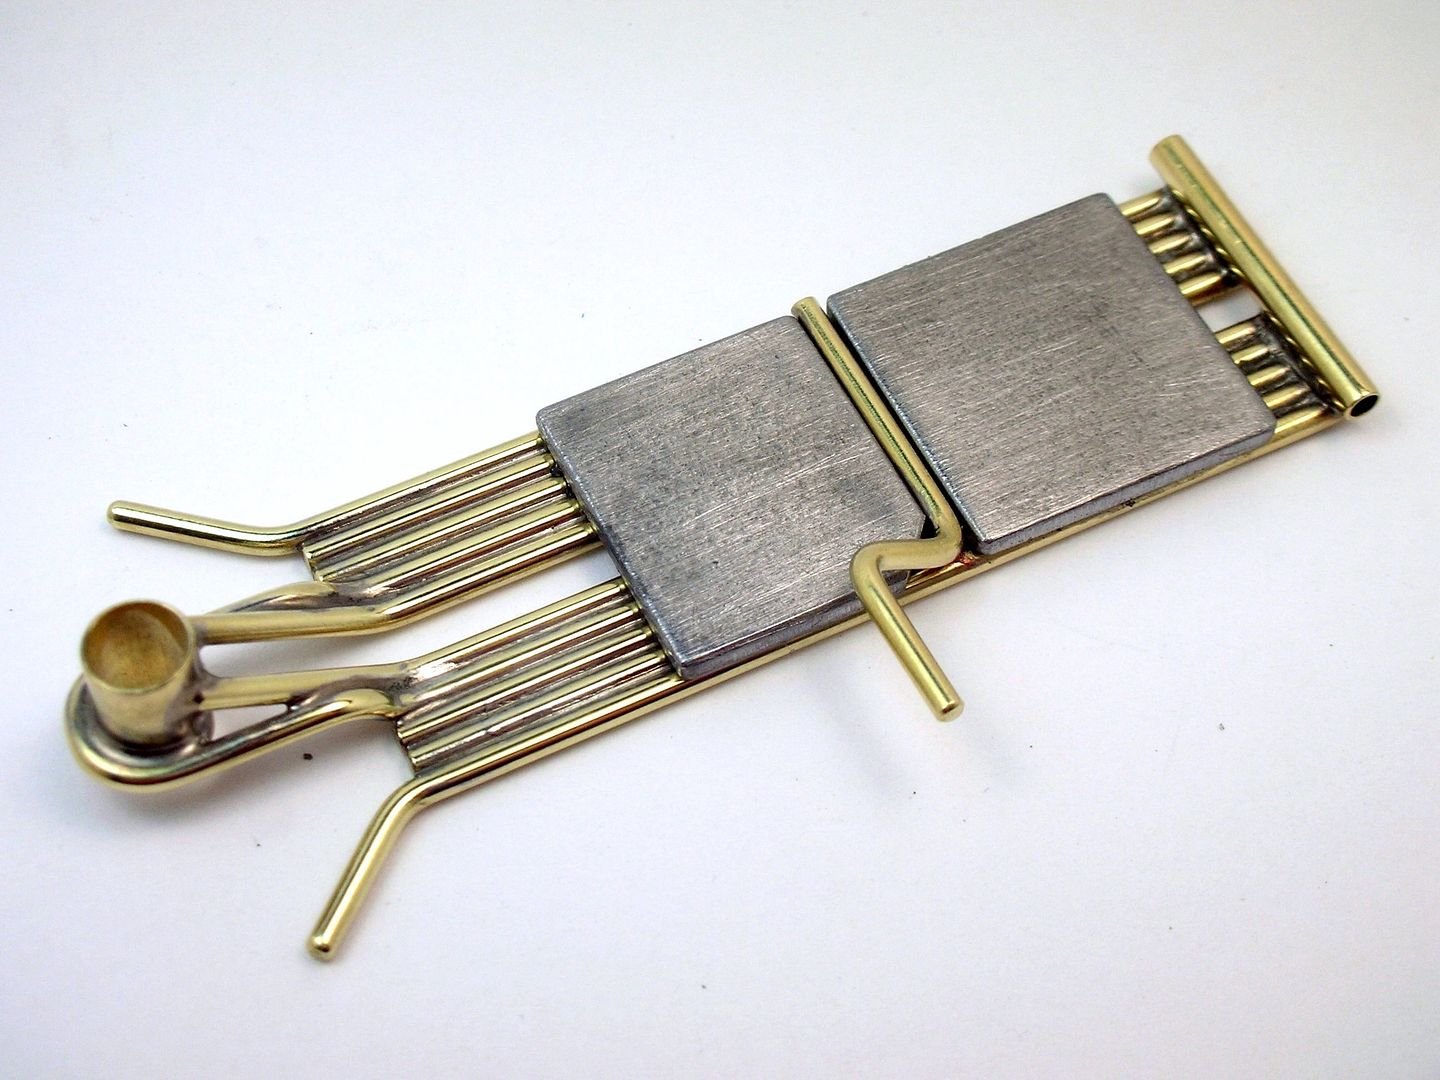
Here are the final steps in Part 1 of Mike Morrissey's how-to build article:

Here's my version with Howie's built-up rod drop arm:
No Step 9 as we're not using plate for the arm...
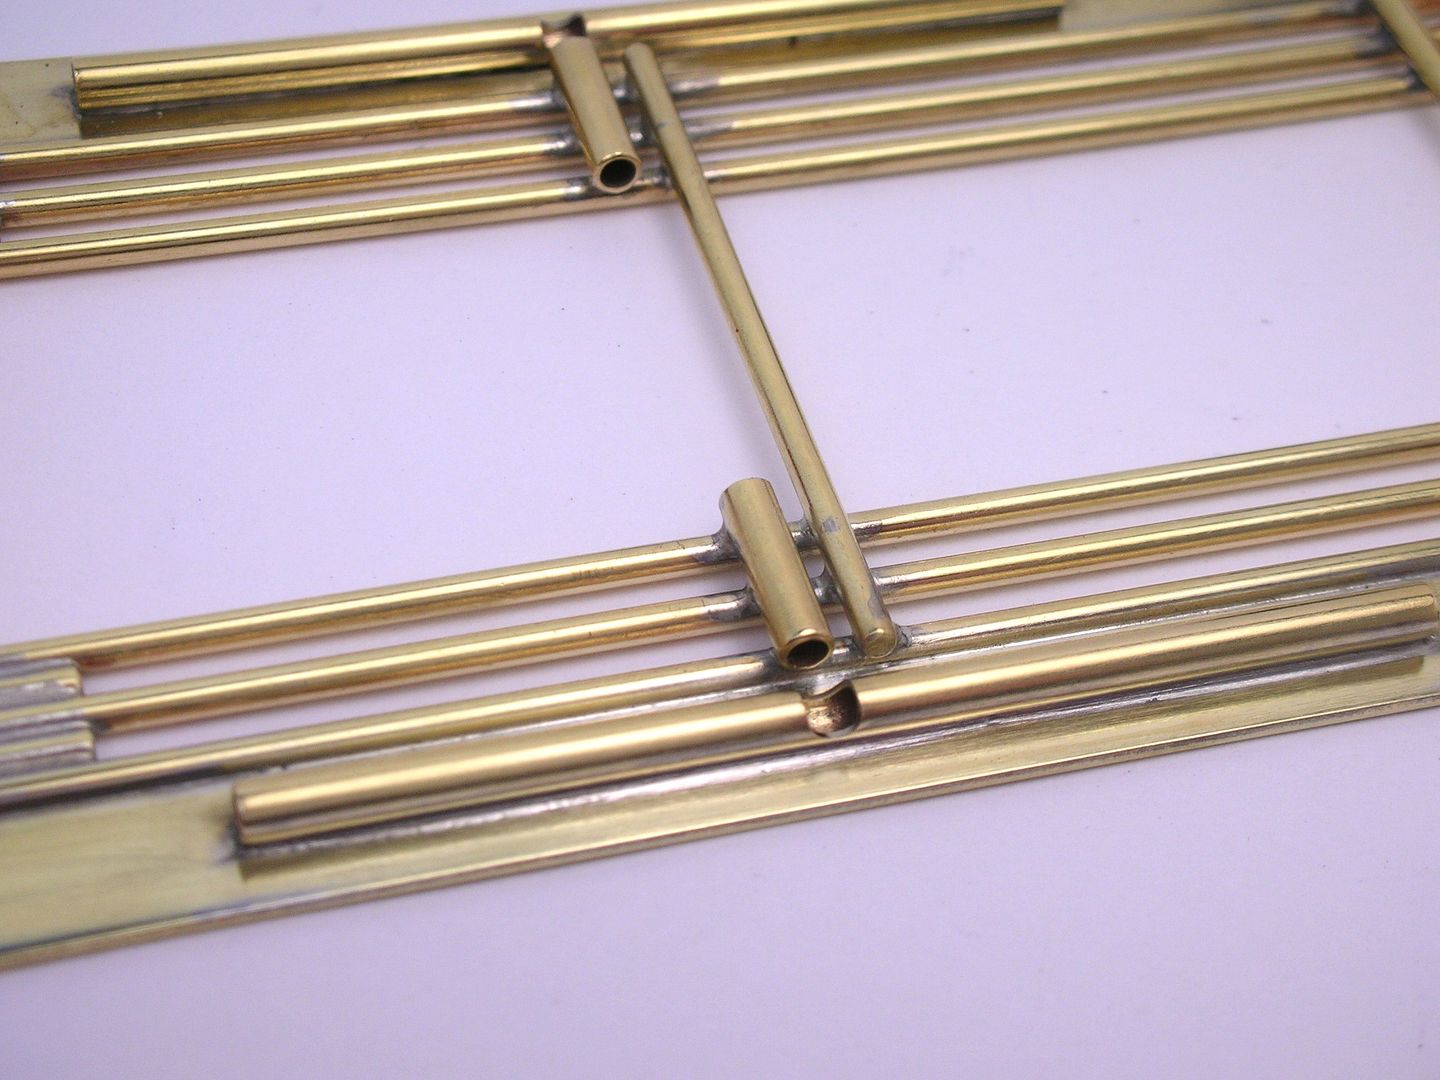
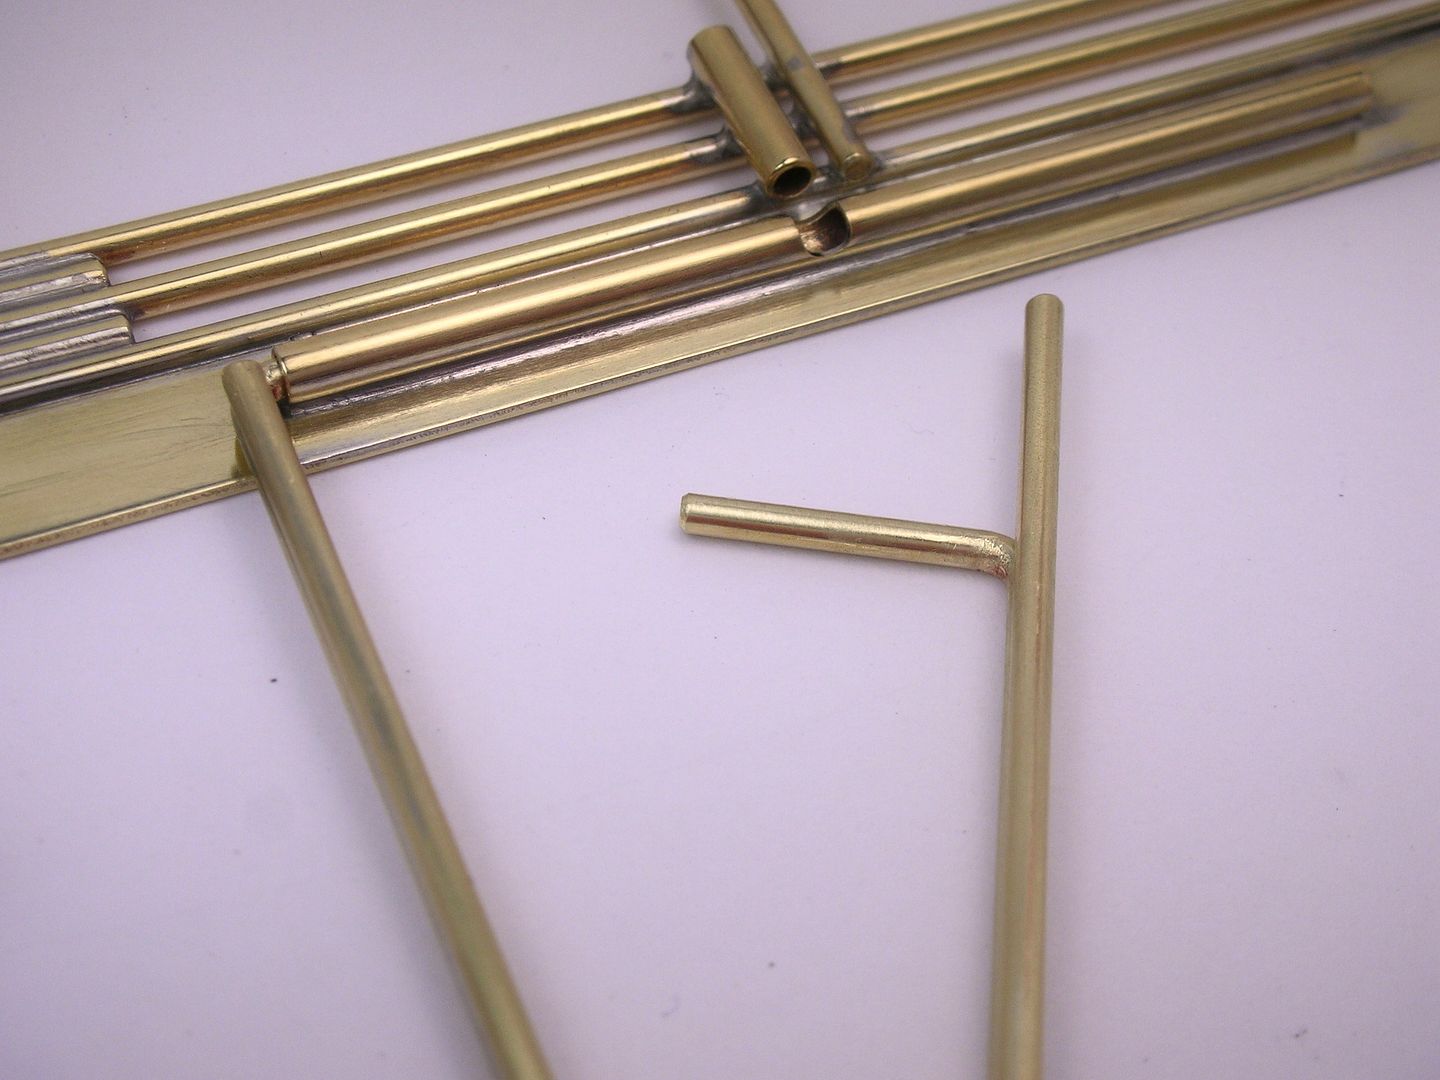
Step 10. The same 1/16" clearance but thank goodness I'm using a "Rick's Jig" and not that Adjust-O Jig!!!
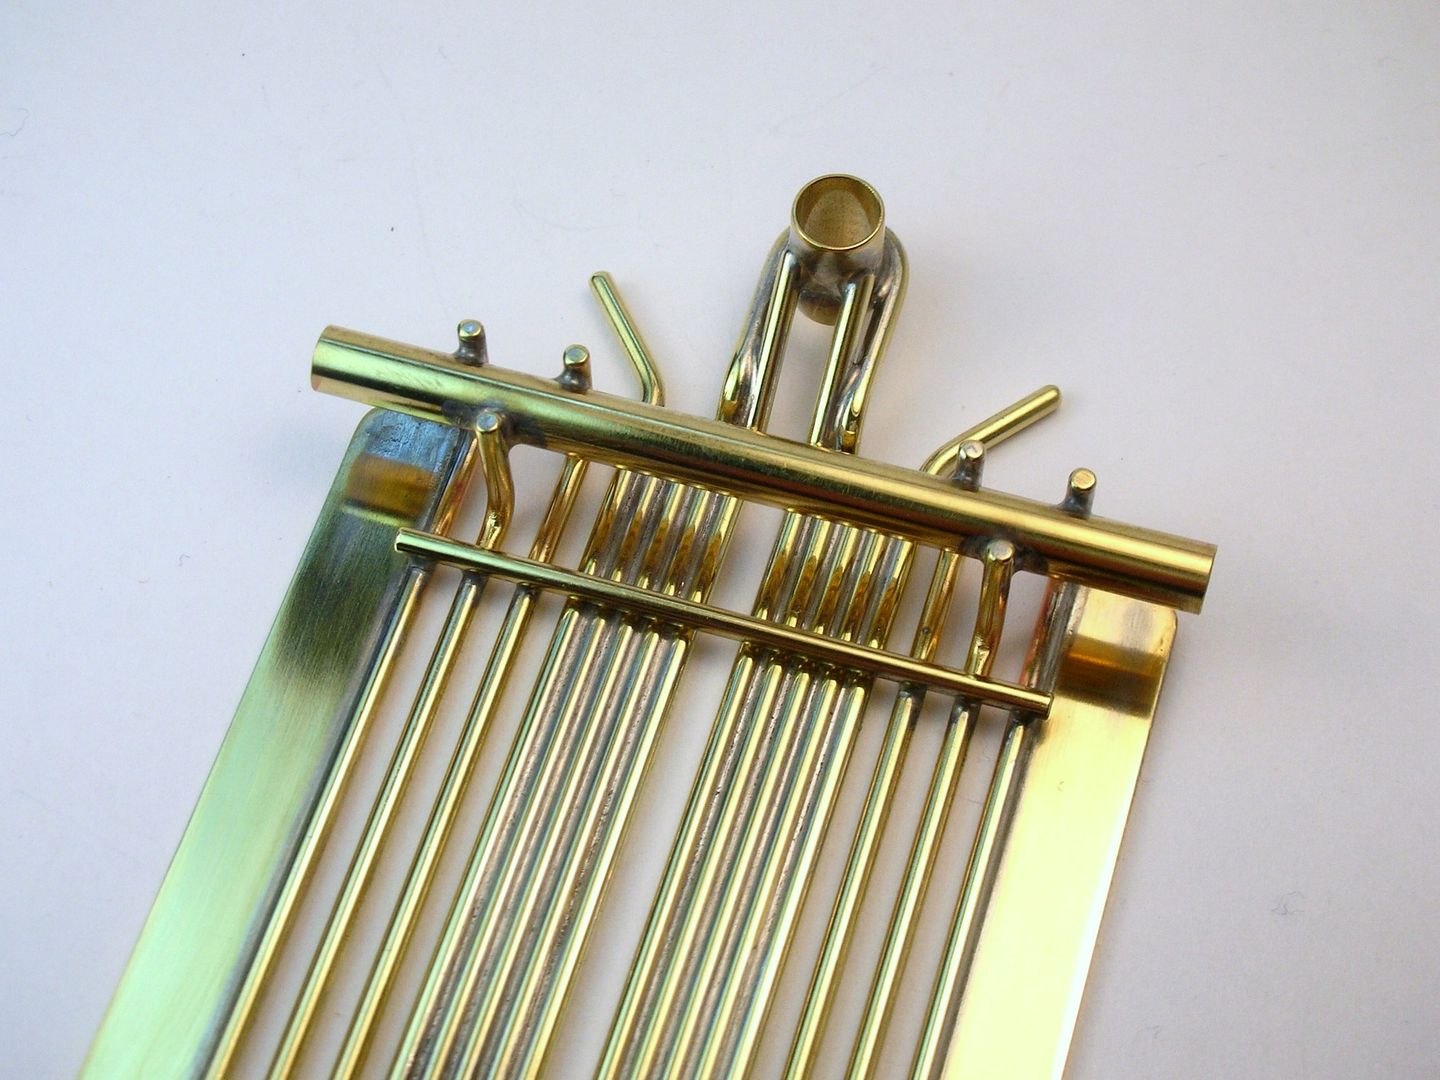
Step 11. The brass rod guide pivot tube mounts:

Step 12. A conventional drop arm upward stop instead of Mike's "fancy lad" version :
Step 13 isn't completed yet, the down stop and weights...
Step 14. The guide pickup pivot stops:
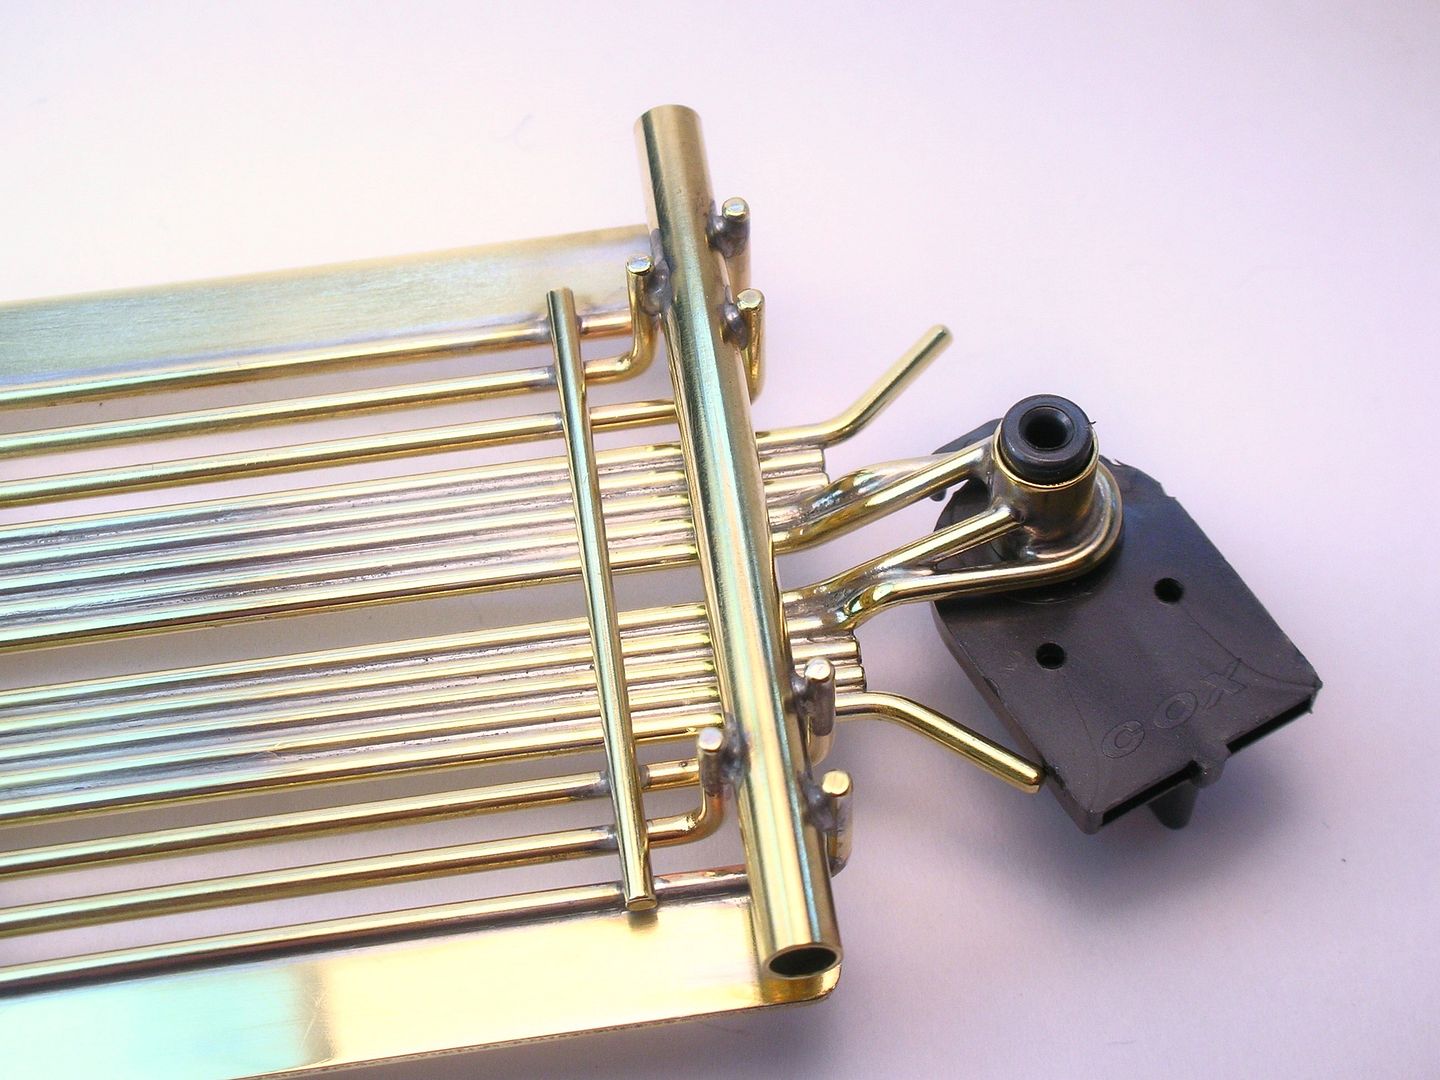
Step 15. The cross piece that prevents the chassis from spreading or squeezing is placed in front of the pivot per Howie's chassis:
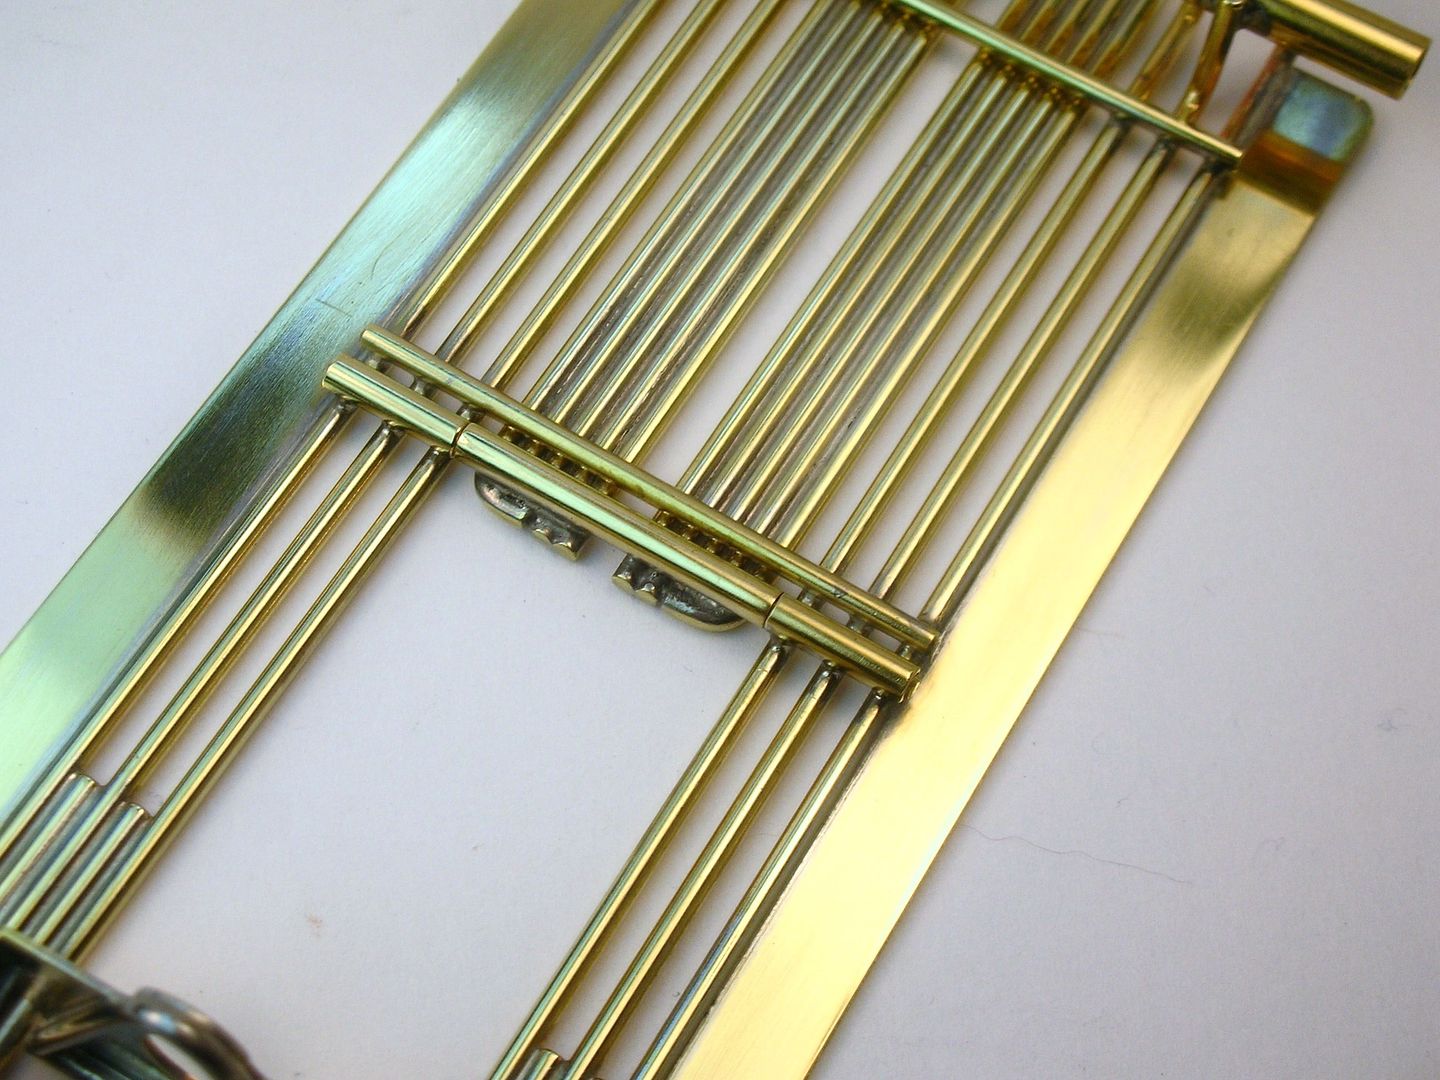
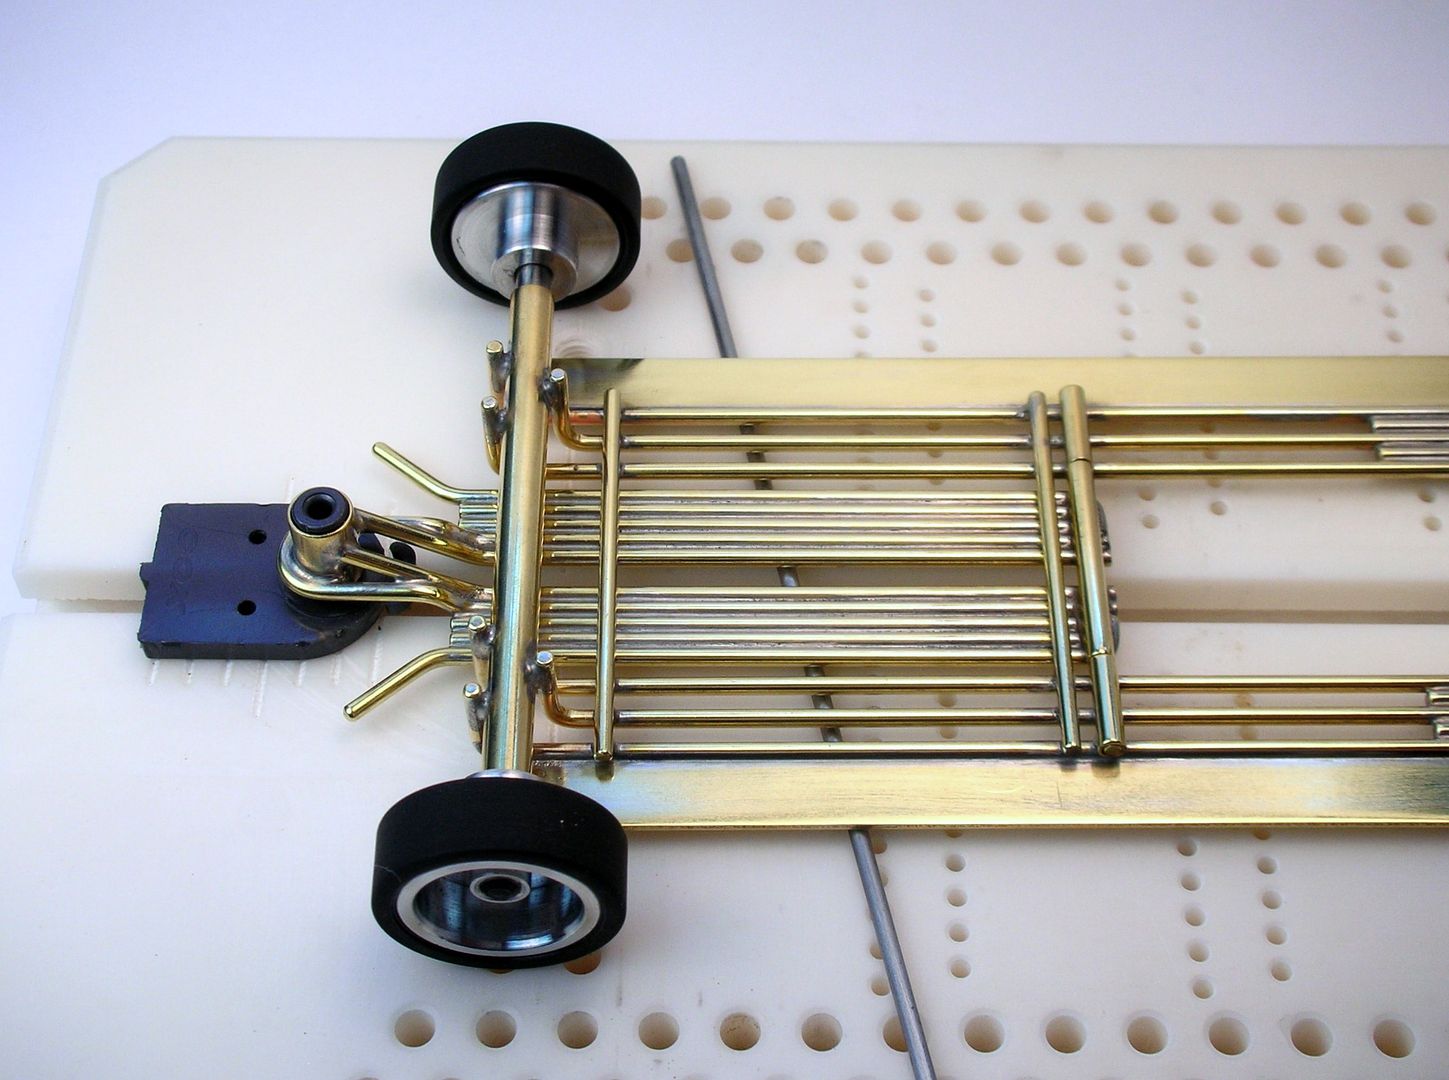
Step 16. Top view of the completed swing arm in the chassis:
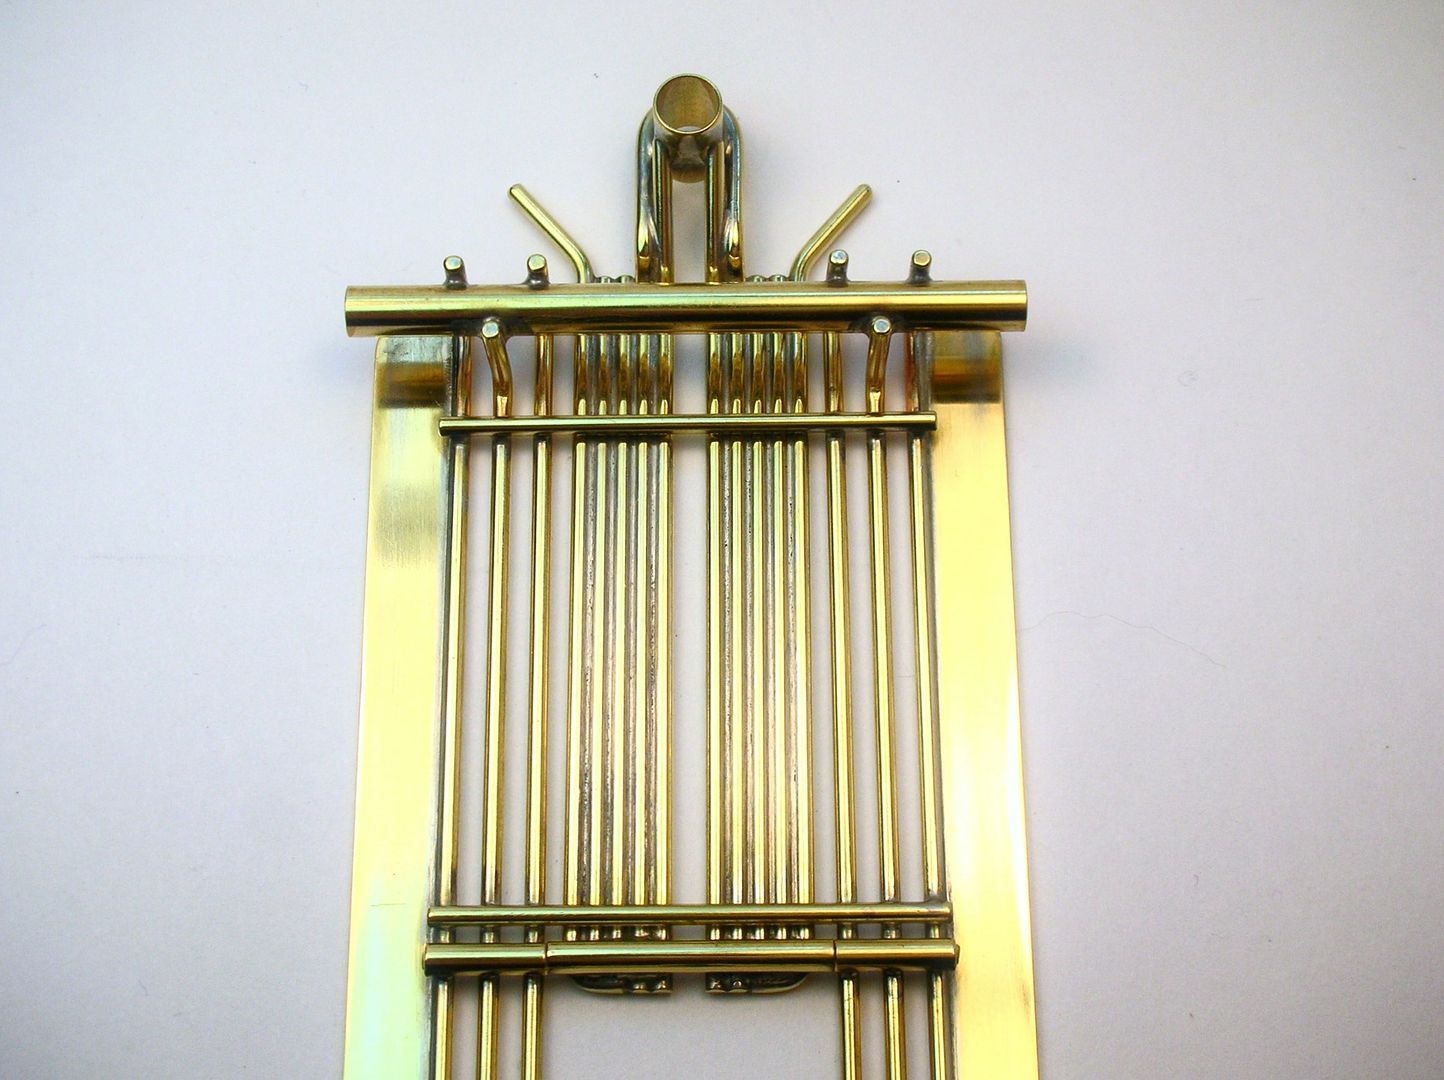
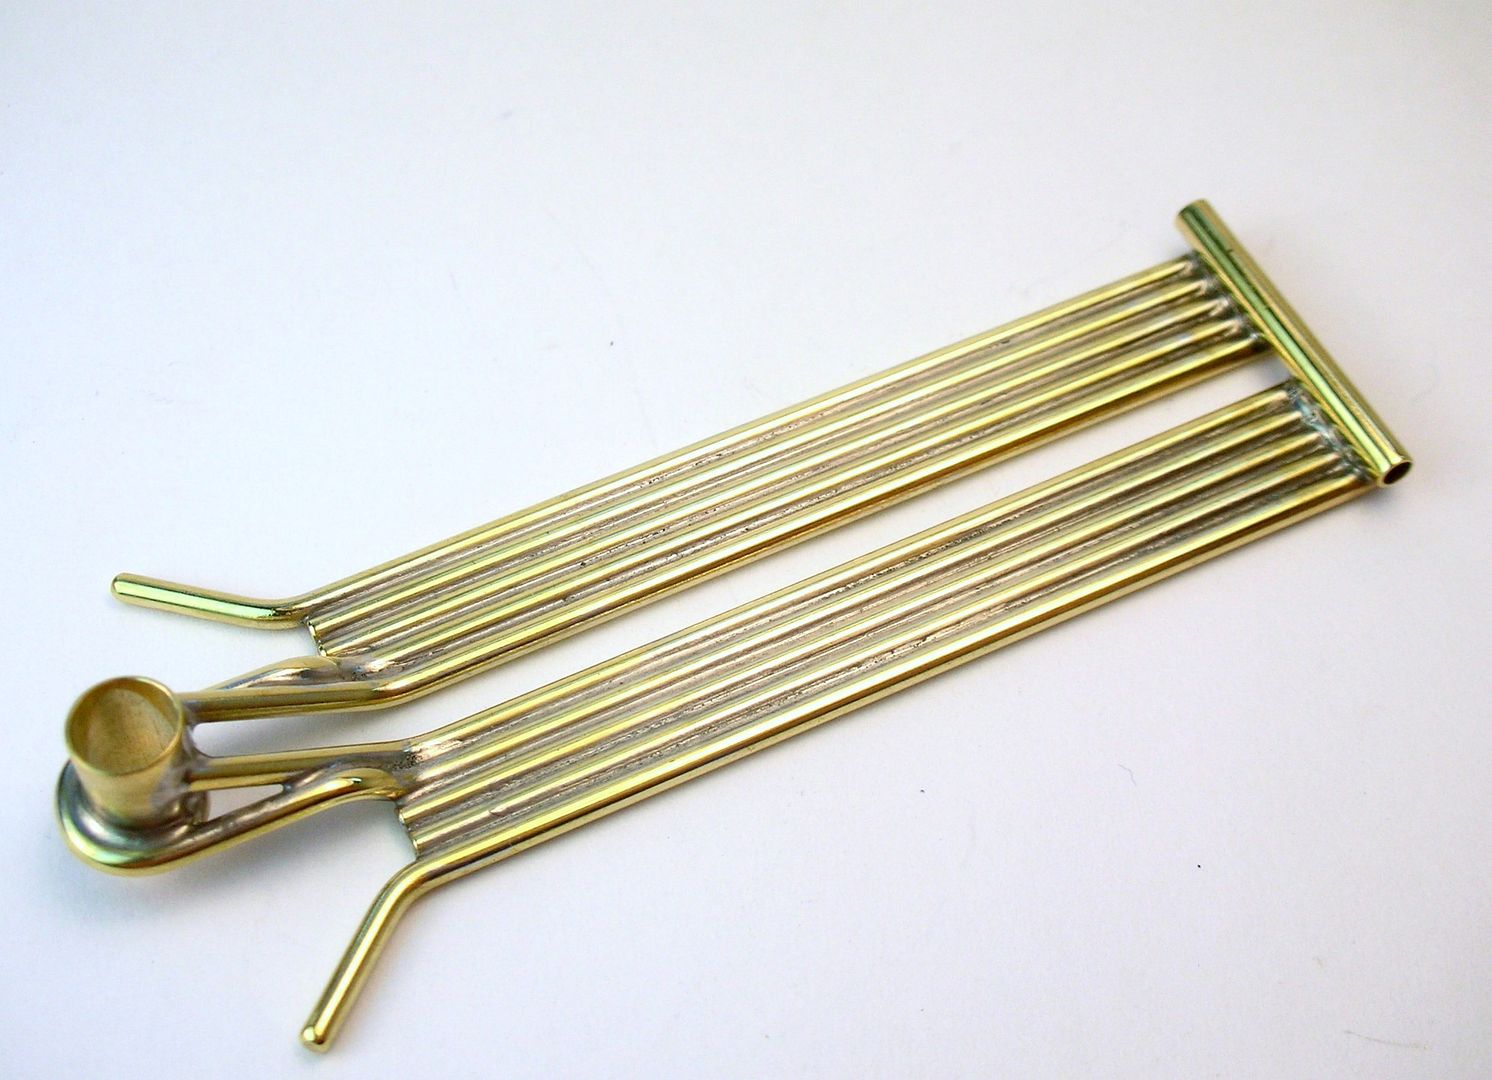
Here's the drop arm by itself. Quite time consuming for me to do compared to a plate arm but I think it looks cool!
Time to move on to Part 2 of the construction article and finish up the chassis....
Rick Thigpen
Check out Steve Okeefe's great web site at its new home here at Slotblog:
The Independent Scratchbuilder
There's much more to come...
Checkered Flag in Hand
Posted 15 August 2015 - 12:27 AM
That is some sano work. Your build brings back memories of my bedroom in my moms apartment on the 11th floor in Forest Hills, NY, where i built all my cars, including full motor winding, balancing, armature, magnets ,etc.
Sandy was my teammate and close friend and my biggest rival... we both built cars and motors and did not share them with each other. We shared all speed secrets but it was my cars against his cars and he had great cars also. He made every race tough...
It was really exciting to have a car this good at the Arco Nats. It was the best thing I ever had or seen to that point.
Grand Champion Poster
Posted 15 August 2015 - 10:46 AM
Thanks, Howie, I'm glad you're happy so far. I will try my best to make the chassis neat and shiny to show off your design.
This car won't have the same performance your original car had. There's just something magical (really!) the top Pros brought to a build that mere mortals can't duplicate. That's why you guys won all the time!
Rick Thigpen
Check out Steve Okeefe's great web site at its new home here at Slotblog:
The Independent Scratchbuilder
There's much more to come...
Grand Champion Poster

Posted 15 August 2015 - 12:38 PM
Anthony 'Tonyp' Przybylowicz
5/28/50-12/20/21
Requiescat in Pace
Builder
Posted 15 August 2015 - 01:09 PM
Evil Bucks.

Paul Wolcott
Grand Champion Poster

Posted 16 August 2015 - 09:46 AM
Question for Howie,
Why did you make the drop arm of rod, if a plate arm was already available at the time?
Aesthetics? Material availability? Cost?
Thanks,
Don
Checkered Flag in Hand
Posted 16 August 2015 - 10:26 AM
Hi Don ,
I always cut up the previous chassis to make the new one. That is why none of my cars exist. We rarely ran the same car twice back then.
That drop arm was probably in a few chassis. I think I just liked the way that one worked.
Grand Champion Poster
Posted 16 August 2015 - 11:49 AM
Thanks Howie, should have thought of that!
I guess we were all cannabilizing old chassis to make the next one, but didn't really think of recovering a drop arm! Of course, mine were nowhere near as nice as this one...
Don
Grand Champion Poster

Posted 16 August 2015 - 12:14 PM
Posting Leader

Posted 16 August 2015 - 02:10 PM
The better builders at our track sold their old frames. Motor bracket and brass for a new frame was a dollar or two, a decent used frame would sell for $8 to 12 plus saving some time melting and cleaning old parts.
Our track owner encouraged this. That way the non-builders could have good cars that increased business. Everybody came out ahead.
Grand Champion Poster
Posted 16 August 2015 - 02:28 PM
Anthony 'Tonyp' Przybylowicz
5/28/50-12/20/21
Requiescat in Pace
Posting Leader

Posted 16 August 2015 - 04:33 PM
The better builders at our track sold their old frames. Motor bracket and brass for a new frame was a dollar or two, a decent used frame would sell for $8 to 12 plus saving some time melting and cleaning old parts.
Our track owner encouraged this. That way the non-builders could have good cars that increased business. Everybody came out ahead.
Grand Champion Poster
Posted 16 August 2015 - 08:44 PM
Drop arms sucked making so they used to see a lot of mileage on various cars.
I love the way this arm looks... especially now that it's almost finished. But, it was a painful process. 
Rick Thigpen
Check out Steve Okeefe's great web site at its new home here at Slotblog:
The Independent Scratchbuilder
There's much more to come...
Grand Champion Poster
Posted 19 August 2015 - 11:21 AM
I'm coming to the conclusion of the chassis build... here is Mike Morrissey's "Part 2" construction article with my pics matching Mike's where possible:

No Step 1 as the bracing is already finished on Howie's:
Step 2. Mike used a pair of pan hinge tubes, Howie used a one-piece job. I use a one-piece with a "blow hole" to allow me to blow out the acid flux and water. It also allows removal of the drop arm pivot rod:
Step 3. I soldered the body mount pin tubes to the pan hinges first. That way I'm not going to accidentally solder them up solid :
Here's my "Rick's Jig" setup for the pans:
OK, time to get soldering :
Rick Thigpen
Check out Steve Okeefe's great web site at its new home here at Slotblog:
The Independent Scratchbuilder
There's much more to come...
Grand Champion Poster
Posted 19 August 2015 - 12:14 PM
Anthony 'Tonyp' Przybylowicz
5/28/50-12/20/21
Requiescat in Pace
Grand Champion Poster
Posted 19 August 2015 - 01:21 PM
I almost blew my thumbs out trying to bend that stuff around a piece of round stock.
Rick Thigpen
Check out Steve Okeefe's great web site at its new home here at Slotblog:
The Independent Scratchbuilder
There's much more to come...
Grand Champion Poster
Posted 19 August 2015 - 01:53 PM
Anthony 'Tonyp' Przybylowicz
5/28/50-12/20/21
Requiescat in Pace
Grand Champion Poster
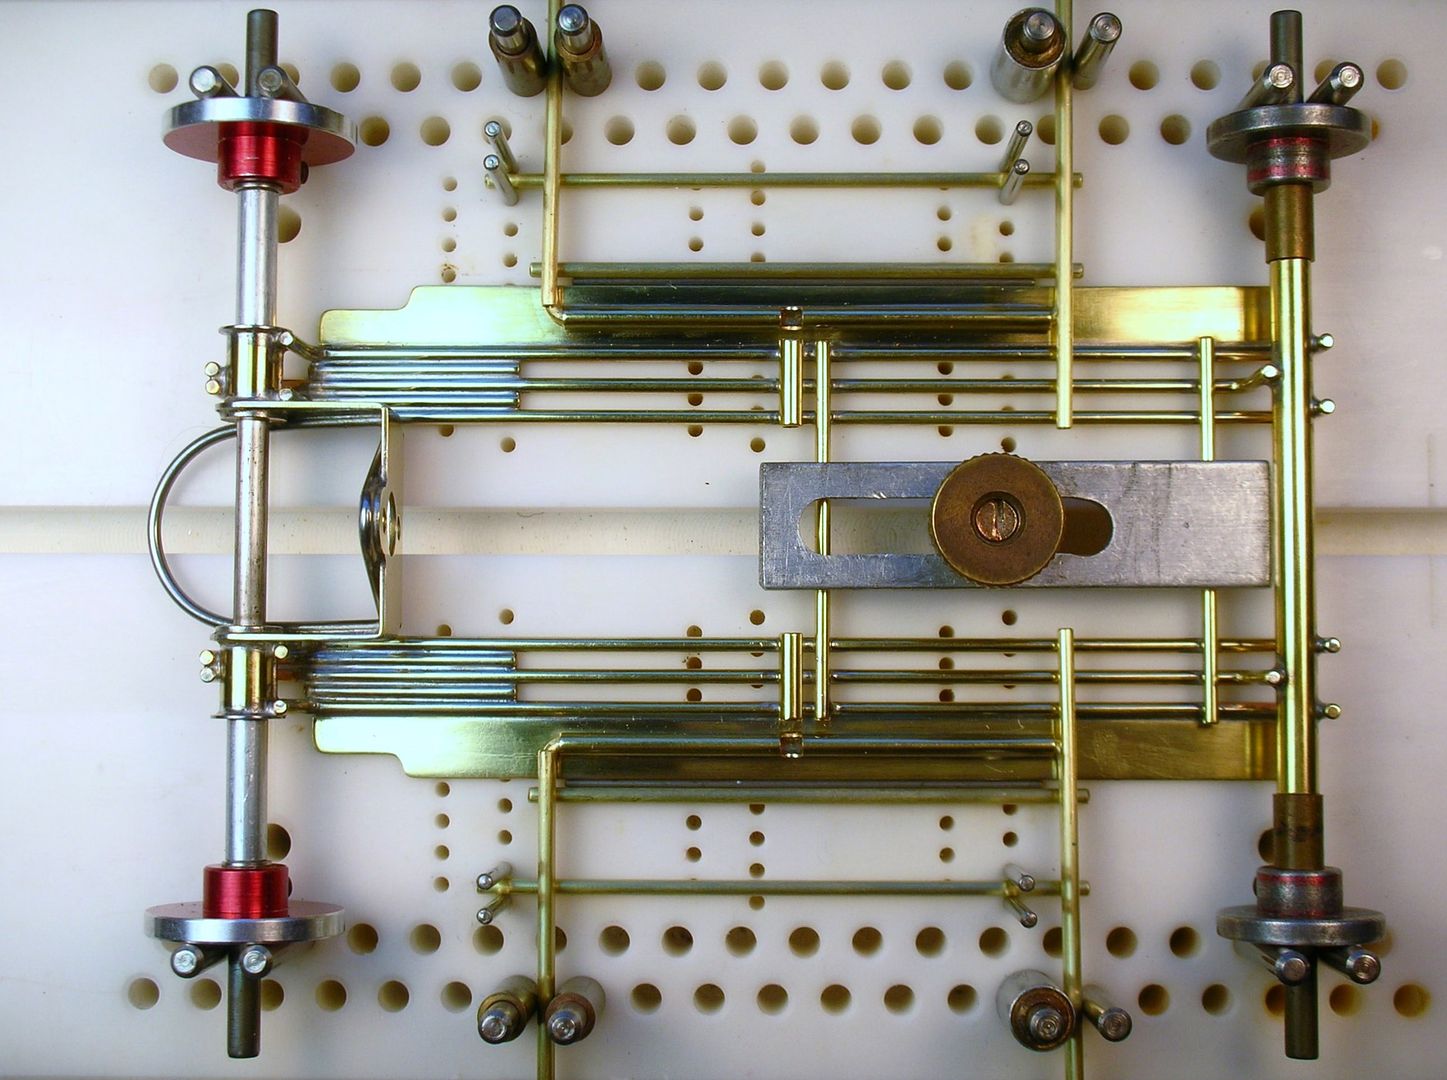
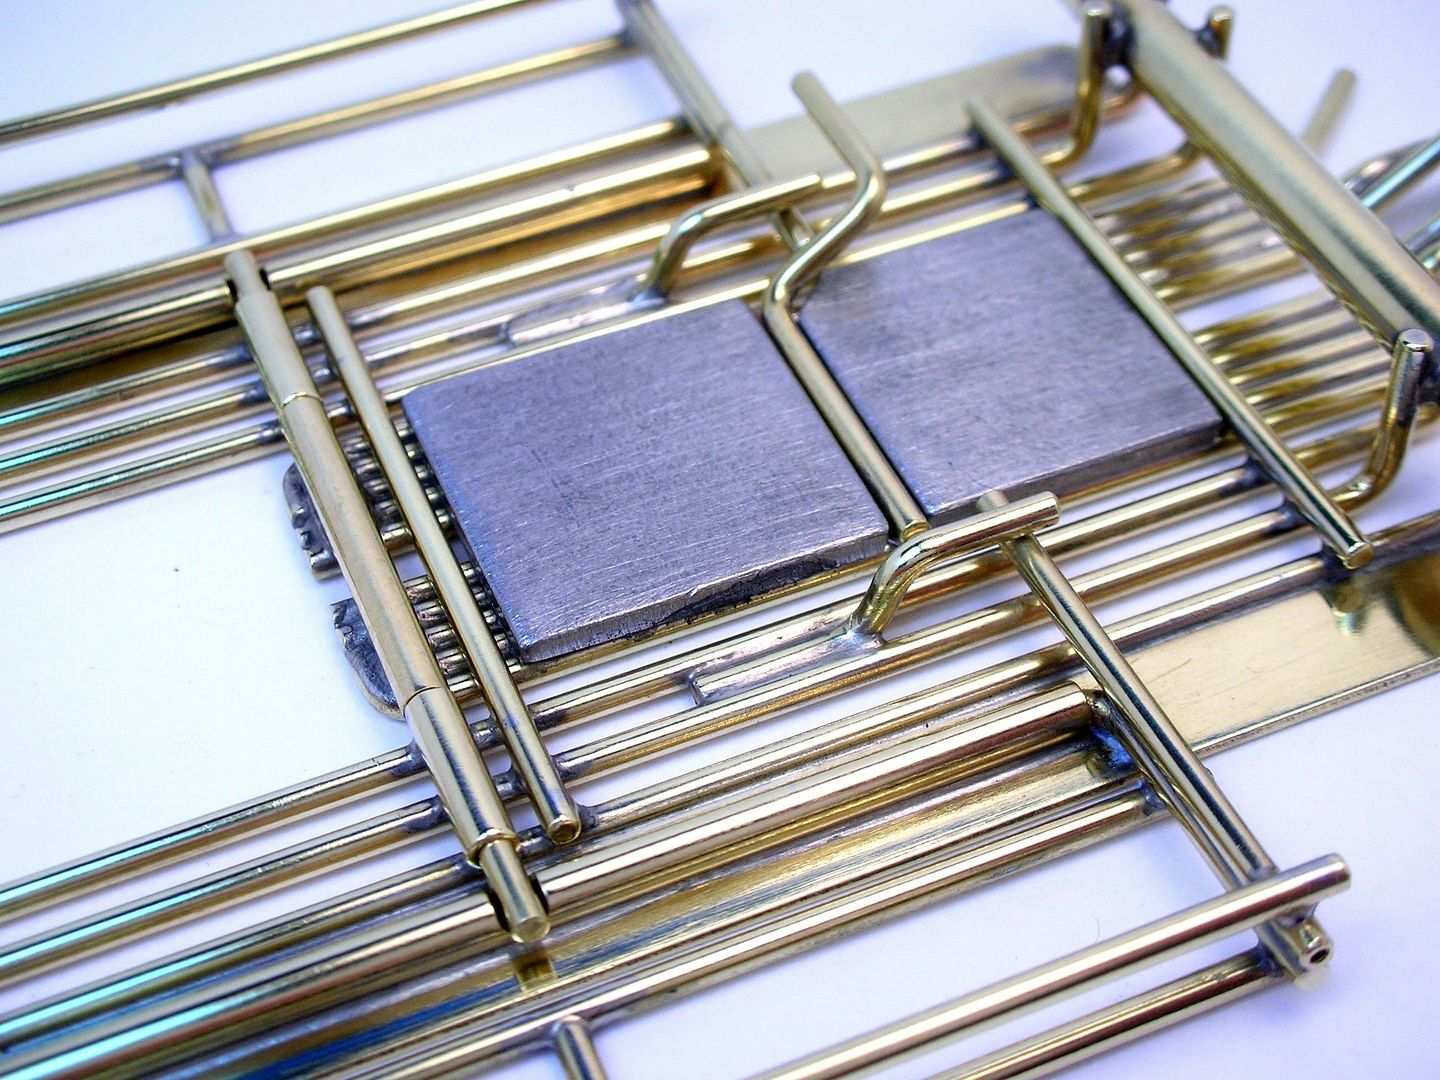
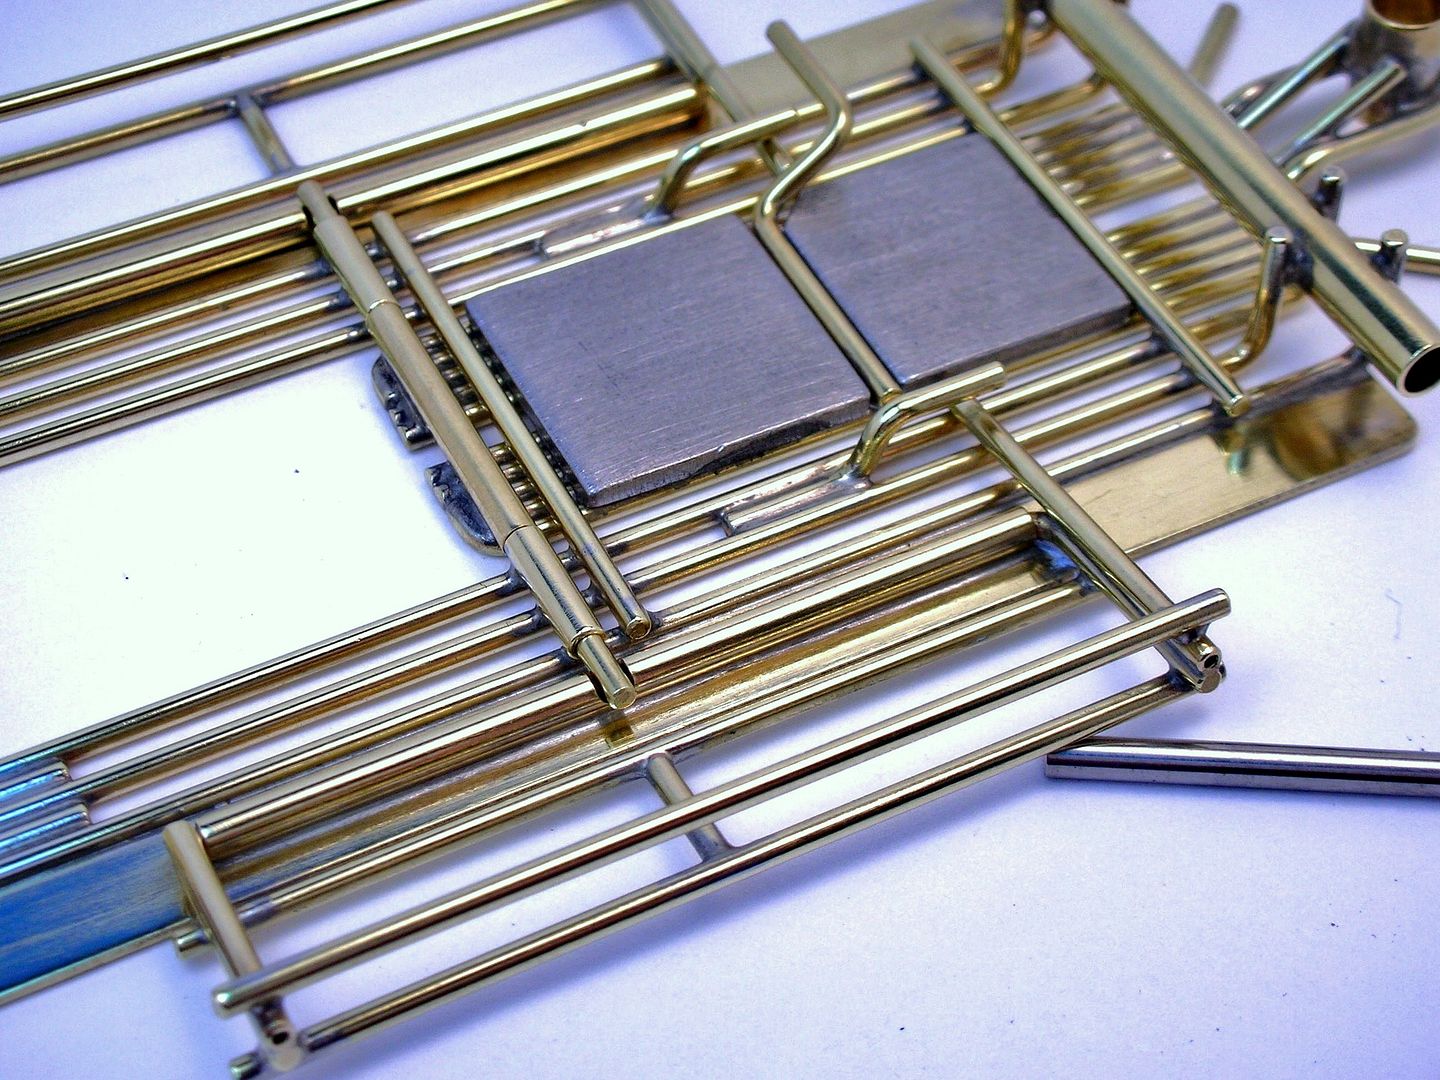
Posted 20 August 2015 - 07:43 PM
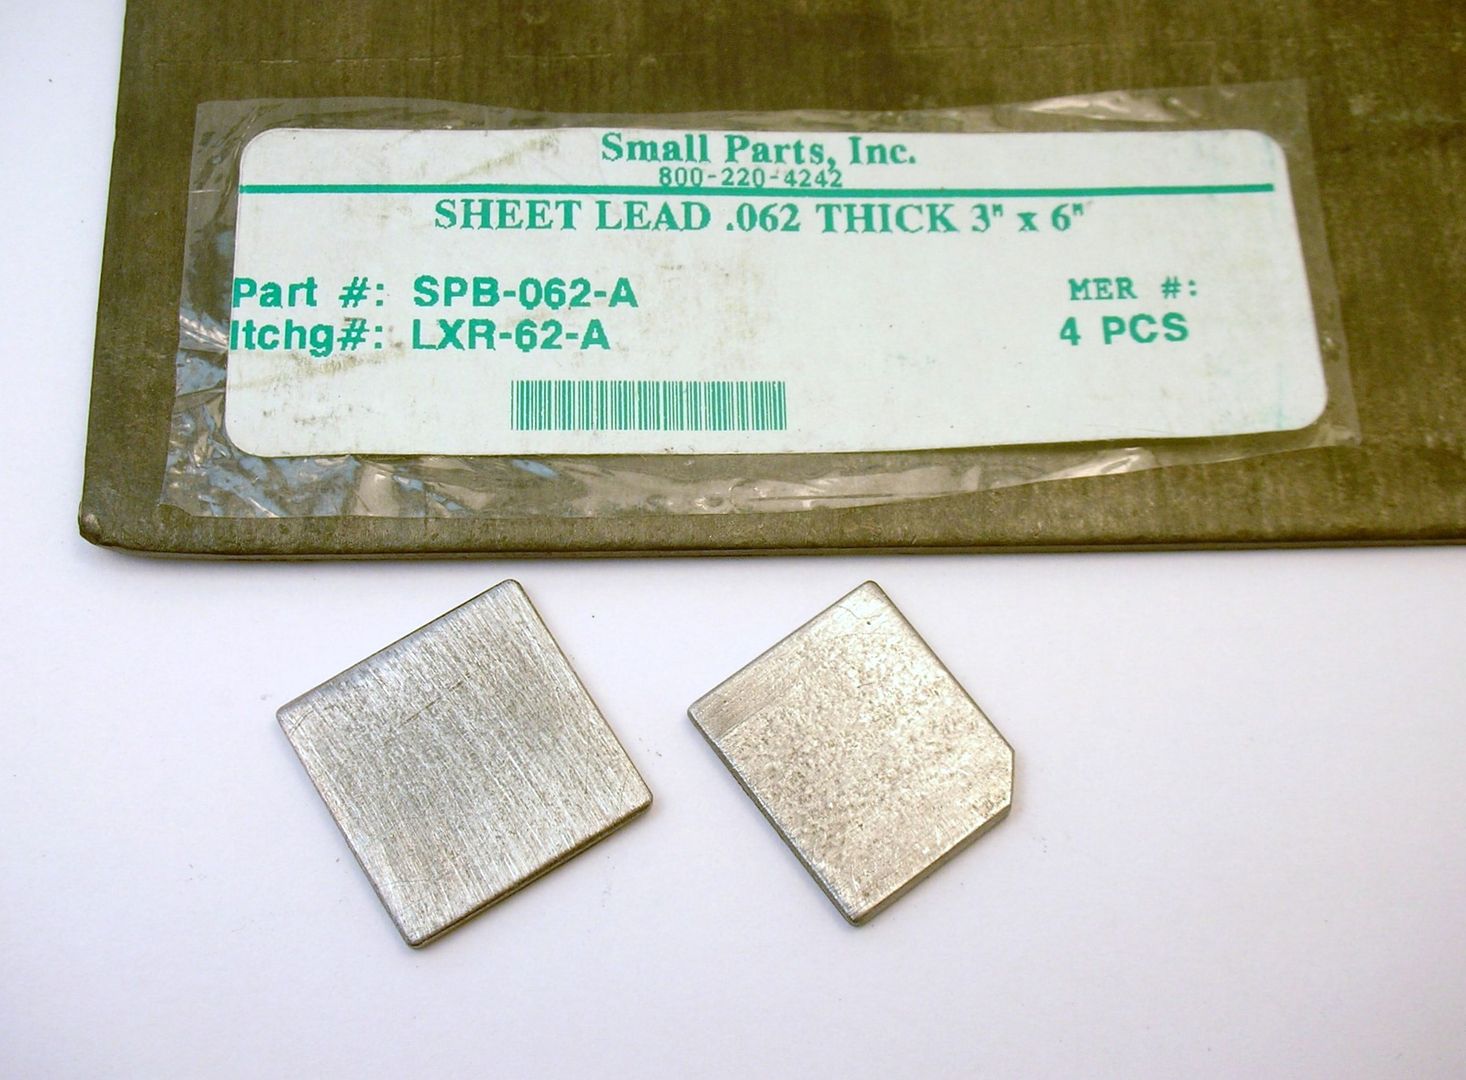
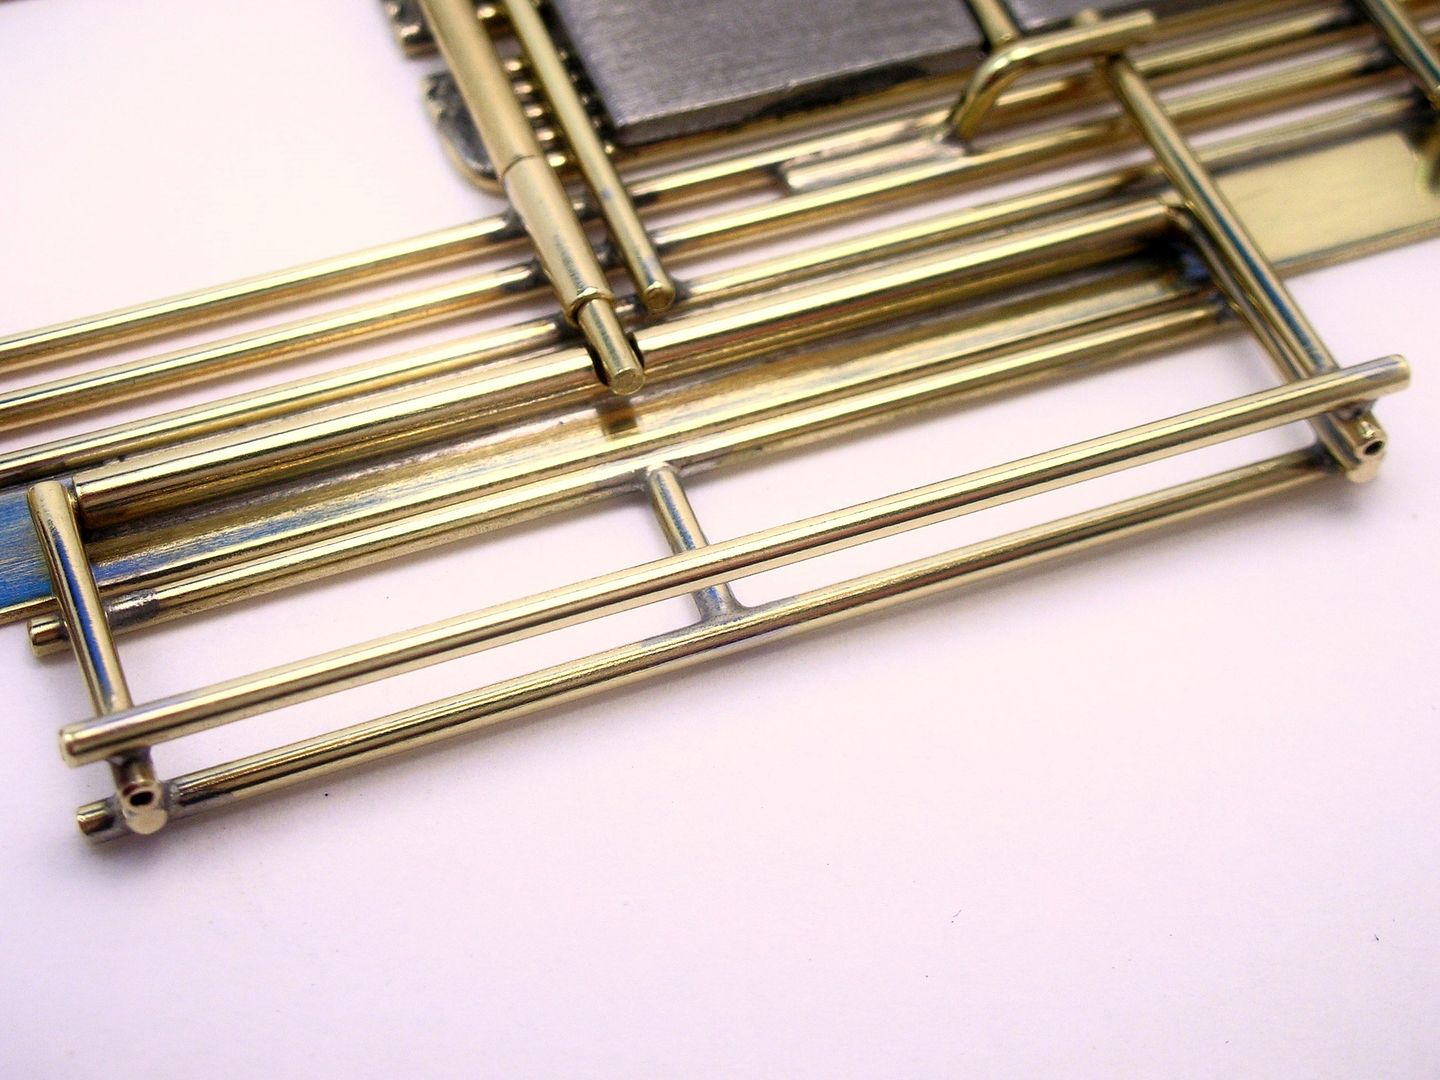
Finishing the chassis up. I went back to do step 13 in part 1 of Morrissey's build article. I wanted to wait to finish the pan down stop before doing this step:
Step 13. I used lead instead of brass for weights as I think (hope!) Howie did, too. Also in place is the down stop:
I now realize I am truly crazed. I spent over an hour squaring up the lead weights with a file and machinist square. 
As I built the tilting body mounts I got carried away and didn't stop for pictures. Here are several of Mike's steps in one shot:
Steps 4, 5, & 6. Building up the tilting body mounts:
Step 7. The downward stops:
Step 8. The prescribed 3/32" of upward tilt:
Finished!

Here are three shots each of the top and bottom of the finished chassis:
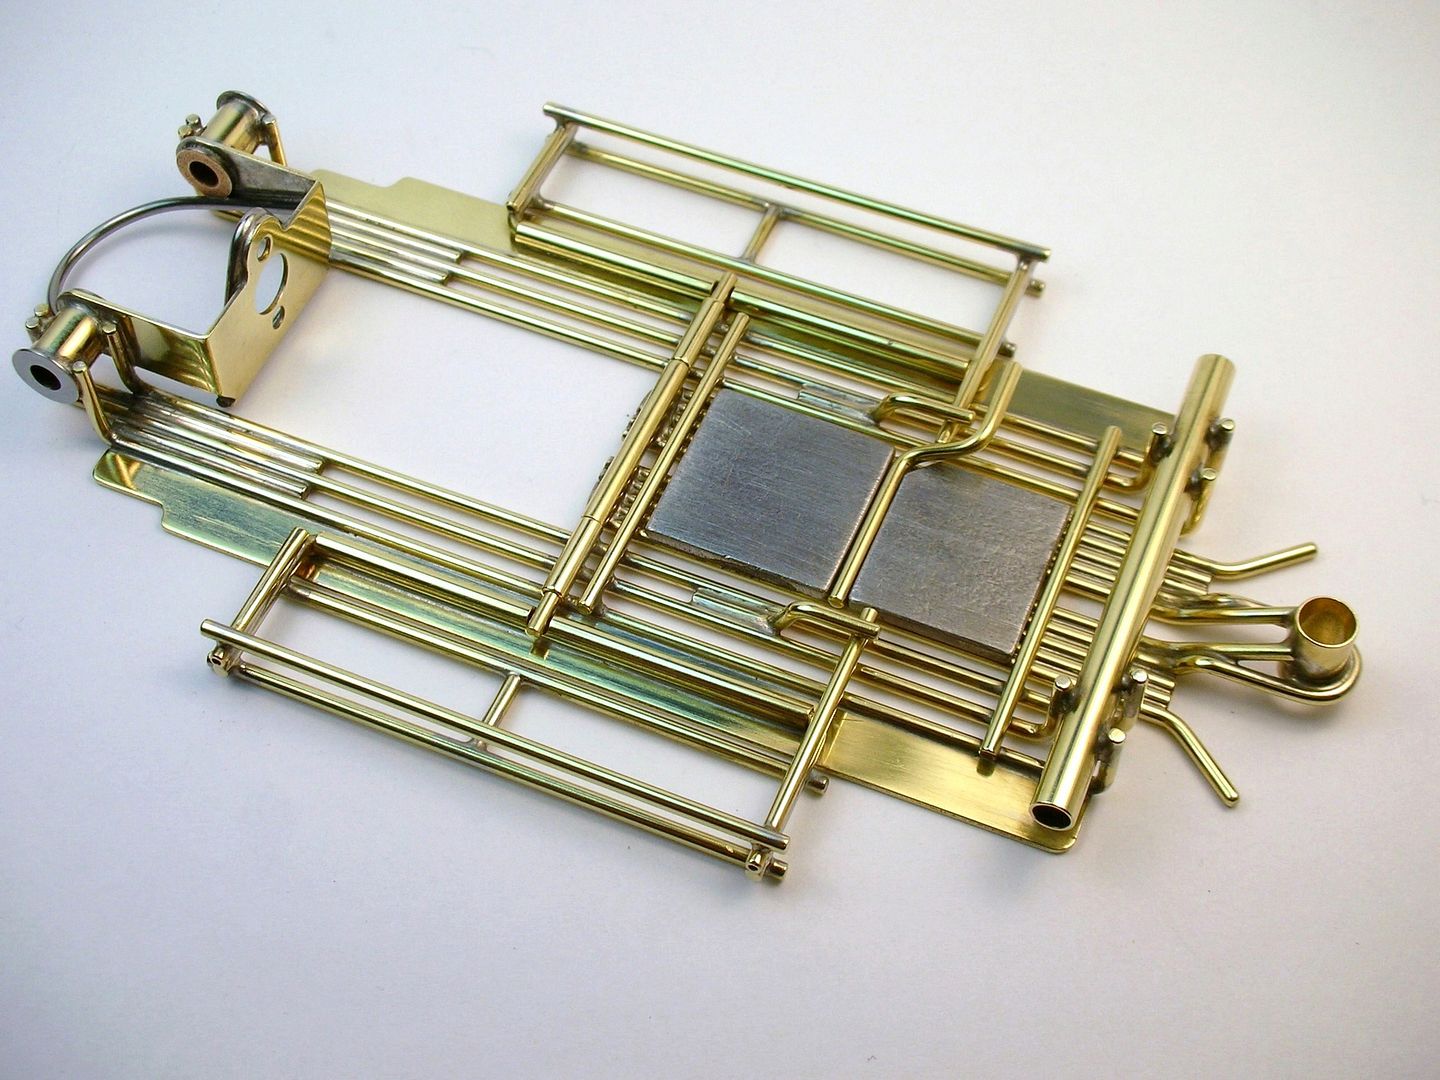
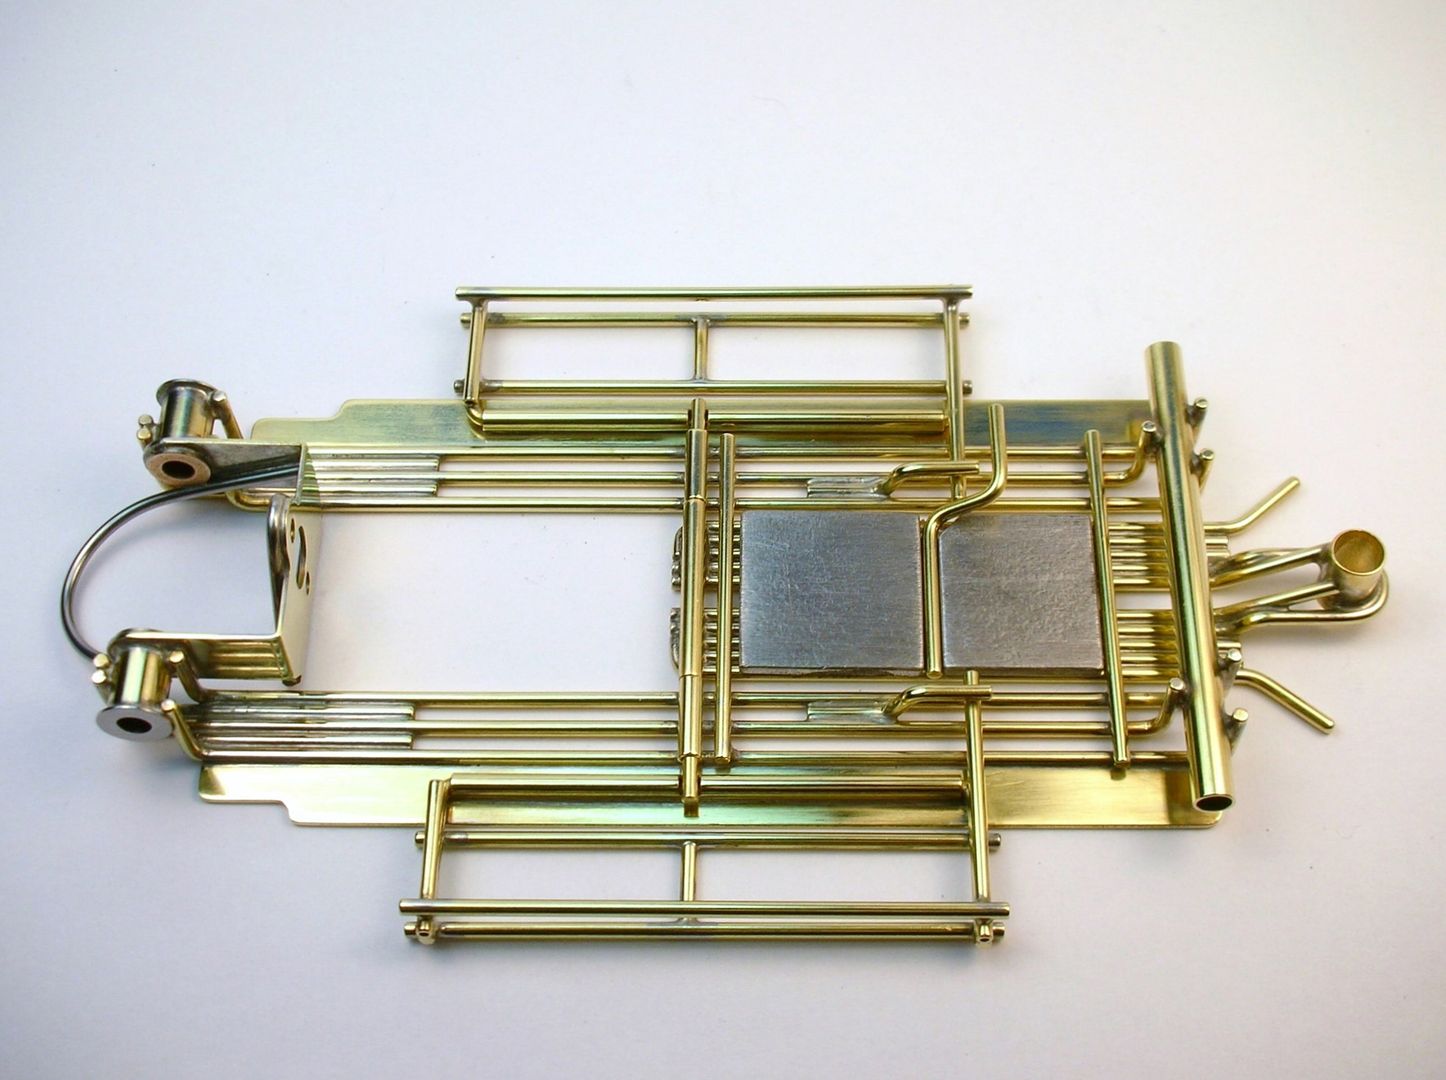
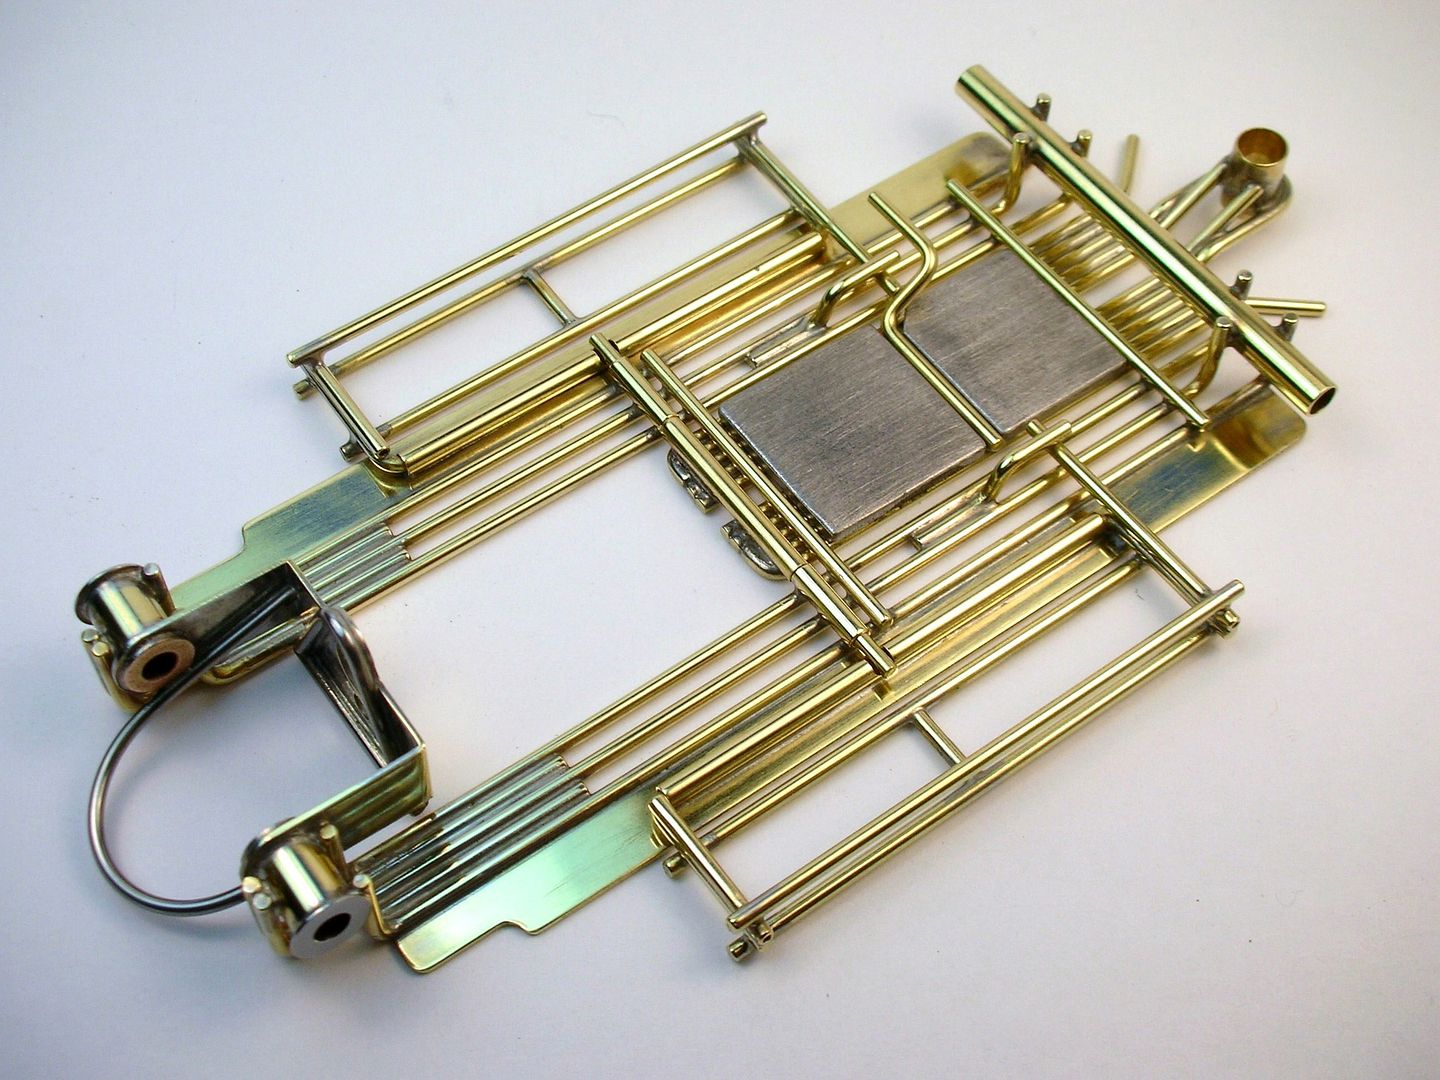
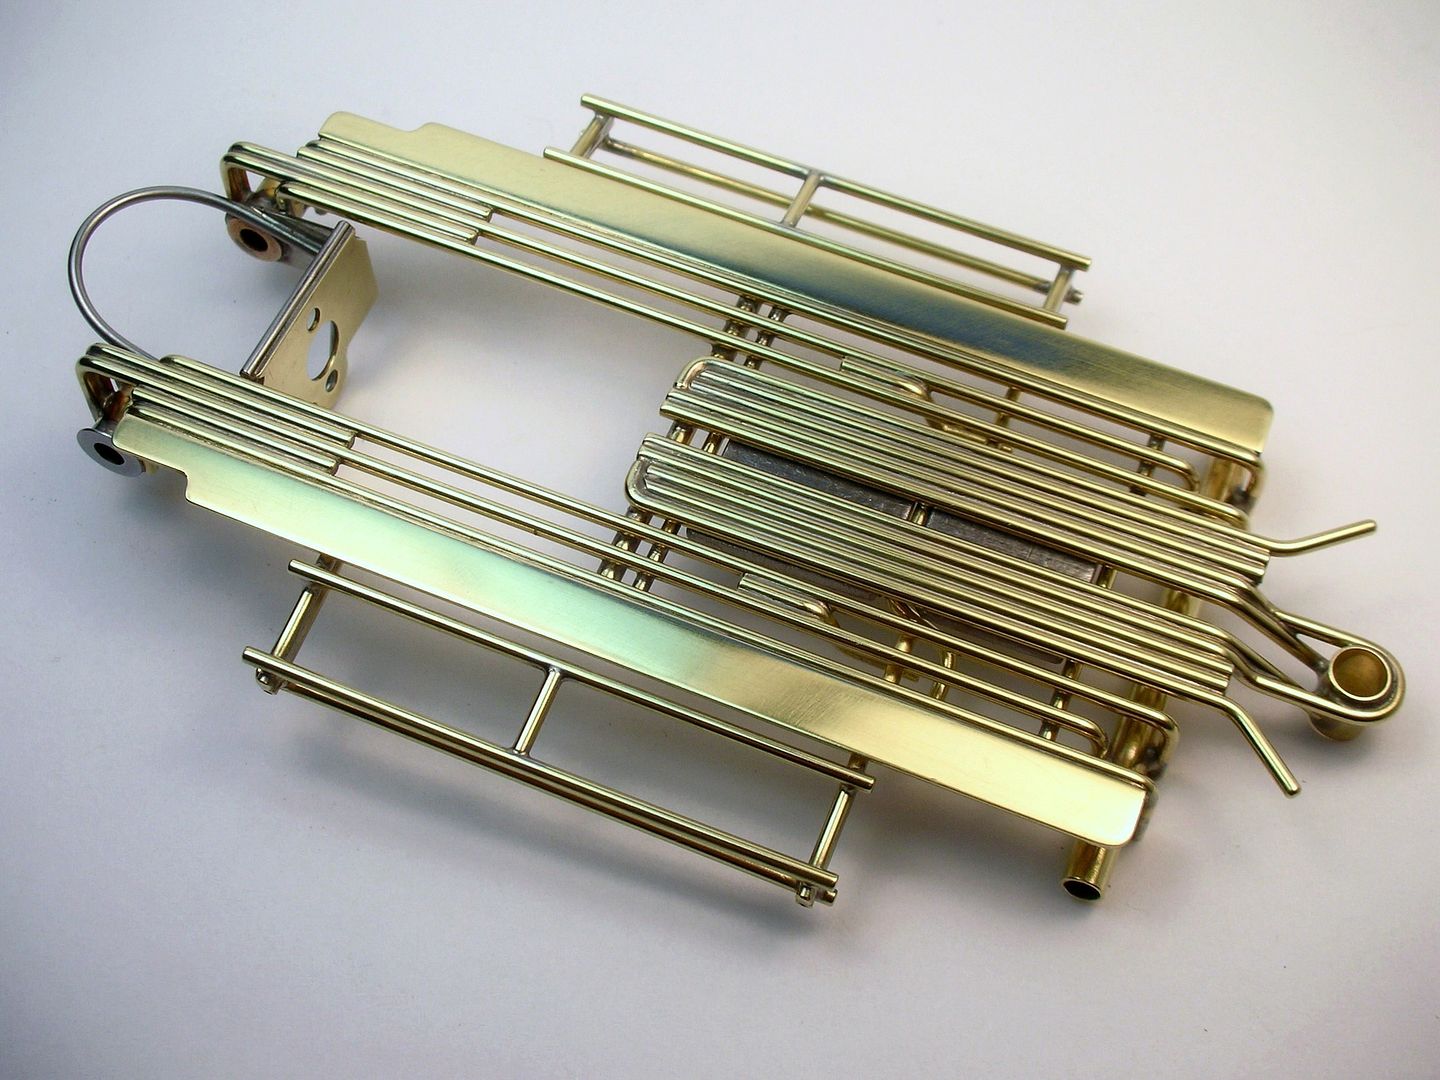

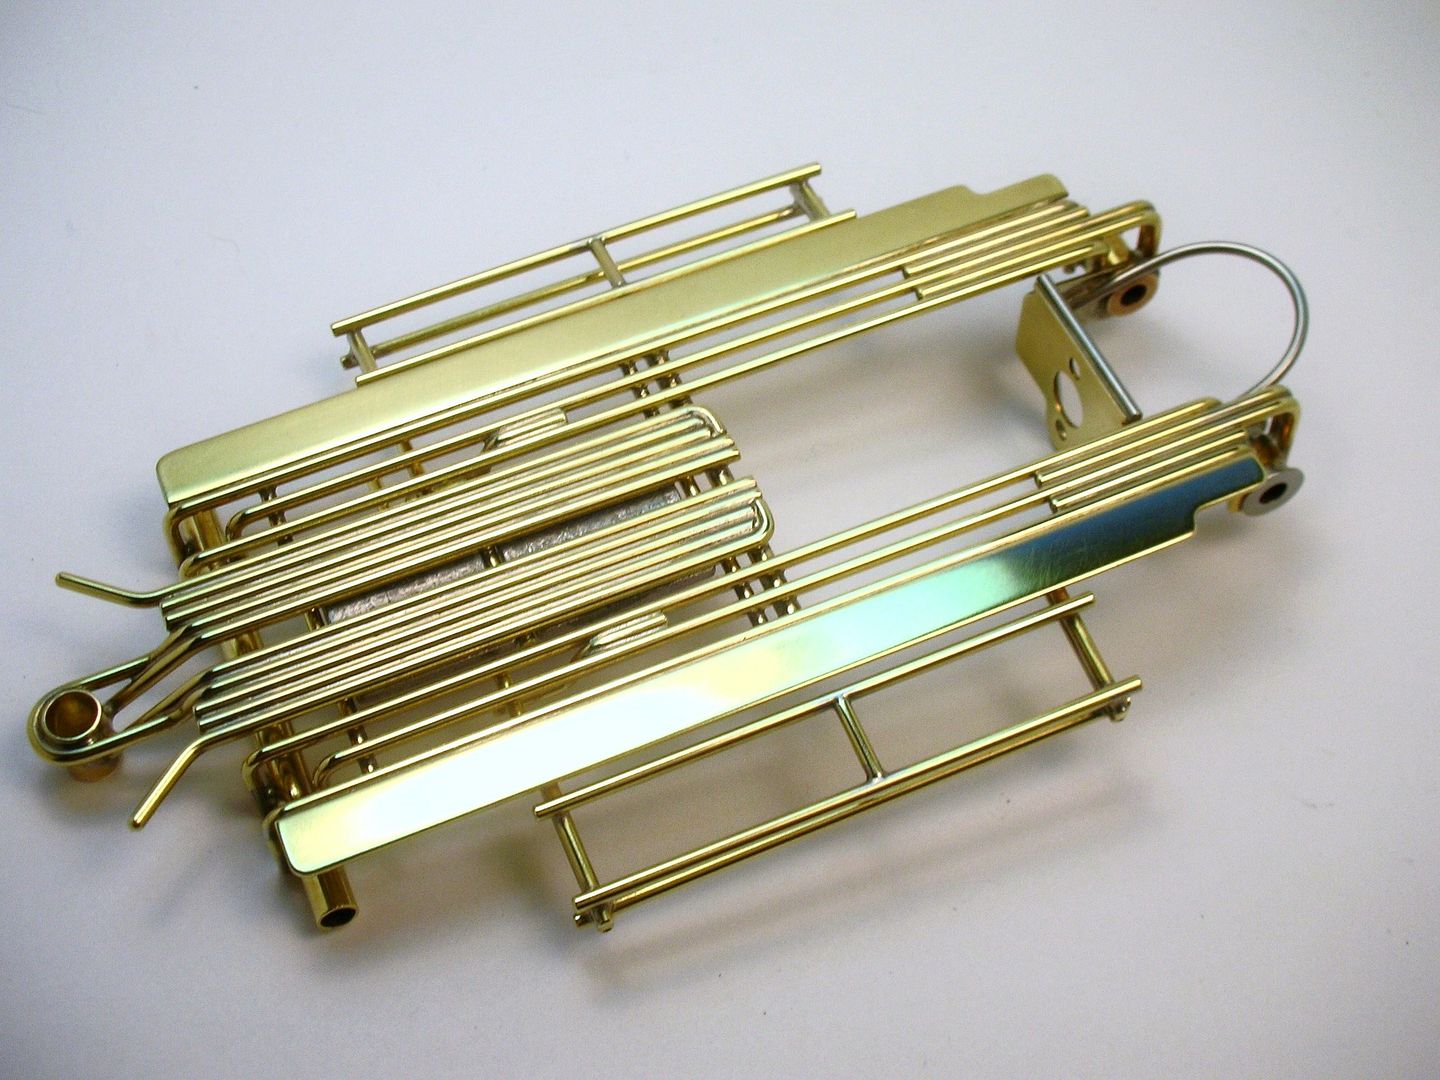
I hope you like it, Howie.
Rick Thigpen
Check out Steve Okeefe's great web site at its new home here at Slotblog:
The Independent Scratchbuilder
There's much more to come...
Grand Champion Poster
Posted 20 August 2015 - 09:33 PM
Mmmmm... shiny brass! Very shiny brass!
When I retire, Rick, I'm comin' up there to be your gopher for a week, hoping you'll let me drive some of your cars on your track.
Checkered Flag in Hand
Posted 20 August 2015 - 10:57 PM
I like it. It is a masterpiece. I might be a little biased but I think it's the nicest one I have seen. 
Thank you for creating this, Rick!
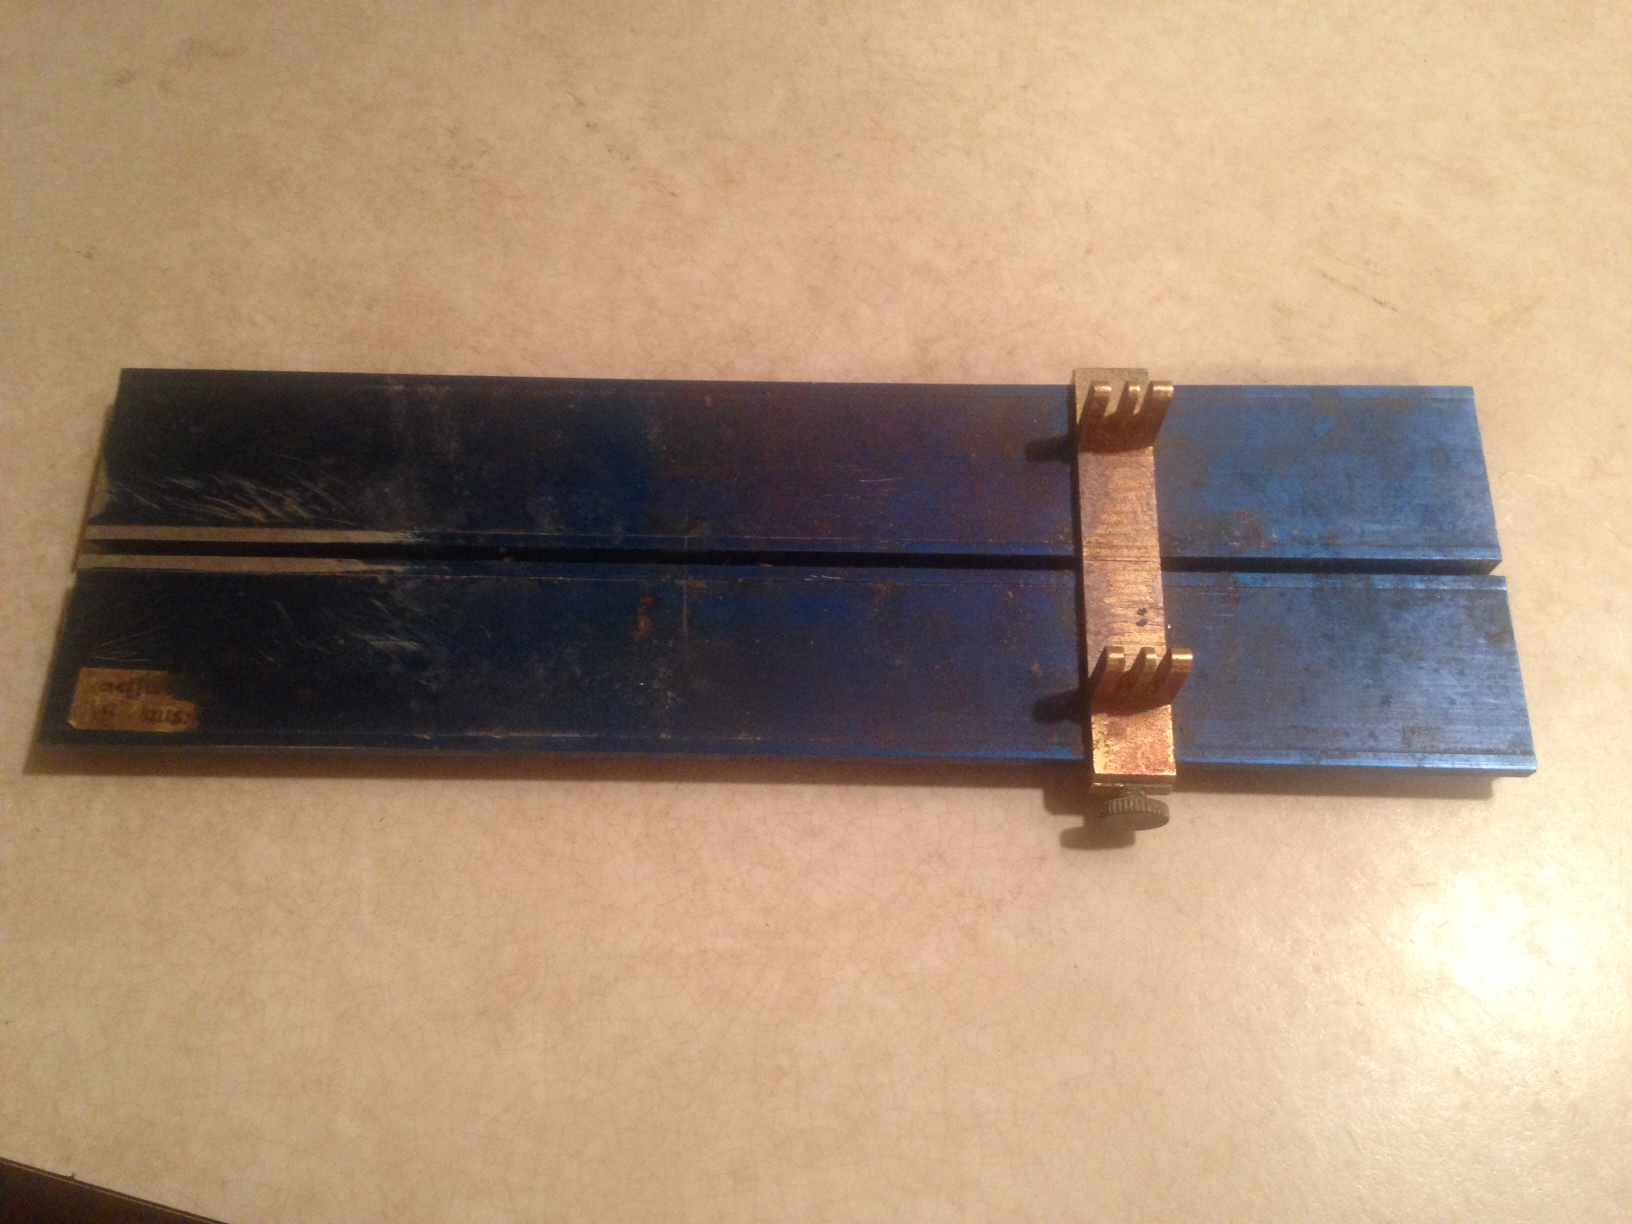
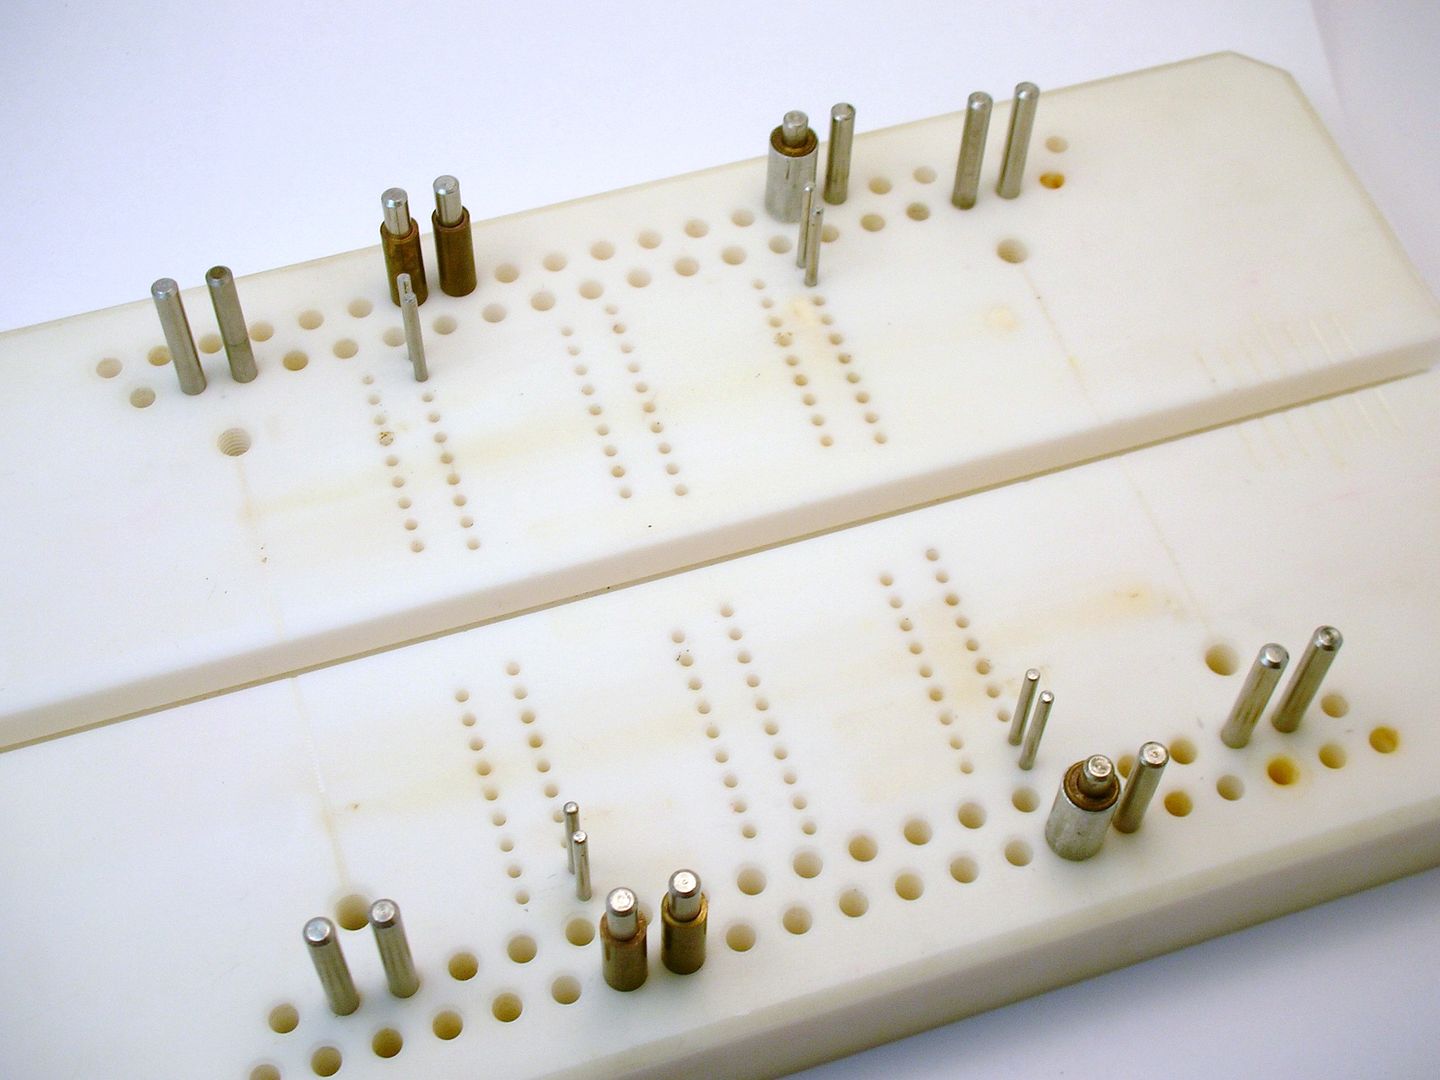
Here is the Russkit Adjust-O-Jig I built all my cars on.