Jump to content


Photo

Arm winding #1

Closed due to length

  • This topic is locked This topic is locked
3573 replies to this topic

#1576 havlicek

havlicek

    OCD Rewinder

  • Subscriber
  • PipPipPipPipPipPipPipPip
  • 11,198 posts
  • Joined: 20-August 07
  • Gender:Male
  • Location:NY

Posted 23 April 2010 - 03:54 AM

Hi Kelly,

Boy, to me it sure looks like you have it figured out already.Posted Image The only thing I would say is that much balancing being necessary is a sure sign the shaft is out. How does it run?

-john


John Havlicek


#1577 Bill from NH

Bill from NH

    Age scrubs away speed!

  • Full Member
  • PipPipPipPipPipPipPipPip
  • 14,703 posts
  • Joined: 02-August 07
  • Gender:Male
  • Location:New Boston, NH

Posted 23 April 2010 - 06:21 AM

Kelly, as John said, that's a beauty! Nice straight winds! Can you explain to us how you made that capped comm? :)
Bill Fernald
 
I intend to live forever!  So far, so good.  :laugh2:  :laugh2: 

#1578 havlicek

havlicek

    OCD Rewinder

  • Subscriber
  • PipPipPipPipPipPipPipPip
  • 11,198 posts
  • Joined: 20-August 07
  • Gender:Male
  • Location:NY

Posted 23 April 2010 - 07:29 AM

Hi Bill,

I think that's just a brass tail spacer (and one of the nylon spacers) on the com end???...or maybe it IS capped???

-john
John Havlicek

#1579 Robert V.

Robert V.

    On The Lead Lap

  • Full Member
  • PipPipPipPip
  • 350 posts
  • Joined: 14-November 09

Posted 23 April 2010 - 09:10 AM

I agree with the others Kelly that arm looks great, with all that balancing i hope the stacks hold together.
Robert Vaglio

#1580 BoomerDog

BoomerDog

    Backmarker

  • Full Member
  • PipPip
  • 89 posts
  • Joined: 16-September 09
  • Gender:Male
  • Location:Northeast Coast, USA

Posted 23 April 2010 - 10:02 AM

Although the pictures are still not what I'm trying to get on this thread. This is my latest attempt, John. 16D arm wrapped with 50 turns of #29 and timed to about 32 degrees. Oven baked and all!! It still needs balancing, but it winds up really well and is pulling about 3.28 amps at 6 volts. I'm thinking this is an amp bomb ready to blow, but what the hell....we all have to go sometime! :shok:

I'll know more when I can get it balanced, but very promising indeed. Thanks, John. What do you think?

Attached Images

  • IMG00011-20100422-1502.jpg
  • IMG00010-20100422-1501.jpg

Team Deliverance
Home of Area 51 Chassis Works

Steve Vogt, Sr.

#1581 havlicek

havlicek

    OCD Rewinder

  • Subscriber
  • PipPipPipPipPipPipPipPip
  • 11,198 posts
  • Joined: 20-August 07
  • Gender:Male
  • Location:NY

Posted 23 April 2010 - 10:46 AM

Looks really good to me Steve, but the picture is a little fuzzy :) 50T/#29 should be a really nice runner, the amp draw sounds on the high side for that wind, but that could be coming from motor setup or even the brushes needing to be broken in some more. I don't think it will do the el-destructo at all! On the pictures, try using a LOT of light and that will help the camera to focus better as well as make the pictures brighter. Also, at ranges/focal distances as close as those above, you should look for a "macro" setting in the camera's menu.
John Havlicek

#1582 Prof. Fate

Prof. Fate

    a dearly-missed departed member

  • Member at Peace
  • PipPipPipPipPipPipPipPip
  • 6,580 posts
  • Joined: 20-February 06
  • Gender:Male
  • Location:Salt Lake City, UT

Posted 23 April 2010 - 12:21 PM

Hi

Another mod in the day for the 13uo was to slice out the can sides and grind larger arcos down to fit in the gap to both get a stronger magent AND get more magnet mass in there.

Dennis, the older Johhson 111s you have have magnets that fit.

Fate
Rocky Russo
3/6/48-1/1/12
Requiescat in Pace

#1583 gascarnut

gascarnut

    Posting Leader

  • Full Member
  • PipPipPipPipPipPipPip
  • 3,938 posts
  • Joined: 16-February 06
  • Gender:Male
  • Location:Irvine, CA

Posted 23 April 2010 - 12:44 PM

Rocky,

All I have of "older Johnsons" are the cans.

I have been looking for some polymer cobalt magnets for them to build some replicas of what we ran in the '80s, but I guess I will end up using Falcon neos instead.
Dennis Samson
--------------------------
Scratchbuilding is life
Life is scratchbuilt

Samson Classics

#1584 Krash

Krash

    Rookie Keyboard Racer

  • Full Member
  • Pip
  • 28 posts
  • Joined: 01-November 09

Posted 23 April 2010 - 01:24 PM

Hi Bill,

I think that's just a brass tail spacer (and one of the nylon spacers) on the com end???...or maybe it IS capped???

-john


It's not capped... as John said above… it' an old ProSlot rewind.


I don’t know how it runs yet as I still need to build it up, I am a little weary of the comm. it has already been cut a couple of times and is getting real thin. I will let you know later if it runs good or goes up in smoke.


K


Kelly Lebechuck

#1585 havlicek

havlicek

    OCD Rewinder

  • Subscriber
  • PipPipPipPipPipPipPipPip
  • 11,198 posts
  • Joined: 20-August 07
  • Gender:Male
  • Location:NY

Posted 25 April 2010 - 12:27 PM

Hi Guys,

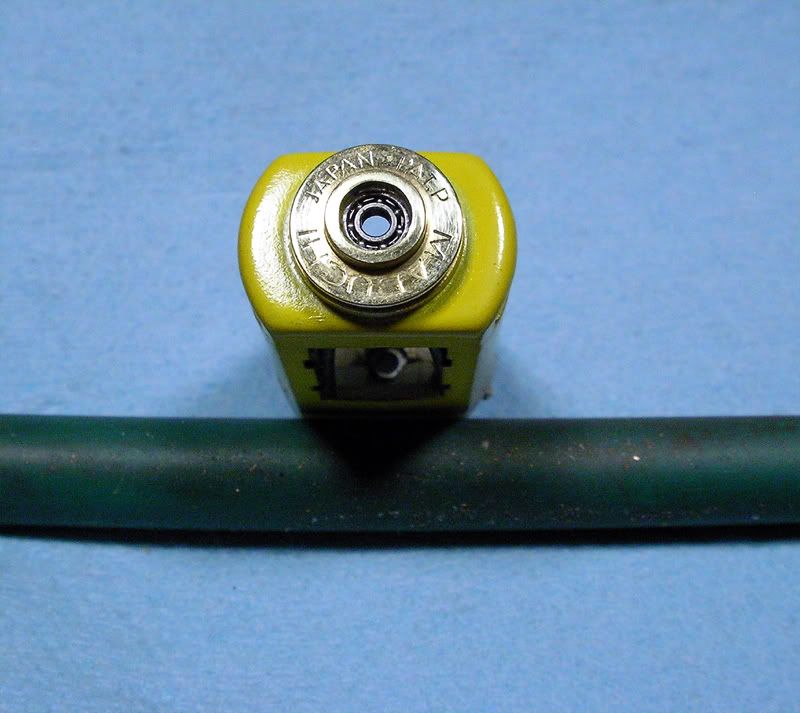
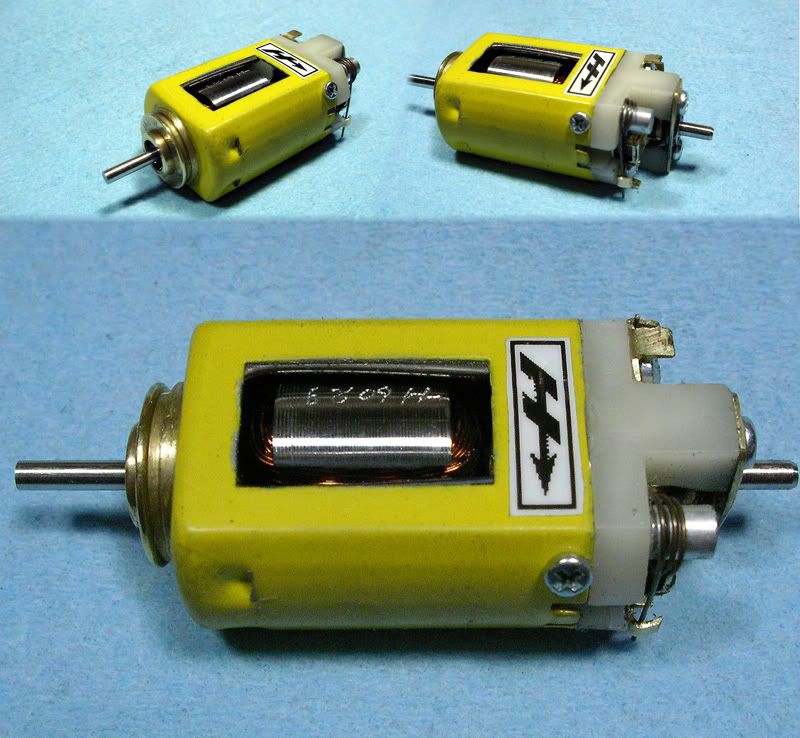
I started a 13UO for myself to complete my collection of Mabuchi motors. First thing I did was to strip the can and clean things up. Then I removed the caged bushing and installed a 2x5mm open bearing in the can end. I finished things up with a coat of yellow over a white prime coat to help the yellow "pop" without shooting too much paint on there.
Posted Image

I also installed a set of magnets from a TSR motor, and they are very strong indeed. Out of the several sets I have here, none were very closely matched...some being very different from the same motor. I haven't epoxied them in or anything and may swap them for a set from an SCX RX42B motor that are ceramic and fairly close, but for now, these seem OK.

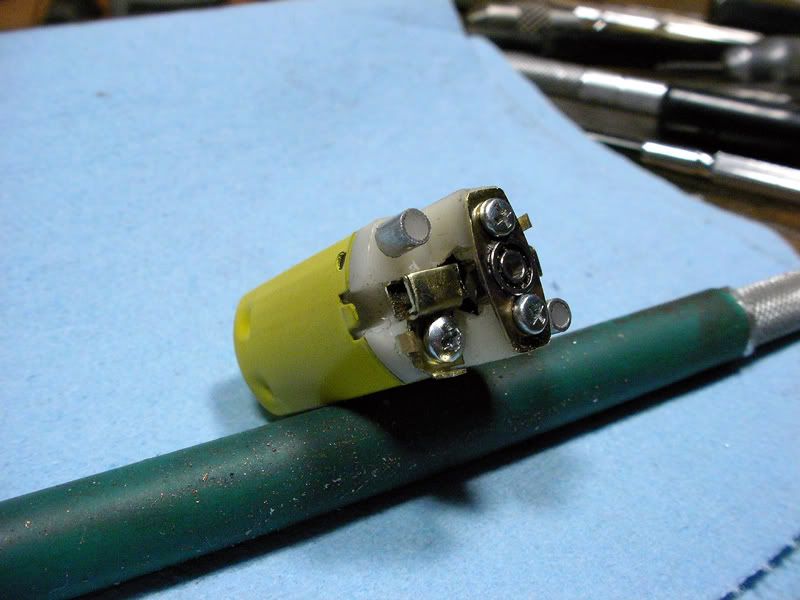
Next thing was the endbell and I went at that from a different angle this time. I fashioned some hardware from square brass tubing and some sheet stock because after flattening the endbell sides, there's a square recess that fit the tubing very well. I of course also sleeved the spring posts, but wanted to do something about the bushing. Since the area around the bushing was cracked as it usually is, I made a brass bearing strap and installed a bearing on the endbell as well. On this motor, it's a lot less difficult since the molded part of the endbell that carries the bushing is almost exactly 5mm, making a strap that fits right over the existing bushing carrier autimatically centers the hole for the replacement ball bearing. Marking the screw holes from the inside after the strap is drilled and then removing the part of the endbell that carried the old bushing leaves you with a well-centered bearing replacement. I also opened up the sides of the endbell a little to allow better ventilation.
Posted Image

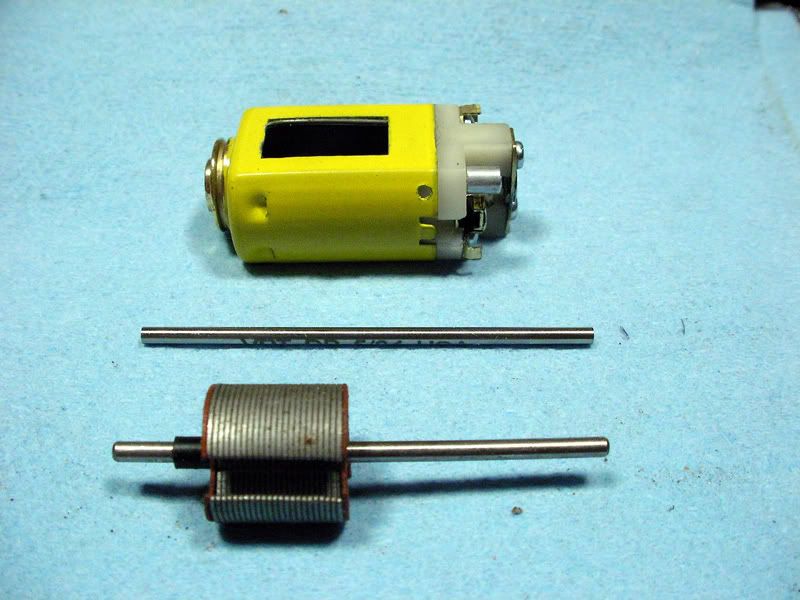
So after a bunch of messing around, I have a completed setup ready for an arm with a new shaft. While I have a bunch of .007" lams salvaged from other motors that I can build new stacks from, even I didn't have the heart to use anything other than a Mabuchi stack for the motorPosted Image Posted Image Anyway, both bearings are really nicely centered and the shaft glides through both without a hitch...rotating very easily and smoothly. The bearing upgrade alone should make a significant improvement in the motor's efficiency. I'm still limited as to the wind the motor will be able to live with because of the endbell material, but I'm confident that even a mild wind will perform well in this setup.

Posted Image

-john
  • MarcusPHagen likes this
John Havlicek

#1586 Alchemist

Alchemist

    Posting Leader

  • Full Member
  • PipPipPipPipPipPipPip
  • 2,692 posts
  • Joined: 11-November 09
  • Gender:Male
  • Location:Far, far away

Posted 25 April 2010 - 08:18 PM

Nice John!

Have you decided how you are going the wind it? Wire size and turns?

Ernie
Ernie Layacan

#1587 Robert V.

Robert V.

    On The Lead Lap

  • Full Member
  • PipPipPipPip
  • 350 posts
  • Joined: 14-November 09

Posted 25 April 2010 - 09:04 PM

Outstanding John that motor is a thing of beauty for shore, I agree those bearings should be a big improvement over the stock setup please post pics when you finish the arm.
Robert Vaglio

#1588 havlicek

havlicek

    OCD Rewinder

  • Subscriber
  • PipPipPipPipPipPipPipPip
  • 11,198 posts
  • Joined: 20-August 07
  • Gender:Male
  • Location:NY

Posted 26 April 2010 - 05:32 AM

Hi guys and thanks for looking-in. The arm will be either a single or double #29, as that's the thinnest gauge wire I have. I may start with the double and if it seems unreasonable, do a second single wind.

I agree those bearings should be a big improvement over the stock setup


For sure Robert. The actual mechanics of installing the bearings (especially the can bearing) is really pretty straightforward...although the endbell bearing strap is a little more involved. The bugaboo is in getting the bore of the bearings well-aligned because even though bearings are much more tolerant by nature of misalignment than bushings, things really need to be as straight as possible for them to work best. I'm getting a little better at this stuff so hopefully the motor will "thank me" by doing what I ask of it Posted Image Posted Image

-john
John Havlicek

#1589 havlicek

havlicek

    OCD Rewinder

  • Subscriber
  • PipPipPipPipPipPipPipPip
  • 11,198 posts
  • Joined: 20-August 07
  • Gender:Male
  • Location:NY

Posted 27 April 2010 - 11:19 AM

While I have a bunch of .007" lams salvaged from other motors that I can build new stacks from, even I didn't have the heart to use anything other than a Mabuchi stack for the motor
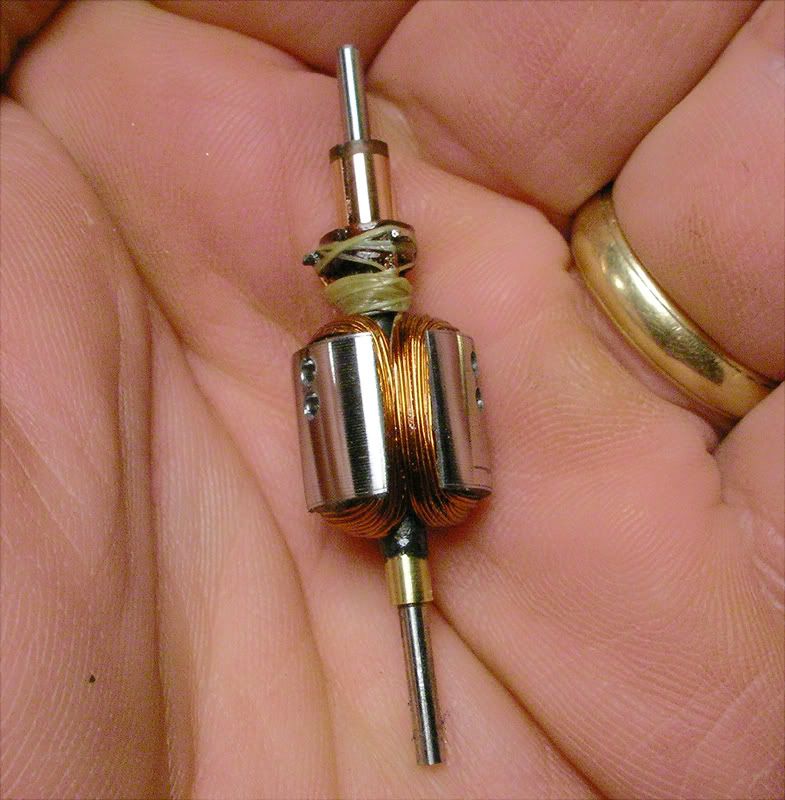
...OK, so shoot me, I liedPosted Image I built a stack with reclaimed .007" Mura lams on a drill blank shaft. At least it's really "scratchbuilding" since I even scratchbuilt the arm blankPosted Image Because of the length of the magnets, I did a shorter stack and because of the shorter stack...I did 60T/#29, the idea being I could keep the motor from getting too hot and generate some useable torque. It seems to have worked out just fine and the arm comes in at somewhere between .4 and .5 ohm which outght to be just this side of "safe"Posted Image Again because of the limited space in the endbell, I used a Tradeship com and they seem to be plenty stout enough for these kinds of motors. I took the arm down to around .508" and it just clears the magnets, there will be NO shimming on this motor! After cutting the com, it looks like this:
Posted Image

Replacing the caged bushing in the can with a bearing leaves you with a LOT more length to fill in there, replacing the endbell bushing with the bearing does the same...using a short stack gives you even more (!) so the tail and com spacing really needed to be stretched on this thing.

After assembly, I gave the motor some quick spins using the same power source I use for com welding (still waiting on a power supply so I don't do this for long and only at 6V) and it sounds really great. Even with the mild wind, it spins up with authority and from the feel of it has good torque as well. There's plenty of revs, but the motor seems to run cool so I think this is a "baby 'Buchi" that will live a (relatively) full life.Posted Image

Posted Image

-john
  • MarcusPHagen likes this
John Havlicek

#1590 Prof. Fate

Prof. Fate

    a dearly-missed departed member

  • Member at Peace
  • PipPipPipPipPipPipPipPip
  • 6,580 posts
  • Joined: 20-February 06
  • Gender:Male
  • Location:Salt Lake City, UT

Posted 27 April 2010 - 12:16 PM

Hi

Dennis.... I just blew the arm on the P can "like we used to run"...snif. It had a joke arm in it in that I had a tagged "super wasp" in the can that was .25 inch short! I do have a card of "X" endbell blanks from england which I was using in the day when i didn't use the 101s. I can spare you a couple of those. As for the magnets, I have one set of loose cobalts which are sadly for another motor that shattered its magnets in a hard crash. I haven't played with the neos enough to know the characteristics here....and I no longer have the magnets from a Buick that I salvaged back in the day for these projects. I have not kept current about alternator magnets. So, i don't know if that is still a source.

I saw a magnet source advertising on the board here, WE should check with them for the "monstermotor" projects, I think.

Fate
Rocky Russo
3/6/48-1/1/12
Requiescat in Pace

#1591 Kim Lander

Kim Lander

    Race Leader

  • Full Member
  • PipPipPipPipPip
  • 598 posts
  • Joined: 06-June 09
  • Gender:Male
  • Location:Macon, GA

Posted 27 April 2010 - 08:40 PM

John,
That motor looks great, let us know how it runs, I bet those things would have been really good in the inline configuration (ie. Dynamic chassis)we ran way back when, oh by the way....had some guy see youre motors last night, he tried for about an hour to get me to sell them to him, said he wanted to put them in his collection, I asked him what he thought I was doing with them, anyways , they came home with me.Seeya later.
Kim

#1592 havlicek

havlicek

    OCD Rewinder

  • Subscriber
  • PipPipPipPipPipPipPipPip
  • 11,198 posts
  • Joined: 20-August 07
  • Gender:Male
  • Location:NY

Posted 27 April 2010 - 09:20 PM

Hi Kim,

Thanks as always. I agree that the motor would make a slick period inline, although this motor has a lot more grunt than even a regular FT16D. I'm glad you kept the motors too. Posted Image

-john
John Havlicek

#1593 Slotgeezer

Slotgeezer

    Posting Leader

  • Full Member
  • PipPipPipPipPipPipPip
  • 2,090 posts
  • Joined: 09-June 06
  • Gender:Male
  • Location:Fullerton, CA

Posted 28 April 2010 - 11:02 AM

Great job, John....

Man, that 60T's of 29 really filled that blank! :shok: ... W/ the TSR magnets, it should have gobs of useable torque! :laugh2:

Thanks for sharing! ... Onward !!! :D


Jeff Easterly ;)

Jeff Easterly - Capt., Team Wheezer...
Asst. Mechanic, Team Zombie...
Power is coming on... NOW!!!


#1594 havlicek

havlicek

    OCD Rewinder

  • Subscriber
  • PipPipPipPipPipPipPipPip
  • 11,198 posts
  • Joined: 20-August 07
  • Gender:Male
  • Location:NY

Posted 28 April 2010 - 04:40 PM

Hi jeff,

First off...thanks as always for peeking in here :)

Man, that 60T's of 29 really filled that blank!


Well, I used the thick web .007" Mura lams so there's less room in there, but the picture is misleading. I could have gotten another 10 turns or so on there if for some reason I wanted to. It's definitely not one of the old "cram it in there with a popsickle stick" winds. Posted Image

-john
John Havlicek

#1595 Slotgeezer

Slotgeezer

    Posting Leader

  • Full Member
  • PipPipPipPipPipPipPip
  • 2,090 posts
  • Joined: 09-June 06
  • Gender:Male
  • Location:Fullerton, CA

Posted 28 April 2010 - 10:58 PM

Ah, yes.... The popsicle stick! LOL! :laugh2:

Now, you're the man to ask....

I've often thought that the late-model arm blanks w/ their thin web, & thin crowns, might be great for the smaller wire dias., but not up-to-snuff for the crazy big-dia. winds we ran, back in the day... W/ the reduced arm mass, & therefore the reduced magnetic field-effect when powered-up, plus the reduced weight, the RPM would be greater, but might not the thick blanks behave better ( less heat & greater stability ) due to their thicker web & crown... Comparing the two different style blanks, how does a 60T-28 behave, thin web vs. thick? ...

After seeing some of the late-production blanks that some companies are using to wind X-12's for Boxstock class, I thought I'd get your impressions & thoughts...

Thanks, John


Jeff Easterly ;)

Jeff Easterly - Capt., Team Wheezer...
Asst. Mechanic, Team Zombie...
Power is coming on... NOW!!!


#1596 havlicek

havlicek

    OCD Rewinder

  • Subscriber
  • PipPipPipPipPipPipPipPip
  • 11,198 posts
  • Joined: 20-August 07
  • Gender:Male
  • Location:NY

Posted 29 April 2010 - 05:31 AM

Hi Jeff,

You know, I really don't have the answer in scientific terms and that kind of physics is way above my pay grade. I have always been partial to the old Mura .007" blanks with the thick web and they seem to produce good performance regardless of the wind. The new Mura .007" arms with the thin web I've used seem to work really well though and there's no doubt that they make winding a lot easier. There's also the question of rotational mass, and a lighter arm should spin up faster and also spin down faster (less "flywheel" effect) if it ...and a similarly wound thick web arm produced the same field. That's a big "if" though and I have no way of measuring the field produced by an arm. To make matters even more complicated, a thin web arm would need more turns to be the same resistance as a thick web arm...more turns should equal a stronger field. If you think about it, a thin web should have some advantages:

1) less rotational mass
2) more turns for the same resistance
3) easier to wind

I was fortunate enough to get some samples from Bill Bugenis of his arms and the crown and web were of a modern design (thin web/small thinner crown) and they were top shelf. If I were winding arms for modern racers (which of course I'm not), I would think they'd be about ideal. Maybe Bill or someone who's done the physics homework can chime in with real definitive info. It seems that there are possible some tradeoffs involved, but the new arms might have an advantage overall. I still love those old Mura .007" blanks though.

-john

PS...I just noticed that "Arm Winding" is over 50,000 views! Somebody's looking!
John Havlicek

#1597 BoomerDog

BoomerDog

    Backmarker

  • Full Member
  • PipPip
  • 89 posts
  • Joined: 16-September 09
  • Gender:Male
  • Location:Northeast Coast, USA

Posted 29 April 2010 - 01:36 PM

50000 views!!! Congrats, John.

I've got some budgeted "rewind" time for this weekend. And, thank you, for the package! I do have a couple of questions regarding the "goop".
You've mentioned during the string about applying it on the arms and that's it's best applied to the bare metal on the interior stack. I'm using modern 16D and S16D recycled arms for rewinding. Mostly, because I have them and secondly, because they're already fairly well insulated. Do you suggest stripping off the factory insulation and then applying the furnace stuff or leave it alone and epoxy where there may be an exposed area?

I've done 5 arms since my picture posting and I've got say that they look awesome, but they're not really as responsive (quick up and down) as the first one. Any suggestions? Anyone.......anyone......Ferris???:laugh2:

All comments welcome!

Thanks, John!
Team Deliverance
Home of Area 51 Chassis Works

Steve Vogt, Sr.

#1598 havlicek

havlicek

    OCD Rewinder

  • Subscriber
  • PipPipPipPipPipPipPipPip
  • 11,198 posts
  • Joined: 20-August 07
  • Gender:Male
  • Location:NY

Posted 29 April 2010 - 02:52 PM

Hi Steve (your welcome!),

I wouldn't remove the factory coating on those arms, from what I've seen it's a very good insulator. You only need to use the furnace cement when there's bare metal. If you want/need some extra protection on the ends of the stack, try slightly roughing up whatever coating is on there and brushing on a little of the cement. It's good to let a little go over the edge to form a slight "lip" oif cement because the corners are where you'll most likely have problems with shorts.

-john
John Havlicek

#1599 Horsepower

Horsepower

    **Numb Thumbs**

  • Full Member
  • PipPipPipPipPipPipPip
  • 4,343 posts
  • Joined: 16-February 06
  • Gender:Male
  • Location:Chicago

Posted 29 April 2010 - 06:18 PM

PS...I just noticed that "Arm Winding" is over 50,000 views! Somebody's looking!


That was just me. My memory is kinda short so I gotta review a lot! :wacko:
Gary Stelter
 
My life fades, the vison dims. All that remains are memories... from The Road Warrior

#1600 Robert V.

Robert V.

    On The Lead Lap

  • Full Member
  • PipPipPipPip
  • 350 posts
  • Joined: 14-November 09

Posted 29 April 2010 - 06:46 PM

Hi John
Like Steve said congrats on all those views and it also seems that people are also winding so i think this thread is a great success, i to should have a new post in a day or 2 so things are looking up around here.
Robert Vaglio


Electric Dreams Online Shop