Jump to content


Photo

MDC Bat chronicles


  • Please log in to reply
180 replies to this topic

#126 Martin

Martin

    Posting Leader

  • Moderator
  • PipPipPipPipPipPipPip
  • 4,649 posts
  • Joined: 22-February 09
  • Gender:Male
  • Location:US

Posted 26 October 2025 - 10:20 PM

Thanks Mark, it was/is a bit of a journey. The last part ( the interior) is being printed at this time. I found a 3D printer close to home so I should have those parts in hand soon.

As soon as I do I plan on posting an add here with a price list. I am only making 10 of each part as I am not sure there is any more interest than that?

I hope you will stay tuned for the cars I get finished?


  • Slot Car Rod likes this
Martin Windmill


#127 Mark Onofri

Mark Onofri

    Posting Leader

  • Subscriber
  • PipPipPipPipPipPipPip
  • 2,981 posts
  • Joined: 18-November 20
  • Gender:Male
  • Location:Syracuse, NY

Posted 27 October 2025 - 10:32 AM

Time flies when you're building slot cars

#128 Martin

Martin

    Posting Leader

  • Moderator
  • PipPipPipPipPipPipPip
  • 4,649 posts
  • Joined: 22-February 09
  • Gender:Male
  • Location:US

Posted 10 November 2025 - 09:55 AM

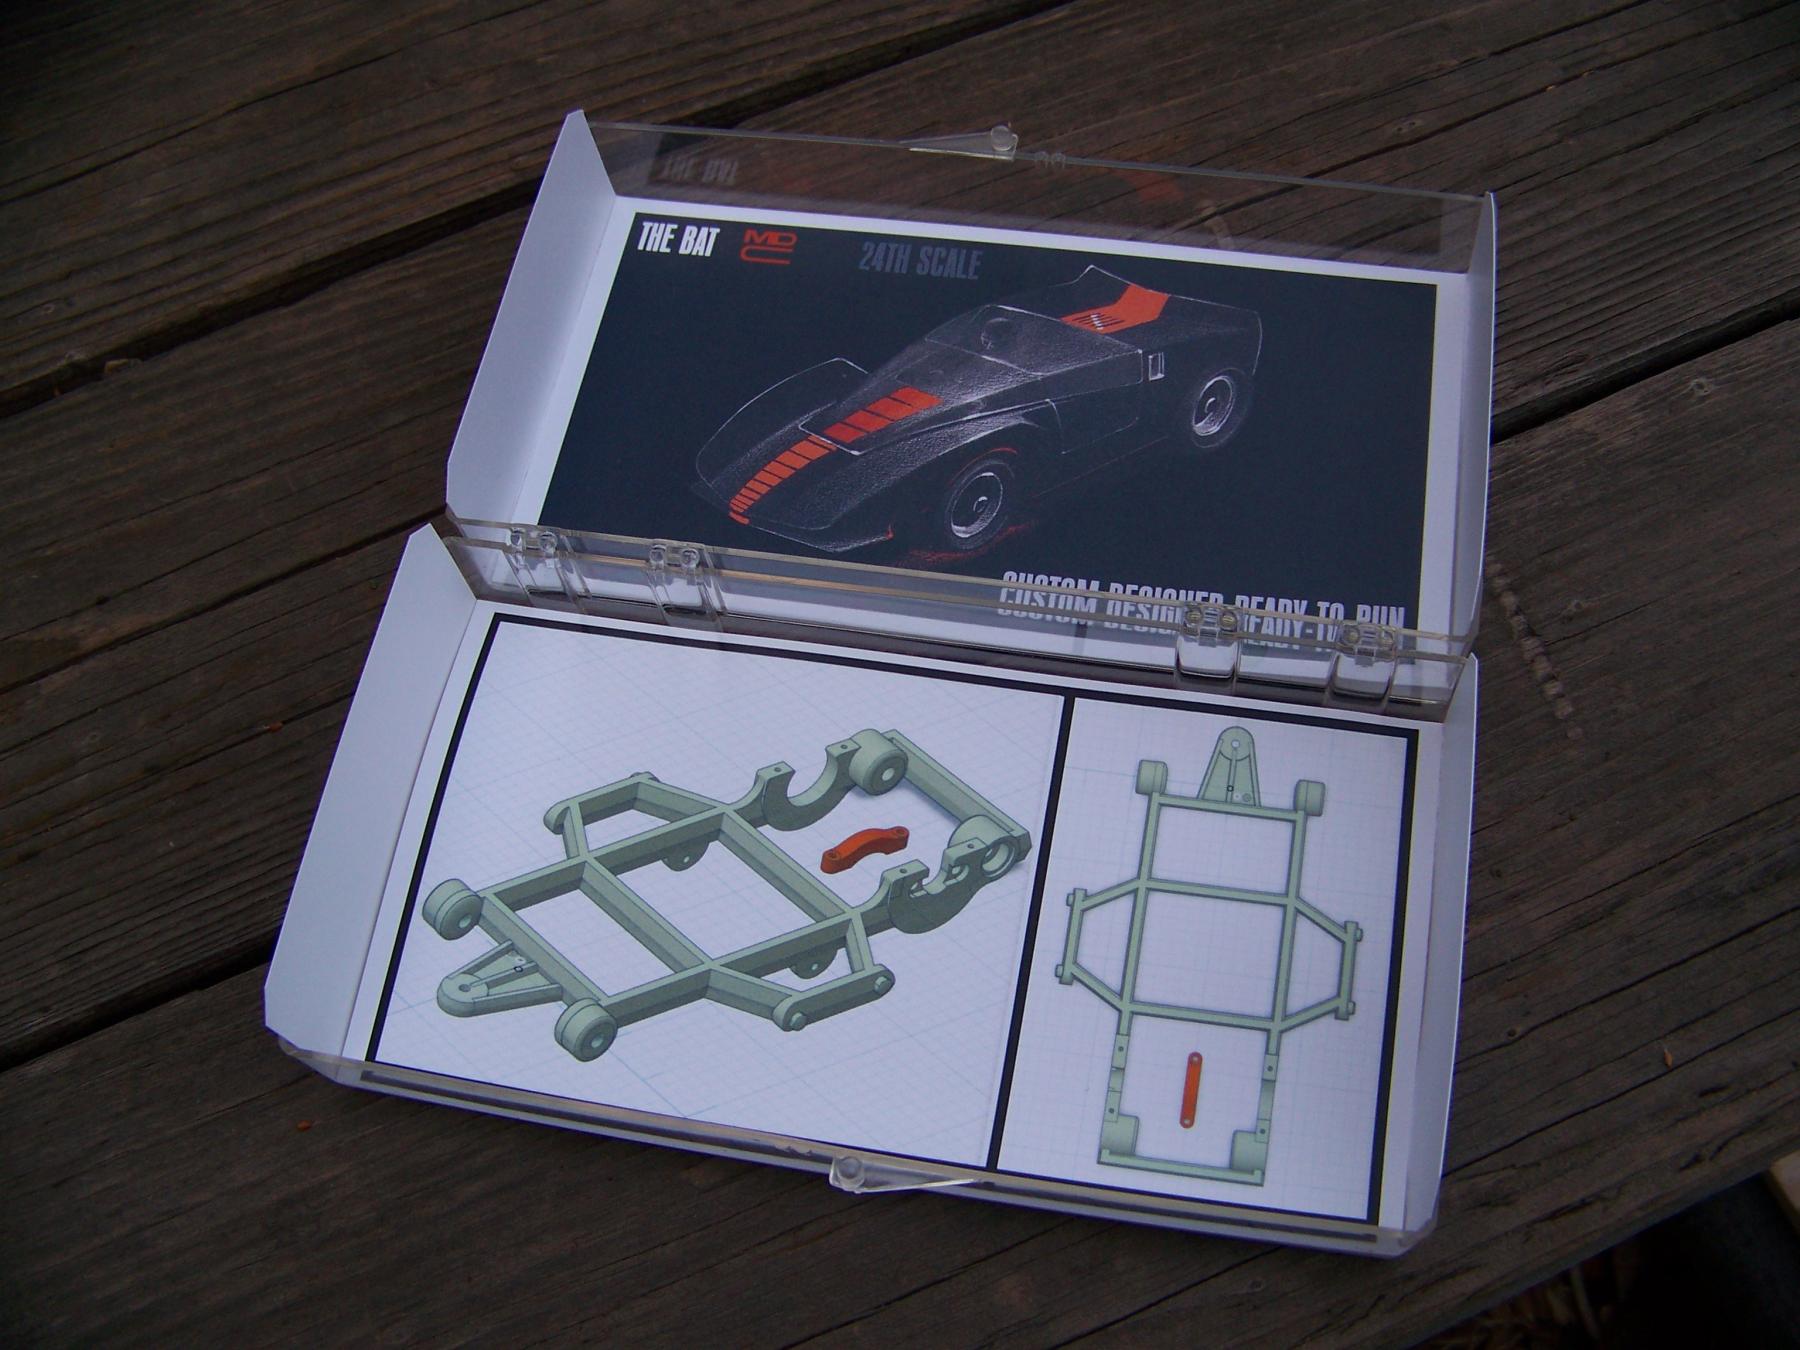
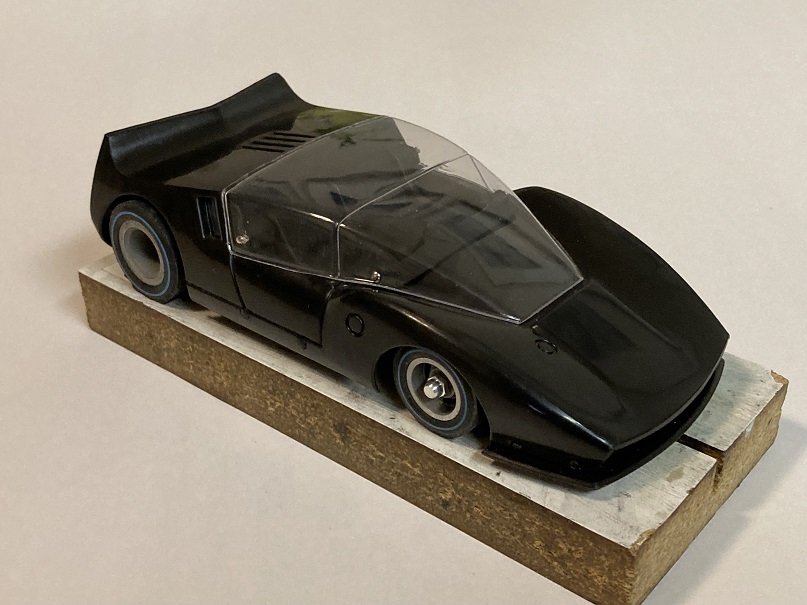
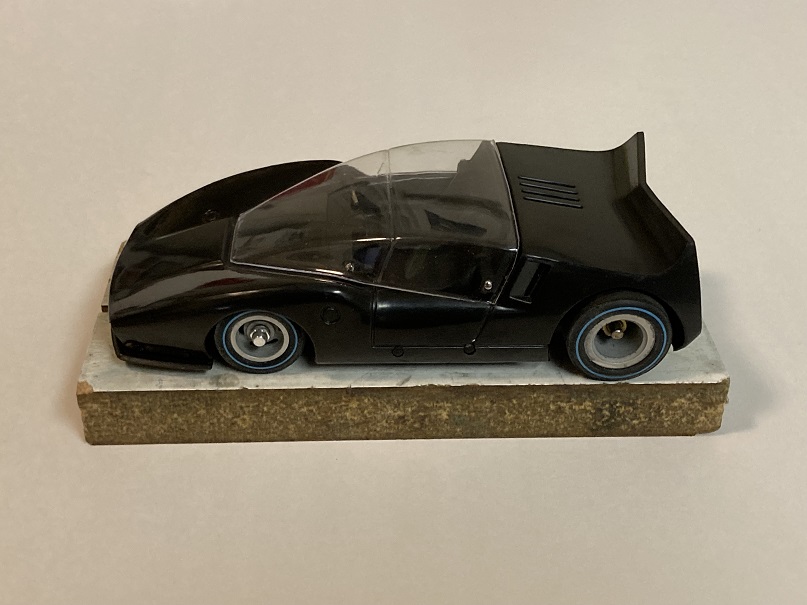
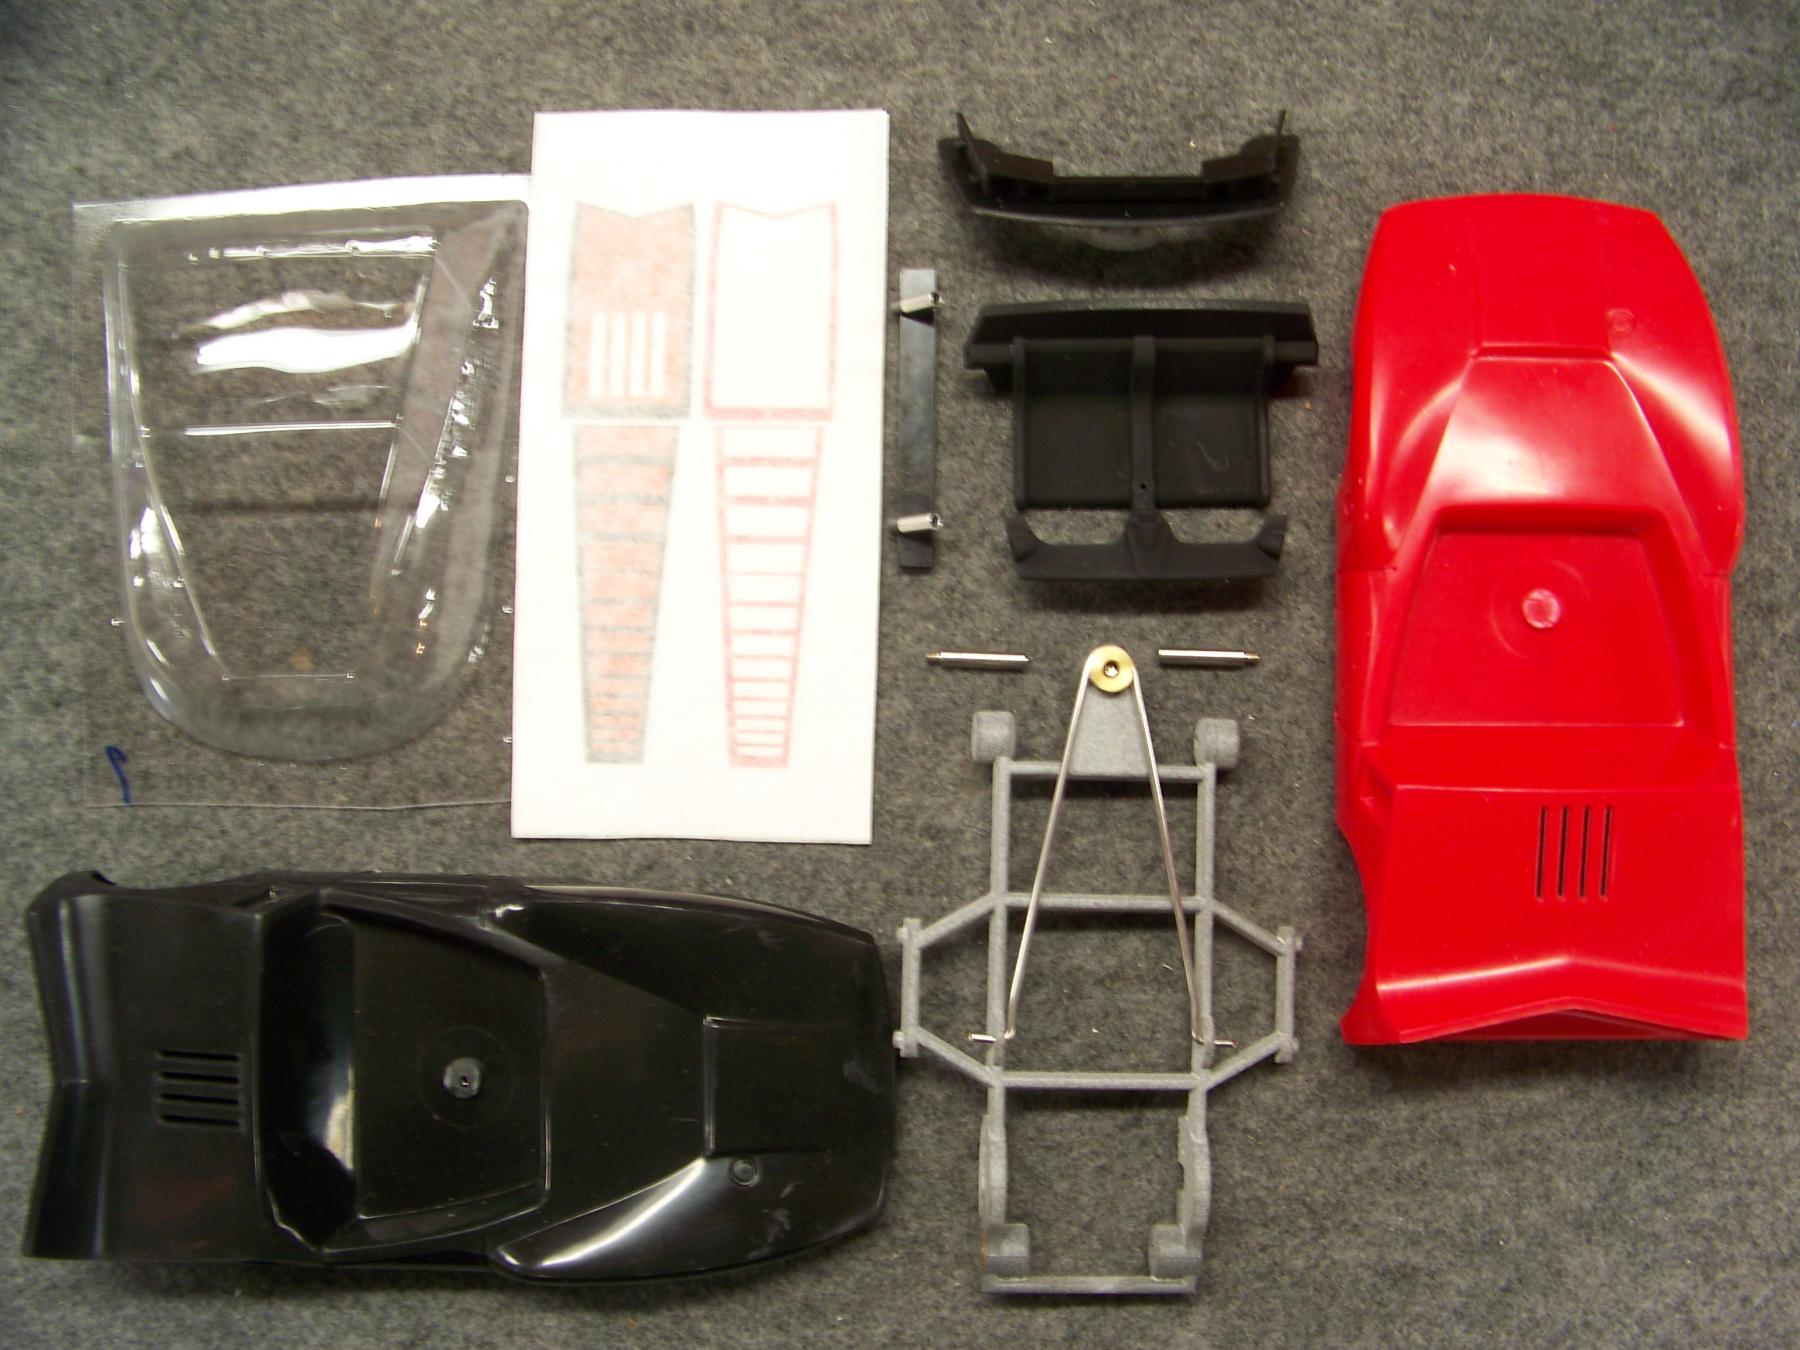
Finally I have available a few extra parts so The MDC Bat can be recreated by anyone interested in this 1/24 custom car. 

This whole process took 1 year, from the first post to today. I was trying to get this done by Halloween but the interior printing took a bit longer that expected.

I could not have made these parts available without the help of my slot car friends.  

Larry for his tireless CAD work, Gene for his Vac-u-forming skills and Matt for his contacts getting the graphics printed.

With out there efforts and skills this car would have gotten no further than it did in 1965.


Coming soon a few hints a tips on how I designed the canopy to attach, but still be removable. This was a method that I thought MDC could have used in production? I am pretty sure they would not have used glue or tape. So please stick around for this step by step assembly.


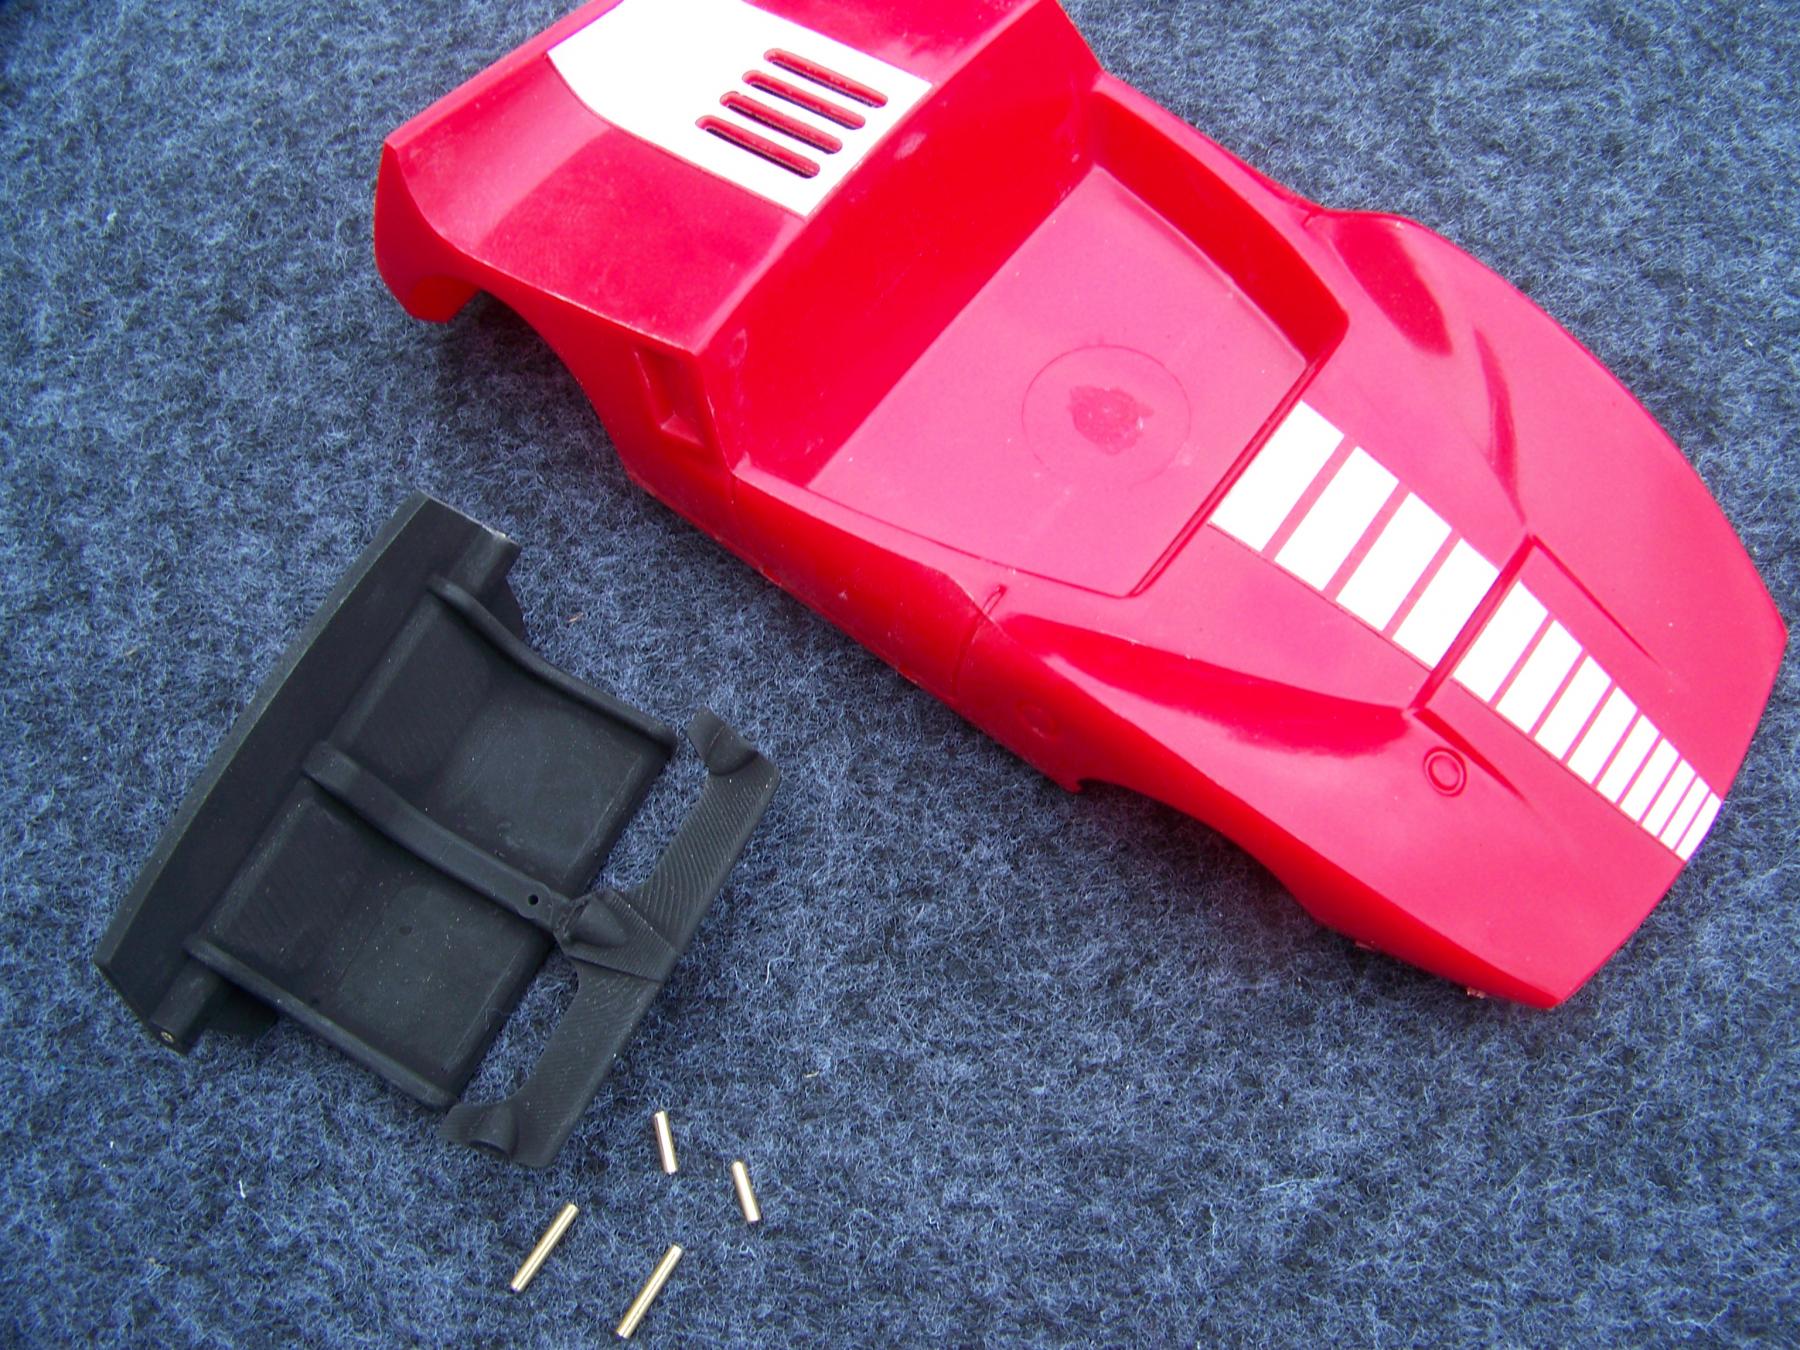
Shown here, your choice of a red or black original body if you do not have one or 3?


The 3D printed front bumper that snaps into the original holes in the body.


The aluminum exhaust tips mounted on a 3D-printed base to be attach to the body in the rear molded location.


A 3D printed interior that fits the body and is designed to attach the removable clear canopy. (More info and details on methods on the Bat chronicle post) see link below.


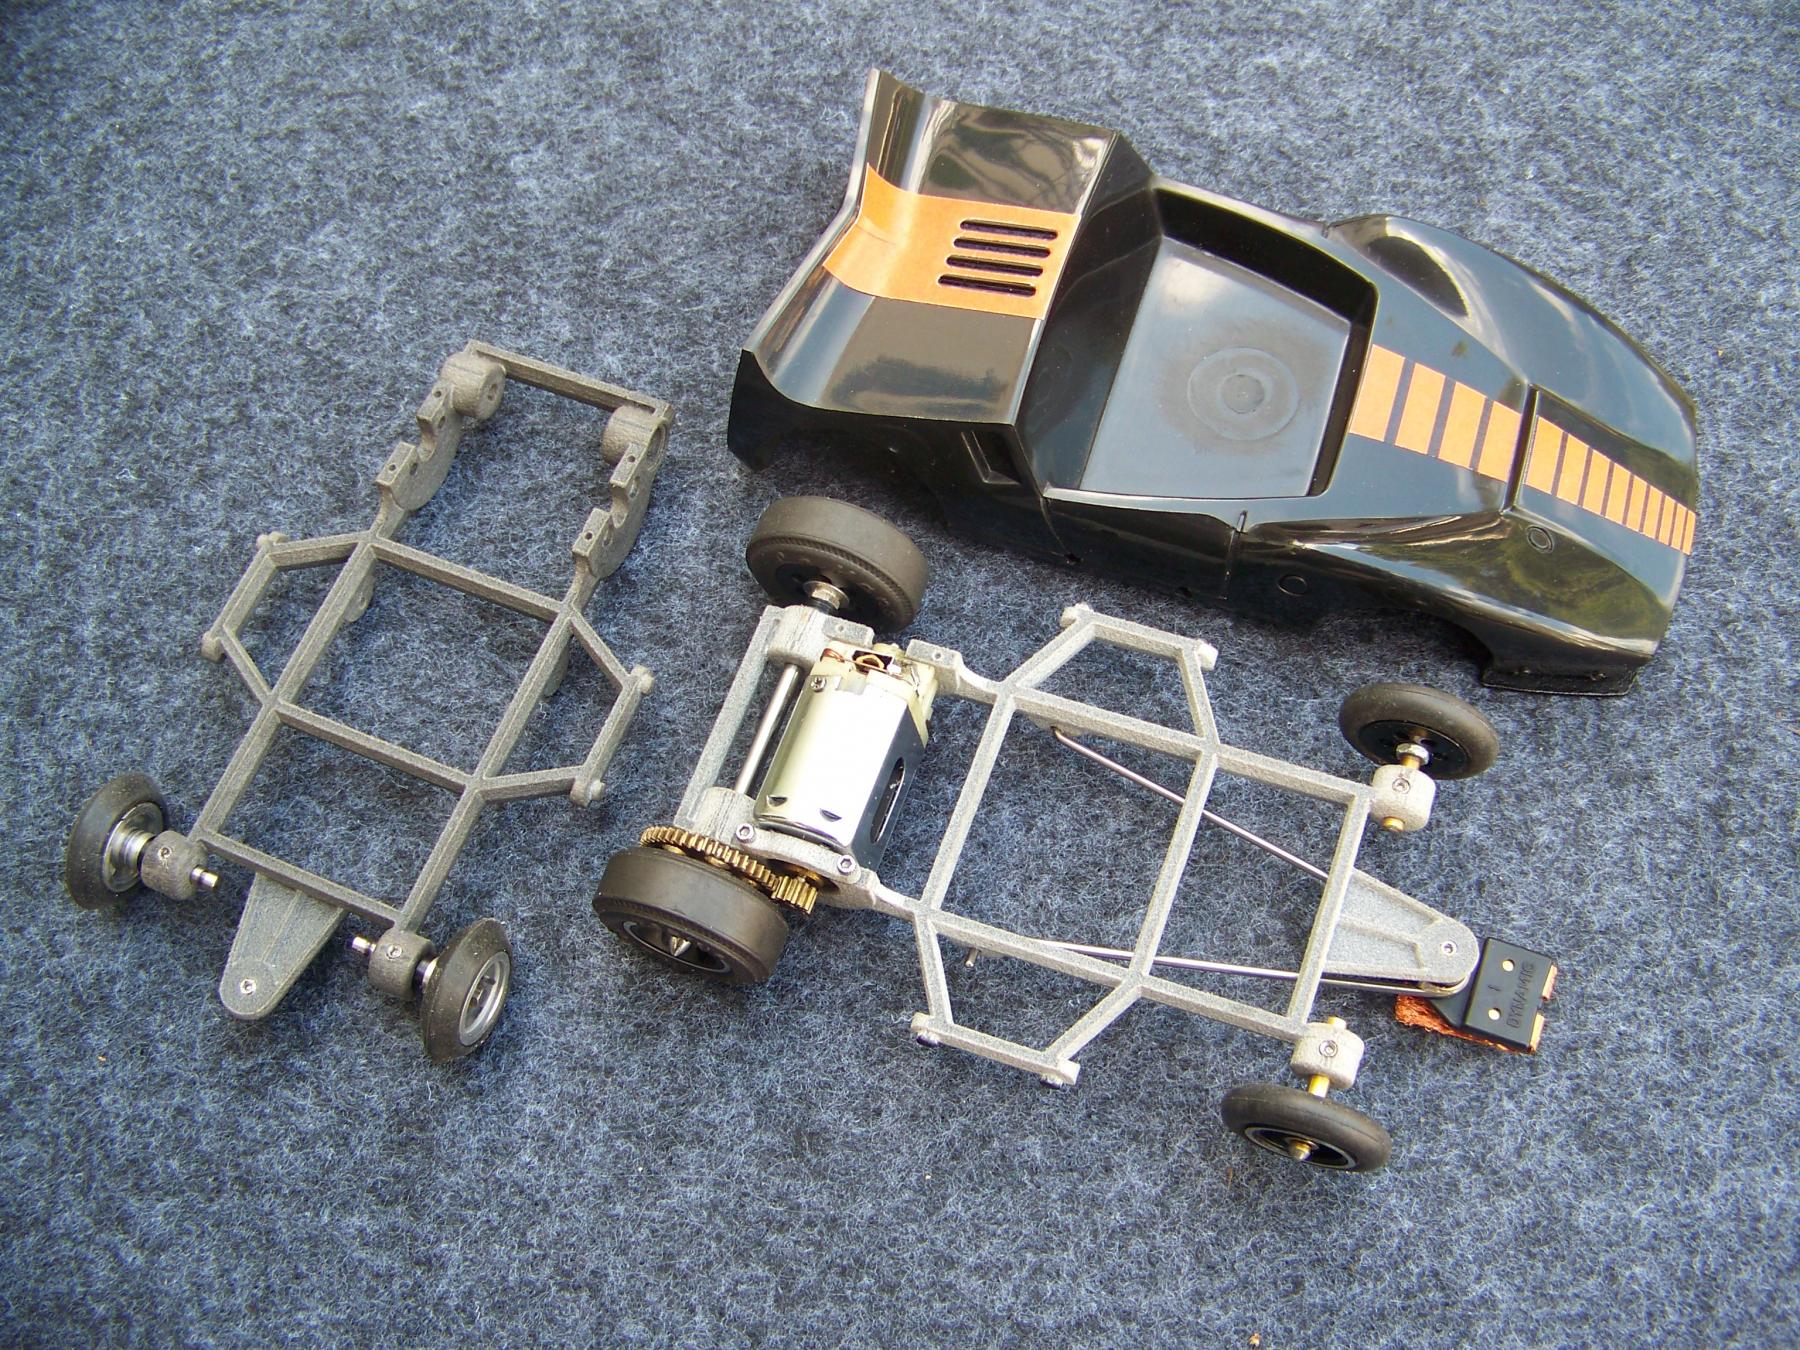
The chassis also snaps into the original locating holes in the side of the body. It is designed to fit any period 16D motor, and has the correct wheelbase and width. Please not there are 2 versions of this chassis. One chassis is designed for the 16D with the small blind can bearing (SB) and the other chassis designed for the large can bearing (LB)

All other features are the same.


Drop arm and front axles are also options to finish this replica 3D printed chassis off.


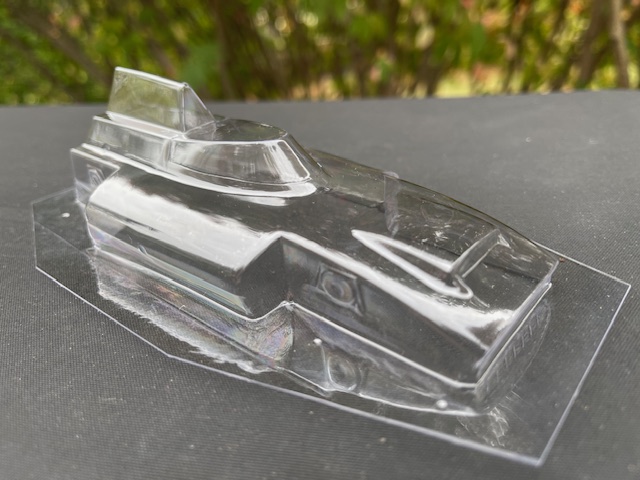
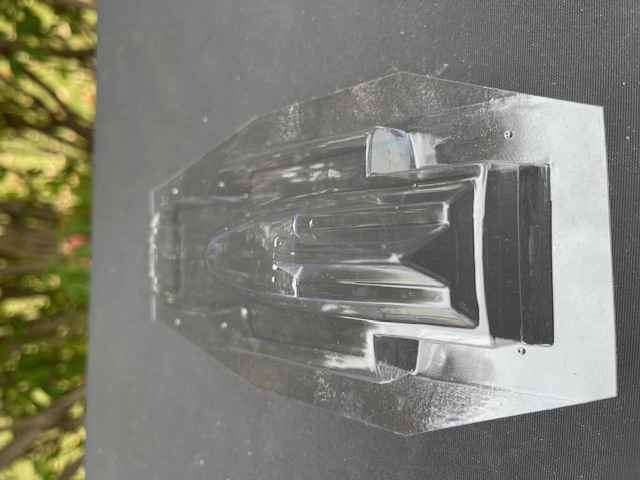
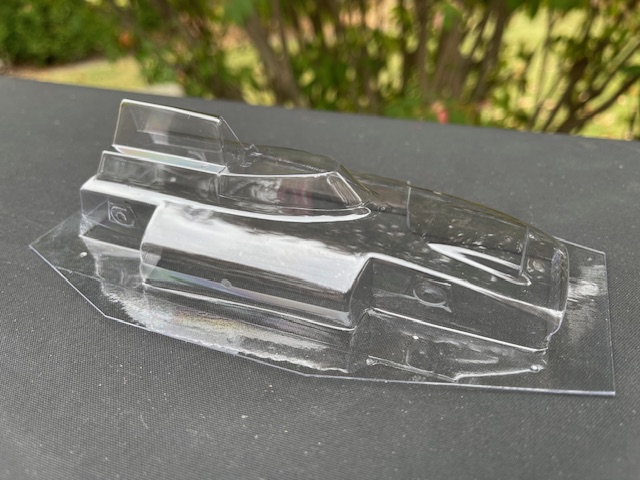
A clear canopy made from original tooling in .030" PETG.


A clear display box is also available with re-imagined Bat art work. 


I will add more info to the blog post to help make this build easy and fun.


Please feel to PM me for a price list and any other questions you may have. 
 

102_9818.JPG


102_9491.JPG


  • don.siegel, Jencar17, Gene/ZR1 and 2 others like this
Martin Windmill

#129 Alchemist

Alchemist

    Posting Leader

  • Full Member
  • PipPipPipPipPipPipPip
  • 2,823 posts
  • Joined: 11-November 09
  • Gender:Male
  • Location:Far, far away

Posted 11 November 2025 - 02:45 PM

Hi Martin!


What a journey indeed - and so satisfying I'm sure!


Thanks for keeping us up to date and sharing this wonderful project of yours!


Hope all is well!


Ernie


Ernie Layacan

#130 Martin

Martin

    Posting Leader

  • Moderator
  • PipPipPipPipPipPipPip
  • 4,649 posts
  • Joined: 22-February 09
  • Gender:Male
  • Location:US

Posted 12 November 2025 - 07:54 PM

Thanks Ernie and all that have encouraged and shown interest in this project.
 
Next is a step by step method I used to mount the interior and canopy.
 
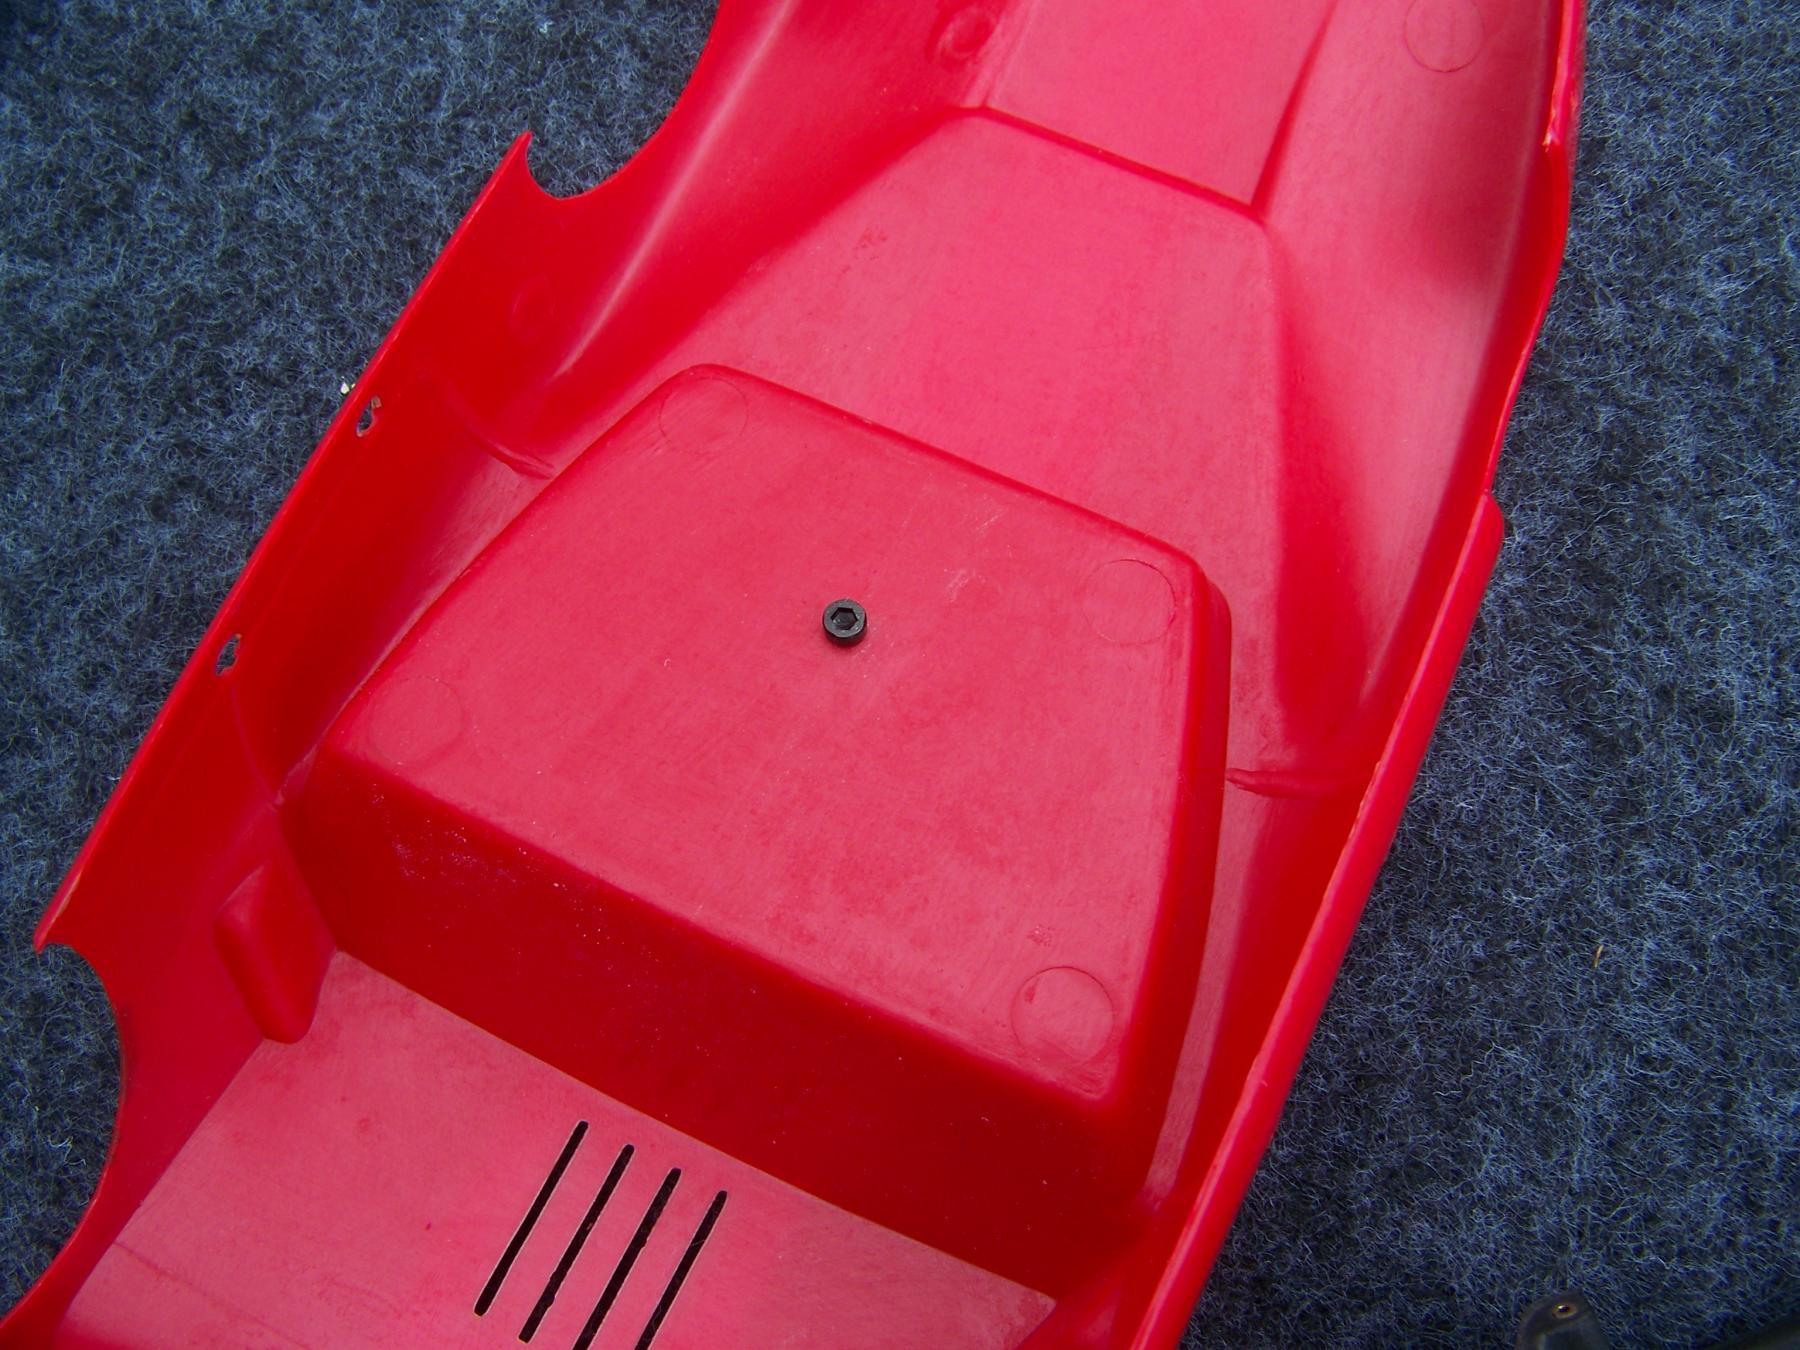
Step 1/ Remove the factory plastic injection port. Its in the middle of the space for the interior and prevents the interior from sitting flat.
 
102_9820.JPG
 
Step 2/ Hold the interior firmly in its happy place and drill through the hole provided in the interior about where the gear shift would be.
Use the drill that is appropriate for your tap. I have a Tap/drill chart and I can provide the drill size for the screw you plan to use if necessary?
 
Step 3/ Tap the interior for a small screw of your choosing. I used a M1.6 x .035 because I had them. Once the threading is done I open up the hole in the body, just so the screw passes through. 
 
102_9825.JPG
 
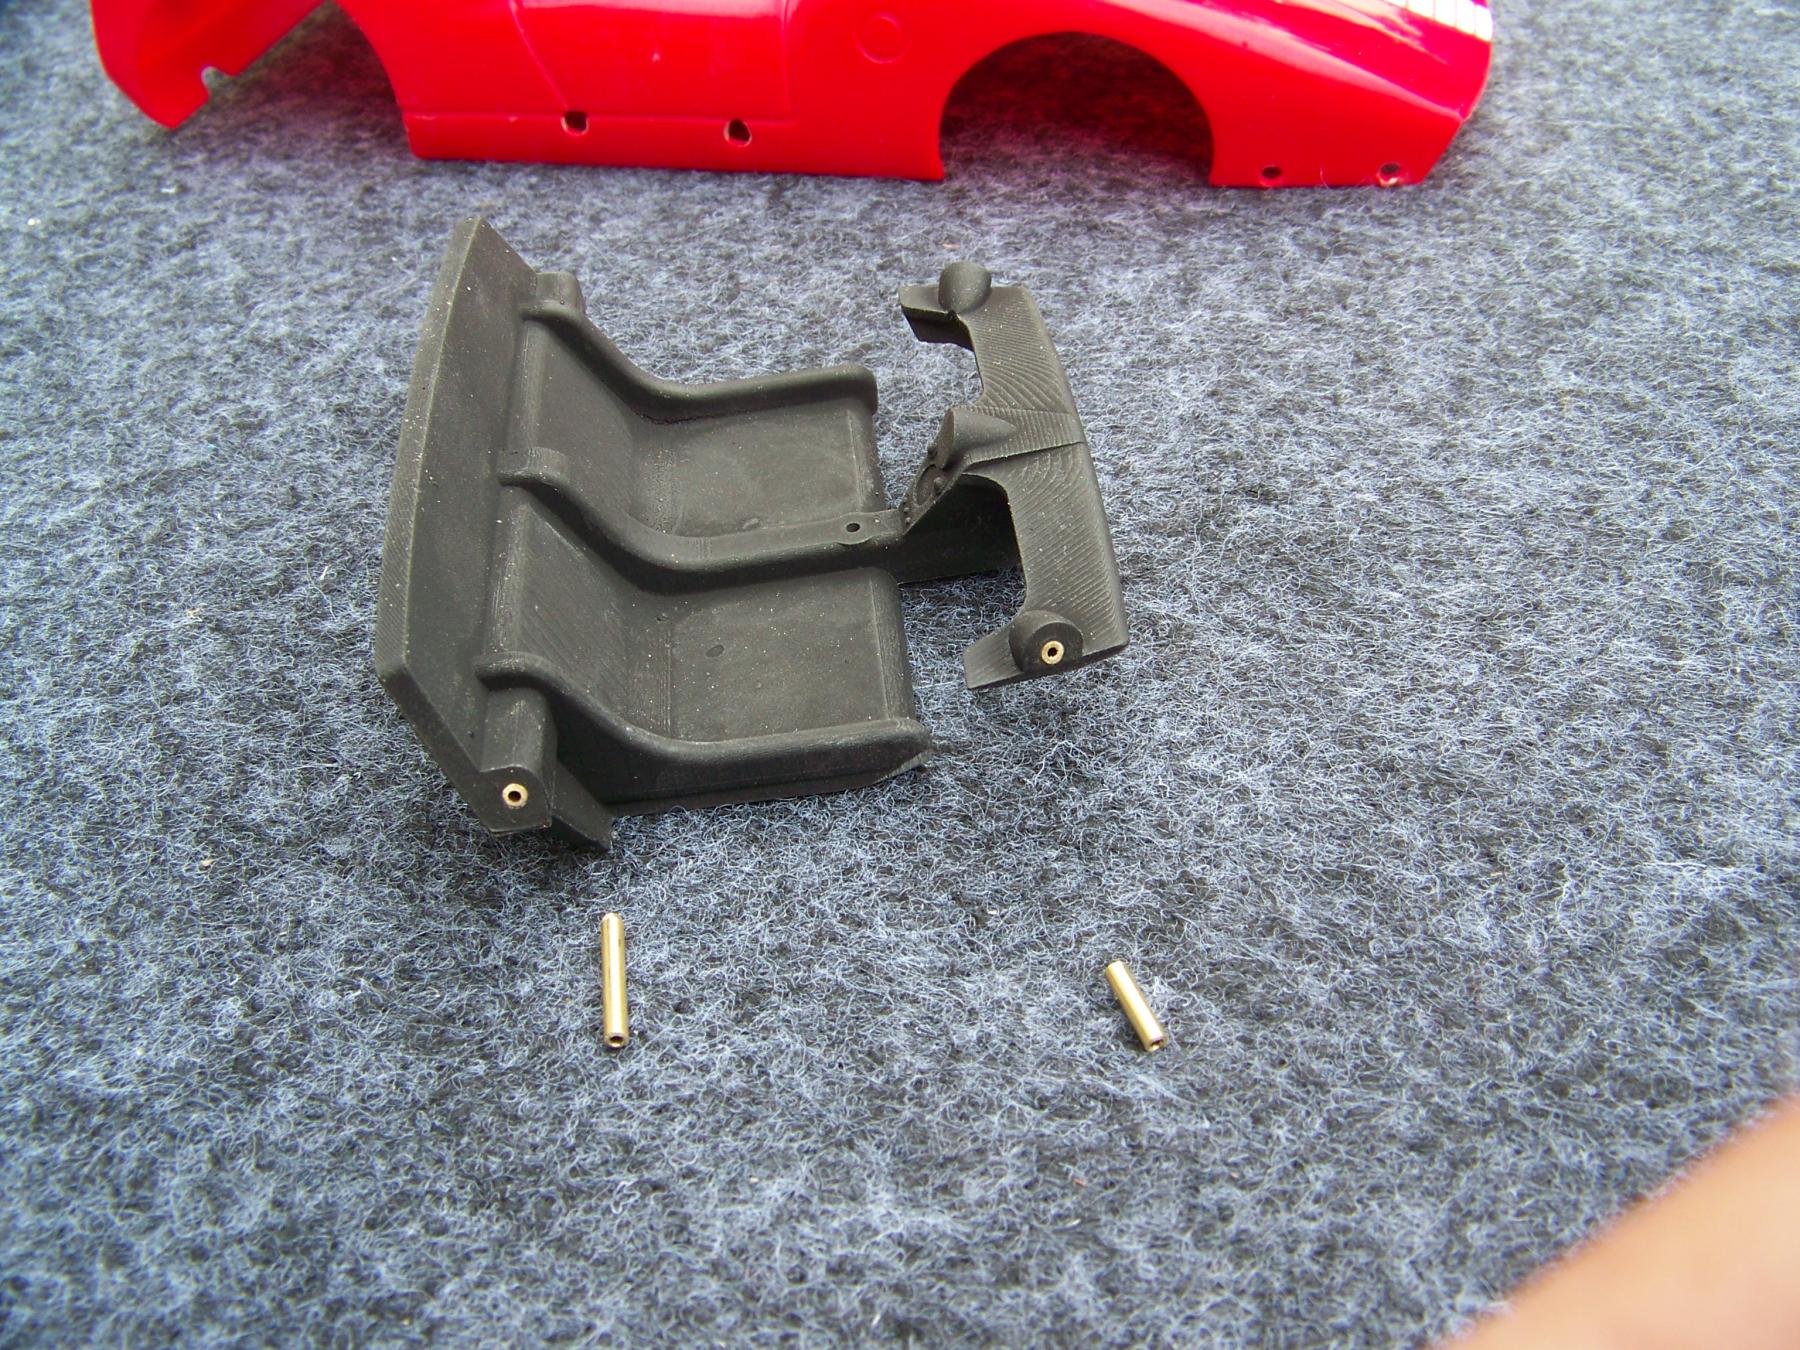
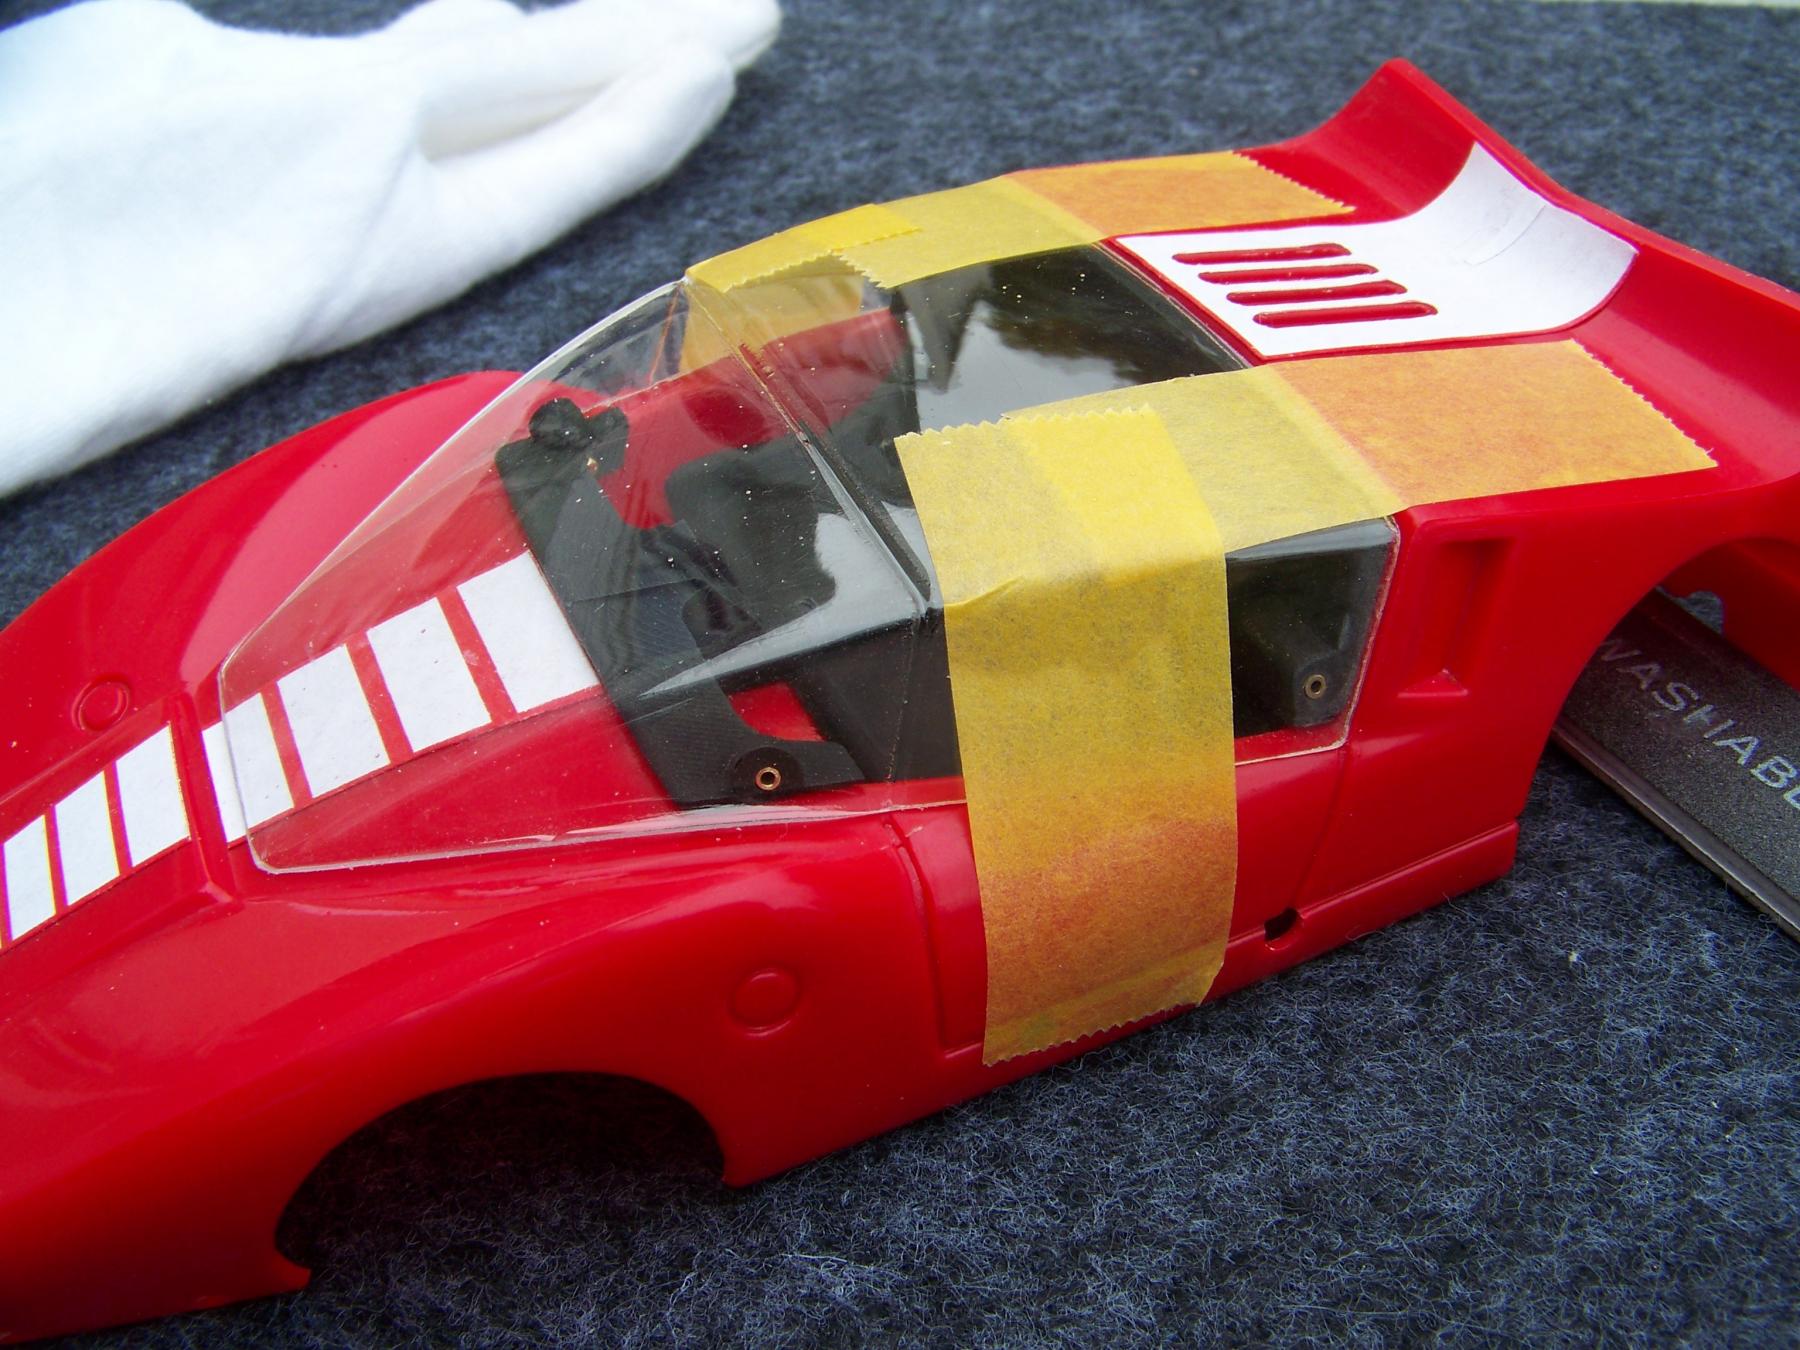
Step 4/ Cut 4 pieces of pin tube 1/16" d. Two at .4" long and two at .2'' long. It is necessary to open up the 3D printed holes to allow the pin tubes to slide in. At this stage I would CA glue the brass pins tubes in place, and then bolt in the interior as we are now ready to fit the canopy. 
Note,You could I suppose, thread directly into the interior, but that's not what I did here. I wanted to take the canopy off without removing screws.
 
102_9821.JPG
 
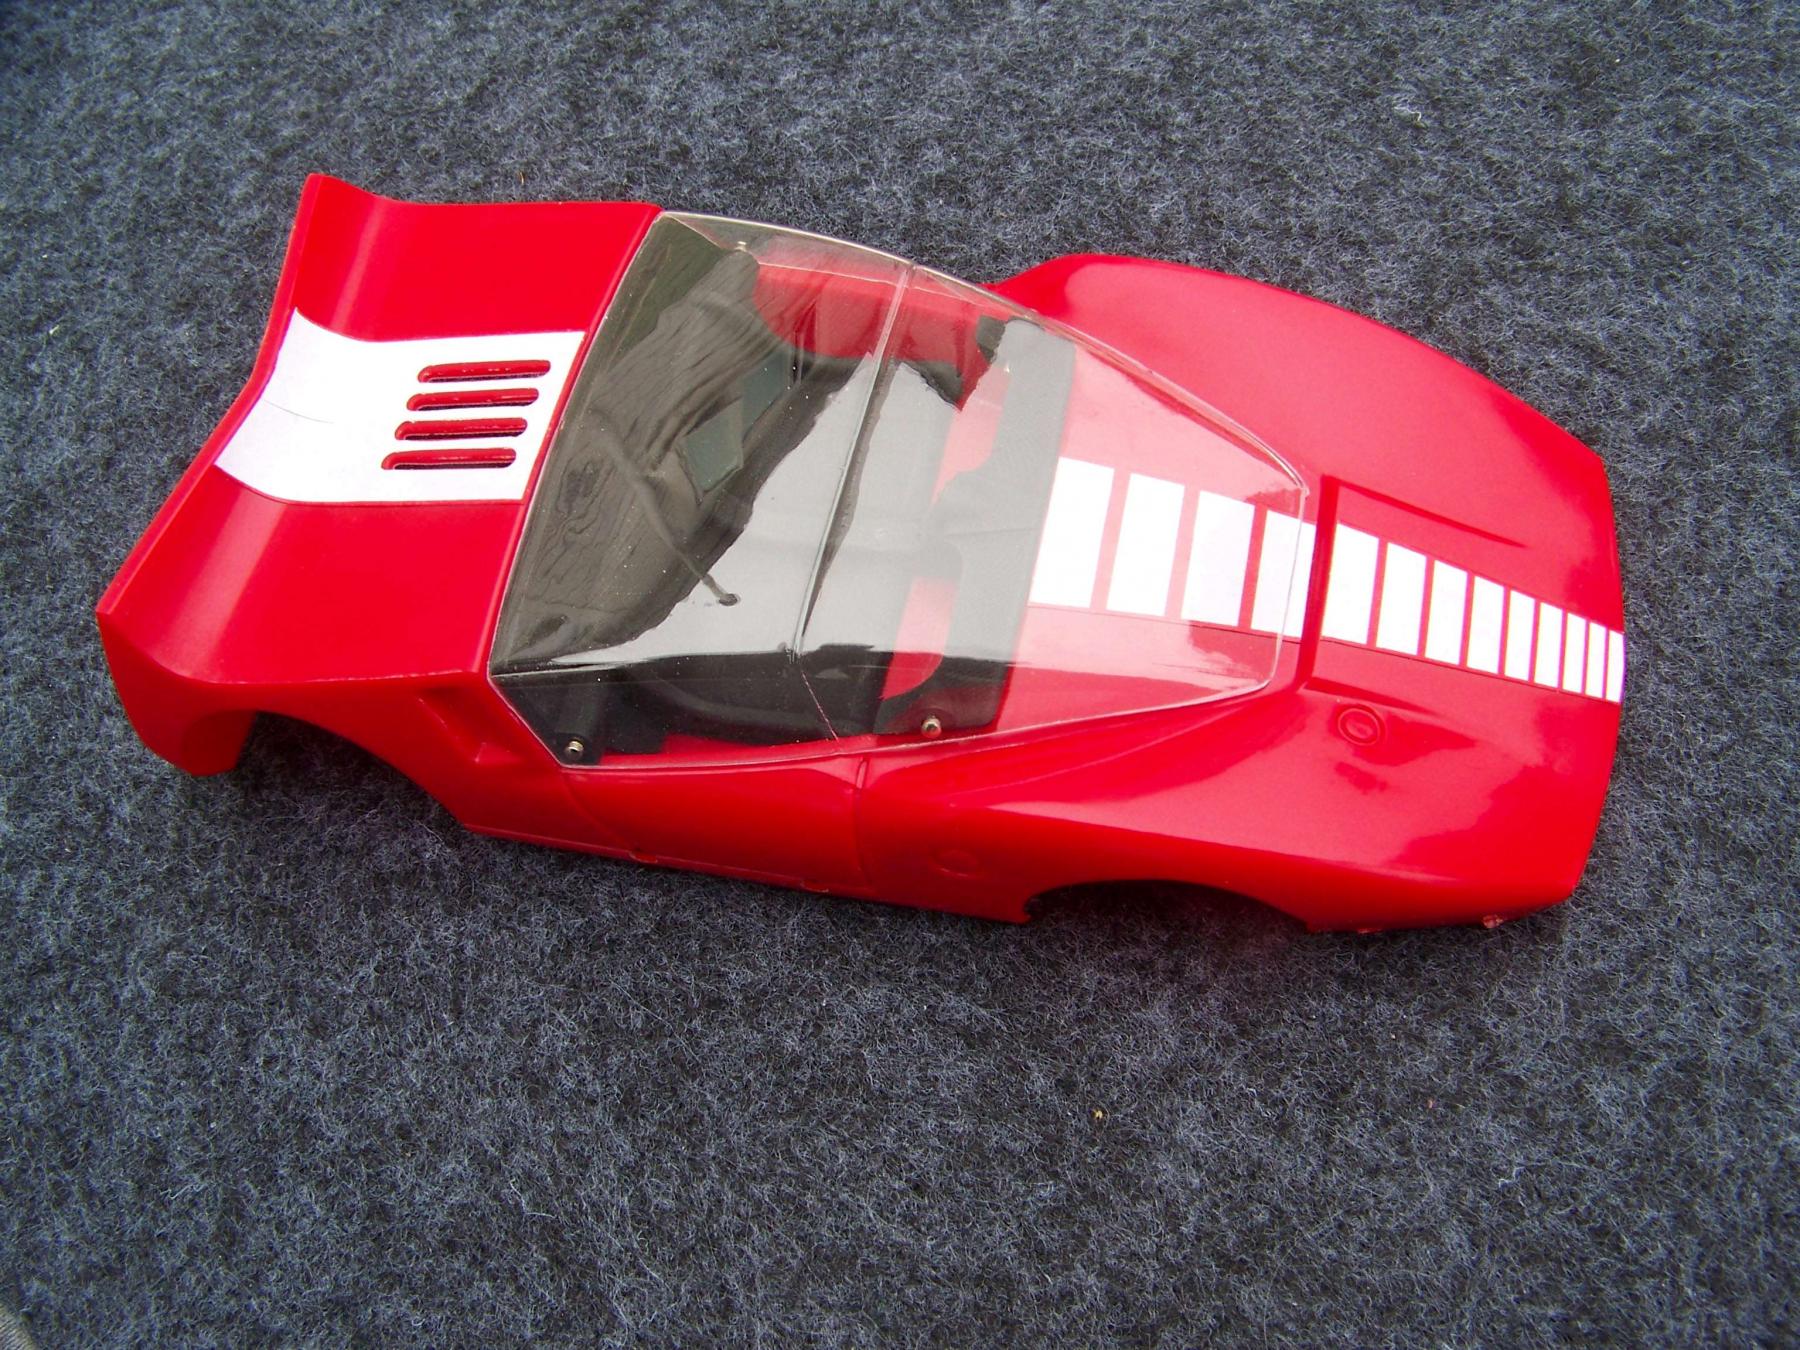
Step 5/ Trim the canopy close to the molded in line, checking and re-checking the fit as you go. Once you are happy with the fit I tape the canopy to the body and then one by one drilled holes in line with the brass pin tubes.
To hold the pins firm I would need to put some shape to the pin not unlike you do for a standard body pin mounting.
 
102_9829.JPG
 
This is one method, your method may differ, please let me know if you have any questions or suggestions.
 
102_9837 medium.JPG

  • don.siegel and Gene/ZR1 like this
Martin Windmill

#131 Martin

Martin

    Posting Leader

  • Moderator
  • PipPipPipPipPipPipPip
  • 4,649 posts
  • Joined: 22-February 09
  • Gender:Male
  • Location:US

Posted 14 November 2025 - 10:30 AM

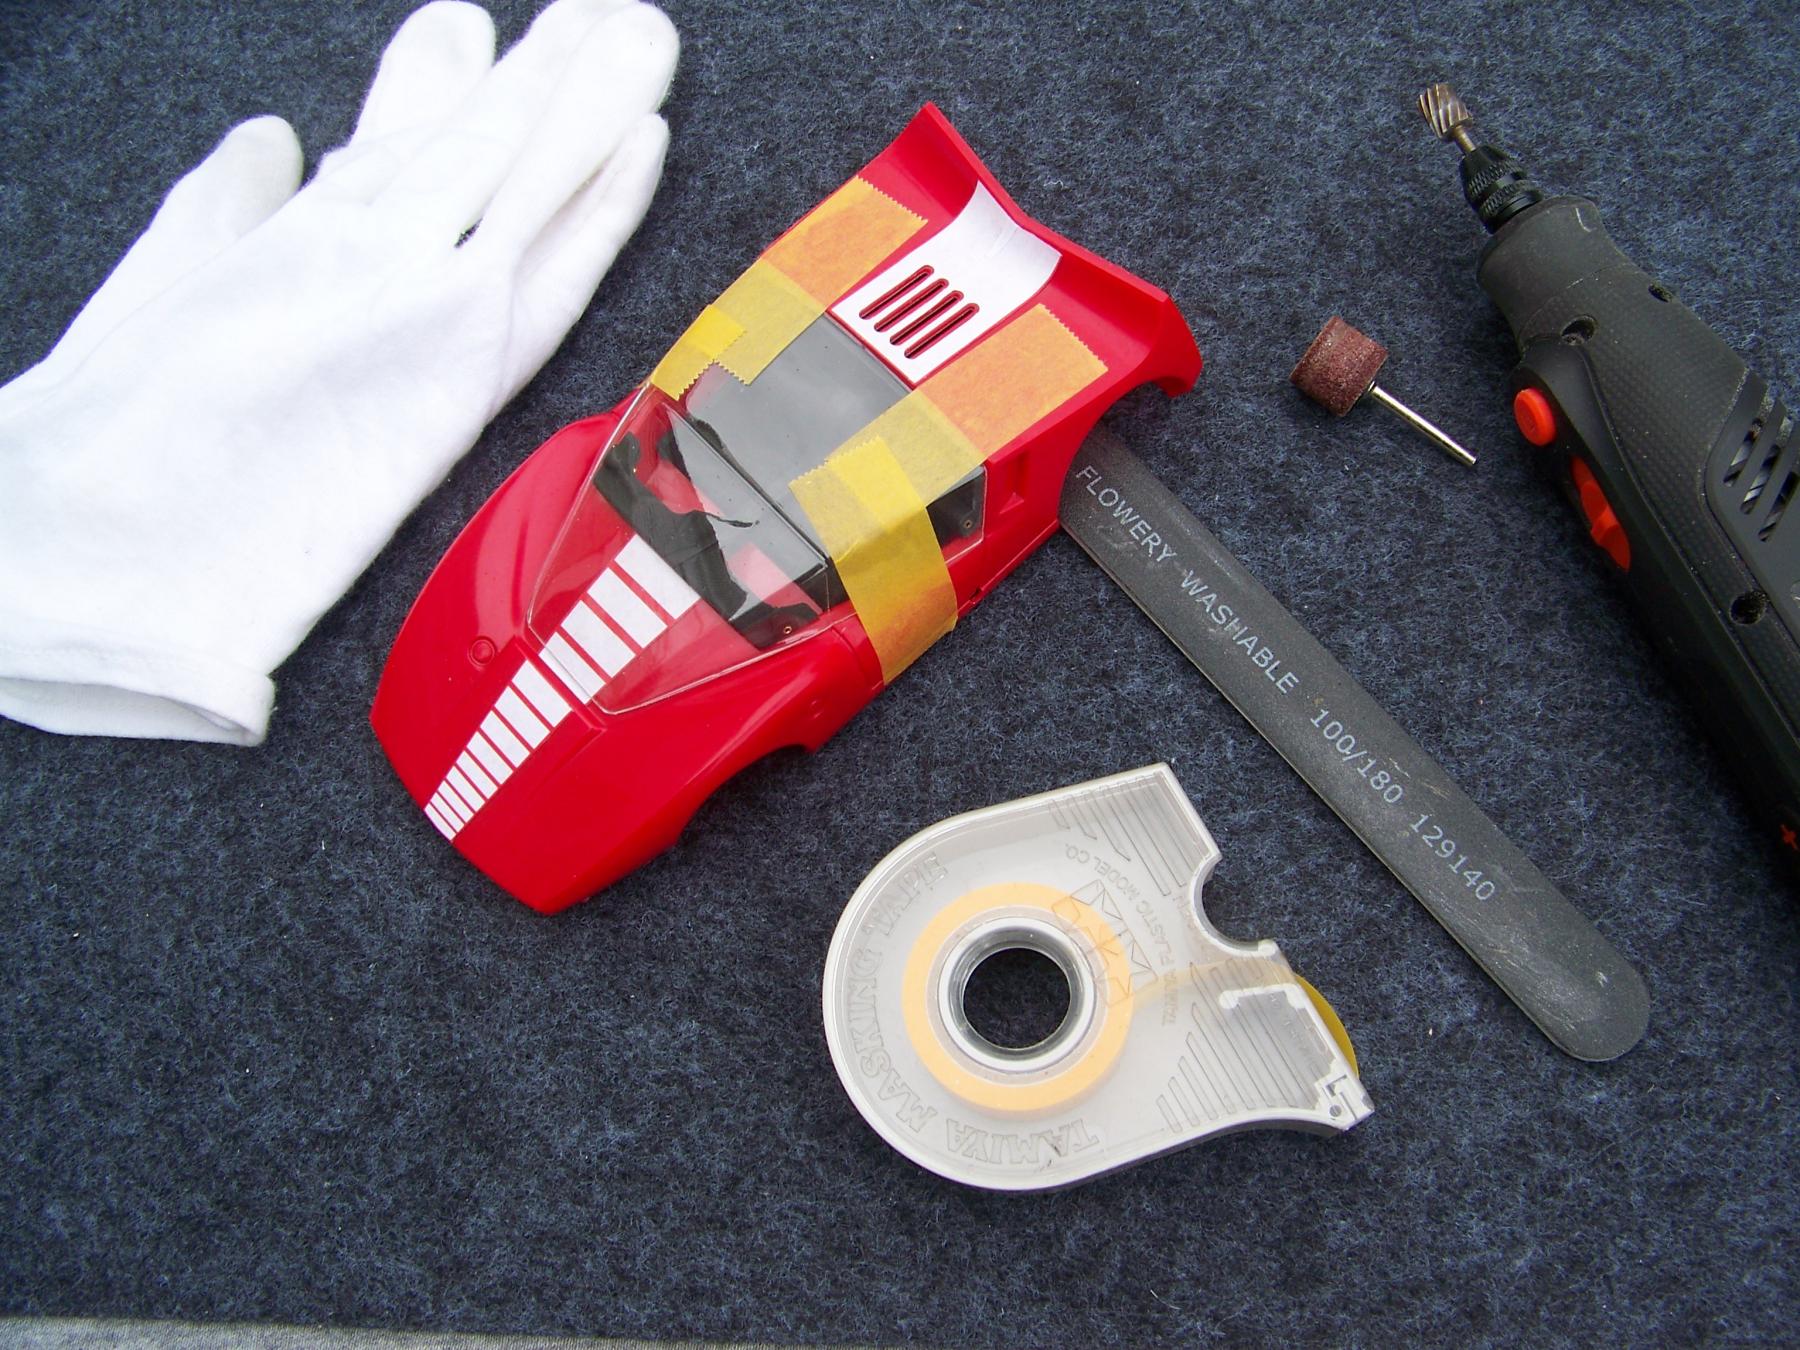
Just realized there was a pic missing from the last post. This pic shows the tools I used to fit the canopy. I do use one other which is a slitting saw to cut away the major extra material around the canopy. The glove really does stop the light scratches that my fingers were imparting onto the PETG. I must have abrasive fingers tips?


102_9828.JPG


Martin Windmill

#132 don.siegel

don.siegel

    Grand Champion Poster

  • Subscriber
  • PipPipPipPipPipPipPipPip
  • 5,954 posts
  • Joined: 17-February 06
  • Gender:Male
  • Location:Paris, France

Posted 14 November 2025 - 10:50 AM

Maybe it's from filing off your fingerprints, so the vintage police won't catch you....


Don 


#133 Martin

Martin

    Posting Leader

  • Moderator
  • PipPipPipPipPipPipPip
  • 4,649 posts
  • Joined: 22-February 09
  • Gender:Male
  • Location:US

Posted 14 November 2025 - 02:15 PM

I will say when I put the white glove on I feel like going HE HE and grabbing my crotch :laugh2:


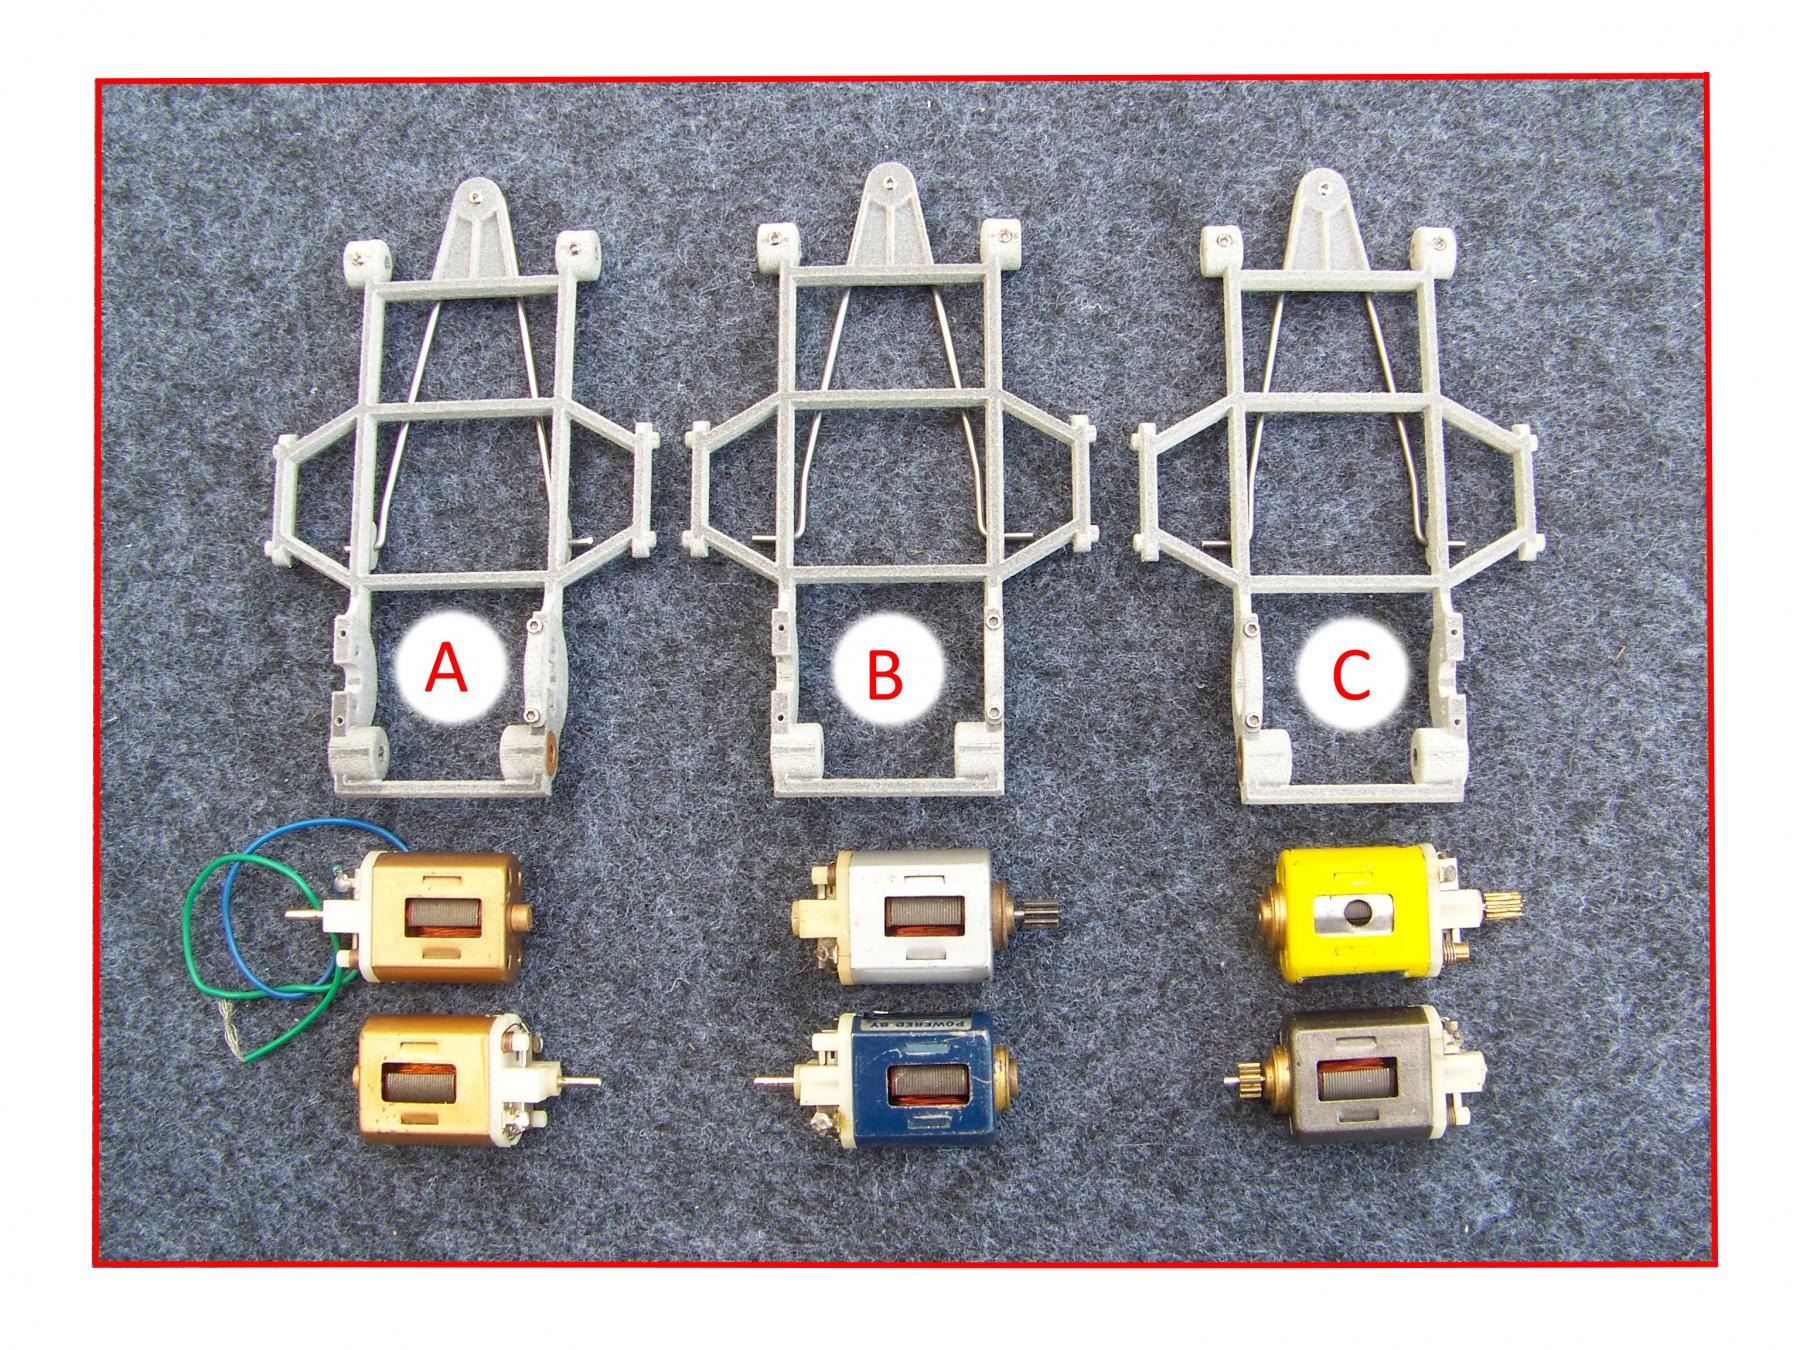
Meanwhile while putting these chassis together I thought it a was good time to explain the motor box variations. 


Left to Right, these are the 3 chassis choices.


(A) Is for the 16Ds with the small blind bearing, it drives from right side or left side, same chassis.


(B) Big bearing on the right side.


(C ) Big bearing on left side. 


This picture shows the various ways the vintage 16D motors was sold. I think this covers any questions, but feel free to ask if this does not explain it?

motor box red line.jpg


  • don.siegel, Gene/ZR1, Bill from NH and 4 others like this
Martin Windmill

#134 Bill from NH

Bill from NH

    Age scrubs away speed!

  • Full Member
  • PipPipPipPipPipPipPipPip
  • 15,317 posts
  • Joined: 02-August 07
  • Gender:Male
  • Location:New Boston, NH

Posted 14 November 2025 - 03:48 PM

Martin, that photo explains a thousand words.  :)


Bill Fernald
 
I intend to live forever!  So far, so good.  :laugh2:  :laugh2: 

#135 Martin

Martin

    Posting Leader

  • Moderator
  • PipPipPipPipPipPipPip
  • 4,649 posts
  • Joined: 22-February 09
  • Gender:Male
  • Location:US

Posted 14 November 2025 - 08:23 PM

Thanks Bill,

this what I love about our SlotBlog, Its a live info center. 


As I put a car or two togeteher I will pass on what I learn to make it easy for others.


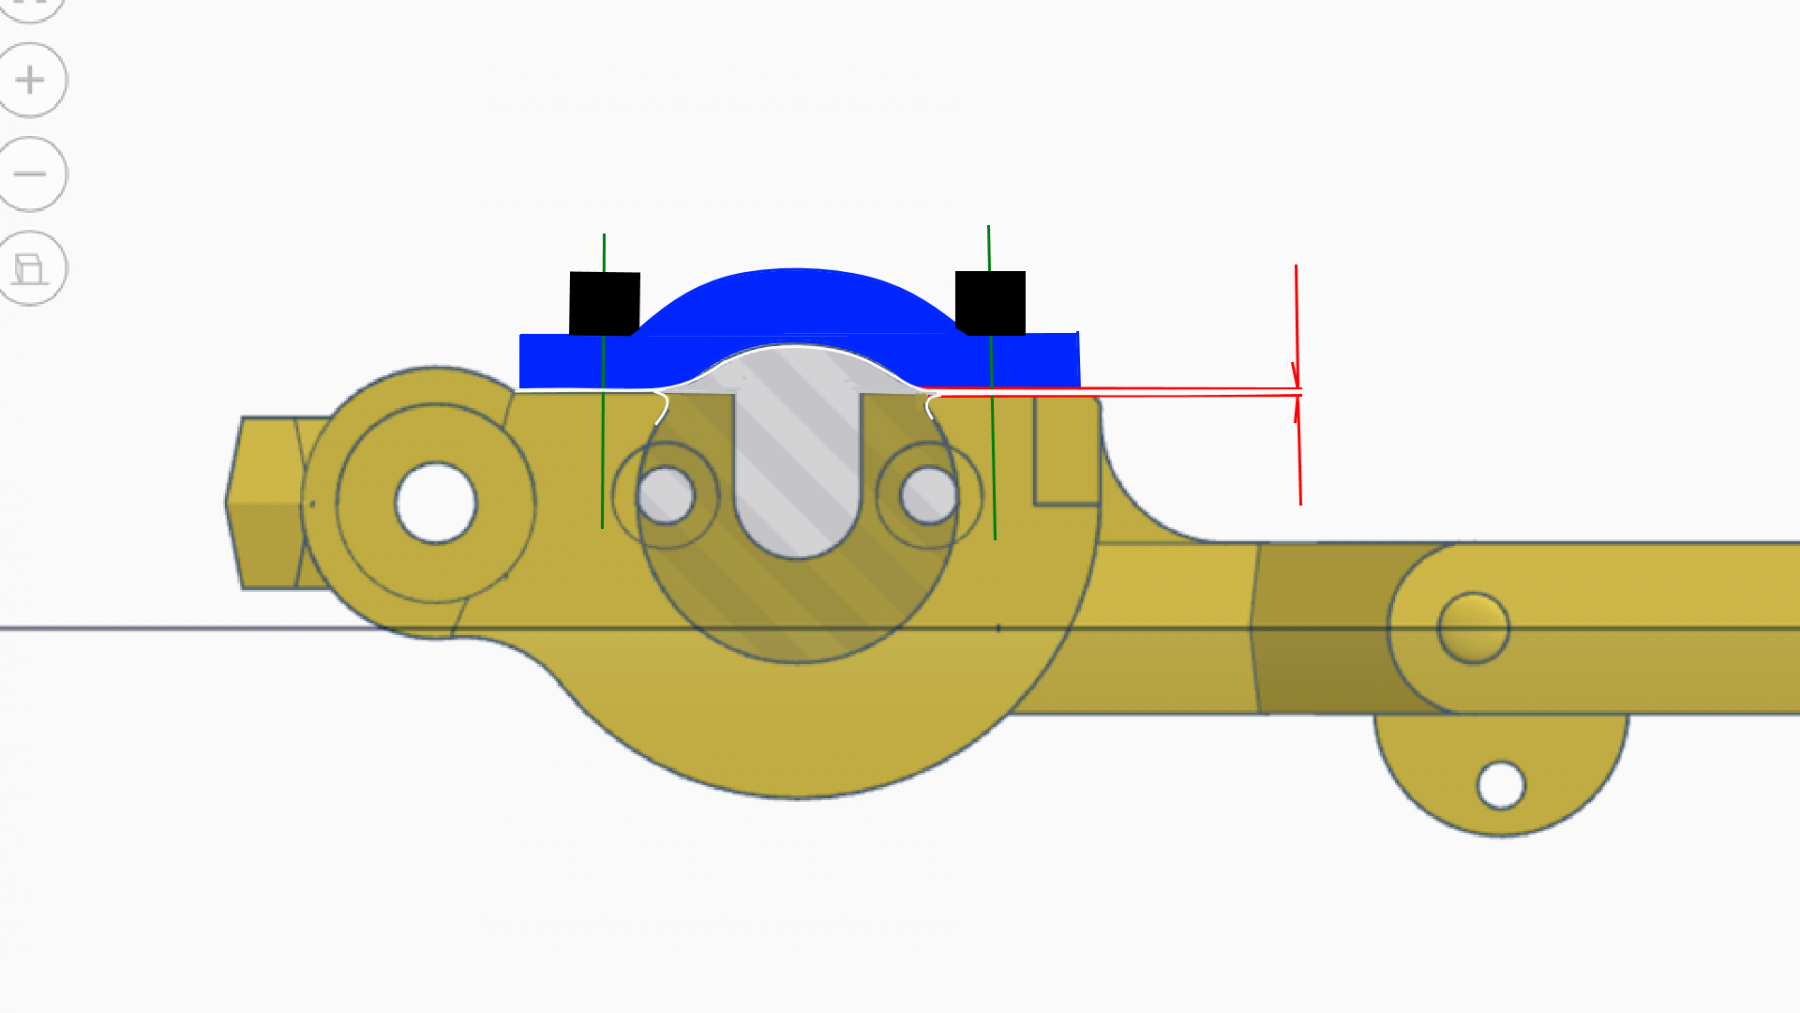
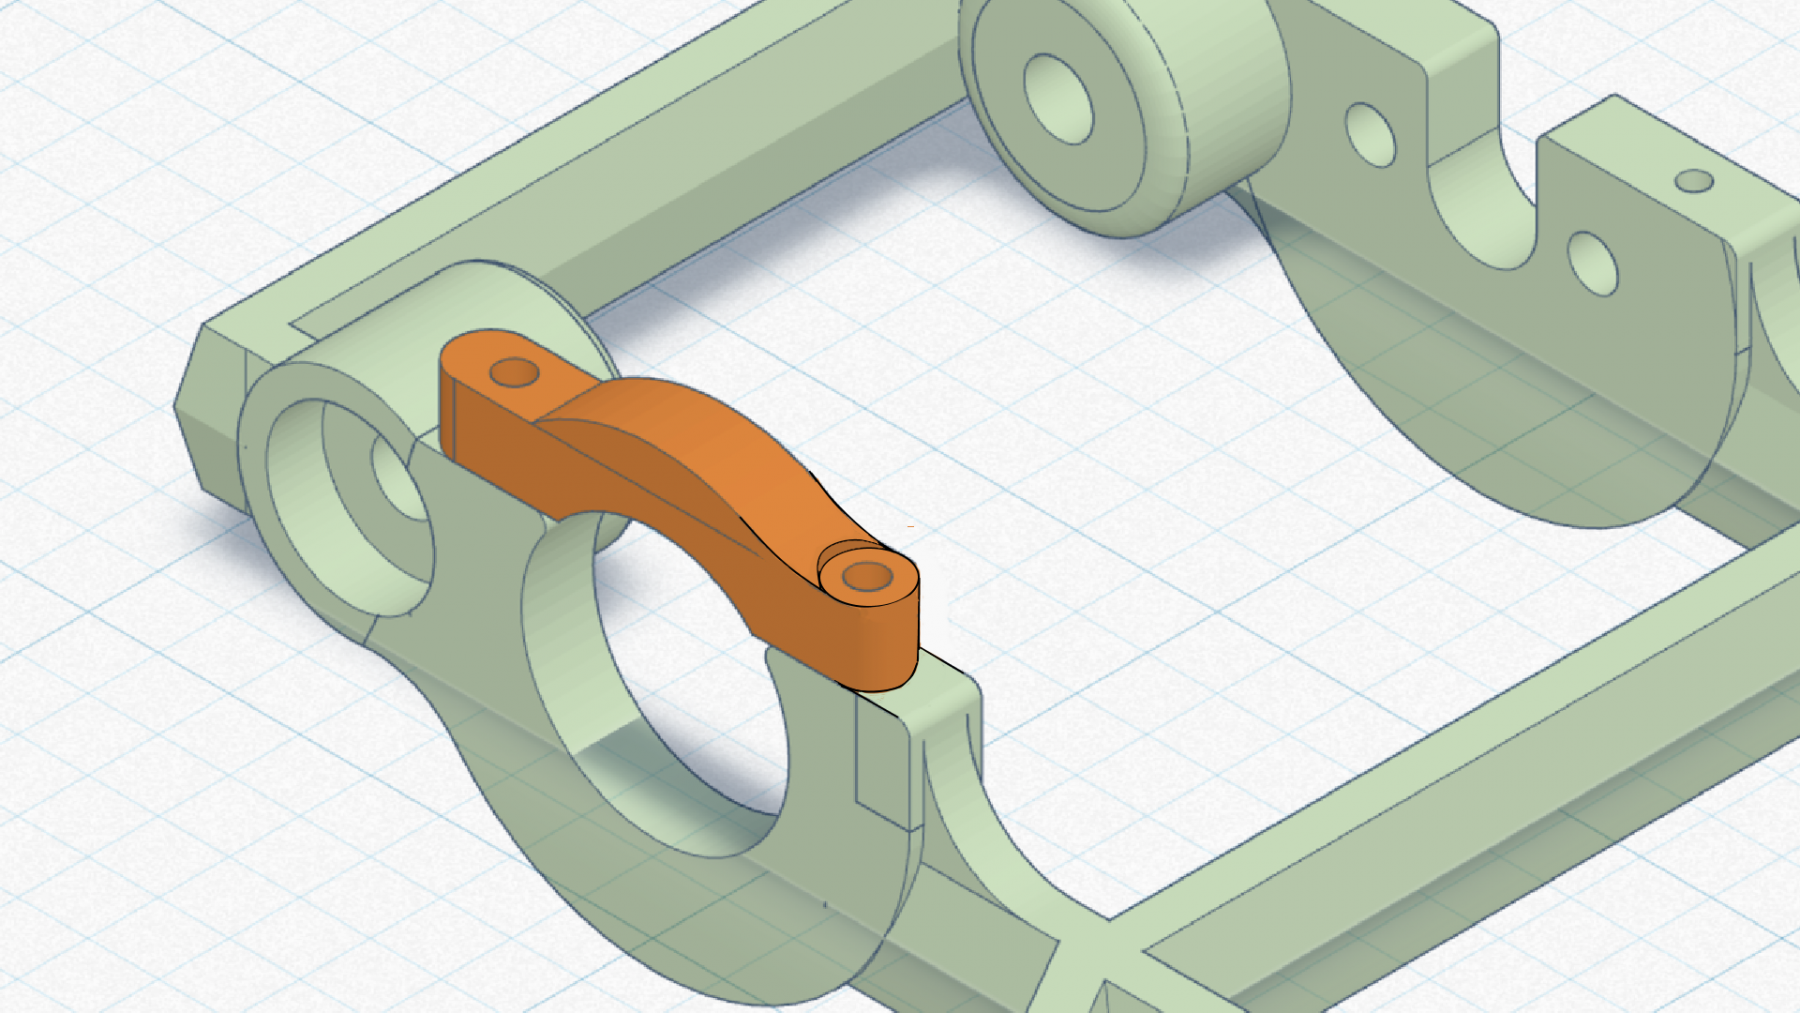
Little things that may be obvious, like these motors install somewhat unconventional with the magnets orientated top and bottom just like MDC designed it. 

It gets the motor closer to the rear axle and the motor drops in from the top with the end-bell screw holes now horizontal.


Another note, when installing the big bearing motors, position the motor at a slight angle big bearing in first. 

As you will see the round shape that locates the big bearing is slightly over center making it more secure but requiring that angle when installing. 


Be aware also that the the 2 hold down clamp screws should not be over tightened. They are taped for M1.6x.035 screws(provided) so proceed with care and feel.


mod motor clamp.png


cap mod.png


  • Bill from NH, Slot Car Rod and Jaeger Team like this
Martin Windmill

#136 Slot Car Rod

Slot Car Rod

    Race Leader

  • Subscriber
  • PipPipPipPipPip
  • 830 posts
  • Joined: 15-March 10
  • Gender:Male
  • Location:Oakland Speedway NorCal

Posted 17 November 2025 - 05:50 PM

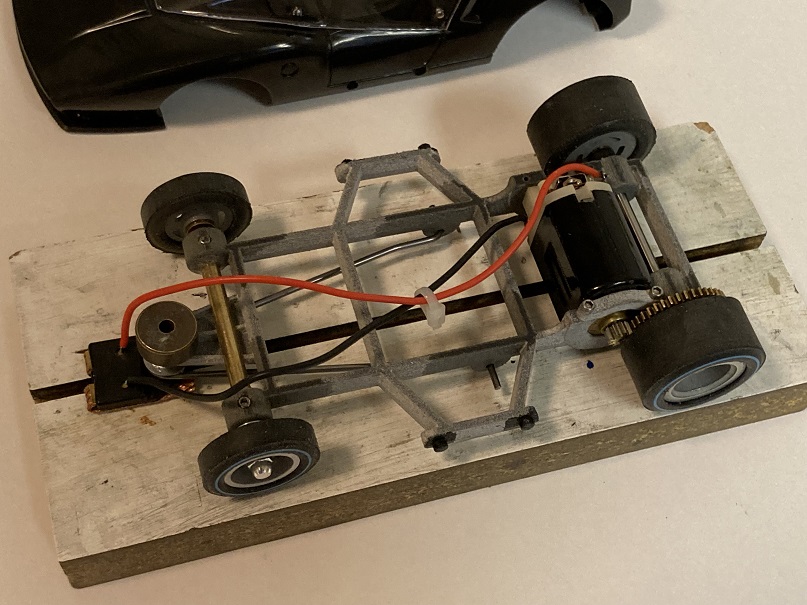
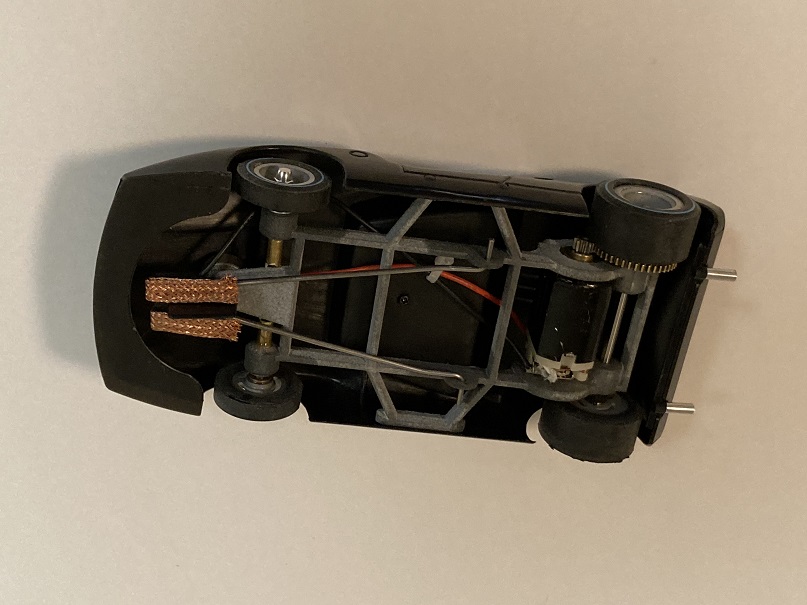
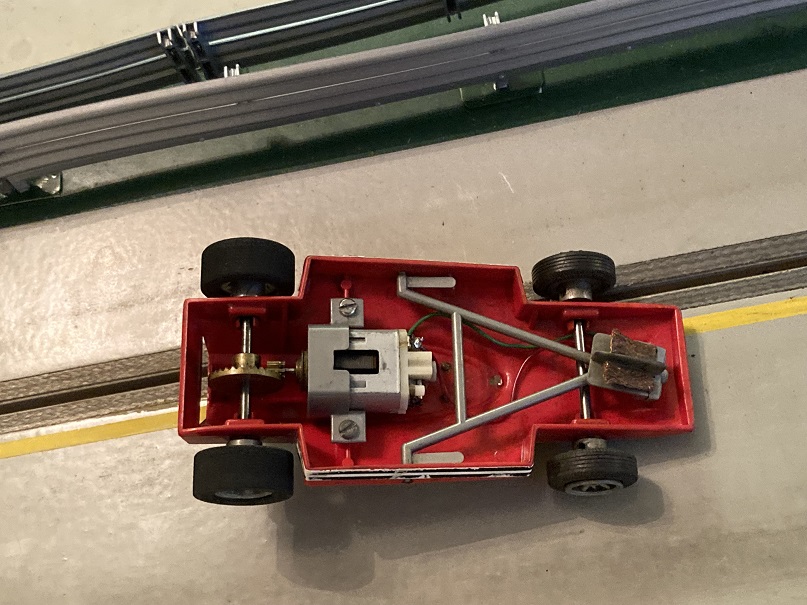
I purchased and built one of Martin's MDC bat kits.  The parts look nice and are precisely made.  I chose a kit for a large can bearing 16D motor.
 
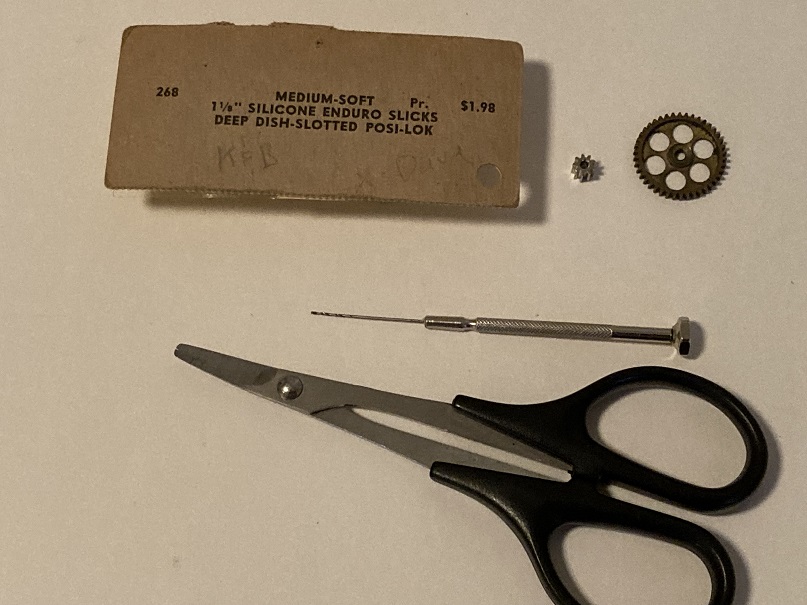
K&B wheels and tires were chosen.  The front wheel taper locks were replaced with bushings for an 1/8" axle.  
 
Stripes and a driver figure will be added later.  Time for a track test.
 
Thanks, Martin, for making these cool parts.
 
 
The straight pin method was used to fasten the canopy.  The canopy was drilled with a .7mm drill bit for the pins.
bat1.jpg
 
bat2.jpg


The brass spur gear was drilled out and soldered to a 1/8" axle.  The front axle tube ties the two stub axles together.  The tube was notched in the middle/bottom to clear the chassis.  A Dynamic quick-change guide with a 1/8" post is used.  The guide is retained with a push-on retainer.  The guide depth is adjusted using the set screw adjuster provided.  The round brass weight is glued to the chassis above the guide area.  It is not used to retain the guide.
bat4.jpg
 
bat5.jpg
 
Martin geared one of his cars 10-41.  Mine ended up being geared 9-42.  Spare gears shown.  Try out different gear sets until a good gear mesh is achieved.  
RC car curved scissors were used on the canopy.  Rough cut, closer cut, then final cut.
bat6.jpg
 

  • don.siegel, Jencar17 and Larry Horner like this
Rodney Chew

#137 Martin

Martin

    Posting Leader

  • Moderator
  • PipPipPipPipPipPipPip
  • 4,649 posts
  • Joined: 22-February 09
  • Gender:Male
  • Location:US

Posted 17 November 2025 - 08:54 PM

Great progress Rodney. 

I like the notched brass front axle tube. Gives it a lot more strength.


I have used the Tamiya panel liner ( thin black ink) to darken the chassis to give it the Mag look and it does not look blotchy when you get oil on it. 


I look forward to painting an interior for myself, look forward to see how you finish yours. 


If you do use the stickers, have your heat gun ready to warm where the stripe goes onto the "kick up spoiler".


I trim most of the black/red border off then cut into the 3 parts. Front nose stripe, mid section (under the canopy) and the most fun, the rear section. Special care needed to line up the rear vents slots. 


Inked on the left.

102_9363.JPG


Martin Windmill

#138 Slot Car Rod

Slot Car Rod

    Race Leader

  • Subscriber
  • PipPipPipPipPip
  • 830 posts
  • Joined: 15-March 10
  • Gender:Male
  • Location:Oakland Speedway NorCal

Posted 18 November 2025 - 05:39 PM

Thanks for the building tips, Martin.


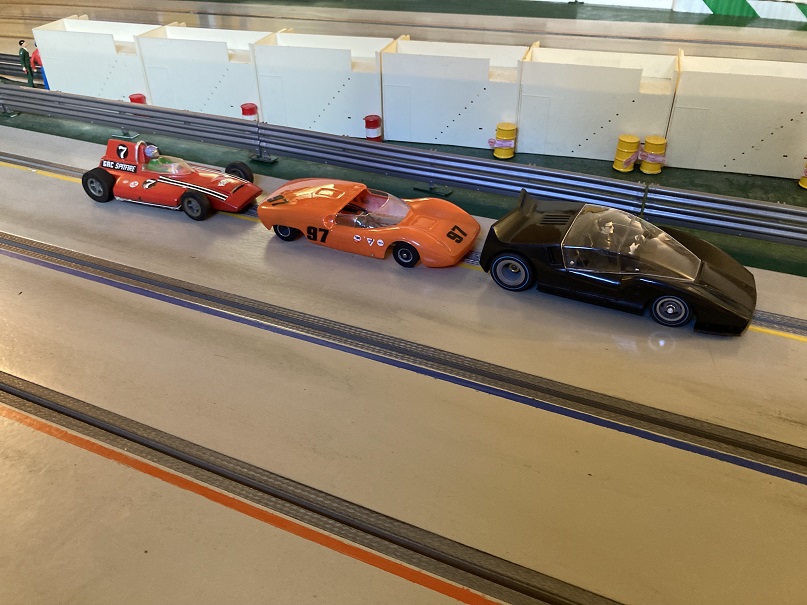
A road test was done with the Bat and a couple of other cars powered with stock 16D motors.  Lap times around the test track were around 5 seconds.
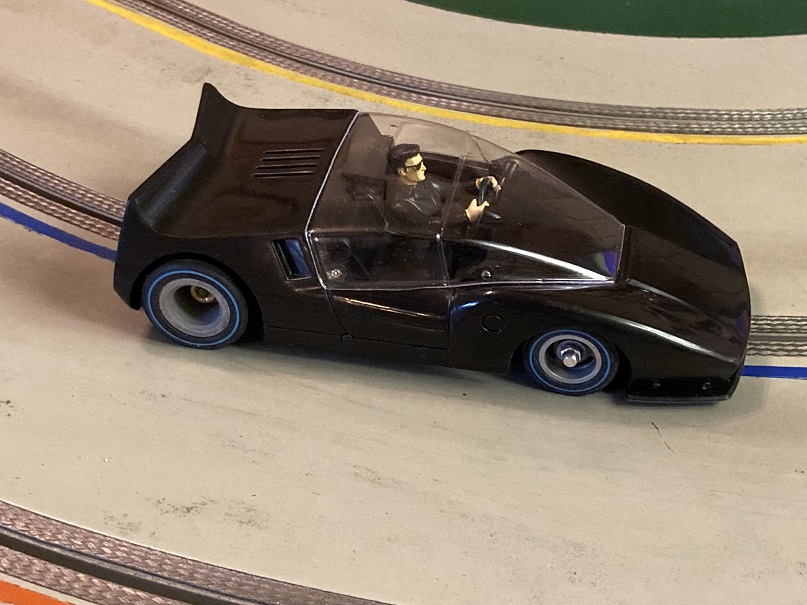
Pictures show Bob driving the Bat.  Bob found that the Bat has good power, is fun to drive, and has no body lean.  
 
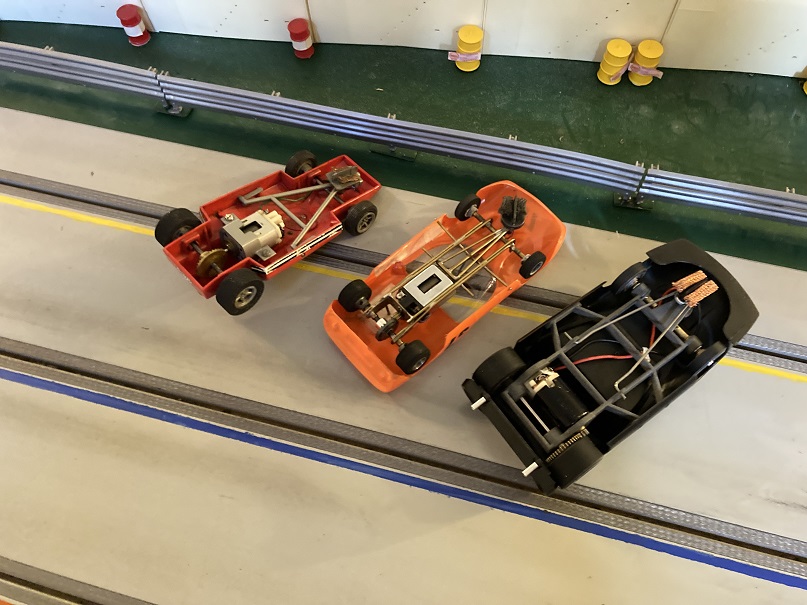
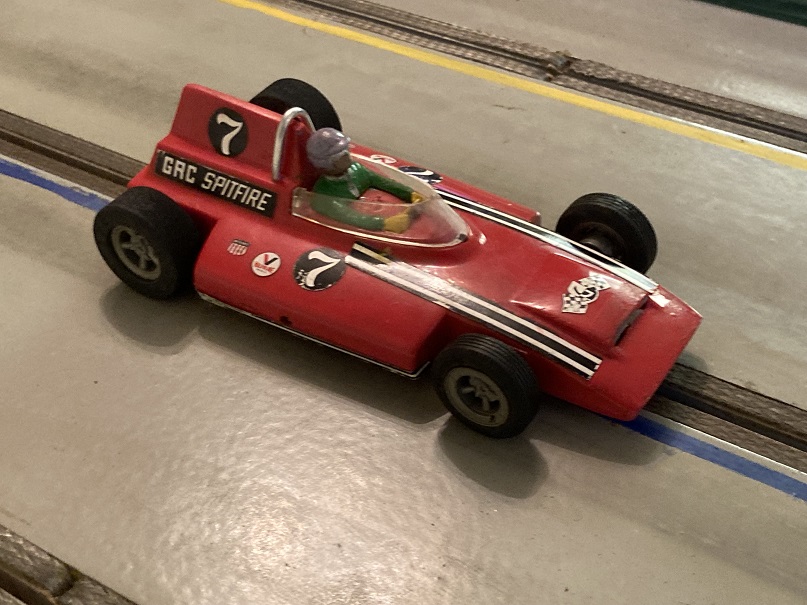
Lap times with the Bat were in the middle of the three.  The orange Cooper was .4 seconds faster than the Bat, and the GRC Spitfire was .4 seconds slower than the Bat. 
 
Some notes:  I did glue the motor in the Bat to the chassis with 3 dots of CA glue prior to the test.  CA glue was also used on the front brass axle tube.  The tires used on my Bat seem to have the right amount of traction.  The test track has just a touch of track glue.  Synthetic oil that is compatible with plastic changed the chassis color and seemed to seep beyond the bearing area.  So, the entire chassis was rubbed with oil for a consistent color and wiped clean.  No oil perceptible to the touch is left on the chassis.  The interior seat was widened for the driver.  I like the car all black.
 
The Bat cars look great and drive nice.
 
bat10.jpg
 
bat11.jpg
 
bat12.jpg


  • Jencar17, Alchemist, ajd350 and 1 other like this
Rodney Chew

#139 Larry Horner

Larry Horner

    Race Leader

  • Full Member
  • PipPipPipPipPip
  • 550 posts
  • Joined: 18-March 17
  • Gender:Male
  • Location:San Francisco

Posted 18 November 2025 - 06:15 PM

Rodney, just to ease your mind, PA12 plastic is unfazed by petroleum, oils and fuel hence is widely used in automotive and industrial applications. And being impregnated with nylon, it's also very strong. But the splotchy look (it is slightly porous) is annoying so I think your idea (and Martin's) of a preemptive rubdown is a good one.


Love the track feedback ... I think your's is the first Bat Car to actually see any track time! 


  • Slot Car Rod likes this

#140 Martin

Martin

    Posting Leader

  • Moderator
  • PipPipPipPipPipPipPip
  • 4,649 posts
  • Joined: 22-February 09
  • Gender:Male
  • Location:US

Posted 18 November 2025 - 07:54 PM

That warms my heart to see it on the track. :good: Way to go Rodney.


I like your driver Bob too. As it not a race car I have been looking for a driver with no helmet. Where did you get Bob?


Thanks for the lap-time comparison. I am sure part of the reason this car never went to market is by 1966 most RTRs thingy's had vac bodies by then.


Do you think it comparable to the Cox Ford GT and 2D for example or the Monogram 2D hard bodies? 


Martin Windmill

#141 Slot Car Rod

Slot Car Rod

    Race Leader

  • Subscriber
  • PipPipPipPipPip
  • 830 posts
  • Joined: 15-March 10
  • Gender:Male
  • Location:Oakland Speedway NorCal

Posted 19 November 2025 - 01:19 AM

Thanks for the information, Larry.  Martin, the car is fun to run and see going around the track.  The driver figure came in a few Carrera brand hot rod slot cars including a '34 Ford.  The bodies sold separately turn up on ebay quite often.  In my opinion, the Bat is better driving than the Cox and Monogram cars you mentioned.  A mild 16D motor in light a car works.


Rodney Chew

#142 Martin

Martin

    Posting Leader

  • Moderator
  • PipPipPipPipPipPipPip
  • 4,649 posts
  • Joined: 22-February 09
  • Gender:Male
  • Location:US

Posted 19 November 2025 - 02:22 AM

Thanks Rodney for the info and opinion.


Martin Windmill

#143 Mark Onofri

Mark Onofri

    Posting Leader

  • Subscriber
  • PipPipPipPipPipPipPip
  • 2,981 posts
  • Joined: 18-November 20
  • Gender:Male
  • Location:Syracuse, NY

Posted 19 November 2025 - 01:22 PM

HR Rod,the car on the left seems to have the body as the chassis. Or do I need a new prescription for my spectacles?
Martin ,you are absolutely correct. It now appears like cast magnesium.

#144 Slot Car Rod

Slot Car Rod

    Race Leader

  • Subscriber
  • PipPipPipPipPip
  • 830 posts
  • Joined: 15-March 10
  • Gender:Male
  • Location:Oakland Speedway NorCal

Posted 19 November 2025 - 03:53 PM

GRC Spitfire 1965/66

grc2.jpg

grc4.jpg


  • don.siegel and Jencar17 like this
Rodney Chew

#145 Gene/ZR1

Gene/ZR1

    Race Leader

  • Subscriber
  • PipPipPipPipPip
  • 853 posts
  • Joined: 06-November 06
  • Gender:Male
  • Location:USA/Michigan

Posted 19 November 2025 - 07:40 PM

GRC Spitfire 1965/66

attachicon.gif grc2.jpg

attachicon.gif grc4.jpg


I don't know why, but I had to do it.

It is an interesting car.

IMG_5263.jpg

IMG_5262.jpg

IMG_5258.jpg


After a brief intermission, now back to the;

MDC Bat chronicles


  • Slot Car Rod, olescratch and Larry Horner like this

Gene Adams AKA Gene/ZR1
ZR1 Corvette owner
Hand-carved balsa bodies, resin body plugs, silicone molds, vacuum bodies
Genes_World@ymail.com


#146 Bill from NH

Bill from NH

    Age scrubs away speed!

  • Full Member
  • PipPipPipPipPipPipPipPip
  • 15,317 posts
  • Joined: 02-August 07
  • Gender:Male
  • Location:New Boston, NH

Posted 19 November 2025 - 08:14 PM

Think of the sophisticated chassis one can put under these bodies now. Spitfires were the track rental cars at Lemans Raceway, Brunswick, ME, my first home track in 1967. The cars lasted as rentals but the grey 16Ds GRC used did not.


  • Gene/ZR1 likes this
Bill Fernald
 
I intend to live forever!  So far, so good.  :laugh2:  :laugh2: 

#147 Martin

Martin

    Posting Leader

  • Moderator
  • PipPipPipPipPipPipPip
  • 4,649 posts
  • Joined: 22-February 09
  • Gender:Male
  • Location:US

Posted 20 November 2025 - 10:54 AM

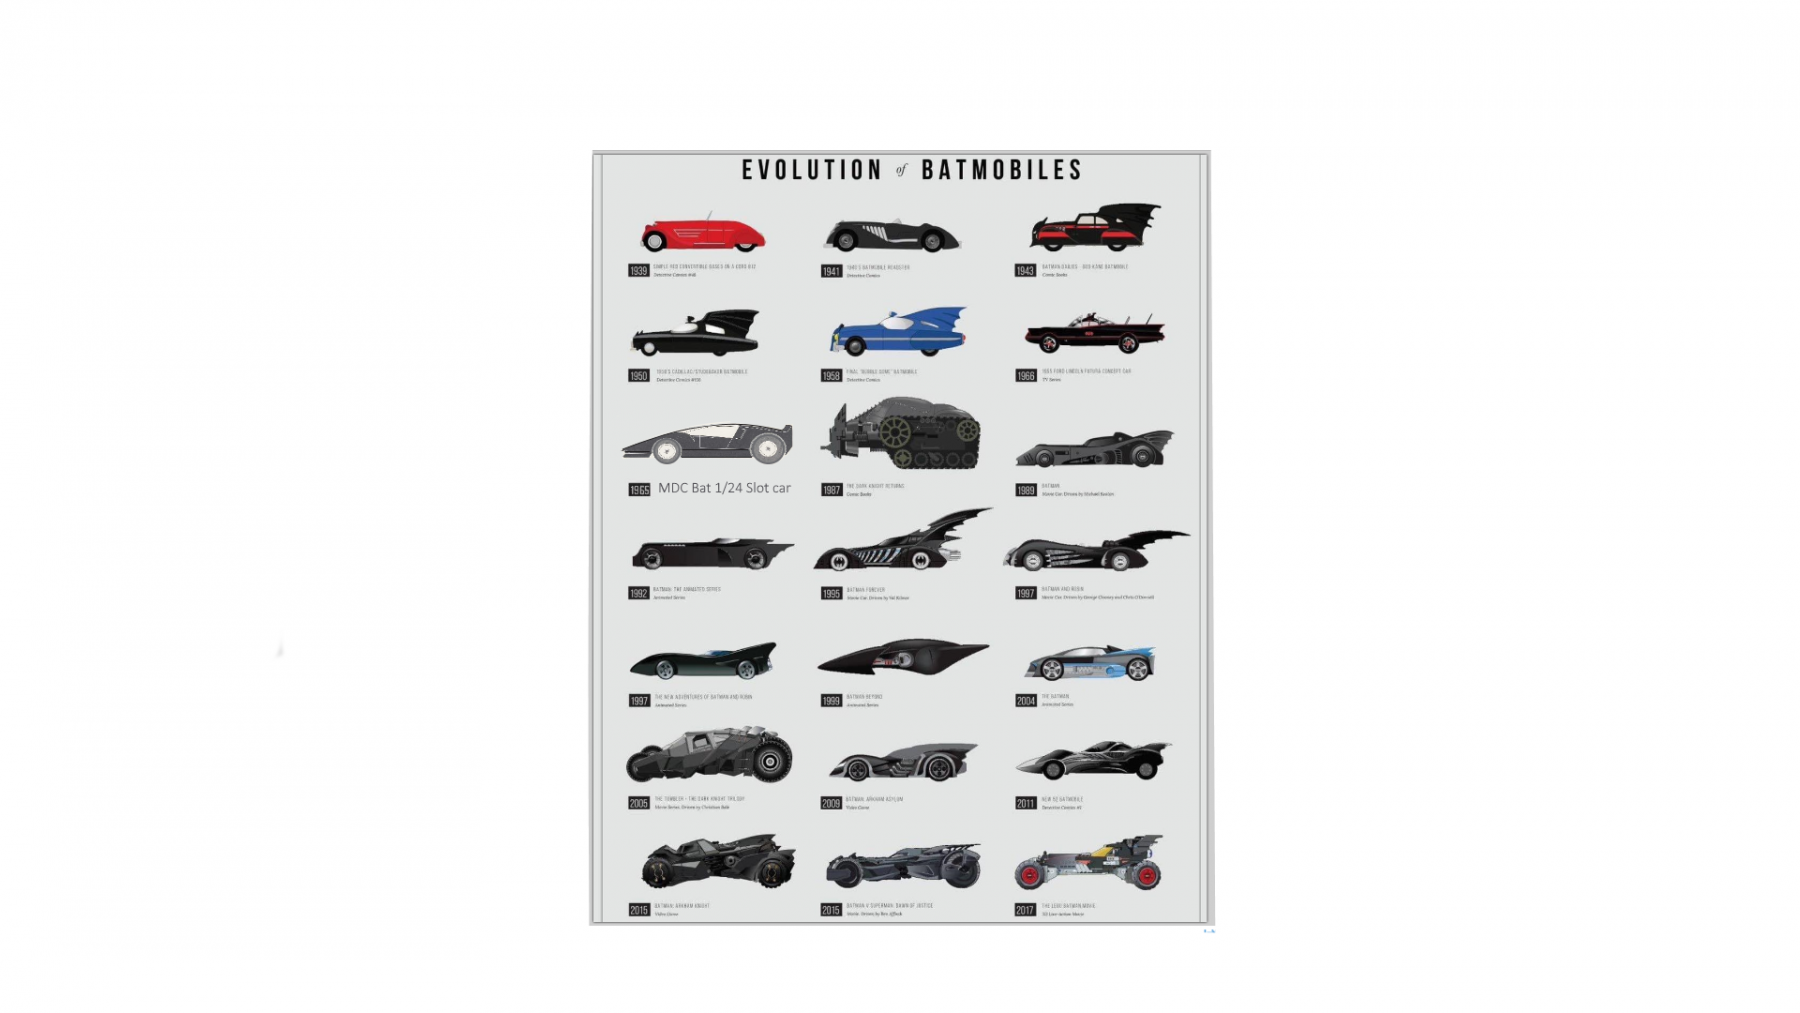
I found this poster pic. Got to admit the Bat car theme has inspired a lot of different cars over time. They forgot the MDC Bat so I added it for us slot car fans.

MDC Bat poster.png


  • Slot Car Rod likes this
Martin Windmill

#148 Mark Onofri

Mark Onofri

    Posting Leader

  • Subscriber
  • PipPipPipPipPipPipPip
  • 2,981 posts
  • Joined: 18-November 20
  • Gender:Male
  • Location:Syracuse, NY

Posted 21 November 2025 - 10:31 PM

This is where I keep my 🦇 's

Attached Images

  • Bell_Tower_1.jpg

  • don.siegel likes this

#149 Martin

Martin

    Posting Leader

  • Moderator
  • PipPipPipPipPipPipPip
  • 4,649 posts
  • Joined: 22-February 09
  • Gender:Male
  • Location:US

Posted 23 November 2025 - 02:57 PM

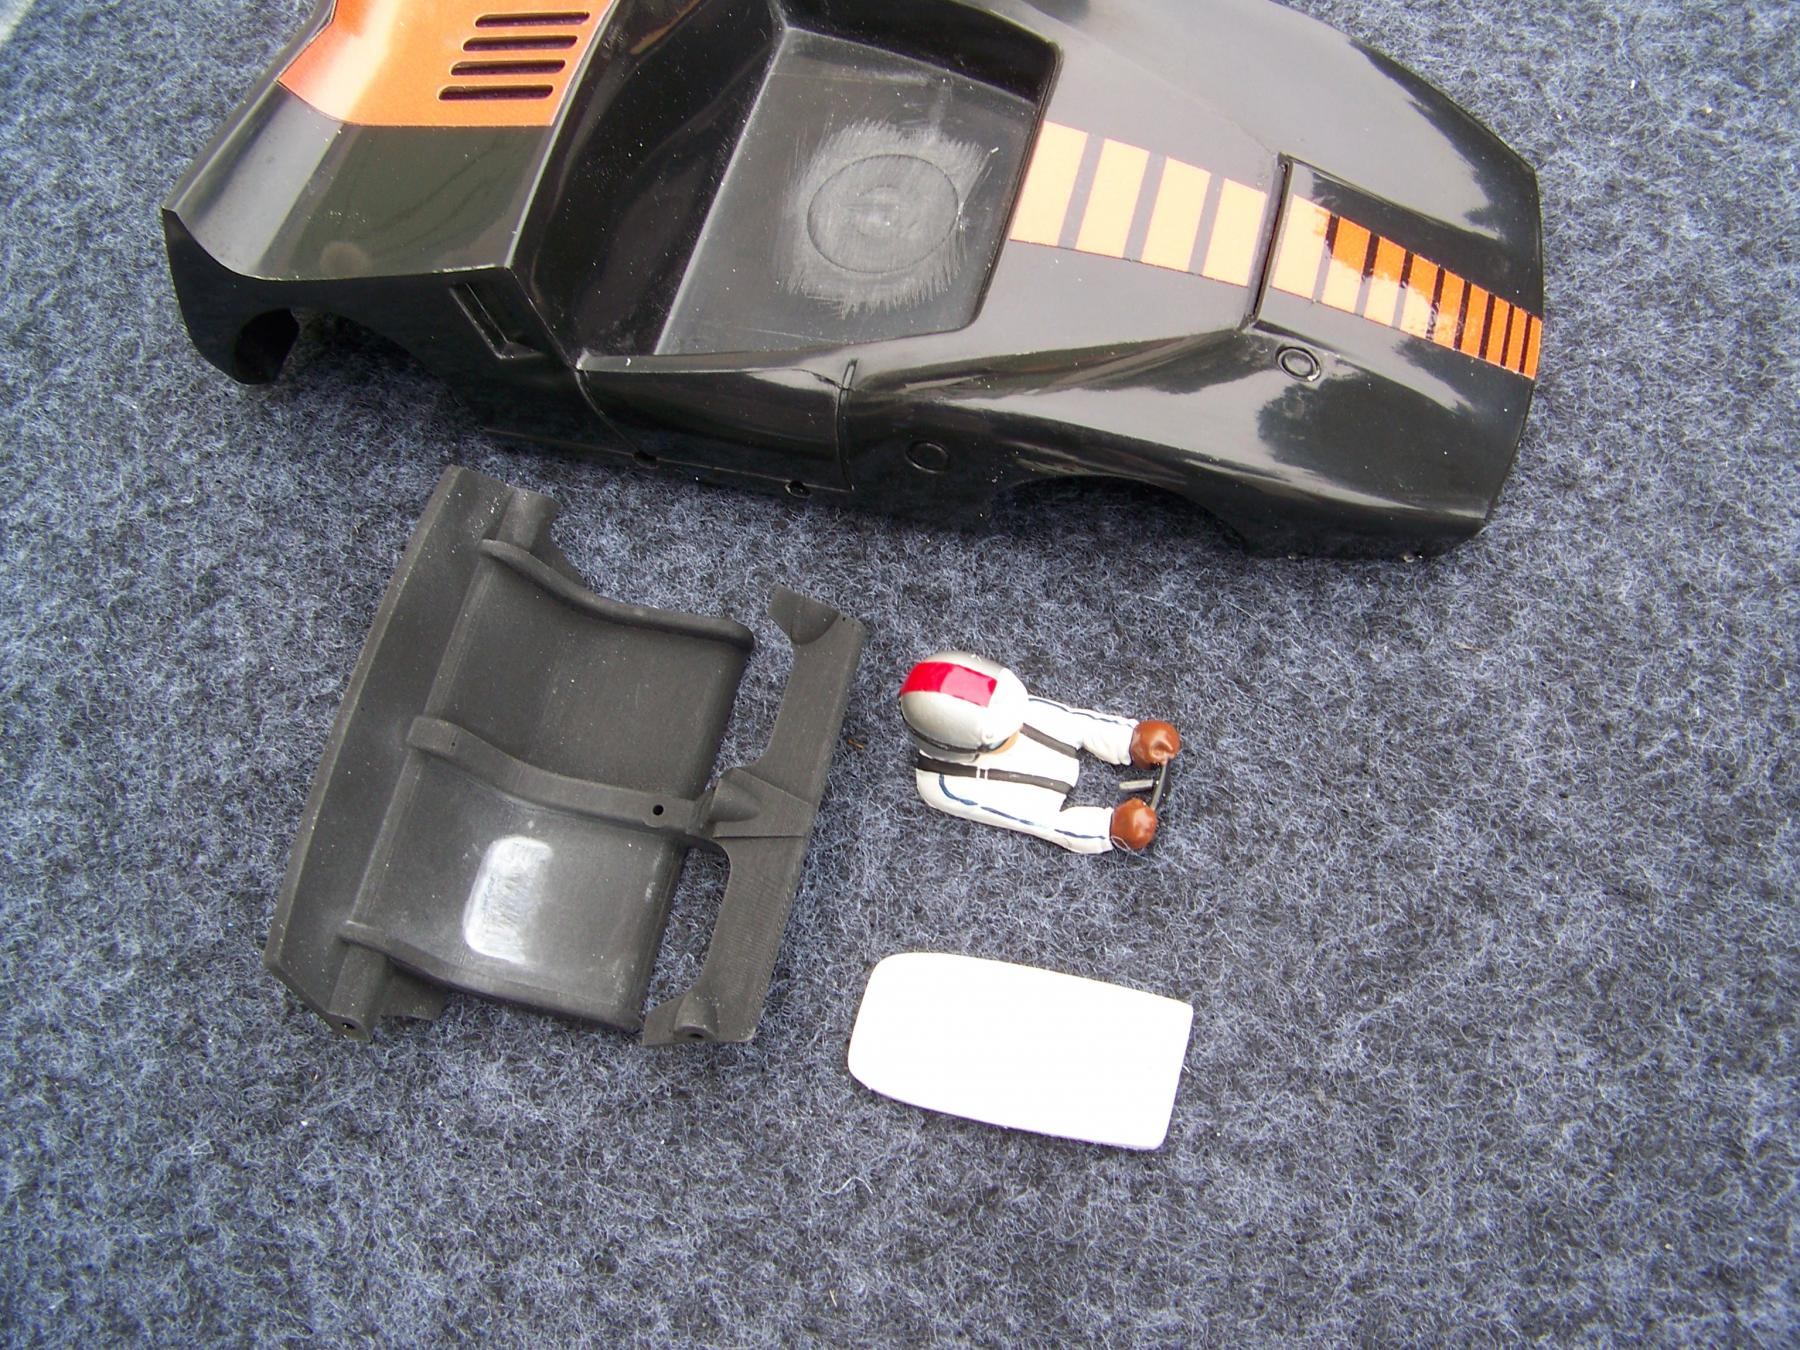
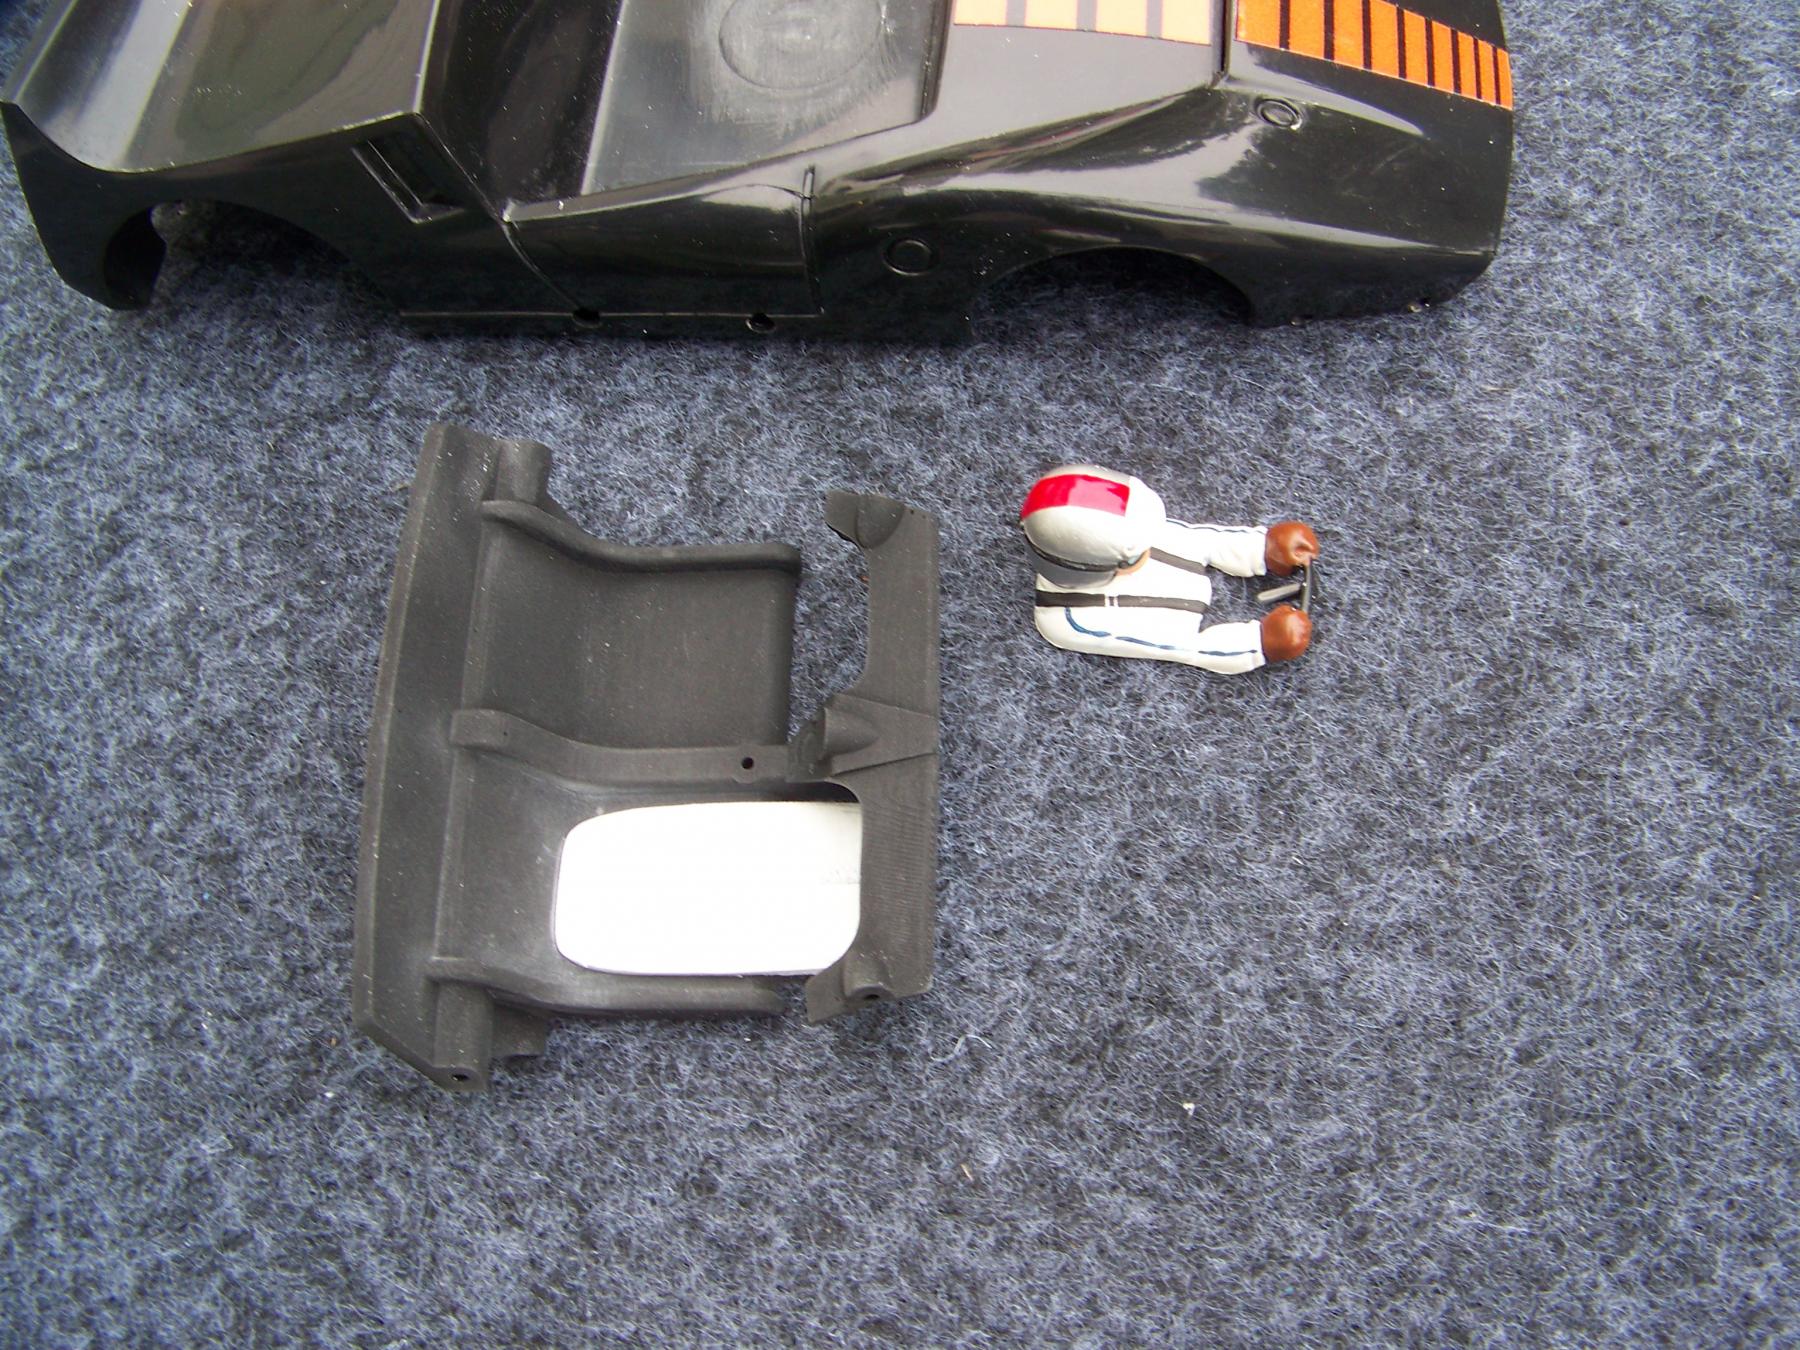
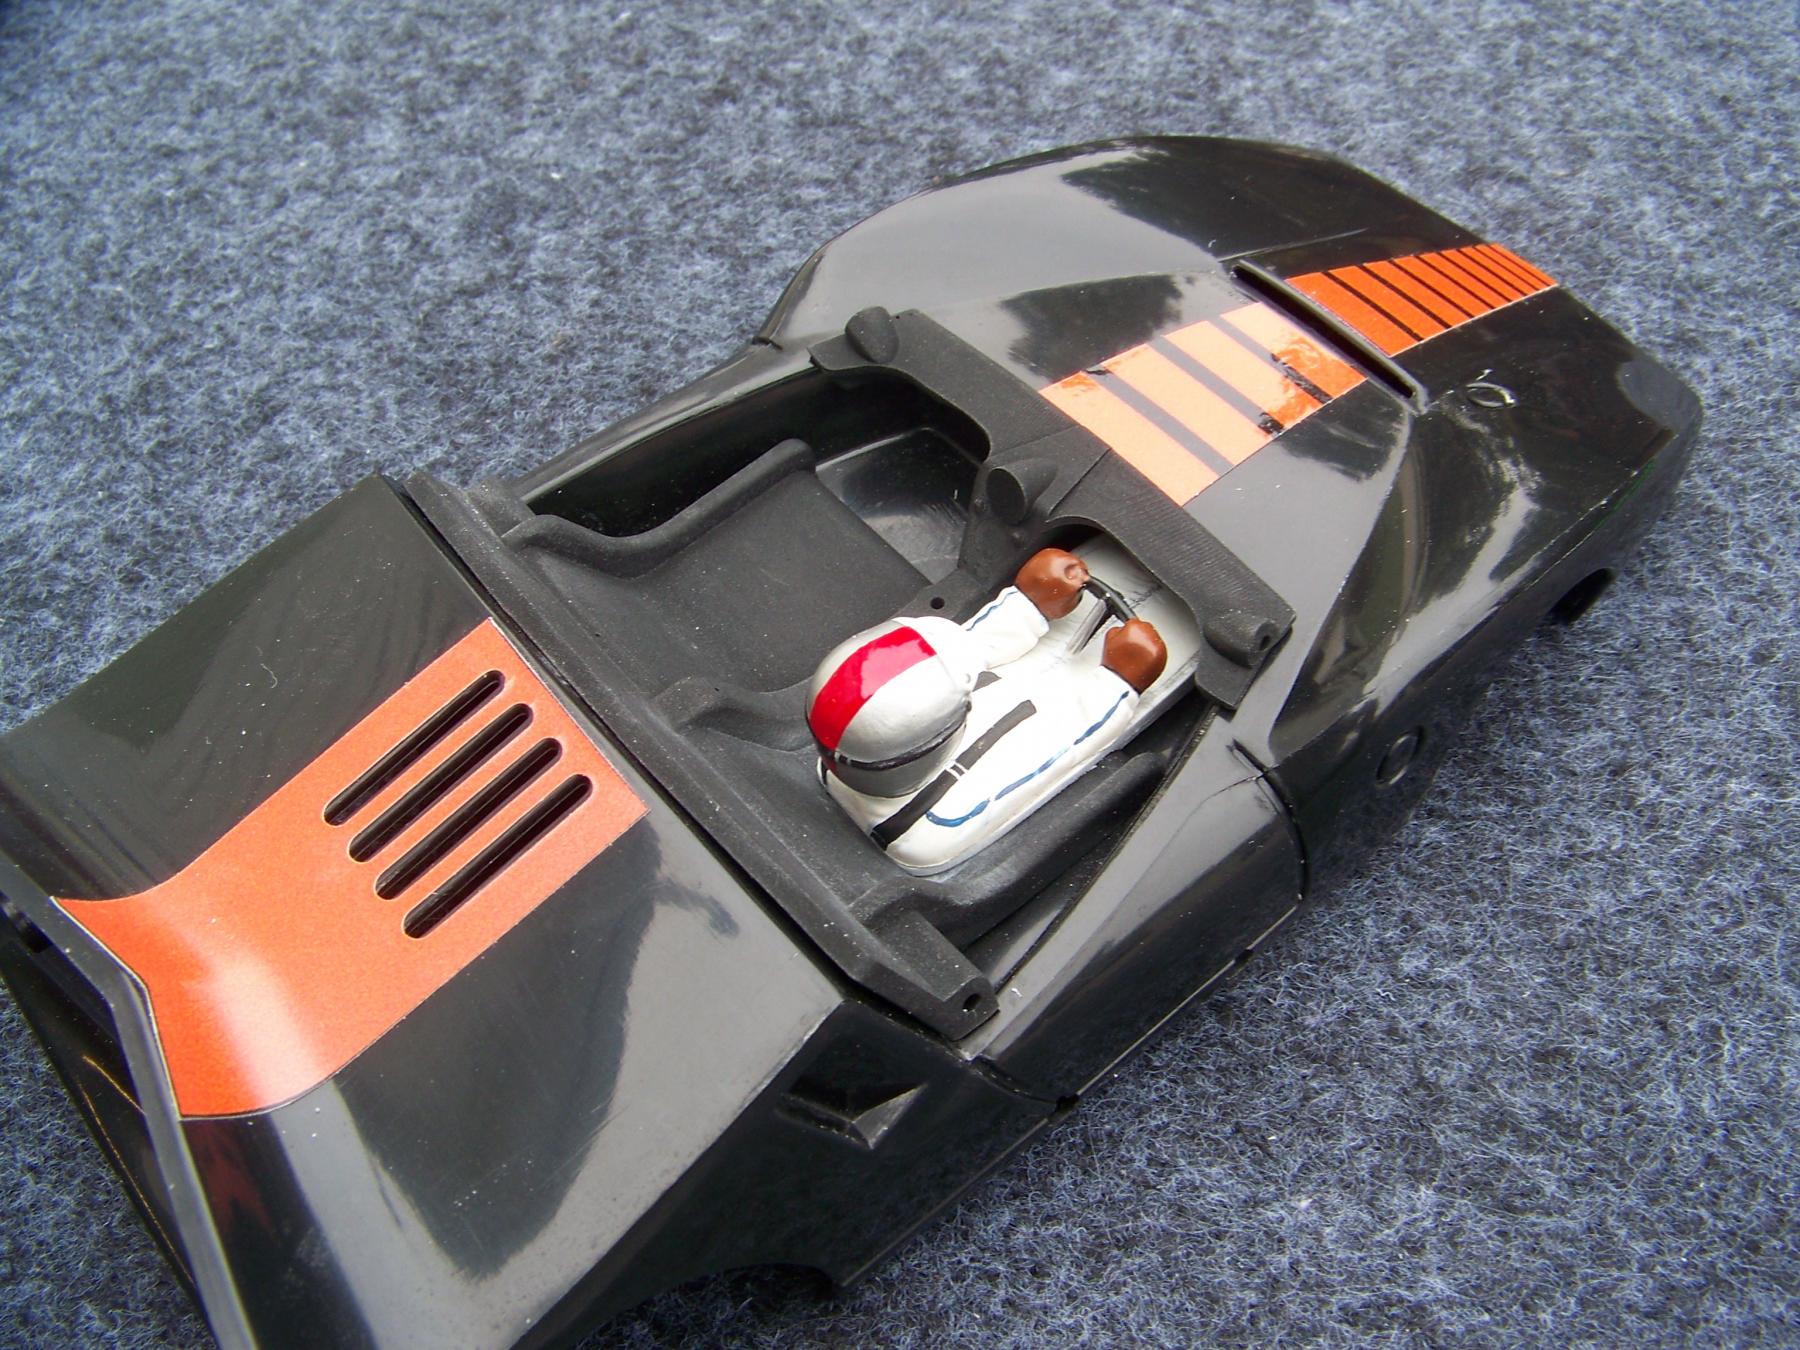
In an effort to adapt an readily available driver to this custom interior I did this.


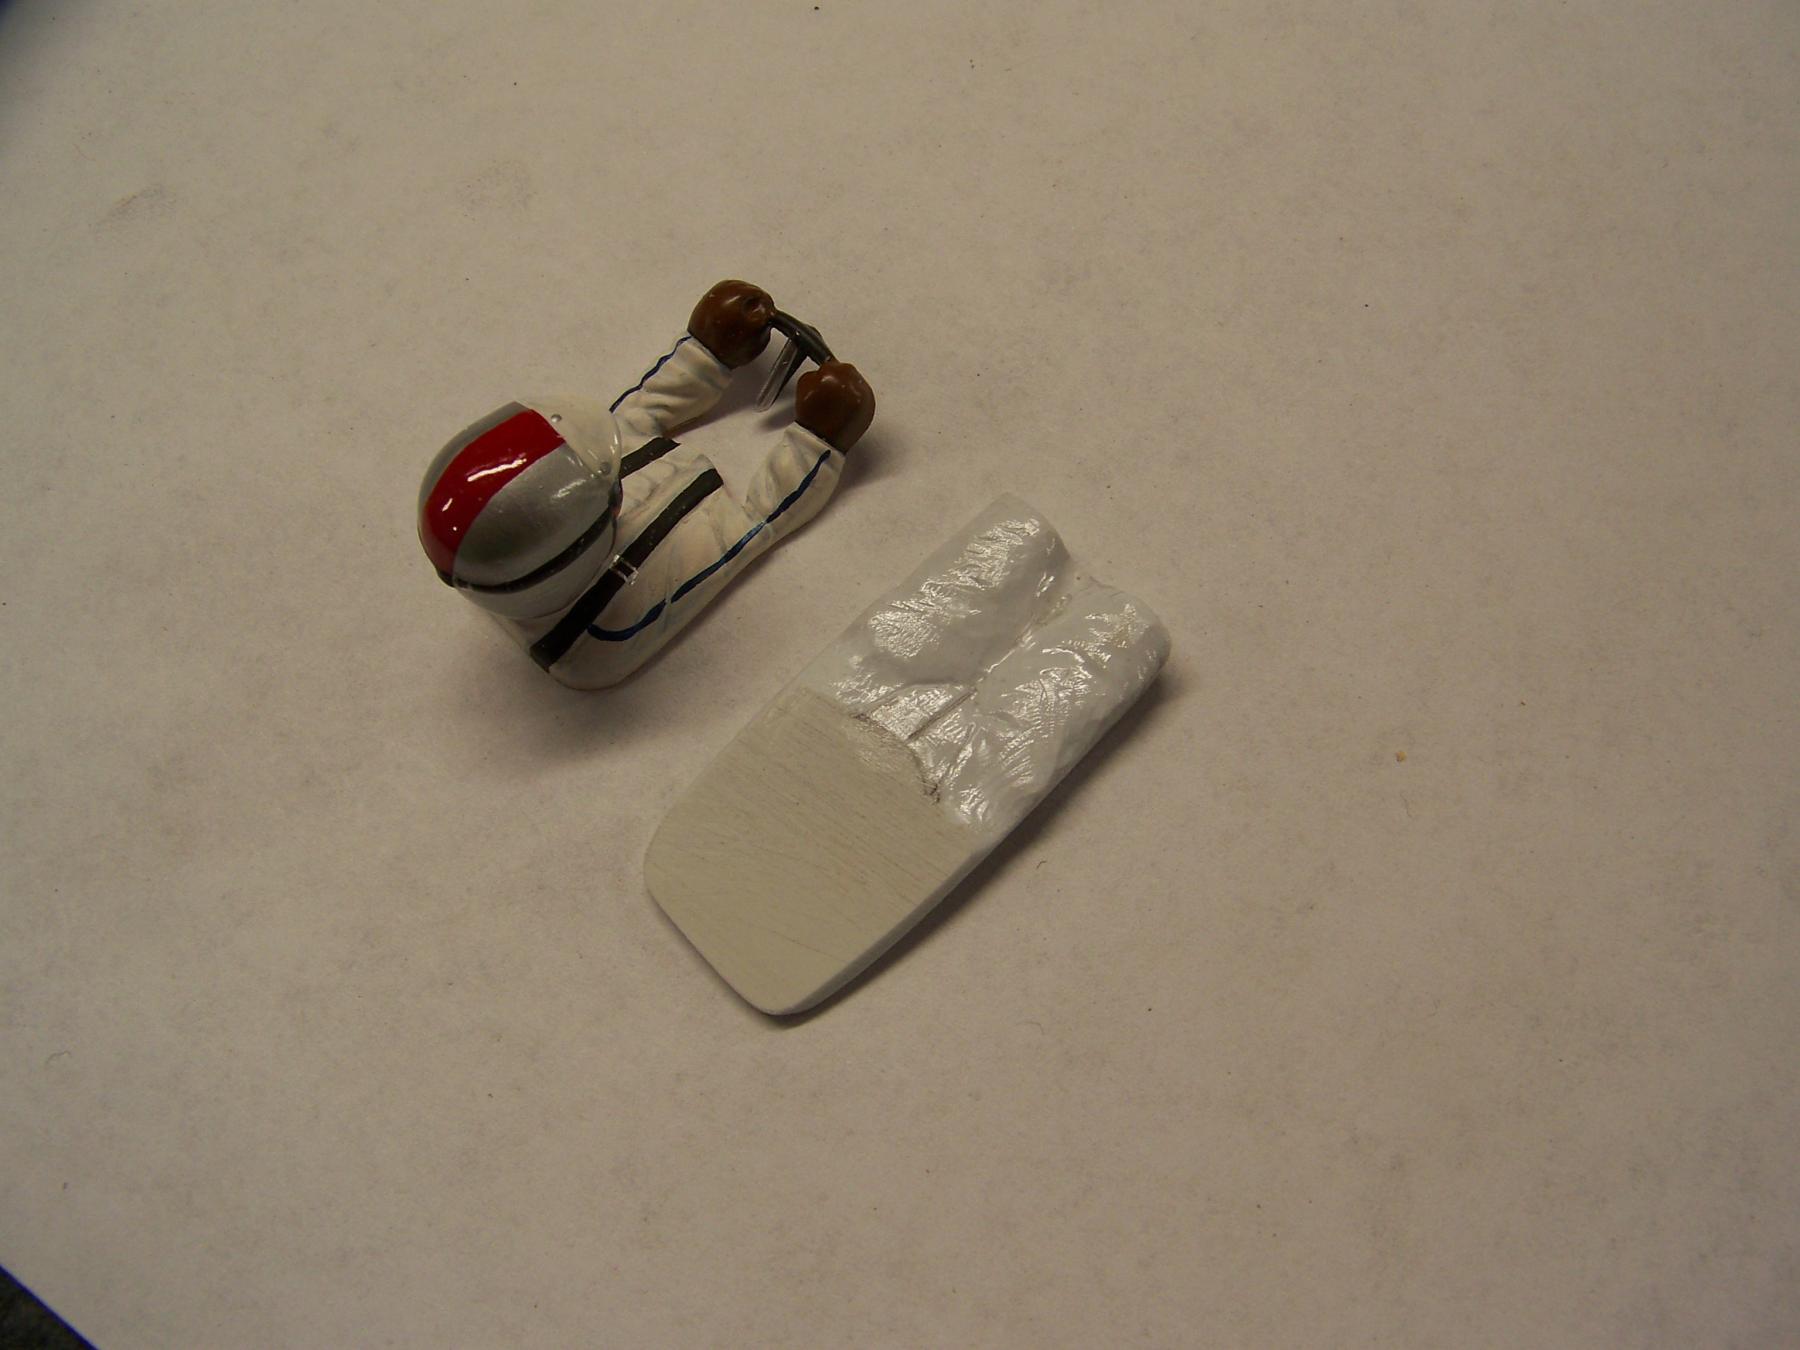
First I carved out a notch at the base of the 3D printed seat. This enables the Cox Cuc driver to slide back. He is still too low and has no legs, so I cut out some 2mm polystyrene sheet for him to sit on. 


102_9851.JPG


I now have some material to carve legs.


102_9852.JPG


Once I shape the legs and give them some shading I think this will look pretty good?


102_9856.JPG


Martin Windmill

#150 Martin

Martin

    Posting Leader

  • Moderator
  • PipPipPipPipPipPipPip
  • 4,649 posts
  • Joined: 22-February 09
  • Gender:Male
  • Location:US

Posted 23 November 2025 - 04:01 PM

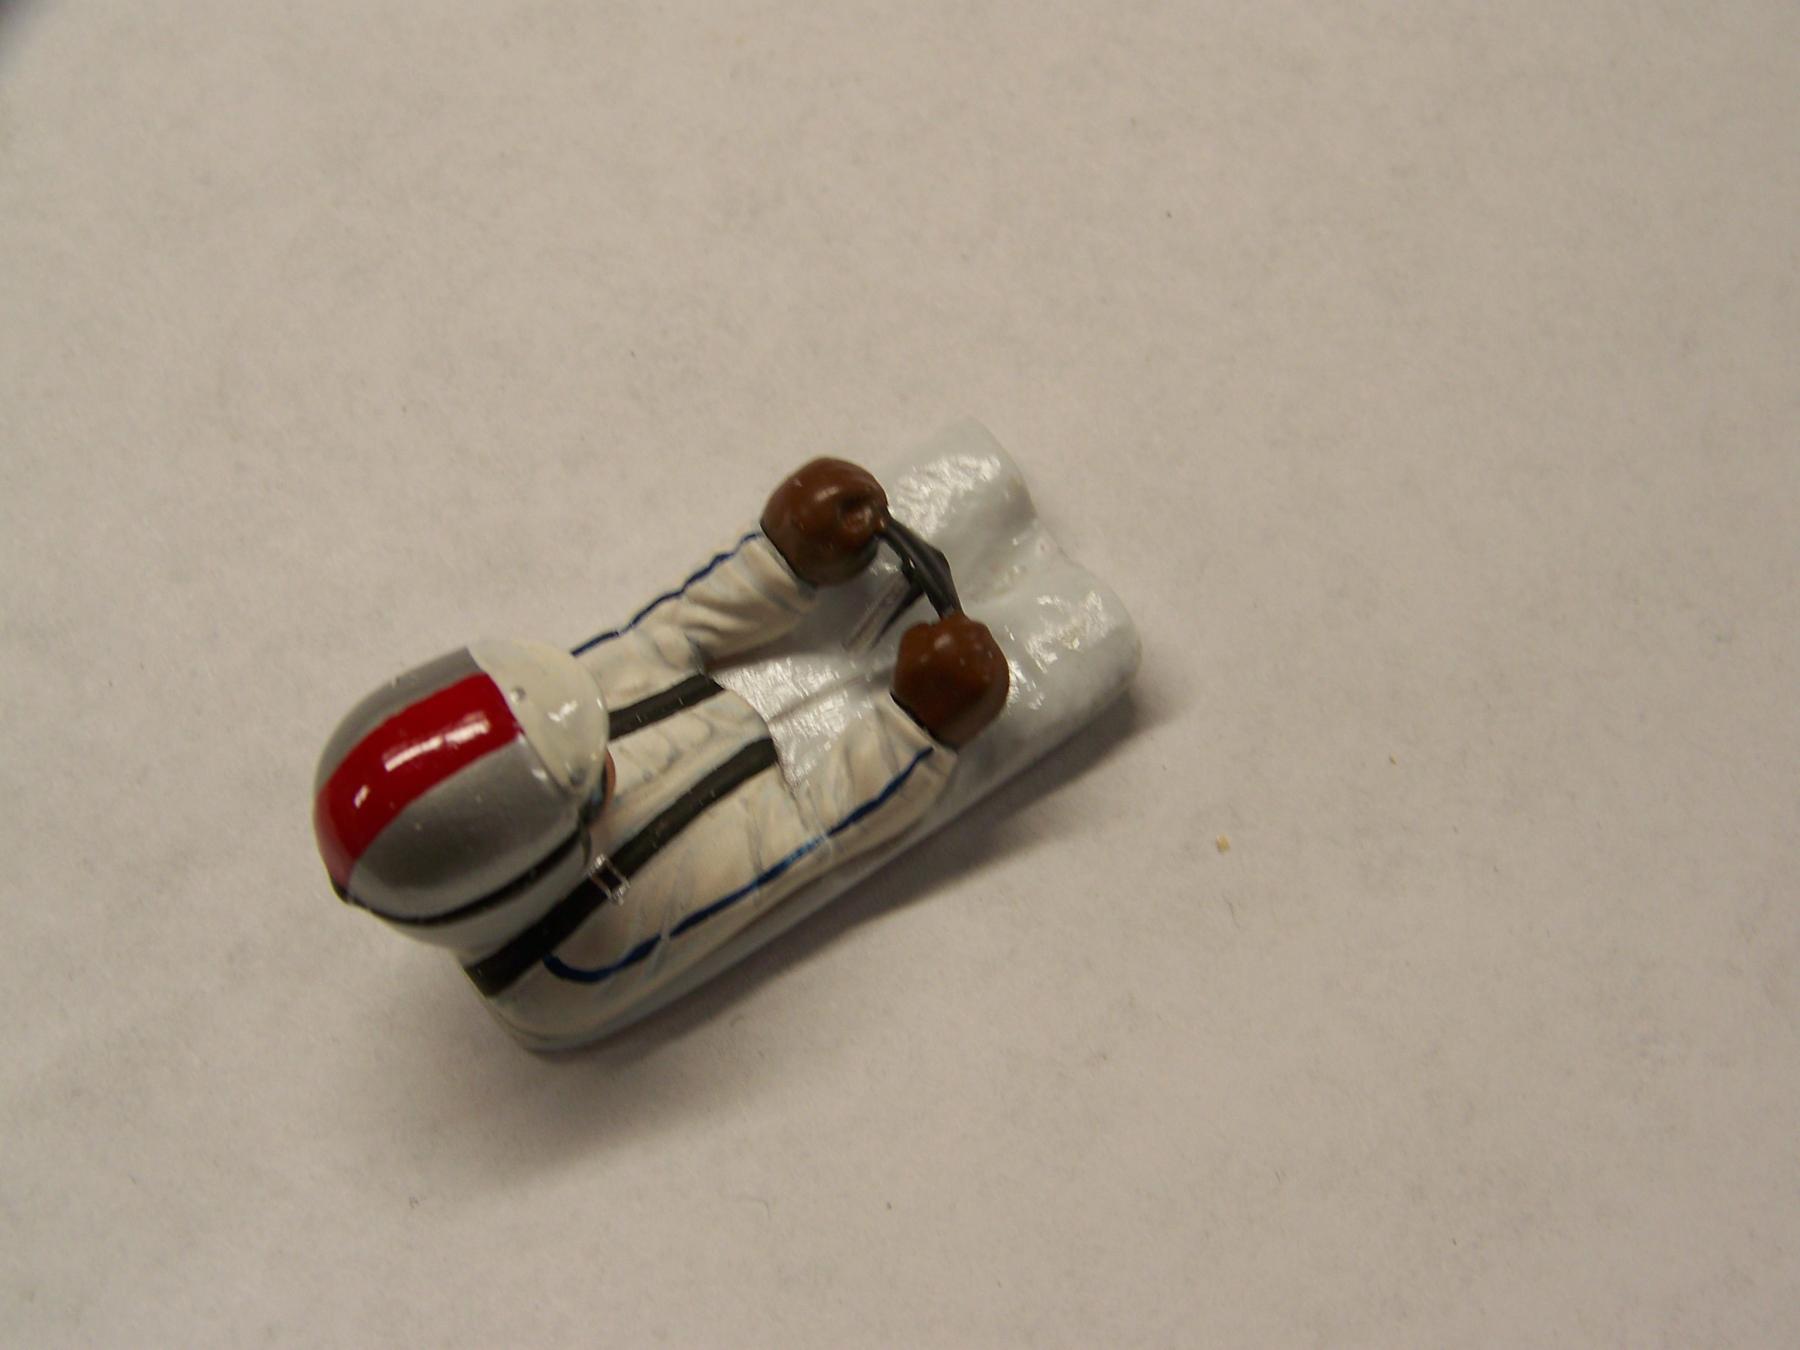
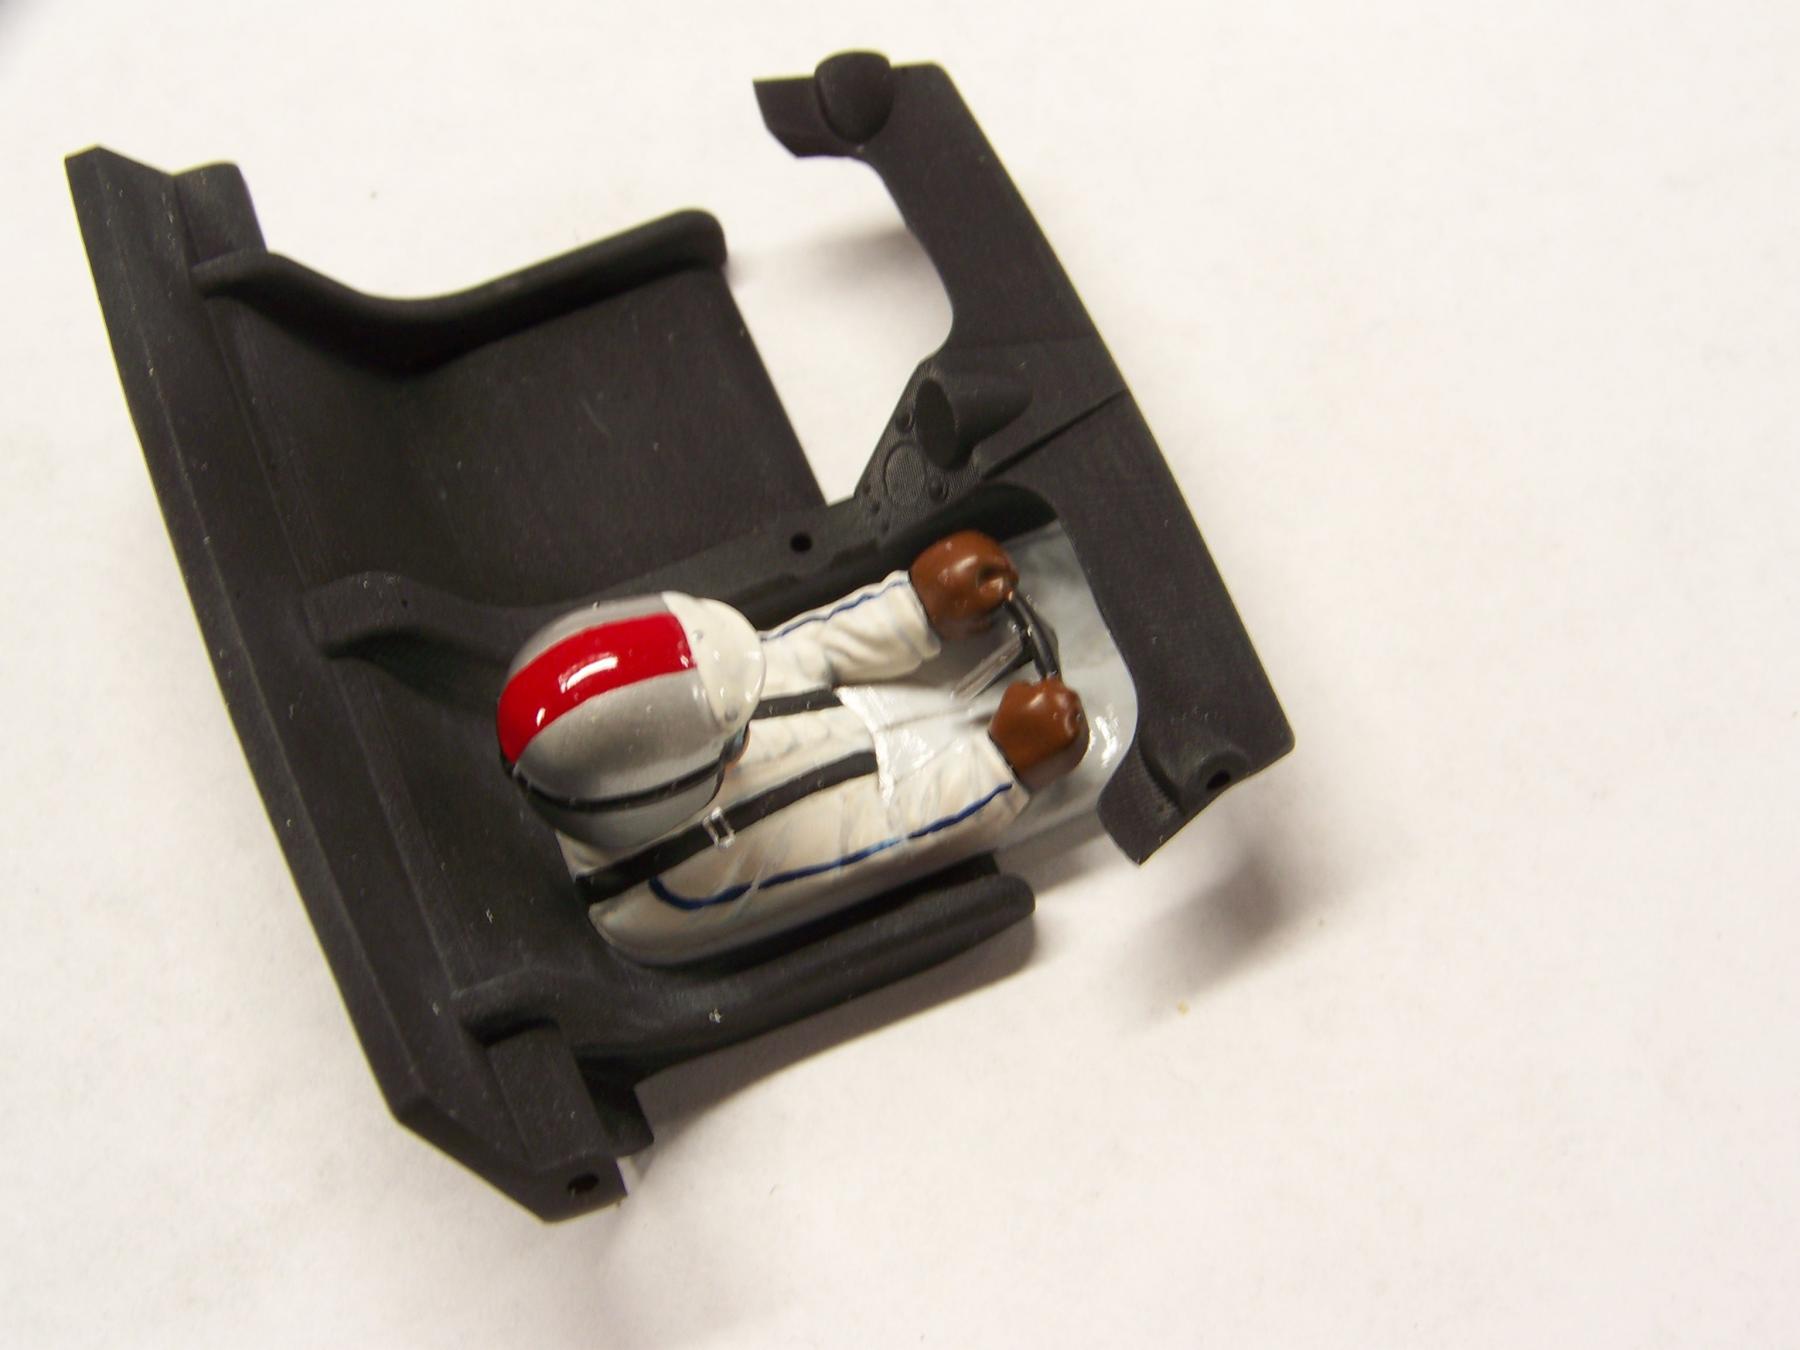
Still not painted, but it does not take much to trick the eye into seeing legs. 


Here is a pic off the faux legs before paint. They are glossy because I used a weld type glue to soften the edges on my crude carving.


102_9870.JPG

102_9871.JPG

102_9872.JPG


I did realize once you raise the driver up on the 2MM platform it will be easier to just radius the back of that, rather than cut the interior.


  • don.siegel likes this
Martin Windmill


Electric Dreams Online Shop